Vue入门教程
文章目录
-
- 一、Vue介绍
- 二、安装
- 三、vue基本用法
- 四、npm项目的开发
一、Vue介绍
简介:Vue.js( /vjuː/) 是一套构建用户界面的渐进式框架, Vue只关注视图层, 采用自底向上增量开发的设计。
特点:响应式编程、组件化。
优势:轻量级框架、简单易学、双向数据绑定、组件化、数据和结构的分离、虚拟DOM、运行速度快。
注:这里是基于Vue2的教程,现在已经出了Vue3,但是还没完全普及,并且Vue3基本兼容Vue2,所以可以先学Vue2,再去了解Vue3的更新,后面会更新这部分内容。
二、安装
一般有三种方式:本地下载、CDN和NPM(推荐)。
1.本地下载地址:https://vuejs.org/js/vue.min.js,下载完直接引入即可。
2.CDN: https://unpkg.com/vue/dist/vue.js
可以放到项目里测试一下,就跟普通引入js一样,非常简单!
DOCTYPE html>
<html>
<head>
    <meta charset="utf-8">
    <title>VueTesttitle>
    <script src="https://unpkg.com/vue/dist/vue.js">script>
head>
<body>
<div id="cdn">
    <p>{{ message }}p>
div>

<script>
    new Vue({
        el: '#cdn',
        data: {
            message: 'Vue Test(cdn)'
        }
    })
script>
body>
html>
页面展示结果如下:

3.NPM
一般在大型项目中,推荐使用NPM的方式,方便包管理,一个个在HTML文件中引入会很不方便。
(1)cmd执行下面命令安装vue
注意选好当前的目录,vue和项目会直接放在这个目录下。
npm install cnpm -g
cnpm install vue
(2)查看是否安装成功
vue -V
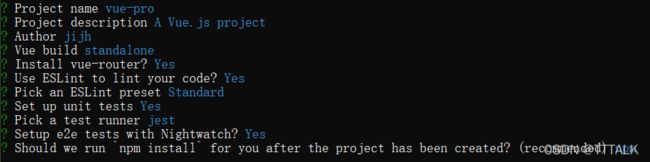
(3)安装vue脚手架,并创建项目vue-pro
cnpm install --global vue-cli
vue init webpack vue-pro
此时会弹出一些验证,直接回车即可,Author那里可以输入你的名字。
(4)进入项目安装运行
cd vue-pro
cnpm install
cnpm run dev
(5)登录测试
进入网址http://localhost:8080/,页面展示如下

三、vue基本用法
1.基本语法
var vm= new Vue({
…
})
其中常用成员有下面几种
挂载点 el:实例id
data:数据
methods:方法
computed:计算
watch:监听
filter:过滤器
delimiters:分隔符,可以改变插值表达式的符号,比如默认是{{ msg }},设置了delimiters: [’ ′ , ′ ′ ] , 要 写 成 {', '}'],要写成 ′,′′],要写成{ msg }才有效
2.vue对象成员使用
放到项目里测试一下这个页面
DOCTYPE html>
<html xmlns:v-on="http://www.w3.org/1999/xhtml">
<head>
    <meta charset="utf-8">
    <title>VueTesttitle>
    <script src="https://unpkg.com/vue/dist/vue.js">script>
head>
<body>
<div id="app">
    <p>{{ msg }}p>
    <button v-on:click="onClick">测试button>
    <p>{{ a }}+{{ b }}={{ c }}p>


div>

<script>
    new Vue({
        el: '#app',
        data: {
            msg: 'Vue Test',
            a : 1,
            b : 2
        },
        methods: {
            onClick () {
                this.a = 0;
                //alert("我被点击了");
            }
        },
        computed: {
            c : function () {
                return this.a + this.b;
            }
        },
        watch: {
            a : function ( newVal , oldVal ) {
                alert("a从"+oldVal+"变成了"+ newVal);
            }
        }//,
        //delimiters: ['${', '}']
    })
script>

body>
html>
点击测试,可以看到效果如下:

这里区别一些computed 和 watch 的使用场景:computed 的话是通过几个数据的变化,来影响一个数据,而 watch,则是可以一个数据的变化,去影响多个数据
3.vue常用语法
下面介绍内容有:
条件语句if、循环语句for、
监听事件v-on、绑定属性v-bind、表单输入绑定v-model。
放到项目里测试一下这个页面
DOCTYPE html>
<html xmlns:v-on="http://www.w3.org/1999/xhtml" xmlns:v-bind="http://www.w3.org/1999/xhtml">
<head>
<meta charset="utf-8">
<title>VueTesttitle>
<script src="https://unpkg.com/vue/dist/vue.js">script>
head>
<body>
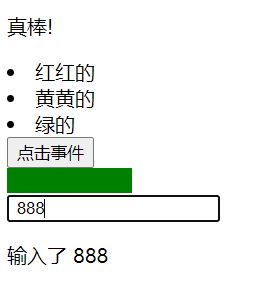
<div id="app">
<p v-if="score>=90">真棒!p>
<p v-else-if="score>=60&&score<90">继续加油!p>
<p v-else>加把劲!p>
<li v-for="item in colors">{{ item }}li>
<button v-on:click="onClick">点击事件button>
<div v-bind:class="{'green': greenActive}">div>
<input v-model="msg">
<p>输入了{{ msg }}p>
div>
<script>
new Vue({
el: '#app',
data: {
score: 99,
colors: ['红红的','黄黄的','绿的'],
greenActive: false,
msg: ' '
},
methods: {
onClick () {
//alert("我被点击了");
this.greenActive = true;
}
}
})
script>
<style>
.green {
width: 100px;
height: 20px;
background: green;
}
style>
body>
html>
可以看到点完按钮和输入框后,展示效果如下
4.组件使用
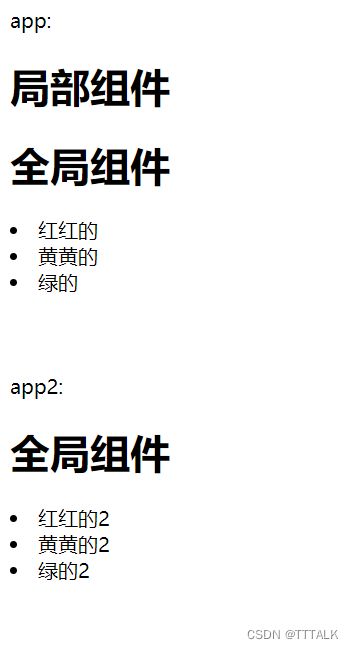
(1)全局组件
(2)局部组件
(3)Props属性
运行下面代码:
DOCTYPE html>
<html>
<head>
<meta charset="utf-8">
<title>VueTesttitle>
<script src="https://unpkg.com/vue/dist/vue.js">script>
head>
<body>
<div id="app">
app:
<somewhere>somewhere>
<everywhere>everywhere>
<prop-test v-for="item in colors" v-bind:color="item" >prop-test>
div>
<br/><br/><br/>
<div id="app2">
app2:
<somewhere>somewhere>
<everywhere>everywhere>
<prop-test v-for="item in colors" v-bind:color="item" >prop-test>
div>
<script>
// 注册全局组件
Vue.component('everywhere', {
template: '全局组件
'
})
//propsTest注意这里prop-test命名成propsTest会报错,官方推荐命名规范是全小写,单词间用-连接
Vue.component('prop-test',{
props:['color'],
template:'{{color}} '
})
var vm = new Vue({
el: '#app',
data :{
colors: ['红红的','黄黄的','绿的']
},
components:{
'somewhere':{
template:'局部组件
'
}
}
})
var vm2 = new Vue({
el: '#app2',
data :{
colors: ['红红的2','黄黄的2','绿的2']
},
})
script>
body>
html>
可看到结果如下:
(5)AJAX使用
使用下面代码,post请求中的http://localhost:8080/test是我本地的代码,返回的数据是“fucking good”
DOCTYPE html>
<html>
<head>
    <meta charset="utf-8">
    <title>VueTesttitle>
    <script src="https://unpkg.com/vue/dist/vue.js">script>

    <script src="https://cdn.staticfile.org/axios/0.18.0/axios.min.js">script>
head>
<body>
<div id="app">
    {{ info }}
div>
<script type = "text/javascript">
    new Vue({
        el: '#app',
        data () {
            return {
                info: null
            }
        },
        mounted () {
            axios
                .post('http://localhost:8080/test')
                .then(response => (this.info = response))
                .catch(function (error) { // 请求失败处理
                    console.log(error);
                });
        }
    })
script>
body>
html>
结果如下:
![]()
四、npm项目的开发
1.导入idea
(1)首先在settings-plugins中搜索vue.js插件,没安装的可以安装一下,高版本idea自带。
(2)导入项目
①File->Open打开项目位置
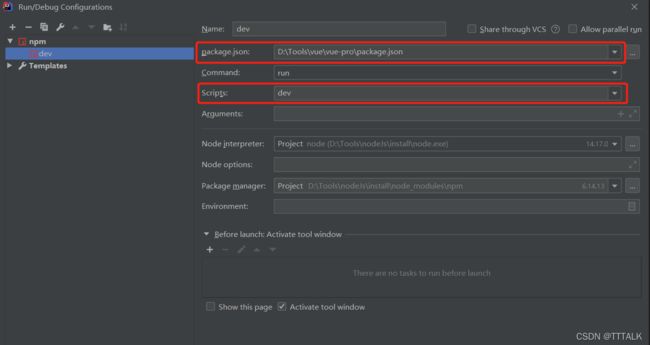
②Run->Edit Configurations->左上角±>npm,然后按下图配置
(3)启动

可以看到结果如下

(4)测试
进入上图中的网址http://localhost:8081,页面正常展示
2.项目目录功能详解
(1)build:构建脚本目录
1)build.js ==> 生产环境构建脚本;
2)check-versions.js ==> 检查npm,node.js版本;
3)utils.js ==> 构建相关工具方法;
4)vue-loader.conf.js ==> 配置了css加载器以及编译css以后自动添加前缀;
5)webpack.base.conf.js ==> webpack基本配置;
6)webpack.dev.conf.js ==> webpack开发环境配置;
7)webpack.prod.conf.js ==> webpack生产环境配置;
(2)config:项目配置
1)dev.env.js ==> 开发环境变量;
2)index.js ==> 项目配置文件;
3)prod.env.js ==> 生产环境变量;
(3)node_modules:npm 加载的项目依赖模块
(4)src:这里是咱们要开发的目录,基本上要作的事情都在这个目录里。里面包含了几个目录及文件:
1)assets:资源目录,放置一些图片或者公共js、公共css。这里的资源会被webpack构建;
2)components:组件目录,咱们写的组件就放在这个目录里面;
3)router:前端路由,咱们须要配置的路由路径写在index.js里面;
4)App.vue:根组件;
5)main.js:入口js文件;
(5)static:静态资源目录,如图片、字体等。不会被webpack构建
(6)index.html:首页入口文件,能够添加一些 meta 信息等
(7)package.json:npm包配置文件,定义了项目的npm脚本,依赖包等信息
(8)README.md:项目的说明文档,markdown 格式
.xxxx文件:这些是一些配置文件,包括语法配置,git配置等
3.简单使用实例
(1)在代码编写的时候报了各种ESLint的错,它的作用就是检查代码规范的,这里推荐配置一下.eslintrc.js,替换下rules这里.更新完记得重启一下,修复下里面的格式问题。
// https://eslint.org/docs/user-guide/configuring

module.exports = {
  root: true,
  parserOptions: {
    parser: 'babel-eslint'
  },
  env: {
    browser: true,
  },
  extends: [
    // https://github.com/vuejs/eslint-plugin-vue#priority-a-essential-error-prevention
    // consider switching to `plugin:vue/strongly-recommended` or `plugin:vue/recommended` for stricter rules.
    'plugin:vue/essential',
    // https://github.com/standard/standard/blob/master/docs/RULES-en.md
    'standard'
  ],
  // required to lint *.vue files
  plugins: [
    'vue'
  ],
  // add your custom rules here
  rules: {
    // allow async-await
    'generator-star-spacing': 'off',
    // allow debugger during development
    'no-debugger': process.env.NODE_ENV === 'production' ? 'error' : 'off',
    /*
    0 或’off’:  关闭规则。
    1 或’warn’: 打开规则,并且作为一个警告,字体颜色为黄色(并不会导致检查不通过)。
    2 或’error’:打开规则,并且作为一个错误 ,色体颜色为红色(退出码为1,检查不通过)。
     */
    // 以下为该项目自定义部分
    'indent': [2, 4], //缩进风格 - 开启缩进4格
    'no-spaced-func': 2, //函数调用时 函数名与()之间不能有空格 - 开启
    'no-const-assign': 2, //禁止修改const声明的变量 - 开启
    'space-before-function-paren': [0, 'always'], //函数定义时括号前面要有空格 - 关闭
    'eol-last': 0, //文件以单一的换行符结束 - 关闭
    'camelcase': 0, //强制驼峰法命名 - 关闭
    'no-undef': 0, //不能有未定义的变量 - 关闭
    'no-alert': 0, //禁止使用alert confirm prompt - 关闭
    'arrow-parens': 0, //箭头函数用小括号括起来 - 关闭
    'no-unused-vars':1
  }
}
(2)在src/compnents下新建文件夹views并创建文件Test.vue,
并在router目录下的index.js里面配置路由路径。
!注意命名规范,首字母大写,不然无法正常启动
index.js:
import Vue from 'vue'
import Router from 'vue-router'
import HelloWorld from '@/components/HelloWorld'
import Test from '@/components/views/Test'

Vue.use(Router)

export default new Router({
    routes: [
        {
            path: '/',
            name: 'HelloWorld',
            component: HelloWorld
        }, {
            path: '/Test',
            name: 'Test',
            component: Test
        }
    ]
})
Test.vue:
<template>
  <div class="Test">
      {{ msg }}
  </div>
</template>

<script>
export default {
    name: 'Test',
    data() {
        return {
            msg: 'Welcome to testVue Page'
        }
    }
}
</script>

<style scoped>

</style>
测试:http://localhost:8080/#/Test
结果如下:

TODO:父子组件