使用Streamlight演示你的模型
任务
假设你需要展示你在开发的一个计算机视觉模型上取得的进展。你正在使用的模型尚未准备就绪,因此将其部署到适当的开发或生产环境可能需要花费时间和大量工作。
另一方面,开发一个特定的web界面来与模型交互可能是一项乏味的任务,需要的技能对数据科学家来说并不常见。
Streamlit
Streamlit是一个开源Python库,它可以轻松创建和共享用于机器学习和数据科学的web应用程序。它在向团队展示项目进展、向经理获取和分享见解,甚至从客户那里获得反馈方面都非常有用。
它并不能取代需要监控、日志记录等功能的生产部署。然而,它可以让你在几个小时内创建“可以工作的东西”,而无需事先了解任何web开发知识,甚至不知道如何使用flask或Django作为后端。
让我们看看它是如何发挥作用的。
安装
要安装Streamlight,请运行:
pip install streamlit如果你使用poetry,那就运行:
poetry add streamlit要验证所有功能是否正常,你可以运行这一行,并查看一些解释和演示:
streamlit hello你的第一个应用-上传图片
让我们从从本地存储加载图像并显示它开始:
import streamlit as st


def load_image():
    uploaded_file = st.file_uploader(label='Pick an image to test')

    if uploaded_file is not None:
        image_data = uploaded_file.getvalue()
        st.image(image_data)


def main():
    st.title('Image upload demo')
    load_image()


if __name__ == '__main__':
    main()
要运行应用程序,只需键入:
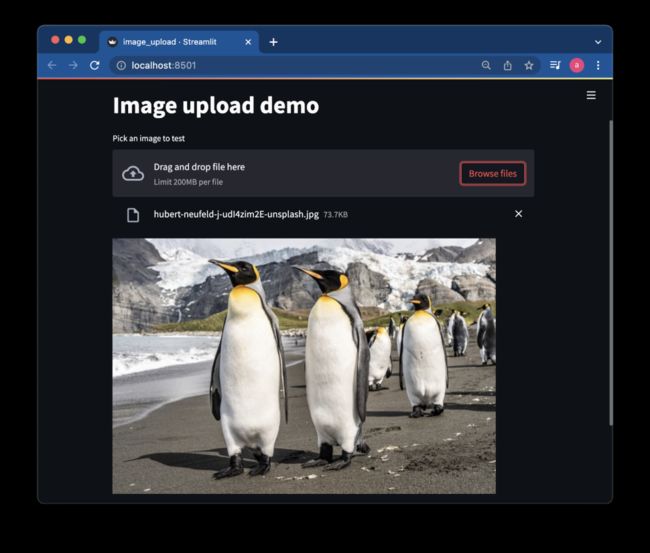
streamlit run image_upload.py然后它会在你的浏览器中打开应用程序。应该是这样的:

你可以浏览你的电脑,上传任何你喜欢的图片。我选择上传一些可爱企鹅的图片。
部署预训练的模型
有时,为了有一个好的基线,看看预训练好的模型是如何工作的是很有用的。现在,你将在Streamlight应用程序中部署其中一个模型,本例中为ResNet18。
要使用PyTorch实现这一点,你需要加载模型并下载ImageNet标签:
def load_model():

    model = torch.hub.load('pytorch/vision:v0.10.0', 'resnet18', pretrained=True)
    model.eval()

    return model


def load_labels():
    labels_path = 'https://raw.githubusercontent.com/pytorch/hub/master/imagenet_classes.txt'
    labels_file = os.path.basename(labels_path)

    if not os.path.exists(labels_file):
        wget.download(labels_path)

    with open(labels_file, "r") as f:
        categories = [s.strip() for s in f.readlines()]
        return categories
为了在image load_image函数上运行模型,应该修改之前使用的函数,以返回图像。你需要将image_data转换为PIL图像对象,以便将其输入模型:
def load_image():

    uploaded_file = st.file_uploader(label='Pick an image to test')

    if uploaded_file is not None:
        image_data = uploaded_file.getvalue()
        st.image(image_data)

        return Image.open(io.BytesIO(image_data))

    else:
        return None
下面的代码是PyTorch ResNet教程的修改版本,它运行模型预测,并显示图像的前5个类别:
def predict(model, categories, image):
    preprocess = transforms.Compose([
        transforms.Resize(256),
        transforms.CenterCrop(224),
        transforms.ToTensor(),
        transforms.Normalize(mean=[0.485, 0.456, 0.406], std=[0.229, 0.224, 0.225]),
    ])

    input_tensor = preprocess(image)
    input_batch = input_tensor.unsqueeze(0)

    with torch.no_grad():
        output = model(input_batch)

    probabilities = torch.nn.functional.softmax(output[0], dim=0)

    top5_prob, top5_catid = torch.topk(probabilities, 5)

    for i in range(top5_prob.size(0)):
        st.write(categories[top5_catid[i]], top5_prob[i].item())
当然,你还需要相应地修改主函数:
def main():
    st.title('Pretrained model demo')

    model = load_model()
    categories = load_labels()
    image = load_image()

    result = st.button('Run on image')

    if result:
        st.write('Calculating results...')
        predict(model, categories, image)
首先需要更改的是标题。然后,你将加载模型、标签和图像。你还应该添加一个按钮,触发模型推断。
这就是应用程序运行时的样子:

该模型以1.0的概率将图像分类为“企鹅”。其他四个类的可能性微乎其微。
这个例子的完整代码在Github中。
https://github.com/asyaf/fun_mini_projects/blob/master/streamlit_examples/resnet_pretrained.py
部署自定义图像分类模型
现在,你可以部署自定义模型了。你将使用PyTorch模型,该模型根据企鹅类型对图像进行分类。创建使用自定义模型的web应用程序的过程与使用预训练过的模型的过程非常相似,只是做了一些修改。代码可以在这里找到。
关于模型
通常,预训练的模型不足以满足我们的需求,因为手头的任务更具体,而且这些模型没有涵盖。例如,ImageNet有一个“king penguin”类,但实际上有更多的企鹅类型。所以,为了根据企鹅类型对图像进行分类,我必须训练自己的模型。我用这个笔记本训练。
https://github.com/asyaf/fun_mini_projects/blob/master/penguin_classification/transfer_learning_penguin.ipynb
如果你想了解更多关于这个模型是如何构建的,你可以在之前的帖子中阅读。
https://medium.com/mlearning-ai/penguins-from-head-to-toe-how-penguins-can-help-you-master-image-classification-process-8be9cd68121d
获取模型
为模型相关文件创建目录:
mkdir custom_model要直接下载模型文件,可以使用此链接。将其复制到新目录。
将此常量定义添加到代码中:
MODEL_PATH = 'custom_model/model.pt'创建标签文件
创建一个包含分类类名称的文本文件,每个类一行。确保类顺序与训练期间使用的顺序一致。
例如,要查找企鹅数据集的顺序,你可以在训练笔记本中查找以下行,并在其后面添加打印:
class_names = image_datasets['train'].classes

print(class_names)
这将为你提供以下输出:
[‘Adelie Penguin’, ‘Chinstrap Penguin’, ‘Emperor Penguin’, ‘Gentoo Penguin’]因此,你应该将以下类名复制到名为model_classes.txt的文件中,并将其放置在custom_model目录中:
Adelie Penguin
Chinstrap Penguin
Emperor Penguin
Gentoo Penguin
将新标签文件作为常量添加到代码中:
LABELS_PATH = 'custom_model/model_classes.txt加载模型和标签
模型和标签加载变得更简单:
def load_model(model_path):
    model = torch.load(model_path, map_location='cpu')
    model.eval()
    return model


def load_labels(labels_file):
    with open(labels_file, "r") as f:
        categories = [s.strip() for s in f.readlines()]
        return categories
修正
与具有许多标签的ResNet18不同,此自定义模型只有4个标签。因此,你应该修改预测代码,以输出所有现有类的概率:
probabilities = torch.nn.functional.softmax(output[0], dim=0)

    all_prob, all_catid = torch.topk(probabilities, len(categories))

    for i in range(all_prob.size(0)):
        st.write(categories[all_catid[i]], all_prob[i].item())
在主函数中更改为应用程序的标题,并传递模型和标签的本地路径:
def main():
    st.title('Custom model demo')
    model = load_model(MODEL_PATH)
    categories = load_labels(LABELS_PATH)
    image = load_image()
    result = st.button('Run on image')
    if result:
        st.write('Calculating results...')
        predict(model, categories, image)
最后,应用程序应该是这样的:
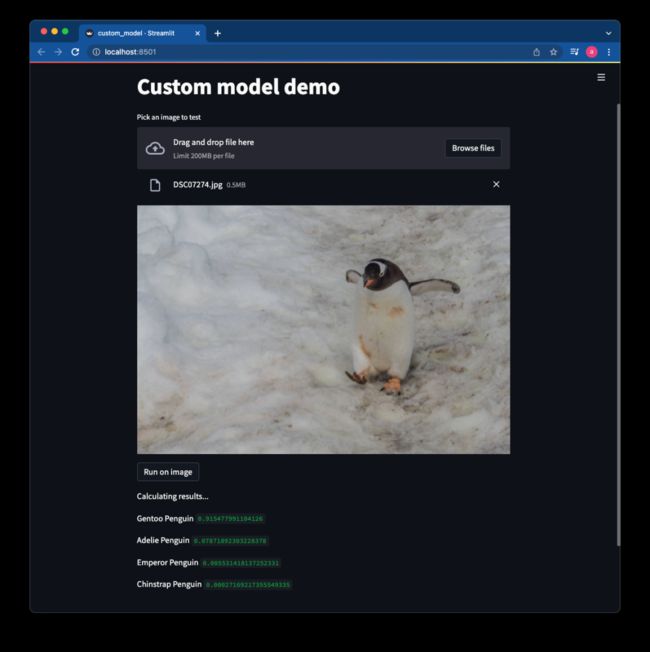
为了测试这个应用,我上传了一张Gentoo企鹅的图片。该模型将该图像归类为Gentoo企鹅的图像,概率为0.91。其他企鹅的概率要低得多。除了确认应用程序运行良好外,我还得到了模型正确性的另一个证明。很好,对吧?
结论
开发一个运行良好的计算机视觉模型需要花费大量的时间和精力。在此过程中,你可能需要部署你的模型,并向你的经理、队友和客户演示其功能。
Streamlight是一款功能强大且易于使用的工具,即使你没有适当的内部工具或前端知识,也可以实现这一点。
我举例说明了Streamlight在图像分类中的潜在用途。然而,它可以用于其他类型的计算机视觉任务,以及可视化、数据分析等。我鼓励你浏览Streamlight网站中的示例,并亲自试用该工具,看看如何将其整合到你的日常工作中。
☆ END ☆
如果看到这里,说明你喜欢这篇文章,请转发、点赞。微信搜索「uncle_pn」,欢迎添加小编微信「 woshicver」,每日朋友圈更新一篇高质量博文。
↓扫描二维码添加小编↓