Mybatis源码分析——插件详解
插件是一种常见的扩展方式,大多数开源框架也都支持用户通过添加自定义插件的方式来扩展或者改变原有的功能,MyBatis中也提供的有插件,虽然叫插件,但是实际上是通过拦截器(Interceptor)实现的,在MyBatis的插件模块中涉及到责任链模式和JDK动态代理,这两种设计模式的技术知识也是大家要提前掌握的。
1. 自定义插件
首先我们通过实现一个自定义插件来对该部分有个清楚的认识。
1.1 创建Interceptor实现类
我们创建的拦截器必须要实现Interceptor接口,Interceptor接口的定义为:
public interface Interceptor {

  // 执行拦截逻辑的方法 111
  Object intercept(Invocation invocation) throws Throwable;

  // 决定是否触发 intercept()方法
  default Object plugin(Object target) {
    return Plugin.wrap(target, this);
  }

  // 根据配置 初始化 Intercept 对象
  default void setProperties(Properties properties) {
    // NOP
  }

}
MyBatis 允许你在映射语句执行过程中的某一点进行拦截调用。默认情况下,MyBatis 允许使用插件来拦截的方法调用包括:
-
Executor (update, query, flushStatements, commit, rollback, getTransaction, close, isClosed)
mybatis的内部执行器,作为调度核心负责调用
StatementHandler操作数据库,并把结果集通过ResultSetHandler进行自动映射。 -
ParameterHandler (getParameterObject, setParameters)
作为处理sql参数设置的对象,主要实现读取参数和对
PreparedStatement的参数进行赋值。 -
ResultSetHandler (handleResultSets, handleOutputParameters)
处理
Statement执行完成后返回结果集的接口对象,mybatis通过它把ResultSet集合映射成实体对象。 -
StatementHandler (prepare, parameterize, batch, update, query)
封装了
JDBC Statement操作,是sql语法的构建器,负责和数据库进行交互执行sql语句。
这些类中方法的细节可以通过查看每个方法的签名来发现,或者直接查看 MyBatis 发行包中的源代码。 如果你想做的不仅仅是监控方法的调用,那么你最好相当了解要重写的方法的行为。 因为在试图修改或重写已有方法的行为时,很可能会破坏 MyBatis 的核心模块。 这些都是更底层的类和方法,所以使用插件的时候要特别当心。
我们创建一个拦截Executor中的query和close方法的插件:
/**
 * 自定义的拦截器
 *
 * @Signature 注解就可以表示一个方法签名, 唯一确定一个方法
 */
@Intercepts({
        @Signature(
                type = Executor.class // 需要拦截的类型
                , method = "query"     // 需要拦截的方法
                // args 中指定 被拦截方法的 参数列表
                , args = {MappedStatement.class, Object.class, RowBounds.class, ResultHandler.class}
        ),
        @Signature(
                type = Executor.class
                , method = "close"
                , args = {boolean.class}
        )
})
public class FirstInterceptor implements Interceptor {

    private int testProp;

    /**
     * 执行拦截逻辑的方法
     *
     * @param invocation
     * @return
     * @throws Throwable
     */
    @Override
    public Object intercept(Invocation invocation) throws Throwable {
        System.out.println("FirstInterceptor  拦截之前 ....");
        Object obj = invocation.proceed();
        System.out.println("FirstInterceptor  拦截之后 ....");
        return obj;
    }

    /**
     * 决定是否触发 intercept方法
     *
     * @param target
     * @return
     */
    @Override
    public Object plugin(Object target) {
        return Plugin.wrap(target, this);
    }

    @Override
    public void setProperties(Properties properties) {
        System.out.println("---->" + properties.get("testProp"));
    }

    public int getTestProp() {
        return testProp;
    }

    public void setTestProp(int testProp) {
        this.testProp = testProp;
    }
}
1.2 配置拦截器
创建好自定义的拦截器后,我们需要在全局配置文件中添加自定义插件的注册:
<plugins>
    <plugin interceptor="com.demo.interceptor.FirstInterceptor">
    	<property name="testProp" value="1000"/>
    </plugin>
    </plugins>
1.3 运行程序
然后我们执行对应的查询操作。
@Test
public void test1() throws Exception {
    // 1.获取配置文件
    InputStream in = Resources.getResourceAsStream("mybatis-config.xml");
    // 2.加载解析配置文件并获取SqlSessionFactory对象
    SqlSessionFactory factory = new SqlSessionFactoryBuilder().build(in);
    // 3.根据SqlSessionFactory对象获取SqlSession对象
    SqlSession sqlSession = factory.openSession();
    // 4.通过SqlSession中提供的 API方法来操作数据库
    UserMapper mapper = sqlSession.getMapper(UserMapper.class);
    List<User> list = mapper.selectUs在erList();
    for (User user : list) {
        System.out.println(user);
    }
    // 5.关闭会话
    sqlSession.close();
}
在输出日志中我们可以看到拦截器中输出的相关信息:
我们可以到源码中找一下query方法和close方法。可以方法这两个方法都是我们在拦截器中设置的,处理Executor接口中的具体方法。
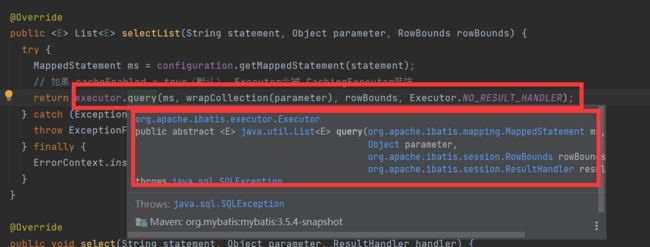
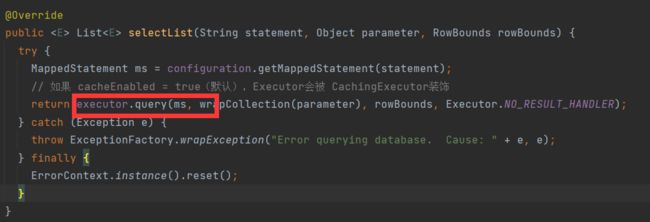
query方法可以直接从session.selectList方法向下查找。
close方法可以直接从session的close方法向下查看。
2. 插件实现原理
自定义插件的步骤还是比较简单的,接下来我们分析下插件的实现原理是怎么回事。
2.1 初始化操作
首先我们来看下在全局配置文件加载解析的时候做了什么操作。
进入方法内部可以看到具体的解析操作:
private void pluginElement(XNode parent) throws Exception {
  if (parent != null) {
    for (XNode child : parent.getChildren()) {
      // 获取 节点的 interceptor 属性的值
      String interceptor = child.getStringAttribute("interceptor");
      // 获取 下的所有的properties子节点
      Properties properties = child.getChildrenAsProperties();
      // 获取 Interceptor 对象
      Interceptor interceptorInstance = (Interceptor) resolveClass(interceptor).getDeclaredConstructor().newInstance();
      // 设置 interceptor的 属性
      interceptorInstance.setProperties(properties);
      // Configuration中记录 Interceptor
      configuration.addInterceptor(interceptorInstance);
    }
  }
}
该方法用来解析全局配置文件中的plugins标签,然后对应的创建Interceptor对象,并且封装对应的属性信息。最后调用了Configuration对象中的方法。
configuration.addInterceptor(interceptorInstance);
public void addInterceptor(Interceptor interceptor) {
  interceptorChain.addInterceptor(interceptor);
}
通过这个代码我们发现我们自定义的拦截器最终是保存在了InterceptorChain这个对象中。而InterceptorChain的定义为:
public class InterceptorChain {

  // 保存所有的 Interceptor  也就我所有的插件是保存在 Interceptors 这个List集合中的
  private final List<Interceptor> interceptors = new ArrayList<>();

  public Object pluginAll(Object target) {
    for (Interceptor interceptor : interceptors) { // 获取拦截器链中的所有拦截器
      target = interceptor.plugin(target); // 创建对应的拦截器的代理对象
    }
    return target;
  }

  public void addInterceptor(Interceptor interceptor) {
    interceptors.add(interceptor);
  }

  public List<Interceptor> getInterceptors() {
    return Collections.unmodifiableList(interceptors);
  }

}
2.2 创建代理对象
在解析的时候创建了对应的Interceptor对象,并保存在了InterceptorChain中,那么这个拦截器是如何和对应的目标对象进行关联的呢?首先拦截器可以拦截的对象是Executor,ParameterHandler,ResultSetHandler,StatementHandler.那么我们来看下这四个对象在创建的时候又什么要注意的。
2.2.1 Executor
首先到创建执行器的那段代码中,从openSession处往下查找:
我们可以看到Executor在装饰完二级缓存后会通过pluginAll来创建Executor的代理对象。
public Object pluginAll(Object target) {
  for (Interceptor interceptor : interceptors) { // 获取拦截器链中的所有拦截器
    target = interceptor.plugin(target); // 创建对应的拦截器的代理对象
  }
  return target;
}
进入plugin方法中,我们会进入到Interceptor中:
// 决定是否触发 intercept()方法
default Object plugin(Object target) {
  return Plugin.wrap(target, this);
}
然后进入到MyBatis给我们提供的Plugin工具类的实现 wrap方法中:
public static Object wrap(Object target, Interceptor interceptor) {
  // 获取用户自定义 Interceptor中@Signature注解的信息
  // getSignatureMap 负责处理@Signature 注解
  Map<Class<?>, Set<Method>> signatureMap = getSignatureMap(interceptor);
  // 获取目标类型
  Class<?> type = target.getClass();
  // 获取目标类型 实现的所有的接口
  Class<?>[] interfaces = getAllInterfaces(type, signatureMap);
  // 如果目标类型有实现的接口 就创建代理对象
  if (interfaces.length > 0) {
    return Proxy.newProxyInstance(
        type.getClassLoader(),
        interfaces,
        new Plugin(target, interceptor, signatureMap));
  }
  // 否则原封不动的返回目标对象
  return target;
}
Plugin中的各个方法的作用:
public class Plugin implements InvocationHandler {

  private final Object target; // 目标对象

  private final Interceptor interceptor; // 拦截器

  private final Map<Class<?>, Set<Method>> signatureMap; // 记录 @Signature 注解的信息

  private Plugin(Object target, Interceptor interceptor, Map<Class<?>, Set<Method>> signatureMap) {
    this.target = target;
    this.interceptor = interceptor;
    this.signatureMap = signatureMap;
  }

  /**
   * 创建目标对象的代理对象
   *    目标对象 Executor  ParameterHandler  ResultSetHandler StatementHandler
   * @param target 目标对象
   * @param interceptor 拦截器
   * @return
   */
  public static Object wrap(Object target, Interceptor interceptor) {
    // 获取用户自定义 Interceptor中@Signature注解的信息
    // getSignatureMap 负责处理@Signature 注解
    Map<Class<?>, Set<Method>> signatureMap = getSignatureMap(interceptor);
    // 获取目标类型
    Class<?> type = target.getClass();
    // 获取目标类型 实现的所有的接口
    Class<?>[] interfaces = getAllInterfaces(type, signatureMap);
    // 如果目标类型有实现的接口 就创建代理对象
    if (interfaces.length > 0) {
      return Proxy.newProxyInstance(
          type.getClassLoader(),
          interfaces,
          new Plugin(target, interceptor, signatureMap));
    }
    // 否则原封不动的返回目标对象
    return target;
  }

  /**
   * 代理对象方法被调用时执行的代码
   * @param proxy
   * @param method
   * @param args
   * @return
   * @throws Throwable
   */
  @Override
  public Object invoke(Object proxy, Method method, Object[] args) throws Throwable {
    try {
      // 获取当前方法所在类或接口中,可被当前Interceptor拦截的方法
      Set<Method> methods = signatureMap.get(method.getDeclaringClass());
      if (methods != null && methods.contains(method)) {
        // 当前调用的方法需要被拦截 执行拦截操作
        return interceptor.intercept(new Invocation(target, method, args));
      }
      // 不需要拦截 则调用 目标对象中的方法
      return method.invoke(target, args);
    } catch (Exception e) {
      throw ExceptionUtil.unwrapThrowable(e);
    }
  }

  private static Map<Class<?>, Set<Method>> getSignatureMap(Interceptor interceptor) {
    Intercepts interceptsAnnotation = interceptor.getClass().getAnnotation(Intercepts.class);
    // issue #251
    if (interceptsAnnotation == null) {
      throw new PluginException("No @Intercepts annotation was found in interceptor " + interceptor.getClass().getName());
    }
    Signature[] sigs = interceptsAnnotation.value();
    Map<Class<?>, Set<Method>> signatureMap = new HashMap<>();
    for (Signature sig : sigs) {
      Set<Method> methods = signatureMap.computeIfAbsent(sig.type(), k -> new HashSet<>());
      try {
        Method method = sig.type().getMethod(sig.method(), sig.args());
        methods.add(method);
      } catch (NoSuchMethodException e) {
        throw new PluginException("Could not find method on " + sig.type() + " named " + sig.method() + ". Cause: " + e, e);
      }
    }
    return signatureMap;
  }

  private static Class<?>[] getAllInterfaces(Class<?> type, Map<Class<?>, Set<Method>> signatureMap) {
    Set<Class<?>> interfaces = new HashSet<>();
    while (type != null) {
      for (Class<?> c : type.getInterfaces()) {
        if (signatureMap.containsKey(c)) {
          interfaces.add(c);
        }
      }
      type = type.getSuperclass();
    }
    return interfaces.toArray(new Class<?>[interfaces.size()]);
  }

}
2.2.2 StatementHandler
接下来我们看一下statementHandler是如何加载插件的。他是在执行的时候对sql语句进行构建,所以到查询方法中寻找:
@Override
public <E> List<E> doQuery(MappedStatement ms, Object parameter, RowBounds rowBounds, ResultHandler resultHandler, BoundSql boundSql) throws SQLException {
  Statement stmt = null;
  try {
    Configuration configuration = ms.getConfiguration();
    // 注意,已经来到SQL处理的关键对象 StatementHandler >>
    StatementHandler handler = configuration.newStatementHandler(wrapper, ms, parameter, rowBounds, resultHandler, boundSql);
    // 获取一个 Statement对象
    stmt = prepareStatement(handler, ms.getStatementLog());
    // 执行查询
    return handler.query(stmt, resultHandler);
  } finally {
    // 用完就关闭
    closeStatement(stmt);
  }
}
在进入newStatementHandler方法中:
public StatementHandler newStatementHandler(Executor executor, MappedStatement mappedStatement, Object parameterObject, RowBounds rowBounds, ResultHandler resultHandler, BoundSql boundSql) {
  StatementHandler statementHandler = new RoutingStatementHandler(executor, mappedStatement, parameterObject, rowBounds, resultHandler, boundSql);
  // 植入插件逻辑(返回代理对象)
  statementHandler = (StatementHandler) interceptorChain.pluginAll(statementHandler);
  return statementHandler;
}
现在就可以发现statementHandler是在哪里获取代理对象了。
2.2.3 ParameterHandler
在上面步骤的RoutingStatementHandler方法中,我们来看:
public RoutingStatementHandler(Executor executor, MappedStatement ms, Object parameter, RowBounds rowBounds, ResultHandler resultHandler, BoundSql boundSql) {
  // StatementType 是怎么来的? 增删改查标签中的 statementType="PREPARED",默认值 PREPARED
  switch (ms.getStatementType()) {
    case STATEMENT:
      delegate = new SimpleStatementHandler(executor, ms, parameter, rowBounds, resultHandler, boundSql);
      break;
    case PREPARED:
      // 创建 StatementHandler 的时候做了什么? >>
      delegate = new PreparedStatementHandler(executor, ms, parameter, rowBounds, resultHandler, boundSql);
      break;
    case CALLABLE:
      delegate = new CallableStatementHandler(executor, ms, parameter, rowBounds, resultHandler, boundSql);
      break;
    default:
      throw new ExecutorException("Unknown statement type: " + ms.getStatementType());
  }
}
然后我们随便选择一个分支进入,比如PreparedStatementHandler:
public PreparedStatementHandler(Executor executor, MappedStatement mappedStatement, Object parameter, RowBounds rowBounds, ResultHandler resultHandler, BoundSql boundSql) {
  super(executor, mappedStatement, parameter, rowBounds, resultHandler, boundSql);
}
进入父类方法:
protected BaseStatementHandler(Executor executor, MappedStatement mappedStatement, Object parameterObject, RowBounds rowBounds, ResultHandler resultHandler, BoundSql boundSql) {
  this.configuration = mappedStatement.getConfiguration();
  this.executor = executor;
  this.mappedStatement = mappedStatement;
  this.rowBounds = rowBounds;

  this.typeHandlerRegistry = configuration.getTypeHandlerRegistry();
  this.objectFactory = configuration.getObjectFactory();

  if (boundSql == null) { // issue #435, get the key before calculating the statement
    generateKeys(parameterObject);
    boundSql = mappedStatement.getBoundSql(parameterObject);
  }

  this.boundSql = boundSql;

  // 创建了四大对象的其它两大对象 >>
  this.parameterHandler = configuration.newParameterHandler(mappedStatement, parameterObject, boundSql);
  this.resultSetHandler = configuration.newResultSetHandler(executor, mappedStatement, rowBounds, parameterHandler, resultHandler, boundSql);
}
在newParameterHandler的步骤我们可以发现代理对象的创建:
public ParameterHandler newParameterHandler(MappedStatement mappedStatement, Object parameterObject, BoundSql boundSql) {
  ParameterHandler parameterHandler = mappedStatement.getLang().createParameterHandler(mappedStatement, parameterObject, boundSql);
  // 植入插件逻辑(返回代理对象)
  parameterHandler = (ParameterHandler) interceptorChain.pluginAll(parameterHandler);
  return parameterHandler;
}
2.2.4 ResultSetHandler
在上面的newResultSetHandler()方法中,也可以看到ResultSetHander的代理对象:
public ResultSetHandler newResultSetHandler(Executor executor, MappedStatement mappedStatement, RowBounds rowBounds, ParameterHandler parameterHandler,
    ResultHandler resultHandler, BoundSql boundSql) {
  ResultSetHandler resultSetHandler = new DefaultResultSetHandler(executor, mappedStatement, parameterHandler, resultHandler, boundSql, rowBounds);
  // 植入插件逻辑(返回代理对象)
  resultSetHandler = (ResultSetHandler) interceptorChain.pluginAll(resultSetHandler);
  return resultSetHandler;
}
2.3 执行流程
以Executor的query方法为例,当查询请求到来的时候,Executor的代理对象是如何处理拦截请求的呢?我们来看下。当请求到了executor.query方法的时候是如何执行的。
因为已经创建过代理对象了,所以这个时候会执行Plugin的invoke方法:
@Override
public Object invoke(Object proxy, Method method, Object[] args) throws Throwable {
  try {
    // 获取当前方法所在类或接口中,可被当前Interceptor拦截的方法
    Set<Method> methods = signatureMap.get(method.getDeclaringClass());
    if (methods != null && methods.contains(method)) {
      // 当前调用的方法需要被拦截 执行拦截操作
      return interceptor.intercept(new Invocation(target, method, args));
    }
    // 不需要拦截 则调用 目标对象中的方法
    return method.invoke(target, args);
  } catch (Exception e) {
    throw ExceptionUtil.unwrapThrowable(e);
  }
}
然后进入interceptor.intercept 会进入我们自定义的 FirstInterceptor对象:
/**
 * 执行拦截逻辑的方法
 *
 * @param invocation
 * @return
 * @throws Throwable
 */
@Override
public Object intercept(Invocation invocation) throws Throwable {
    System.out.println("FirstInterceptor  拦截之前 ....");
    Object obj = invocation.proceed();
    System.out.println("FirstInterceptor  拦截之后 ....");
    return obj;
}
这个就是自定义的拦截器执行的完整流程。
2.4 多拦截器
如果我们有多个自定义的拦截器,那么他的执行流程是怎么样的呢?比如我们创建了两个Interceptor 都是用来拦截 Executor 的query方法,一个是用来执行逻辑A 一个是用来执行逻辑B的。
2.4.1 单拦截器流程
2.4.2 多拦截器流程
如果说对象被代理了多次,这里会继续调用下一个插件的逻辑,再走一次Plugin的invoke()方法。这里我们需要关注一下有多个插件的时候的运行顺序。
配置的顺序和执行的顺序是相反的。InterceptorChain的List是按照插件从上往下的顺序解析、添加的。
而创建代理的时候也是按照list的顺序代理。执行的时候当然是从最后代理的对象开始。
2.5 总结
这个我们可以通过实际的案例来得到验证,最后来总结下Interceptor的相关对象的作用:
| 对象 | 作用 |
|---|---|
| Interceptor | 自定义插件需要实现接口,实现4个方法 |
| InterceptChain | 配置的插件解析后会保存在Configuration的InterceptChain中 |
| Plugin | 触发管理类,还可以用来创建代理对象 |
| Invocation | 对被代理类进行包装,可以调用proceed()调用到被拦截的方法 |
3. PageHelper插件分析
我们使用最多的Mybatis插件应该是分页插件PageHelper,我们先来回顾下PageHelper的应用。
3.1 简单使用
3.1.1 依赖
<dependency>
    <groupId>com.github.pagehelper</groupId>
    <artifactId>pagehelper</artifactId>
    <version>4.1.6</version>
</dependency>
3.1.2 配置文件注入插件
<plugins>

    <!--        <plugin interceptor="com.demo.interceptor.FirstInterceptor">
                <property name="testProp" value="1000"/>
            </plugin>-->

    <!-- com.github.pagehelper为PageHelper类所在包名 -->
    <plugin interceptor="com.github.pagehelper.PageHelper">
        <property name="dialect" value="mysql"/>
        <!-- 该参数默认为false -->
        <!-- 设置为true时,会将RowBounds第一个参数offset当成pageNum页码使用 -->
        <!-- 和startPage中的pageNum效果一样 -->
        <property name="offsetAsPageNum" value="true"/>
        <!-- 该参数默认为false -->
        <!-- 设置为true时,使用RowBounds分页会进行count查询 -->
        <property name="rowBoundsWithCount" value="true"/>
        <!-- 设置为true时,如果pageSize=0或者RowBounds.limit = 0就会查询出全部的结果 -->
        <!-- (相当于没有执行分页查询,但是返回结果仍然是Page类型) -->
        <property name="pageSizeZero" value="true"/>
        <!-- 3.3.0版本可用 - 分页参数合理化,默认false禁用 -->
        <!-- 启用合理化时,如果pageNum<1会查询第一页,如果pageNum>pages会查询最后一页 -->
        <!-- 禁用合理化时,如果pageNum<1或pageNum>pages会返回空数据 -->
        <property name="reasonable" value="false"/>
        <!-- 3.5.0版本可用 - 为了支持startPage(Object params)方法 -->
        <!-- 增加了一个`params`参数来配置参数映射,用于从Map或ServletRequest中取值 -->
        <!-- 可以配置pageNum,pageSize,count,pageSizeZero,reasonable,不配置映射的用默认值 -->
        <!-- 不理解该含义的前提下,不要随便复制该配置 -->
        <property name="params" value="pageNum=start;pageSize=limit;"/>
        <!-- always总是返回PageInfo类型,check检查返回类型是否为PageInfo,none返回Page -->
        <property name="returnPageInfo" value="check"/>
    </plugin>
</plugins>
3.1.3 分页查询
@Test
    public void test1() throws Exception {
        // 1.获取配置文件
        InputStream in = Resources.getResourceAsStream("mybatis-config.xml");
        // 2.加载解析配置文件并获取SqlSessionFactory对象
        SqlSessionFactory factory = new SqlSessionFactoryBuilder().build(in);
        // 3.根据SqlSessionFactory对象获取SqlSession对象
        SqlSession sqlSession = factory.openSession();

        // 4. 分页查询设置
        PageHelper.startPage(1, 1);

        // 通过SqlSession中提供的 API方法来操作数据库
        List<User> list = sqlSession.selectList("com.demo.mapper.UserMapper.selectUserList");
        System.out.println(list.size());
        // 5.关闭会话
        sqlSession.close();
    }
通过日志我们可以发现只查出一条记录。
通过MyBatis的分页插件的使用,我们发现我们仅仅是在 执行操作之前设置了一句PageHelper.startPage(1,1); 并没有做其他操作,也就是没有改变任何其他的业务代码。这就是它的优点,那么我再来看下他的实现原理。
3.2 原理分析
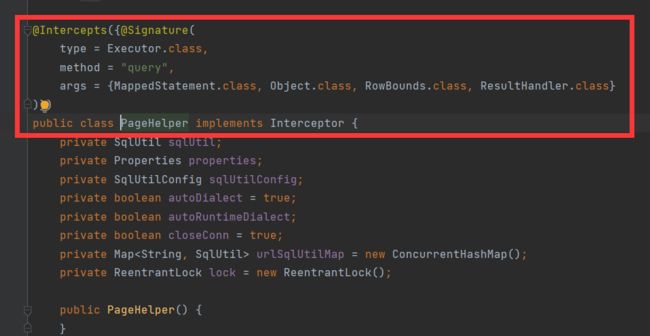
在PageHelper中,肯定有提供Interceptor的实现类,通过源码我们可以发现是PageHelper,而且我们也可以看到在该方法头部添加的注解,声明了该拦截器拦截的是Executor的query方法。(可以从配置文件中点击pageHelper进入)
然后当我们要执行查询操作的时候,我们知道 Executor.query() 方法的执行本质上是执行 Executor的代理对象的方法。
所以最后执行的就是PageHelper的intercept方法。
intercept
public Object intercept(Invocation invocation) throws Throwable {
    if (this.autoRuntimeDialect) {//多数据源
        SqlUtil sqlUtil = this.getSqlUtil(invocation);
        return sqlUtil.processPage(invocation);
    } else {//单数据源
        if (this.autoDialect) {
            this.initSqlUtil(invocation);
        }
        return this.sqlUtil.processPage(invocation);
    }
}
在interceptor方法中首先会获取一个SqlUtils对象:
SqlUtil:数据库类型专用sql工具类,一个数据库url对应一个SqlUtil实例,SqlUtil内有一个Parser对象,如果是mysql,它是MysqlParser,如果是oracle,它是OracleParser,这个Parser对象是SqlUtil不同实例的主要存在价值。执行count查询、设置Parser对象、执行分页查询、保存Page分页对象等功能,均由SqlUtil来完成。
initSqlUtil
public synchronized void initSqlUtil(Invocation invocation) {
    if (this.sqlUtil == null) {
        this.sqlUtil = this.getSqlUtil(invocation);
        if (!this.autoRuntimeDialect) {
            this.properties = null;
            this.sqlUtilConfig = null;
        }
        this.autoDialect = false;
    }
}
getSqlUtil
public SqlUtil getSqlUtil(Invocation invocation) {
    MappedStatement ms = (MappedStatement)invocation.getArgs()[0];
    //改为对dataSource做缓存
    DataSource dataSource = ms.getConfiguration().getEnvironment().getDataSource();
    String url = this.getUrl(dataSource);
    if (this.urlSqlUtilMap.containsKey(url)) {
        return (SqlUtil)this.urlSqlUtilMap.get(url);
    } else {
        SqlUtil var7;
        try {
            this.lock.lock();
            if (this.urlSqlUtilMap.containsKey(url)) {
                SqlUtil var11 = (SqlUtil)this.urlSqlUtilMap.get(url);
                return var11;
            }

            if (StringUtil.isEmpty(url)) {
                throw new RuntimeException("无法自动获取jdbcUrl,请在分页插件中配置dialect参数!");
            }

            String dialect = Dialect.fromJdbcUrl(url);
            if (dialect == null) {
                throw new RuntimeException("无法自动获取数据库类型,请通过dialect参数指定!");
            }
            // 创建SqlUtil
            SqlUtil sqlUtil = new SqlUtil(dialect);
            if (this.properties != null) {
                sqlUtil.setProperties(this.properties);
            } else if (this.sqlUtilConfig != null) {
                sqlUtil.setSqlUtilConfig(this.sqlUtilConfig);
            }
            this.urlSqlUtilMap.put(url, sqlUtil);
            var7 = sqlUtil;
        } finally {
            this.lock.unlock();
        }
        return var7;
    }
}
SqlUtil的构造方法
public SqlUtil(String strDialect) {
    if (strDialect != null && !"".equals(strDialect)) {
        Object exception = null;

        try {
            Dialect dialect = Dialect.of(strDialect);
            // 根据方言创建对应的解析器
            this.parser = AbstractParser.newParser(dialect);
        } catch (Exception var8) {
            exception = var8;
            //异常的时候尝试反射,允许自己写实现类传递进来
            try {
                Class<?> parserClass = Class.forName(strDialect);
                if (Parser.class.isAssignableFrom(parserClass)) {
                    this.parser = (Parser)parserClass.newInstance();
                }
            } catch (ClassNotFoundException var5) {
                exception = var5;
            } catch (InstantiationException var6) {
                exception = var6;
            } catch (IllegalAccessException var7) {
                exception = var7;
            }
        }

        if (this.parser == null) {
            throw new RuntimeException((Throwable)exception);
        }
    } else {
        throw new IllegalArgumentException("Mybatis分页插件无法获取dialect参数!");
    }
}
解析器
public static Parser newParser(Dialect dialect) {
    Parser parser = null;
    switch(dialect) {
    case mysql:
    case mariadb:
    case sqlite:
        parser = new MysqlParser();
        break;
    case oracle:
        parser = new OracleParser();
        break;
    case hsqldb:
        parser = new HsqldbParser();
        break;
    case sqlserver:
        parser = new SqlServerParser();
        break;
    case sqlserver2012:
        parser = new SqlServer2012Dialect();
        break;
    case db2:
        parser = new Db2Parser();
        break;
    case postgresql:
        parser = new PostgreSQLParser();
        break;
    case informix:
        parser = new InformixParser();
        break;
    case h2:
        parser = new H2Parser();
        break;
    default:
        throw new RuntimeException("分页插件" + dialect + "方言错误!");
    }

    return (Parser)parser;
}
我们可以看到不同的数据库方言,创建了对应的解析器。
然后我们再回到前面的interceptor方法中继续,查看sqlUtil.processPage(invocation);方法
processPage
public Object processPage(Invocation invocation) throws Throwable {
    Object var3;
    try {
        Object result = this._processPage(invocation);
        var3 = result;
    } finally {
        clearLocalPage();
    }

    return var3;
}
private Object _processPage(Invocation invocation) throws Throwable {
    Object[] args = invocation.getArgs();
    Page page = null;
    //支持方法参数时,会先尝试获取Page
    if (this.supportMethodsArguments) {
        page = this.getPage(args);  // 有通过ThreadLocal来获取分页数据信息
    }
    //分页信息
    RowBounds rowBounds = (RowBounds)args[2];
    //支持方法参数时,如果page == null就说明没有分页条件,不需要分页查询
    if (this.supportMethodsArguments && page == null || !this.supportMethodsArguments && getLocalPage() == null && rowBounds == RowBounds.DEFAULT) {
        return invocation.proceed();
    } else {
        //不支持分页参数时,page==null,这里需要获取
        if (!this.supportMethodsArguments && page == null) {
            page = this.getPage(args);
        }

        return this.doProcessPage(invocation, page, args);
    }
}
doProcessPage
private Page doProcessPage(Invocation invocation, Page page, Object[] args) throws Throwable {
    //保存RowBounds状态
    RowBounds rowBounds = (RowBounds)args[2];
    //获取原始的ms
    MappedStatement ms = (MappedStatement)args[0];
    //判断并处理为PageSqlSource
    if (!this.isPageSqlSource(ms)) {
        this.processMappedStatement(ms);
    }
    //设置当前的parser,后面每次使用前都会set,ThreadLocal的值不会产生不良影响
    ((PageSqlSource)ms.getSqlSource()).setParser(this.parser);

    Page var6;
    try {
        //忽略RowBounds-否则会进行Mybatis自带的内存分页
        args[2] = RowBounds.DEFAULT;
        //如果只进行排序 或 pageSizeZero的判断
        if (!this.isQueryOnly(page)) {
            //简单的通过total的值来判断是否进行count查询
            if (page.isCount()) {
                page.setCountSignal(Boolean.TRUE);
                //替换MS
                args[0] = msCountMap.get(ms.getId());
                //查询总数
                Object result = invocation.proceed();
                //还原ms
                args[0] = ms;
                //设置总数
                page.setTotal((long)(Integer)((List)result).get(0));
                if (page.getTotal() == 0L) {
                    Page var7 = page;
                    return var7;
                }
            } else {
                page.setTotal(-1L);
            }

            //pageSize>0的时候执行分页查询,pageSize<=0的时候不执行相当于可能只返回了一个count
            if (page.getPageSize() > 0 && (rowBounds == RowBounds.DEFAULT && page.getPageNum() > 0 || rowBounds != RowBounds.DEFAULT)) {
                //将参数中的MappedStatement替换为新的qs
                page.setCountSignal((Boolean)null);
                BoundSql boundSql = ms.getBoundSql(args[1]);
                // 在 invocation中绑定 分页的数据
                args[1] = this.parser.setPageParameter(ms, args[1], boundSql, page);
                page.setCountSignal(Boolean.FALSE);
                //执行分页查询
                Object result = invocation.proceed();
                //得到处理结果
                page.addAll((List)result);
            }
            //返回结果
            return page;
        }
        var6 = this.doQueryOnly(page, invocation);
    } finally {
        ((PageSqlSource)ms.getSqlSource()).removeParser();
    }

    return var6;
}
invocation.proceed();方法会进入 CachingExecutor中的query方法。
query
@Override
public <E> List<E> query(MappedStatement ms, Object parameterObject, RowBounds rowBounds, ResultHandler resultHandler) throws SQLException {
  // 获取SQL
  BoundSql boundSql = ms.getBoundSql(parameterObject);
  // 创建CacheKey:什么样的SQL是同一条SQL? >>
  CacheKey key = createCacheKey(ms, parameterObject, rowBounds, boundSql);
  return query(ms, parameterObject, rowBounds, resultHandler, key, boundSql);
}
ms.getBoundSql方法中会完成分页SQL的绑定;
SQL绑定
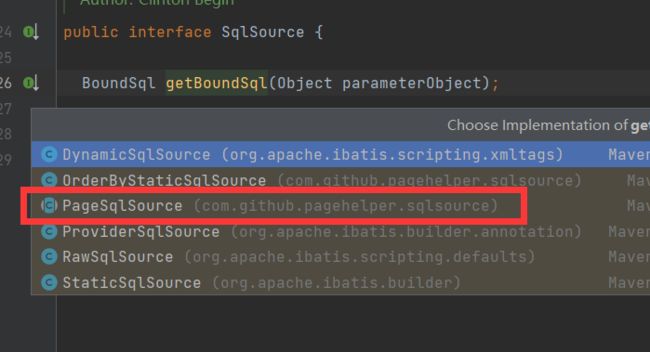
进入 PageSqlSource 的getBoundSql方法中:
getBoundSql
public BoundSql getBoundSql(Object parameterObject) {
    Boolean count = this.getCount();
    if (count == null) {
        return this.getDefaultBoundSql(parameterObject);
    } else {
        return count ? this.getCountBoundSql(parameterObject) : this.getPageBoundSql(parameterObject);
    }
}
然后进入getPageBoundSql获取分页的SQL语句,在这个方法中大家也可以发现查询总的记录数的SQL生成。
protected BoundSql getPageBoundSql(Object parameterObject) {
    String tempSql = this.sql;
    String orderBy = PageHelper.getOrderBy();
    if (orderBy != null) {
        tempSql = OrderByParser.converToOrderBySql(this.sql, orderBy);
    }

    tempSql = ((Parser)localParser.get()).getPageSql(tempSql);
    return new BoundSql(this.configuration, tempSql, ((Parser)localParser.get()).getPageParameterMapping(this.configuration, this.original.getBoundSql(parameterObject)), parameterObject);
}
最终在这个方法中生成了对应数据库的分页语句:
4. 应用场景分析
| 作用 | 描述 | 实现 |
|---|---|---|
| 水平分表 | 一张费用表按月度拆分为12张表。fee_202001-202012。当查询条件出现月度(tran_month)时,把select语句中的逻辑 表名修改为对应的月份表。 | 对query update方法进行拦截在接口上添加注解,通过反射获取接口注解,根据注解上配置的参数进行分表,修改原SQL,例如id取模,按月分表 |
| 数据脱敏 | 手机号和身份证在数据库完整存储。但是返 回给用户,屏蔽手机号的中间四位。屏蔽身份证号中的出生日期。 | query——对结果集脱敏 |
| 菜单权限控制 | 不同的用户登录,查询菜单权限表时获得不同的结果,在前端展示不同的菜单 | 对query方法进行拦截在方法上添加注解,根据权限配置,以及用户登录信息,在SQL上加上权限过滤条件 |
| 黑白名单 | 有些SQL语句在生产环境中是不允许执行的,比如like %% | 对Executor的update和query方法进行拦截,将拦截的SQL语句和黑白名单进行比较,控制SQL语句的执行 |
| 全局唯一ID | 在高并发的环境下传统的生成ID的方式不太适用,这时我们就需要考虑其他方式了 | 创建插件拦截Executor的insert方法,通过UUID或者雪花算法来生成ID,并修改SQL中的插入信息 |


