前端导出 Excel 的方案有很多,但是能够导出一份专业的 Excel 表格很少,本文将介绍一款导出 Excel 表格界的天花板,能够满足 99.99% 的业务需求,直呼 yyds !
技术方案
xlsx
xlsx 是前端最热门的 Excel 导出方案,又叫做 SheetJS,默认不支持修改 Excel 的样式。
若在工作业务需求上需要修改 Excel 的样式的话需要使用该作者的付费版本。或者使用 xlsx-style,但使用起来非常麻烦,需要修改 node_modules 源码,而且作者最近的提交的版本也在 6 年前,不建议使用。
exceljs
exceljs 是一款可导出,可读取的 Excel 操作工具,可以实现样式的修改以及 Excel 的高级功能,是非常值得推荐的一个处理 Excel 的库,而 exceljs 也是本文介绍的主角!
安装依赖
exceljs 同于写入 Excel,file-sever 用于保存到本地文件。
yarn add exceljs保存文件本地我们还需要 file-saver 的辅助
yarn add file-saver简单案例
当你能够写出 第一行 Hello ExcelJS 的时候也就意味着你已经可以上手 exceljs 了。
// 引入依赖
import ExcelJS from "exceljs";
import FileSaver from "file-saver";

// 导出Excel
const exportExcel = () => {
  // 创建工作簿
  const _workbook = new ExcelJS.Workbook();
  // 添加工作表
  const _sheet1 = _workbook.addWorksheet("sheet1");

  // 设置表格内容
  const _titleCell = _sheet1.getCell("A1");
  _titleCell.value = "Hello ExcelJS!";

  // 导出表格
  _workbook.xlsx.writeBuffer().then((buffer) => {
    let _file = new Blob([buffer], {
      type: "application/octet-stream",
    });
    FileSaver.saveAs(_file, "ExcelJS.xlsx");
  });
};
设置表头
我们一般把每列的第一个设置为表头,并且可以设置每一列的宽度。
_sheet1.columns = [
    { header: "名次", key: "sort", width: 10 },
    { header: "班级", key: "class", width: 20 },
    { header: "姓名", key: "name", width: 20 },
    { header: "得分", key: "score", width: 10 },
];
添加数据
表头设置后,我们可以直接根据 key 值去添加每一行的数据。
_sheet1.addRow({ sort: 1, class: "前端三班", name: "Buer", score: 99 });
_sheet1.addRow({ sort: 2, class: "前端一班", name: "Jack", score: 86 });
_sheet1.addRow({ sort: 3, class: "前端一班", name: "Mary", score: 58 });
读取列
getColumn 用于读取当前列的数据,我们可以使用 eachCell 进行遍历单元格。
_sheet1.getColumn("score").eachCell((cell, rowIdx) => {
    console.log(cell.value, rowIdx);
    // 得分, 1
    // 99, 2
    // 86, 3
});
获取行
getRow 用于读取每一样,同样我们可以使用 exchCell 进行遍历单元格
_sheet1.getRow(1).eachCell((cell, rowIdx) => {
    console.log(cell.value, rowIdx);
    // 名次, 1
    // 班级, 2
    // 姓名, 3
    // 得分, 4
});Array.prototype.forEach依旧可以使用,不过在这里更加推荐使用eachCell来遍历单元格。
样式
我们将读取到的表头添加一些样式,让 Excel变得看起来更加的好看。
// 获取第一行
const _titleCell = _sheet1.getRow(1);
// 设置第一行的高度
_titleCell.height = 30;
// 设置第一行的字体样式
_titleCell.font = {
    name: "黑体",
    bold: true,
    size: 14,
    color: {
        argb: "FF999999",
    },
};
// 设置第一行的对齐方式(水平垂直)
_titleCell.alignment = {
    vertical: "middle",
    horizontal: "center",
};
// 设置边框线的样式
_titleCell.border = {
    top: {
        style: "medium",
        color: {
            argb: "FFEBEEF5",
        },
    },
    left: {
        style: "medium",
        color: {
            argb: "FFEBEEF5",
        },
    },
    bottom: {
        style: "medium",
        color: {
            argb: "FFEBEEF5",
        },
    },
    right: {
        style: "medium",
        color: {
            argb: "FFEBEEF5",
        },
    },
};
// 设置单元的样式
_titleCell.fill = {
    type: "pattern",
    pattern: "solid",
    fgColor: {
        argb: "FFF5F7FA",
    },
};在exceljs中所有的的颜色值均为argb格式,且不带#符号。

单元格已经成功的添加上了样式,只不过表格中第一行的所有的单元格都被添加上样式了,当然这肯定不是我们想要的。
这个时候我们可以使用 eachCell 来遍历单元格,给每一个单元格添加上样式。
const _titleCell = _sheet1.getRow(1);
_titleCell.height = 30;
_titleCell.eachCell((cell, colIdx) => {
    cell.font = {
        name: "黑体",
        bold: true,
        size: 14,
        color: {
            argb: "FF999999",
        },
    };
    cell.alignment = {
        vertical: "middle",
        horizontal: "center",
    };
    cell.border = {
        top: {
            style: "medium",
            color: {
                argb: "FFEBEEF5",
            },
        },
        left: {
            style: "medium",
            color: {
                argb: "FFEBEEF5",
            },
        },
        bottom: {
            style: "medium",
            color: {
                argb: "FFEBEEF5",
            },
        },
        right: {
            style: "medium",
            color: {
                argb: "FFEBEEF5",
            },
        },
    };
    cell.fill = {
        type: "pattern",
        pattern: "solid",
        fgColor: {
            argb: "FFF5F7FA",
        },
    };
});
自动筛选
在很多的时候我们需要对表格中每一列的数据进行筛选,比如直接筛选班级,我们可以通过 autoFilter 来添加筛选。
_sheet1.autoFilter = "B1";

// 当然我们也可以直接添加多个列筛选
_sheet1.autoFilter = "B1:C1";
合并表格
表格的合并应该是业务需求中最频繁的功能。当然这一功能使用 xlsx 也可以实现,前提是你的项目对表格没有复杂的需求。
不同的合并方向
// 按左,右合并
_sheet1.mergeCells("A1:A2");
// 按上,下合并
_sheet1.mergeCells("A1:B1");
// 按左上,右下合并
_sheet1.mergeCells("A1:B2");
合并并设置样式
// 合并
_sheet1.mergeCells("A6:B9");
_sheet1.getCell("A6").value = "汇总";
// 设置合并后的样式
_sheet1.getCell("A6").alignment = {
    vertical: "middle",
    horizontal: "center",
};
注意,已经合并的单元格无法继续合并!
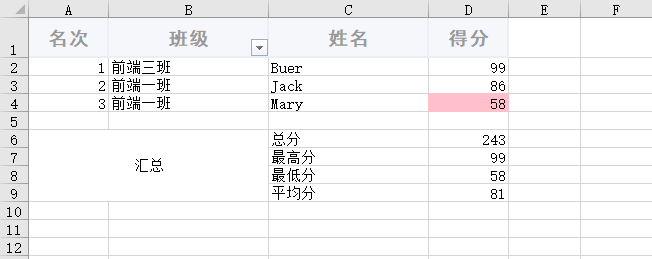
公式值
我们可以直接对表格中的数据进行公式计算,比如 求和(SUM),平均数(AVERAGE) 等等。
_sheet1.getCell("C6").value = "总分";
_sheet1.getCell("C7").value = "最高分";
_sheet1.getCell("C8").value = "最低分";
_sheet1.getCell("C9").value = "平均分";

// 求和
_sheet1.getCell("D6").value = { formula: "=SUM(D2:D4)" };
// 最大值
_sheet1.getCell("D7").value = { formula: "=MAX(D2:D4)" };
// 最小值
_sheet1.getCell("D8").value = { formula: "=MIN(D2:D4)" };
// 平均数
_sheet1.getCell("D9").value = { formula: "=AVERAGE(D2:D4)" };
数据验证
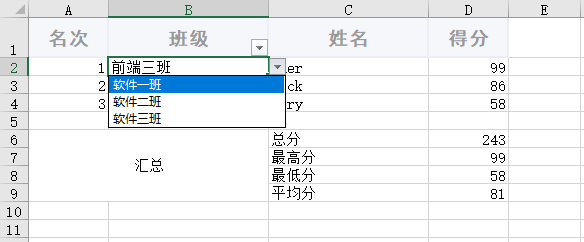
有时候我们需要为某个单元格添加数据可以方便直接下拉选择指定的值。
_sheet1.getCell("B2").dataValidation = {
    type: "list",
    allowBlank: true,
    formulae: ['"软件一班,软件二班,软件三班"'],
};
条件格式
我们可以为指定单元格添加数据验证,比如为不及格的分数添加红色背景。
// 为 D2:D4添加条件格式
_sheet1.addConditionalFormatting({
    ref: "D2:D4",
    rules: [
        {
            type: "cellIs",
            operator: "lessThan",
            priority: 1,
            formulae: [60],
            style: {
                fill: {
                    type: "pattern",
                    pattern: "solid",
                    bgColor: { argb: "FFFFC0CB" },
                },
            },
        },
    ],
});
总结
以上介绍的内容仅仅是 exceljs 的冰山一角,能够满足一些基本的对 Excel 有着美化的业务需求。
在官方的文档里面,还有更多好的用、专业的功能,以及读取表格等非常强大的功能需要你去探索。
ExcelJS 中文文档 https://github.com/exceljs/exceljs/blob/master/README_zh.md
最后
感谢你的阅读~
如果觉得这篇文章对你有所帮助,点赞、在看是最大的支持!
