基于IMDB评论数据集的情感分析
文章目录
- 前言
- 一、大型电影评论数据集介绍
- 二、环境配置
- 三、实验代码
-
- 1.多层感知器模型代码
- 2.递归神经网络模型代码
- 3.长短期记忆模型代码
- 四、实验结果
-
- 1.多层感知器模型运行结果
- 2.递归神经网络模型运行结果
- 3.长短期记忆模型运行结果
- 五、遇到的问题
- 总结
前言
本文的主要内容是基于IMDB评论数据集的情感分析,文中包括大型电影评论数据集介绍、环境配置、实验代码、运行结果以及遇到的问题这几个部分,该实验采用了多层感知器 (MLP)、递归神经网络 (RNN) 和长短期记忆 (LSTM) 等深度学习模型分别进行了测试,其中长短期记忆模型效果最好,测试准确率达到了86.4%。
一、大型电影评论数据集介绍
大型电影评论数据集(Large Movie Review Dataset):点此跳转下载
该数据集是一个用于二元情绪分类的数据集,即包含正面评价和负面评价,其中包含的数据比以前的基准数据集多很多,其中有25000条高度极性的电影评论用于训练,25000条用于测试,还有一些未标记的数据可供使用。
下载数据集解压后所包含的文件如下图所示。
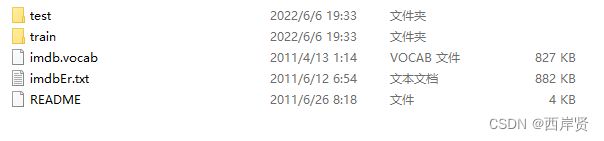
test文件夹下包含的文件信息如下,其中neg文件夹下包含12500条负面评价,pos文件夹下包含12500条正面评价。
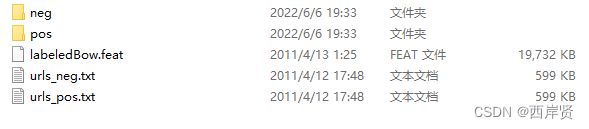
train文件夹下包含的文件信息如下,其中neg文件夹下包含12500条负面评价,pos文件夹下包含12500条正面评价,unsup文件夹下包含50000条未标记的评价可供使用。

二、环境配置
本实验在上一个实验:基于 PyTorch 的 cifar-10 图像分类 环境配置的基础上再安装 tensorflow 和 keras 即可,我这里安装的 tensorflow 版本是2.1.0,keras版本是2.3.1,安装适应自己环境的版本即可。
Tensorflow是一个基于数据流编程(dataflow programming)的符号数学系统,被广泛应用于各类机器学习算法的编程实现。Tensorflow拥有多层级结构,可部署于各类服务器、PC终端和网页并支持GPU和TPU高性能数值计算。
Keras是一个由Python编写的开源人工神经网络库,可以作为Tensorflow、Microsoft-CNTK和Theano的高阶应用程序接口,进行深度学习模型的设计、调试、评估、应用和可视化。Keras在代码结构上由面向对象方法编写,完全模块化并具有可扩展性,它试图简化复杂算法的实现难度。Keras支持现代人工智能领域的主流算法,包括前馈结构和递归结构的神经网络,也可以通过封装参与构建统计学习模型。在硬件和开发环境方面,Keras支持多操作系统下的多GPU并行计算,可以根据后台设置转化为Tensorflow、Microsoft-CNTK等系统下的组件。
三、实验代码
该实验采用了多层感知器 (MLP)、递归神经网络 (RNN) 和长短期记忆 (LSTM) 等深度学习模型,代码如下。
1.多层感知器模型代码
基于多层感知器模型的代码如下。
# 声明:本代码并非自己编写,代码来源在文末已给出链接
import urllib.request  # 下载文件
import os
import tarfile   # 解压缩文件
import re
import numpy as np
import matplotlib.pyplot as plt
from keras.preprocessing.text import Tokenizer   # 建立字典
from keras.preprocessing import sequence  # 截长补短
from keras.models import Sequential
from keras.layers.core import Dense, Dropout, Activation, Flatten
from keras.layers.embeddings import Embedding

# 下载电影评论数据集
url = "http://ai.stanford.edu/~amaas/data/sentiment/aclImdb_v1.tar.gz"
filepath = r"G:\PycharmProjects\aclImdb_v1.tar.gz"  # 这里的数据集压缩包路径位置因人而异
if not os.path.isfile(filepath):  # 该路径下没有文件就下载
    result = urllib.request.urlretrieve(url, filepath)
    print('downloaded:', result)

if not os.path.exists(r"G:\PycharmProjects\aclImdb"):
    tfile = tarfile.open(filepath, 'r:gz')  # 解压该数据集文件
    result = tfile.extractall(r"G:/PycharmProjects/")


def rm_tags(text):
    re_tag = re.compile(r'<[^>]+>')  # 剔除掉html标签
    return re_tag.sub('', text)


def read_file(filetype):  # 读取文件
    path = "G:/PycharmProjects/aclImdb/"
    file_list = []

    positive_path = path + filetype + '/pos/'   # 正面评价的文件路径
    for f in os.listdir(positive_path):
        file_list += [positive_path + f]   # 存储到文件列表中

    negative_path = path + filetype + '/neg/'   # 负面评价的文件路径
    for f in os.listdir(negative_path):
        file_list += [negative_path + f]

    print('read', filetype, 'files:', len(file_list))   # 打印文件个数

    all_labels = ([1] * 12500 + [0] * 12500)  # 前12500是正面都为1;后12500是负面都为0
    all_texts = []

    for fi in file_list:  # 读取所有文件
        with open(fi, encoding='utf8') as file_input:
            # 先读取文件,使用join连接所有字符串,然后使用rm_tags剔除tag最后存入列表all_texts
            all_texts += [rm_tags(" ".join(file_input.readlines()))]
    return all_labels, all_texts


y_train, train_text = read_file("train")
y_test, train_test = read_file("test")

y_train = np.array(y_train)
y_test = np.array(y_test)
test_text = train_test


# 建立 token
token = Tokenizer(num_words=2000)  # 词典的单词数为2000
# 建立token词典
token.fit_on_texts(train_text)  # 按单词出现次数排序 取前2000个

# 将影评文字转化为数字列表(一条影评文字转化为一条数字列表)
x_train_seq = token.texts_to_sequences(train_text)
x_test_seq = token.texts_to_sequences(test_text)

# 截长补短操作
x_train = sequence.pad_sequences(x_train_seq, maxlen=100)
x_test = sequence.pad_sequences(x_test_seq, maxlen=100)

# mlp感知机
model = Sequential()
model.add(Embedding(output_dim=32, input_dim=2000, input_length=100))
# 一个单词用32维词向量表示;字典词数(维数)为2000;每个数字列表有100个数字,相当于用100个数字去表示一条评论
model.add(Dropout(0.2))
model.add(Flatten())  # 将输入“压平”,即把多维的输入一维化 共有32*100=3200个
model.add(Dense(units=256, activation='relu'))  # 神经元节点数为256,激活函数为relu
model.add(Dropout(0.35))
model.add(Dense(units=1, activation='sigmoid'))  # 输出1表示正面评价,0表示负面评价,激活函数为sigmoid
model.summary()  # 模型汇总

# 配置
model.compile(loss='binary_crossentropy', optimizer='adam', metrics=['accuracy'])  # 定义损失函数、优化器以及评估
# 训练
train_history=model.fit(x=x_train, y=y_train, validation_split=0.2, epochs=10, batch_size=300, verbose=1)
# 训练10个epoch,每一批次训练300项数据


# 展示训练结果
def show_train_history(train_history, train, validation):
    plt.plot(train_history.history[train])
    plt.plot(train_history.history[validation])
    plt.title('Train History')
    plt.ylabel(train)
    plt.xlabel('Epoch')
    plt.legend(['train', 'validation'], loc='upper left')
    plt.show()


show_train_history(train_history, 'accuracy', 'val_accuracy')   # 准确率折线图
show_train_history(train_history, 'loss', 'val_loss')   # 损失函数折线图

scores = model.evaluate(x_test, y_test)  # 评估
print(scores)
print('Test loss: ', scores[0])
print('Test accuracy: ', scores[1])
2.递归神经网络模型代码
基于递归神经网络模型的代码如下。
# 声明:本代码并非自己编写,代码来源在文末已给出链接
import urllib.request  # 下载文件
import os
import tarfile   # 解压缩文件
import re
import numpy as np
import matplotlib.pyplot as plt
from keras.preprocessing.text import Tokenizer   # 建立字典
from keras.preprocessing import sequence  # 截长补短
from keras.models import Sequential
from keras.layers.core import Dense, Dropout, Activation, Flatten
from keras.layers.embeddings import Embedding
from keras.layers.recurrent import SimpleRNN  # RNN

# 下载电影评论数据集
url = "http://ai.stanford.edu/~amaas/data/sentiment/aclImdb_v1.tar.gz"
filepath = r"G:\PycharmProjects\aclImdb_v1.tar.gz"
if not os.path.isfile(filepath):  # 该路径下没有文件就下载
    result = urllib.request.urlretrieve(url, filepath)
    print('downloaded:', result)

if not os.path.exists(r"G:\PycharmProjects\aclImdb"):
    tfile = tarfile.open(filepath, 'r:gz')  # 解压该数据集文件
    result = tfile.extractall(r"G:/PycharmProjects/")


def rm_tags(text):
    re_tag = re.compile(r'<[^>]+>')  # 剔除掉html标签
    return re_tag.sub('', text)


def read_file(filetype):  # 读取文件
    path = "G:/PycharmProjects/aclImdb/"
    file_list = []

    positive_path = path + filetype + '/pos/'   # 正面评价的文件路径
    for f in os.listdir(positive_path):
        file_list += [positive_path + f]   # 存储到文件列表中

    negative_path = path + filetype + '/neg/'   # 负面评价的文件路径
    for f in os.listdir(negative_path):
        file_list += [negative_path + f]

    print('read', filetype, 'files:', len(file_list))   # 打印文件个数

    all_labels = ([1] * 12500 + [0] * 12500)  # 前12500是正面都为1;后12500是负面都为0
    all_texts = []

    for fi in file_list:  # 读取所有文件
        with open(fi, encoding='utf8') as file_input:
            # 先读取文件,使用join连接所有字符串,然后使用rm_tags剔除tag最后存入列表all_texts
            all_texts += [rm_tags(" ".join(file_input.readlines()))]
    return all_labels, all_texts


y_train, train_text = read_file("train")
y_test, train_test = read_file("test")

y_train = np.array(y_train)
y_test = np.array(y_test)
test_text = train_test


# 建立 token
token = Tokenizer(num_words=2000)  # 词典的单词数为2000
# 建立token词典
token.fit_on_texts(train_text)  # 按单词出现次数排序 取前2000个

# 将影评文字转化为数字列表(一条影评文字转化为一条数字列表)
x_train_seq = token.texts_to_sequences(train_text)
x_test_seq = token.texts_to_sequences(test_text)

# 截长补短操作
x_train = sequence.pad_sequences(x_train_seq, maxlen=380)
x_test = sequence.pad_sequences(x_test_seq, maxlen=380)

# RNN 模型
model = Sequential()
model.add(Embedding(output_dim=32, input_dim=3800, input_length=380))
# 一个单词用32维词向量表示;字典词数(维数)为3800;每个数字列表有100个数字,相当于用100个数字去表示一条评论
model.add(Dropout(0.35))
model.add(SimpleRNN(16))  # RNN
model.add(Dense(units=256, activation='relu'))  # 神经元节点数为256,激活函数为relu
model.add(Dropout(0.35))
model.add(Dense(units=1, activation='sigmoid'))  # 输出1表示正面评价,0表示负面评价,激活函数为sigmoid
model.summary()  # 模型汇总


# 配置
model.compile(loss='binary_crossentropy', optimizer='adam', metrics=['accuracy'])  # 定义损失函数、优化器以及评估
# 训练
train_history = model.fit(x=x_train, y=y_train, validation_split=0.2, epochs=10, batch_size=300, verbose=1)
# 训练10个epoch,每一批次训练300项数据


# 展示训练结果
def show_train_history(train_history, train, validation):
    plt.plot(train_history.history[train])
    plt.plot(train_history.history[validation])
    plt.title('Train History')
    plt.ylabel(train)
    plt.xlabel('Epoch')
    plt.legend(['train', 'validation'], loc='upper left')
    plt.show()


show_train_history(train_history, 'accuracy', 'val_accuracy')   # 准确率折线图
show_train_history(train_history, 'loss', 'val_loss')   # 损失函数折线图

scores = model.evaluate(x_test, y_test)  # 评估
print(scores)
print('Test loss: ', scores[0])
print('Test accuracy: ', scores[1])
3.长短期记忆模型代码
基于长短期记忆模型的代码如下。
# 声明:本代码并非自己编写,代码来源在文末已给出链接
import urllib.request  # 下载文件
import os
import tarfile   # 解压缩文件
import re
import numpy as np
import matplotlib.pyplot as plt
from keras.preprocessing.text import Tokenizer   # 建立字典
from keras.preprocessing import sequence  # 截长补短
from keras.models import Sequential
from keras.layers.core import Dense, Dropout, Activation, Flatten
from keras.layers.embeddings import Embedding
from keras.layers.recurrent import LSTM  # LSTM

# 下载电影评论数据集
url = "http://ai.stanford.edu/~amaas/data/sentiment/aclImdb_v1.tar.gz"
filepath = r"G:\PycharmProjects\aclImdb_v1.tar.gz"
if not os.path.isfile(filepath):  # 该路径下没有文件就下载
    result = urllib.request.urlretrieve(url, filepath)
    print('downloaded:', result)

if not os.path.exists(r"G:\PycharmProjects\aclImdb"):
    tfile = tarfile.open(filepath, 'r:gz')  # 解压该数据集文件
    result = tfile.extractall(r"G:/PycharmProjects/")


def rm_tags(text):
    re_tag = re.compile(r'<[^>]+>')  # 剔除掉html标签
    return re_tag.sub('', text)


def read_file(filetype):  # 读取文件
    path = "G:/PycharmProjects/aclImdb/"
    file_list = []

    positive_path = path + filetype + '/pos/'   # 正面评价的文件路径
    for f in os.listdir(positive_path):
        file_list += [positive_path + f]   # 存储到文件列表中

    negative_path = path + filetype + '/neg/'   # 负面评价的文件路径
    for f in os.listdir(negative_path):
        file_list += [negative_path + f]

    print('read', filetype, 'files:', len(file_list))   # 打印文件个数

    all_labels = ([1] * 12500 + [0] * 12500)  # 前12500是正面都为1;后12500是负面都为0
    all_texts = []

    for fi in file_list:  # 读取所有文件
        with open(fi, encoding='utf8') as file_input:
            # 先读取文件,使用join连接所有字符串,然后使用rm_tags剔除tag最后存入列表all_texts
            all_texts += [rm_tags(" ".join(file_input.readlines()))]
    return all_labels, all_texts


y_train, train_text = read_file("train")
y_test, train_test = read_file("test")

y_train = np.array(y_train)
y_test = np.array(y_test)
test_text = train_test


# 建立 token
token = Tokenizer(num_words=2000)  # 词典的单词数为2000
# 建立token词典
token.fit_on_texts(train_text)  # 按单词出现次数排序 取前2000个

# 将影评文字转化为数字列表(一条影评文字转化为一条数字列表)
x_train_seq = token.texts_to_sequences(train_text)
x_test_seq = token.texts_to_sequences(test_text)

# 截长补短操作
x_train = sequence.pad_sequences(x_train_seq, maxlen=380)
x_test = sequence.pad_sequences(x_test_seq, maxlen=380)

# LSTM 模型
model = Sequential()
model.add(Embedding(output_dim=32, input_dim=3800, input_length=380))
# 一个单词用32维词向量表示;字典词数(维数)为3800;每个数字列表有100个数字,相当于用100个数字去表示一条评论
model.add(Dropout(0.2))
model.add(LSTM(32))  # LSTM
model.add(Dense(units=256, activation='relu'))  # 神经元节点数为256,激活函数为relu
model.add(Dropout(0.2))
model.add(Dense(units=1, activation='sigmoid'))  # 输出1表示正面评价,0表示负面评价,激活函数为sigmoid
model.summary()  # 模型汇总


# 配置
model.compile(loss='binary_crossentropy', optimizer='adam', metrics=['accuracy'])  # 定义损失函数、优化器以及评估
# 训练
train_history = model.fit(x=x_train, y=y_train, validation_split=0.2, epochs=10, batch_size=300, verbose=1)
# 训练10个epoch,每一批次训练300项数据


# 展示训练结果
def show_train_history(train_history, train, validation):
    plt.plot(train_history.history[train])
    plt.plot(train_history.history[validation])
    plt.title('Train History')
    plt.ylabel(train)
    plt.xlabel('Epoch')
    plt.legend(['train', 'validation'], loc='upper left')
    plt.show()


show_train_history(train_history, 'accuracy', 'val_accuracy')   # 准确率折线图
show_train_history(train_history, 'loss', 'val_loss')   # 损失函数折线图

scores = model.evaluate(x_test, y_test)  # 评估
print(scores)
print('Test loss: ', scores[0])
print('Test accuracy: ', scores[1])
四、实验结果
1.多层感知器模型运行结果
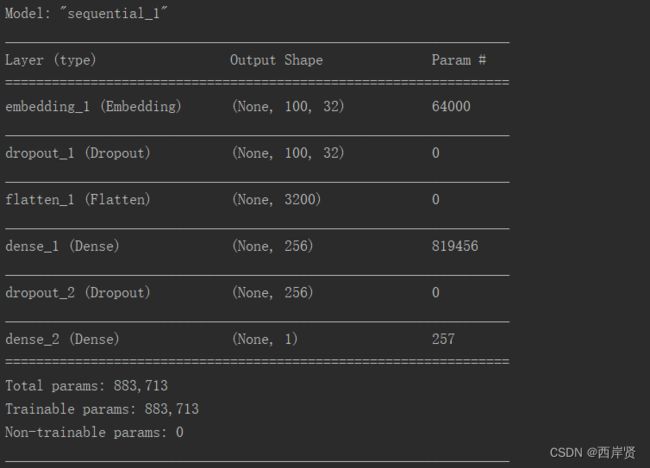
多层感知器模型参数训练的情况如下图所示。
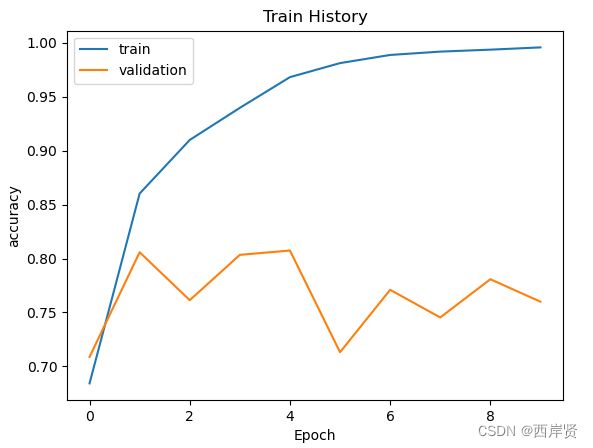
多层感知器模型准确率随学习周期变化的折线图。
多层感知器模型损失函数值随学习周期变化的折线图。

多层感知器模型最终的测试损失函数值和测试准确率。

2.递归神经网络模型运行结果
递归神经网络模型参数训练的情况如下图所示。
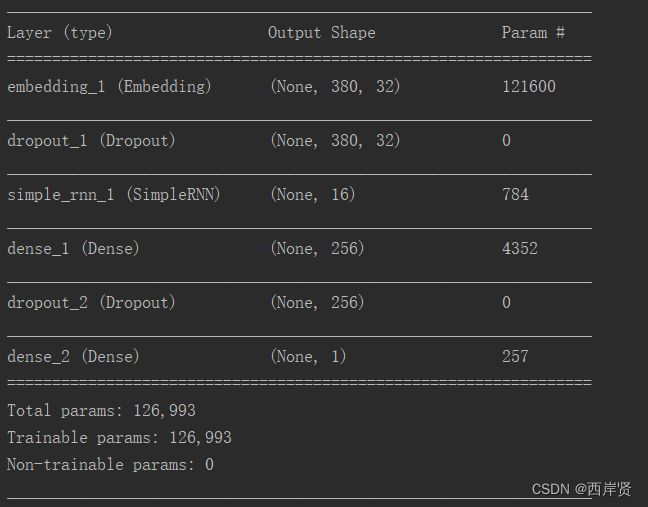
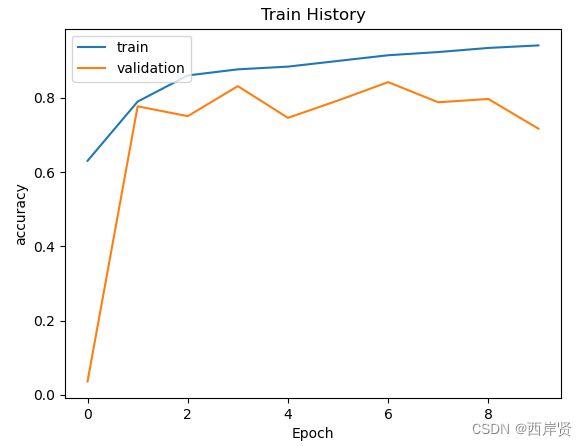
递归神经网络模型准确率随学习周期变化的折线图。
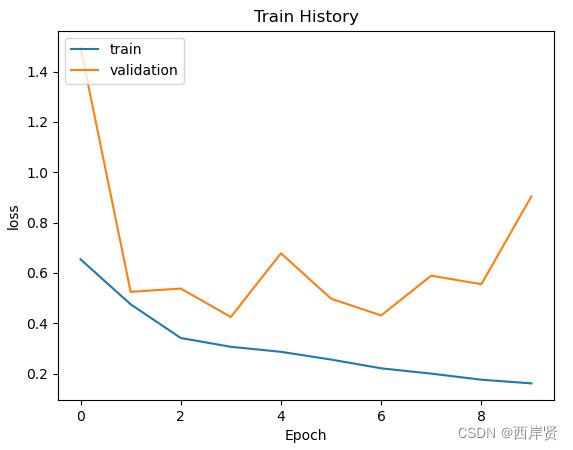
递归神经网络模型损失函数值随学习周期变化的折线图。
递归神经网络模型最终的测试损失函数值和测试准确率。

3.长短期记忆模型运行结果
长短期记忆模型参数训练的情况如下图所示。

长短期记忆模型准确率随学习周期变化的折线图。

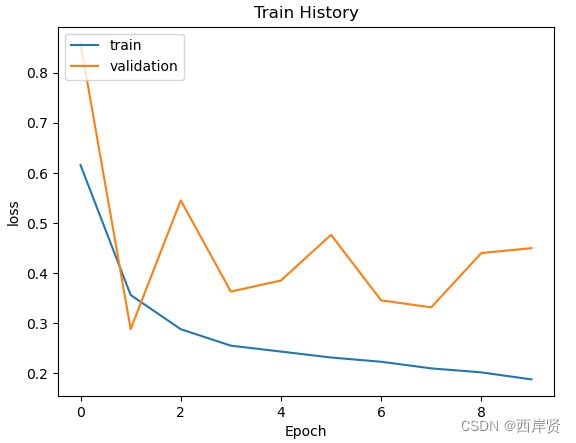
长短期记忆模型损失函数值随学习周期变化的折线图。
长短期记忆模型最终的测试损失函数值和测试准确率。

通过这几个模型的实验结果,多层感知器模型的测试准确率为82.01%,递归神经网络模型的测试准确率为82.79%,长短期记忆模型的测试准确率为86.39%,其中长短期记忆模型的测试准确率是三种模型中最高的。
五、遇到的问题
在环境中安装tensorflow时,直接使用下面命令安装时不太行,Solving environment一直在转动,不会出现done。
conda install tensorflow
所以我先使用下面的命令检查所有的tensorflow版本。
anaconda show anaconda/tensorflow
输出结果如下图所示。

再选择和自己python版本相兼容的tensorflow版本进行安装,命令如下。
conda install --channel https://conda.anaconda.org/anaconda tensorflow=2.1.0
第二个错误是运行程序后出现错误:Warning! HDF5 library version mismatched error
解决方法:先后使用下面两条命令,先卸载h5py,再安装与环境兼容的h5py版本。
pip uninstall h5py
pip install h5py
总结
以上就是基于IMDB评论数据集情感分析的所有内容了,找到合适的开源代码并配置正确的环境是在自己电脑上成功运行代码的关键一环,希望本文对你的学习有所帮助!
参考网址:
TensorFlow 百度百科
Keras 百度百科
IMDb网络电影数据集处理与LSTM情感分析
参考代码:点此跳转