基于PyQT5制作一个二维码生成器
这篇文章主要介绍了利用PyQT5制作一个简单的二维码生成器,并打包成exe可执行程序。文中的示例代码讲解详细,感兴趣的同学可以了解一下。编程学习资料点击领取
个性化二维码的exe桌面应用的获取方式我放在文章最后面了,注意查收。通过执行打包后的exe应用程序可以直接运行生成个性化二维码。
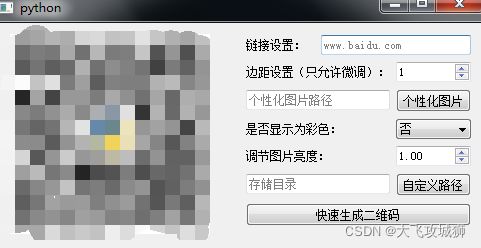
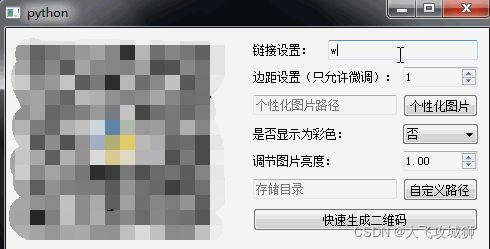
开始之前先来看一下通过二维码生成器是如何生成个性化二维码的。
其中使用的python包和之前的GUI应用制作使用的模块是一样的。
| 1 2 3 4 5 6 7 8 9 10 11 12 |
|
这里的images模块是用于解决打包应用时外部图片的引用不能生效的问题。后面的一篇文章中将会说明如何将外部资源打包到exe的应用中去。
做GUI的桌面应用,首先还是使用pyqt5进行界面的布局和界面组件的添加,虽然代码量看起来比较多,但逻辑不多。
| 1 2 3 4 5 6 7 8 9 10 11 12 13 14 15 16 17 18 19 20 21 22 23 24 25 26 27 28 29 30 31 32 33 34 35 36 37 38 39 40 41 42 43 44 45 46 47 48 49 50 51 52 53 54 55 56 57 58 59 60 61 62 63 64 65 66 67 68 69 70 71 72 73 74 75 76 77 78 79 80 81 82 83 |
|
用到的槽函数有三个,一个是为了做选择背景图片、第二个是为了做选择要存储生成后的文件存放路径可以自由选择存放到什么地方、第三个是为了做调起生成二维码的函数。
第一个来看一下如何通过关联槽函数来实现读取需要作为个性化二维码的背景图片。
| 1 2 3 4 5 6 7 8 9 10 |
|
第二个就是选择存储文件路径的槽函数。
| 1 2 3 4 5 6 |
|
是通过dialog对话框的形式获取到自定义选择的存储文件路径。
第三个槽函数就是为了生成个性化二维码,其实二维码的生成部分只有一句代码。那就是MYQR模块提供的run函数,通过这个函数就能实现个性化二维码的生成。
首先,需要导入MYQR这个库。
| 1 |
|
为了可以看清楚后面二维码生成函数(run函数),先来看一下这个库提供的run函数都有什么参数。
| 1 2 3 4 5 6 7 8 9 10 11 12 |
|
下面看一下这个具体生成个性化二维码的槽函数。除了二维码的生成部分和需要将生成后的二维码放到应用的页面上展示之外,其他主要就是一些参数的校验方法。
| 1 2 3 4 5 6 7 8 9 10 11 12 13 14 15 16 17 18 19 20 21 22 23 24 25 26 27 28 29 30 31 32 33 34 35 36 37 38 39 40 41 |
|
到此这篇关于基于PyQT5制作一个二维码生成器的文章就介绍到这了。