YOLOv5 使用入门
YOLOv5 使用入门
- 1. 源码准备
- 2. 例子
- 3. 运行
1. 源码准备
在很早之前,在 《深度学习笔记(40) YOLO》 提及到 YOLO 目标检测
$ git clone https://github.com/ultralytics/yolov5
然后就进入该文件夹,安装依赖包
$ cd yolov5
$ pip3 install -r requirements.txt
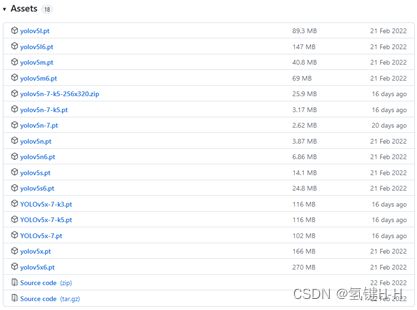
默认使用的 yolov5s.pt,可以提前下载后放置在 \weights 文件夹下

2. 例子
官方里给的使用多种来源数据的检测目标的例子:
$ python detect.py --source 0  # webcam
                           img.jpg  # image
                           vid.mp4  # video
                           path/  # directory
                           path/*.jpg  # glob
                           'https://youtu.be/Zgi9g1ksQHc'  # YouTube
                           'rtsp://example.com/media.mp4'  # RTSP, RTMP, HTTP stream
那么先来查看 detect.py 文件:
if __name__ == "__main__":
    opt = parse_opt()
    main(opt)
parse_opt 是关于参数的设置
def parse_opt():
    parser = argparse.ArgumentParser()
    parser.add_argument('--weights', nargs='+', type=str, default=ROOT / 'yolov5s.pt', help='model path(s)')
    parser.add_argument('--source', type=str, default=ROOT / 'data/images', help='file/dir/URL/glob, 0 for webcam')
    parser.add_argument('--data', type=str, default=ROOT / 'data/coco128.yaml', help='(optional) dataset.yaml path')
    parser.add_argument('--imgsz', '--img', '--img-size', nargs='+', type=int, default=[640], help='inference size h,w')
    parser.add_argument('--conf-thres', type=float, default=0.25, help='confidence threshold')
    parser.add_argument('--iou-thres', type=float, default=0.45, help='NMS IoU threshold')
    parser.add_argument('--max-det', type=int, default=1000, help='maximum detections per image')
    parser.add_argument('--device', default='', help='cuda device, i.e. 0 or 0,1,2,3 or cpu')
    parser.add_argument('--view-img', action='store_true', help='show results')
    parser.add_argument('--save-txt', action='store_true', help='save results to *.txt')
    parser.add_argument('--save-conf', action='store_true', help='save confidences in --save-txt labels')
    parser.add_argument('--save-crop', action='store_true', help='save cropped prediction boxes')
    parser.add_argument('--nosave', action='store_true', help='do not save images/videos')
    parser.add_argument('--classes', nargs='+', type=int, help='filter by class: --classes 0, or --classes 0 2 3')
    parser.add_argument('--agnostic-nms', action='store_true', help='class-agnostic NMS')
    parser.add_argument('--augment', action='store_true', help='augmented inference')
    parser.add_argument('--visualize', action='store_true', help='visualize features')
    parser.add_argument('--update', action='store_true', help='update all models')
    parser.add_argument('--project', default=ROOT / 'runs/detect', help='save results to project/name')
    parser.add_argument('--name', default='exp', help='save results to project/name')
    parser.add_argument('--exist-ok', action='store_true', help='existing project/name ok, do not increment')
    parser.add_argument('--line-thickness', default=3, type=int, help='bounding box thickness (pixels)')
    parser.add_argument('--hide-labels', default=False, action='store_true', help='hide labels')
    parser.add_argument('--hide-conf', default=False, action='store_true', help='hide confidences')
    parser.add_argument('--half', action='store_true', help='use FP16 half-precision inference')
    parser.add_argument('--dnn', action='store_true', help='use OpenCV DNN for ONNX inference')
    opt = parser.parse_args()
    opt.imgsz *= 2 if len(opt.imgsz) == 1 else 1  # expand
    print_args(vars(opt))
    return opt
| 参数 | 说明 |
|---|---|
| –weights | 权重文件的路径地址 |
| –source | 数据来源 图片/视频路径,也可以是’0’(摄像头),也可以是rtsp等视频流 |
| –data | 数据集 |
| –imgsz | 网络输入图片大小。在处理过程中的图像尺寸,不同权重参数推荐的也不同,以“6”为结尾的权重推荐设置为1280 |
| –conf-thres | 置信度阈值,越大标注框越少 |
| –iou-thres | 交并比阈值,越大所得的重叠框越多 |
| –max-det | 一张图片中最多的检测个数 |
| –device | 所用设备,如CPU或GPU,程序为自动选择 |
| –view-img | 是否展示预测之后的图片/视频,默认False |
| –save-txt | 是否将预测的框坐标以txt文件形式保存,默认False |
| –save-conf | 是否保存置信度值在–save-txt文件夹中 |
| –save-crop | 是否保存裁剪的预测框,默认False |
| –nosave | 是否不保存预测结果,默认False,即默认是将预测结果保存的 |
| –classes | 设置只保留某一部分类别,形如0或者0 2 3 |
| –agnostic-nms | 进行nms是否也去除不同类别之间的框,默认False |
| –augment | 推理的时候进行多尺度,翻转等操作(TTA)推理 |
| –visualize | 可视化特征,默认False |
| –update | 如果为True,则对所有模型进行strip_optimizer操作,去除pt文件中的优化器等信息,默认为False |
| –project | 预测结果的存储路径,默认在runs/detect目录下 |
| –name | 预测结果的存储路径下的文件夹名,默认exp |
| –exist-ok | 若设置该参数,则在相同文件夹下生成文件 |
| –line-thickness | 标注狂的厚度 |
| –hide-labels | 隐藏标签 |
| –hide-conf | 隐藏置信度 |
| –half | 采用FP16半精度推理 |
| –dnn | 使用OpenCV DNN进行ONNX推断 |
然后进入主函数 main
def main(opt):
    check_requirements(exclude=('tensorboard', 'thop'))
    run(**vars(opt))
如果想要加快加载过程的话,确保环境安装ok的情况下屏蔽了依赖检查
3. 运行
这里采用摄像头作为数据输入,权重设置为 yolov5s.pt,置信度阈值为0.5
只检测人类,在 detect.py 文件中数据集默认为 data/coco128.yaml,查看其文件
# Classes
nc: 80  # number of classes
names: ['person', 'bicycle', 'car', 'motorcycle', 'airplane', 'bus', 'train', 'truck', 'boat', 'traffic light',
        'fire hydrant', 'stop sign', 'parking meter', 'bench', 'bird', 'cat', 'dog', 'horse', 'sheep', 'cow',
        'elephant', 'bear', 'zebra', 'giraffe', 'backpack', 'umbrella', 'handbag', 'tie', 'suitcase', 'frisbee',
        'skis', 'snowboard', 'sports ball', 'kite', 'baseball bat', 'baseball glove', 'skateboard', 'surfboard',
        'tennis racket', 'bottle', 'wine glass', 'cup', 'fork', 'knife', 'spoon', 'bowl', 'banana', 'apple',
        'sandwich', 'orange', 'broccoli', 'carrot', 'hot dog', 'pizza', 'donut', 'cake', 'chair', 'couch',
        'potted plant', 'bed', 'dining table', 'toilet', 'tv', 'laptop', 'mouse', 'remote', 'keyboard', 'cell phone',
        'microwave', 'oven', 'toaster', 'sink', 'refrigerator', 'book', 'clock', 'vase', 'scissors', 'teddy bear',
        'hair drier', 'toothbrush']  # class names
person人类的序号为0,那么就可以这样运行:
python detect.py --source 0 --weights weights/yolov5s.pt --conf-thres 0.5 --classes 0
一般要的就是目标的类型、位置和置信度,查看源码158-171,把相关信息写入文件保存的代码:
# Write results
for *xyxy, conf, cls in reversed(det):
    if save_txt:  # Write to file
        xywh = (xyxy2xywh(torch.tensor(xyxy).view(1, 4)) / gn).view(-1).tolist()  # normalized xywh
        line = (cls, *xywh, conf) if save_conf else (cls, *xywh)  # label format
        with open(f'{txt_path}.txt', 'a') as f:
            f.write(('%g ' * len(line)).rstrip() % line + '\n')

    if save_img or save_crop or view_img:  # Add bbox to image
        c = int(cls)  # integer class
        label = None if hide_labels else (names[c] if hide_conf else f'{names[c]} {conf:.2f}')
        annotator.box_label(xyxy, label, color=colors(c, True))
    if save_crop:
        save_one_box(xyxy, imc, file=save_dir / 'crops' / names[c] / f'{p.stem}.jpg', BGR=True)
可以看出,类型为cls ,位置信息为xywh,置信度为 conf
利用源码的图片检测
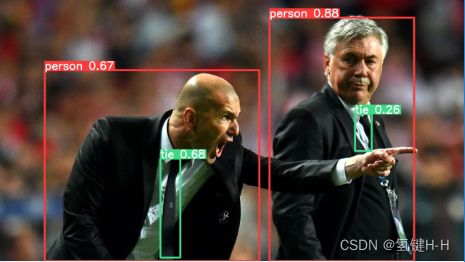
$ python detect.py --source=data/images/zidane.jpg --weights=weights/yolov5s.pt
将其数据显示:
LOGGER.info("cls:{}, xywh:{}, conf:{:.2f}".format(int(cls),(xyxy2xywh(torch.tensor(xyxy).view(1, 4)) / gn).view(-1).tolist(), conf))
得到齐祖和安胖,以及他们的Tie
cls:0, xywh:[0.32734376192092896, 0.6340277791023254, 0.4625000059604645, 0.7319444417953491], conf:0.67
cls:27, xywh:[0.3667968809604645, 0.7965278029441833, 0.04296875, 0.3791666626930237], conf:0.68
cls:0, xywh:[0.736328125, 0.5333333611488342, 0.31171876192092896, 0.9333333373069763], conf:0.88
cls:27, xywh:[0.7828124761581421, 0.5069444179534912, 0.03593749925494194, 0.14166666567325592], conf:0.26
谢谢


