ubuntu16.04+opencv3.4.5实现深度学习目标检测
ubuntu16.04+opencv3.4.5实现深度学习目标检测
- 前言
- 一、如何在ubuntu16.04环境下安装opencv3.4.5
-
- 1.首先下载opencv
- 2.安装
- 二、使用例程
-
- 1.进入目标文件夹
- 2.实现例程
- 三、使用opencv加载caffe深度学习框架,实现动态目标检测
-
- 1.进入目标文件夹
- 2.CMakeLists.txt
- 3.dnn_ssd_video.cpp
- 4.MobileNetSSD_deploy.caffemodel与MobileNetSSD_deploy.prototxt
- 4.最终效果
- 总结
前言
本文针对以下目标人群:
(1)安装了ros,由于ros自带opencv3.3.1,有时需要对opencv进行升级,以达到更强大的功能,同时不影响ros的使用
(2)部分已经在win10+vs环境下实现基于opencv+dnn 目标检测的朋友,想在linux环境下使用
下面将介绍如何实现
一、如何在ubuntu16.04环境下安装opencv3.4.5
实际上安装其他版本也是可以的,比如opencv4.4.5等
1.首先下载opencv
(1)官网下载地址:https://github.com/opencv/opencv/archive/3.4.5.zip
下载后为zip压缩包,解压后放到HOME文件夹下
(2)下载速度慢,可以参考https://www.bzblog.online/wordpress/index.php/2020/03/09/opencvdownload/
2.安装
参考https://www.cnblogs.com/Shuqing-cxw/p/9195303.html 解压后在home文件夹下看到opencv3.4.5 1.进入opencv3.4.5文件夹cd opencv3.4.5
2.安装cmake
sudo apt-get install cmake
3.安装依赖库
sudo apt-get install build-essential libgtk2.0-dev libavcodec-dev libavformat-dev libjpeg.dev libtiff4.dev libswscale-dev libjasper-dev
4.创建编译目录(release)并进入
mkdir release && cd release
5.cmake配置编译
cmake -D CMAKE_BUILD_TYPE=RELEASE -D CMAKE_INSTALL_PREFIX=/usr/local -D WITH_TBB=ON -D BUILD_NEW_PYTHON_SUPPORT=ON -D WITH_V4L=ON -D WITH_QT=ON -D WITH_OPENGL=ON ..
6.make编译
make -j4
7.安装
sudo make install
8.环境配置添加库路径(方式一)
sudo /bin/bash -c 'echo "/usr/local/lib" > /etc/ld.so.conf.d/opencv.conf'
9.环境配置添加库路径(方式二)
sudo gedit /etc/ld.so.conf.d/opencv.conf
//打开后可能是空文件,在文件内容最后添加
/usr/local/lib
10.更新系统库
sudo ldconfig
11.配置bash,执行如下命令
sudo gedit /etc/bash.bashrc
//在末尾添加
PKG_CONFIG_PATH=$PKG_CONFIG_PATH:/usr/local/lib/pkgconfig
export PKG_CONFIG_PATH
12.保存退出,然后执行如下命令使得配置生效
sudo source /etc/bash.bashrc
//激活配置然后更新database
sudo updatedb
二、使用例程
1.进入目标文件夹
如图所示,在该文件夹下操作下一步
cd /home/“你的文件名”/opencv-3.4.5/samples/cpp/example_cmake
2.实现例程
代码如下(示例):
cmake .
make
./opencv_example
三、使用opencv加载caffe深度学习框架,实现动态目标检测
1.进入目标文件夹
直接启动终端,创建文件夹,并在该文件夹下操作
mkdir good && cd good
 该文件夹下有五个文件分別为01.mp4(如果使用摄像头,可不用该文件),CMakeLists.txt,dnn_ssd_video.cpp,MobileNetSSD_deploy.caffemodel,MobileNetSSD_deploy.prototxt
2.CMakeLists.txt
我们知道makefile是在Linux编译c或者c++代码的时候的一种脚本文件,但是每一个功能都要写一个makefile文件,这样如果这个工程很大,而且相关性比较强的话,makefile的书写就会变得相对繁琐,更要命的是如果以后需要添加新的功能或者是新人需要修改功能的话,看起来就会特别麻烦;因为介于此,cmake的出现就是为了解决这样的问题,cmake的入门相当容易,而且管理也特别方便简单,那我们开始吧。
cmake的所有语句都写在一个CMakeLists.txt的文件中,CMakeLists.txt文件确定后,直接使用cmake命令进行运行,但是这个命令要指向CMakeLists.txt所在的目录,cmake之后就会产生我们想要的makefile文件,然后再直接make就可以编译出我们需要的结果了。更简单的解释就是cmake是为了生成makefile而存在,这样我们就不需要再去写makefile了,只需要写简单的CMakeLists.txt即可。
原文链接:https://blog.csdn.net/u013896064/article/details/82874152
# cmake needs this line
cmake_minimum_required(VERSION 2.8)

# Define project name
project(opencv_example_project)

# Find OpenCV, you may need to set OpenCV_DIR variable
# to the absolute path to the directory containing OpenCVConfig.cmake file
# via the command line or GUI
#find_package(OpenCV REQUIRED)
set(OpenCV_DIR /usr/local/share/OpenCV)
# If the package has been found, several variables will
# be set, you can find the full list with descriptions
# in the OpenCVConfig.cmake file.
# Print some message showing some of them
message(STATUS "OpenCV library status:")
message(STATUS "    version: ${OpenCV_VERSION}")
message(STATUS "    libraries: ${OpenCV_LIBS}")
message(STATUS "    include path: ${OpenCV_INCLUDE_DIRS}")
find_package(OpenCV QUIET COMPONENTS core highgui imgproc imgcodecs videoio dnn)
if(CMAKE_VERSION VERSION_LESS "2.8.11")
  # Add OpenCV headers location to your include paths
  include_directories(${OpenCV_INCLUDE_DIRS})
endif()

# Declare the executable target built from your sources
add_executable(opencv_example dnn_ssd_video.cpp)

# Link your application with OpenCV libraries
target_link_libraries(opencv_example ${OpenCV_LIBS})
3.dnn_ssd_video.cpp
代码如下(示例):
#include 4.MobileNetSSD_deploy.caffemodel与MobileNetSSD_deploy.prototxt
MobileNetSSD_deploy.caffemodel后缀名为.caffemodel,为模型文件,存储了模型权重的相关参数和具体信息。
MobileNetSSD_deploy.prototxt后缀名为.prototxt,为配置文件,存储了网络图。
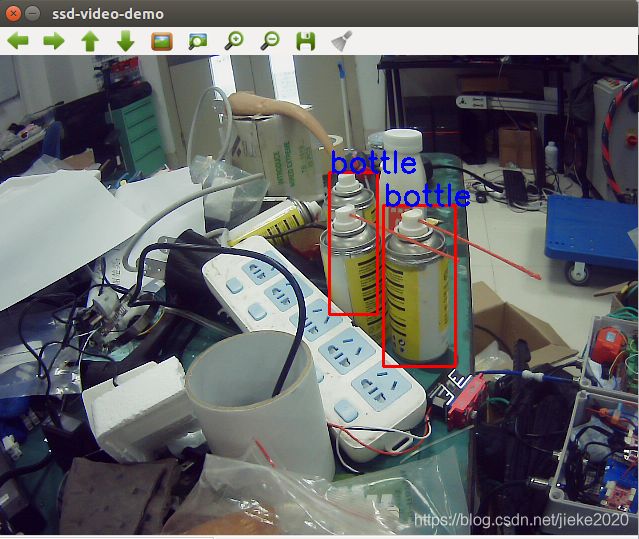
4.最终效果
和例程一样,只需要执行下面的流程,即可看到动态目标检测效果
cmake .
make
./opencv_example
(https://img-blog.csdnimg.cn/20210626165722313.png?x-oss-process=image/watermark,type_ZmFuZ3poZW5naGVpdGk,shadow_10,text_aHR0cHM6Ly9ibG9nLmNzZG4ubmV0L2ppZWtlMjAyMA==,size_16,color_FFFFFF,t_70)
总结
我在这一过程出现了很多问题,其中最大的问题就是如何编译c++源代码。我一开始是在vs17+opencv环境下使用的。在vs环境下配置编译环境很容易,但是在ubantu下就没有那么容易了。我一开始编译出了很多错误,后来通过看例程差++源代码和cmakelist.txt,才最终解决问题。
**

