jQuery 图片剪裁插件使用之 imgAreaSelect
插件主页:http://odyniec.net/projects/imgareaselect/
官方网站上说明支持的浏览器:The plugin works in all major browsers, including Firefox 2+, Opera 9.5+, Google Chrome, Safari 3+, and Internet Explorer 6+.
插件的主要功能包括:
1. 可以选取固定比例 或 任意比例的选区
2. 可以设置选区的长宽最大最小限值
3. 可以设默认显示初始选区
4. 可以用鼠标移动选区的位置,不能移出原始图片的范围
5. 可以用鼠标对选区进行缩放 ( 鼠标按住8个点 ( handles: true ) 其中1点不放移动:左上、左、左下、右上、右、右下 )
6. 可以显示选区预览图
7. 可以显示选区的各点 ( 左上和右下 ) 坐标和长度与宽度
下载的插件包大小 56.4 k,插件包中不含 demo,只包含 css 文件夹、 script 文件夹和两个 LICENSE 文件。
一.创建demo:
在根目录下创建demo.html ,在头部链接引入 css 文件和 js 文件
  <link rel="stylesheet" type="text/css" href="css/imgareaselect-default.css" />

  <script type="text/javascript" src="scripts/jquery.min.js"></script>

  <script type="text/javascript" src="scripts/jquery.imgareaselect.js"></script>
注:插件包中所带的 jquery 版本为 jQuery v1.9.0
html 结构包括 原图、选区缩略图和信息。原图和选区预览图:
<!-- 原图 -->

<div>

     <img id="photo" src="images/pic3.jpg"/>

</div>


<!-- 选区预览图 -->

<div id="preview" style="width: 100px; height: 100px; overflow: hidden;">

     <img style="position: relative;">

</div>
信息,包括选区起点和终点的横纵坐标、选区的长度和高度:
<table style="margin-top: 1em;">

          <thead>

            <tr>

              <th colspan="2" style="font-size: 110%; font-weight: bold; text-align: left; padding-left: 0.1em;">

                坐标

              </th>

              <th colspan="2" style="font-size: 110%; font-weight: bold; text-align: left; padding-left: 0.1em;">

                尺寸

              </th>

            </tr>

          </thead>

          <tbody>

            <tr>

              <td style="width: 10%;"><b>X<sub>1</sub>:</b></td>

                  <td style="width: 30%;"><input type="text" id="x1" value="-"></td>

                  <td style="width: 20%;"><b>Width:</b></td>

                <td><input type="text" value="-" id="w"></td>

            </tr>

            <tr>

              <td><b>Y<sub>1</sub>:</b></td>

              <td><input type="text" id="y1" value="-"></td>

              <td><b>Height:</b></td>

              <td><input type="text" id="h" value="-"></td>

            </tr>

            <tr>

              <td><b>X<sub>2</sub>:</b></td>

              <td><input type="text" id="x2" value="-"></td>

              <td></td>

              <td></td>

            </tr>

            <tr>

              <td><b>Y<sub>2</sub>:</b></td>

              <td><input type="text" id="y2" value="-"></td>

              <td></td>

              <td></td>

            </tr>

          </tbody>

</table>
js 设置:
 1 <script type="text/javascript">

 2

 3     function preview(img, selection) {

 4         if (!selection.width || !selection.height)

 5             return;

 6

 7         //预览图尺寸等比例缩放,以100为临界,当在原图中选定的区域大于100px时,预览图中图像缩小;当在原图中选定的区域小于100px时,预览图中图像放大;selection为选区

 8         var scaleX = 100 / selection.width;

 9         var scaleY = 100 / selection.height;

10

11         $('#preview img').css({

12             width: Math.round(scaleX * 400), //原图宽400

13             height: Math.round(scaleY * 300), //原图高300

14             marginLeft: -Math.round(scaleX * selection.x1),

15             marginTop: -Math.round(scaleY * selection.y1)

16         });

17

18         $('#x1').val(selection.x1);

19         $('#y1').val(selection.y1);

20         $('#x2').val(selection.x2);

21         $('#y2').val(selection.y2);

22         $('#w').val(selection.width);

23         $('#h').val(selection.height);

24     }

25

26     $(function () {

27

28         //onSelectChange: preview 使用缩略图

29         //模式一.选区宽高比为1:1

30         //$('#photo').imgAreaSelect({ aspectRatio: '1:1', handles: true, fadeSpeed: 200, onSelectChange: preview });

31

32         //模式二.选区最大宽度200,最大高度150

33         //$('#photo').imgAreaSelect({ maxWidth: 200, maxHeight: 150, handles: true, fadeSpeed: 200, onSelectChange: preview });

34

35         //模式三.选区的起点和终点初始坐标

36         //$('#photo').imgAreaSelect({ x1: 116, y1: 77, x2: 276, y2: 237, aspectRatio: '1:1', handles: true, fadeSpeed: 200, onSelectChange: preview });

37

38         //模式四.任意尺寸的选区

39         $('#photo').imgAreaSelect({ handles: true, fadeSpeed: 200, onSelectChange: preview });

40

41         //缩略图的图片

42         $("#preview img").attr("src",$("#photo").attr("src"));

43     });

44 </script>
二. 预览图的成像原理:
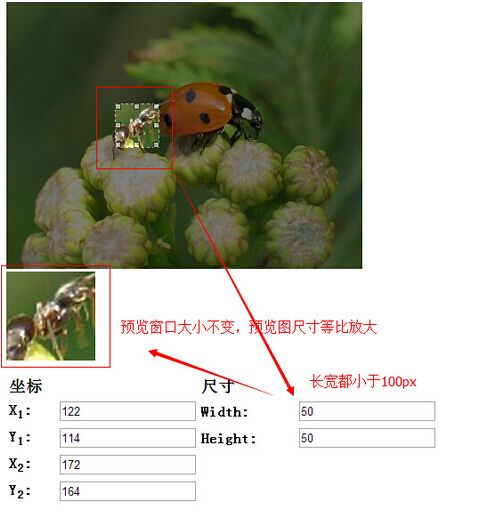
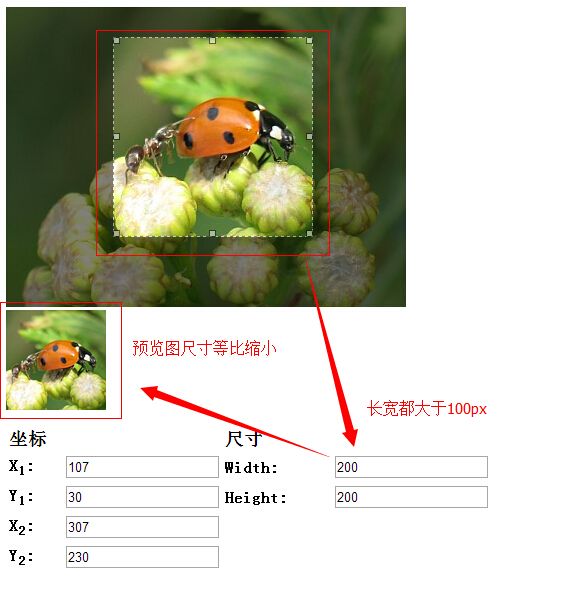
在 html 中,预览窗口的宽度和高度设各置成了 100px ,scaleX 和 scaleY 分别表示预览窗口中图像的缩放比例,以预览窗口的长和高的缩放比等于 100px 除以 原始图像上选区的长和宽,这样当选区的长和宽小于 100px 时,预览图片会被等比放大
$('#preview img').css({

        width: Math.round(scaleX * 400), //原图宽400

        height: Math.round(scaleY * 300), //原图高300

        marginLeft: -Math.round(scaleX * selection.x1),

        marginTop: -Math.round(scaleY * selection.y1)

});
当选区的长和宽大于 100px 时,预览图片会被等比缩小:
三. 在 js 中,可以设置 4 种选区模式:
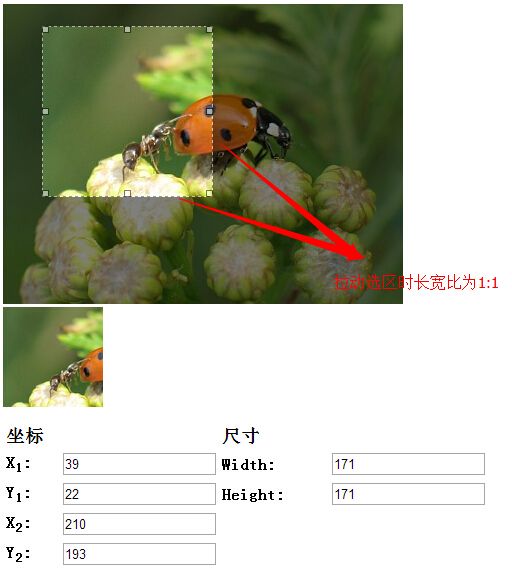
1. 固定选区长宽比,可以设置成 1:1 , 4:3 等模式,如图:
2. 设置选区的最大 ( 最小 ) 宽度和最大 ( 最小 ) 高度
3. 初始时默认显示选区,并给定初始选区的各点 ( 左上和右下 ) 坐标
4. 选取任意尺寸的选区
完整demo.html:

  1 <!DOCTYPE html>

  2 <html>

  3 <head>

  4 <meta charset="utf-8">

  5 <title>imgAreaSelect demo1</title>

  6   <link rel="stylesheet" type="text/css" href="css/imgareaselect-default.css" />

  7   <script type="text/javascript" src="scripts/jquery-1.8.3.min.js"></script>

  8   <script type="text/javascript" src="scripts/jquery.imgareaselect.js"></script>

  9

 10   <script type="text/javascript">

 11

 12     function preview(img, selection) {

 13         if (!selection.width || !selection.height)

 14             return;

 15

 16         //预览图尺寸等比例缩放,以100为临界,当在原图中选定的区域大于100px时,预览图中图像缩小;当在原图中选定的区域小于100px时,预览图中图像放大;

 17         var scaleX = 100 / selection.width;

 18         var scaleY = 100 / selection.height;

 19

 20         $('#preview img').css({

 21             width: Math.round(scaleX * 400), //原图宽400

 22             height: Math.round(scaleY * 300), //原图高300

 23             marginLeft: -Math.round(scaleX * selection.x1),

 24             marginTop: -Math.round(scaleY * selection.y1)

 25         });

 26

 27         $('#x1').val(selection.x1);

 28         $('#y1').val(selection.y1);

 29         $('#x2').val(selection.x2);

 30         $('#y2').val(selection.y2);

 31         $('#w').val(selection.width);

 32         $('#h').val(selection.height);

 33     }

 34

 35     $(function () {

 36

 37         //onSelectChange: preview 使用缩略图

 38         //选区宽高比为1:1

 39         //$('#photo').imgAreaSelect({ aspectRatio: '1:1', handles: true, fadeSpeed: 200, onSelectChange: preview });

 40

 41         //选区最大宽度200,最大高度150

 42         //$('#photo').imgAreaSelect({ maxWidth: 200, maxHeight: 150, handles: true, fadeSpeed: 200, onSelectChange: preview });

 43

 44         //选区的起点和终点初始坐标

 45         //$('#photo').imgAreaSelect({ x1: 116, y1: 77, x2: 276, y2: 237, aspectRatio: '1:1', handles: true, fadeSpeed: 200, onSelectChange: preview });

 46

 47         //任意尺寸的选区

 48         $('#photo').imgAreaSelect({ handles: true, fadeSpeed: 200, onSelectChange: preview });

 49

 50         //缩略图的图片

 51         $("#preview img").attr("src",$("#photo").attr("src"));

 52     });

 53 </script>

 54 </head>

 55

 56 <body>

 57

 58     <div id="container">

 59

 60         <!-- 原图 -->

 61         <div>

 62             <img id="photo" src="images/pic3.jpg"/>

 63         </div>

 64

 65         <!-- 选区缩略图 -->

 66         <div id="preview" style="width: 100px; height:100px; overflow: hidden;">

 67             <img style="position: relative;">

 68         </div>

 69

 70         <!-- 信息 -->

 71         <table style="margin-top: 1em;">

 72           <thead>

 73             <tr>

 74               <th colspan="2" style="font-size: 110%; font-weight: bold; text-align: left; padding-left: 0.1em;">

 75                 坐标

 76               </th>

 77               <th colspan="2" style="font-size: 110%; font-weight: bold; text-align: left; padding-left: 0.1em;">

 78                 尺寸

 79               </th>

 80             </tr>

 81           </thead>

 82           <tbody>

 83             <tr>

 84               <td style="width: 10%;"><b>X<sub>1</sub>:</b></td>

 85                   <td style="width: 30%;"><input type="text" id="x1" value="-"></td>

 86                   <td style="width: 20%;"><b>Width:</b></td>

 87                 <td><input type="text" value="-" id="w"></td>

 88             </tr>

 89             <tr>

 90               <td><b>Y<sub>1</sub>:</b></td>

 91               <td><input type="text" id="y1" value="-"></td>

 92               <td><b>Height:</b></td>

 93               <td><input type="text" id="h" value="-"></td>

 94             </tr>

 95             <tr>

 96               <td><b>X<sub>2</sub>:</b></td>

 97               <td><input type="text" id="x2" value="-"></td>

 98               <td></td>

 99               <td></td>

100             </tr>

101             <tr>

102               <td><b>Y<sub>2</sub>:</b></td>

103               <td><input type="text" id="y2" value="-"></td>

104               <td></td>

105               <td></td>

106             </tr>

107           </tbody>

108         </table>

109

110     </div>

111

112 </body>

113 </html>
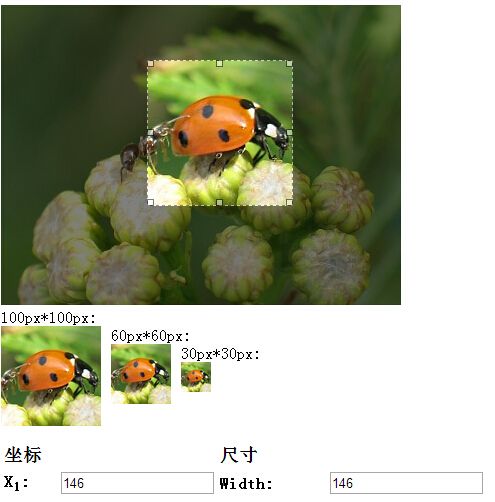
四 . 如果需要多个尺寸的预览窗口 ( 比如 100px * 100px , 60px * 60px , 30px * 30px ),则可以设置多种缩放比例:
var scaleX = 100 / selection.width;

var scaleY = 100 / selection.height;


var scale2X = 60 / selection.width;

var scale2Y = 60 / selection.height;


var scale3X = 30 / selection.width;

var scale3Y = 30 / selection.height;
然后 html 和 css 分别设置每个窗口即可:
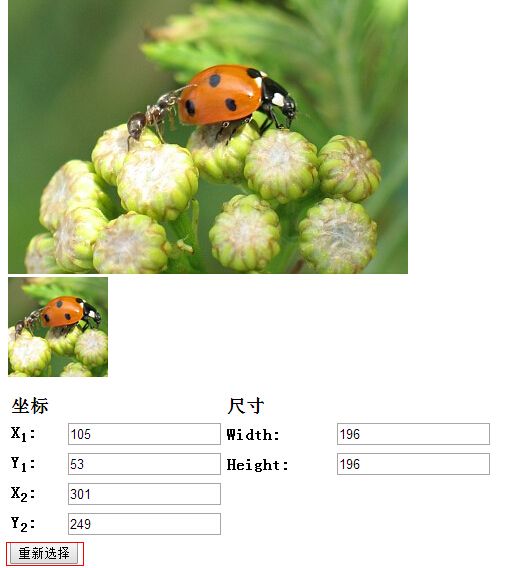
五. 重新选择选区
html 增加:
<!-- 重置选区 -->

<input type="button" id="reselect" value="重新选择" />
js $(function(){}) 中增加:
//重新选择

$("#reselect").click(function(){


        $('#photo').data('imgAreaSelect').remove();

        $('#photo').removeData('imgAreaSelect');

        $('#photo').imgAreaSelect({ aspectRatio: '1:1', handles: true, fadeSpeed: 200, onSelectChange: preview });

});
如图:
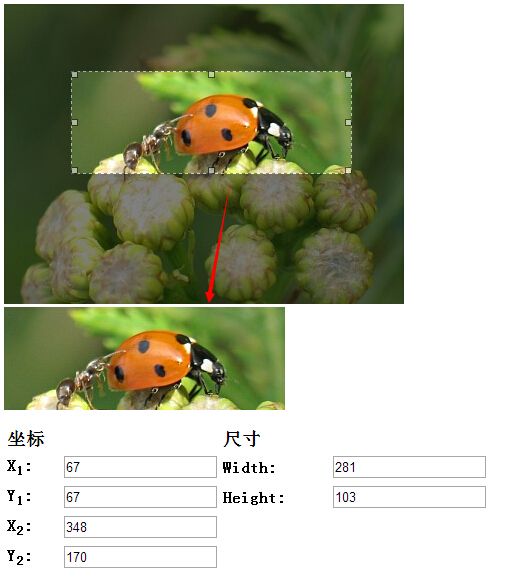
六 . 此插件的选区预览图只能在确定长宽比的情况下正常预览,在截取任意尺寸的选区时将得不到正确比例的预览图,如果要实现任意长宽比的选区都能正常显示,可以修改代码:
预览图部分 html:
<!-- 选区预览图 -->

<div id="preview" style="display:none; overflow: hidden;">

    <img style="position: relative;">

</div>
初始的预览图外围 div 设置了 display:none
js 的 preview() 函数修改如下:
 1 function preview(img, selection) {

 2         if (!selection.width || !selection.height)

 3             return;

 4

 5         $('#preview img').css({

 6

 7              marginLeft: -Math.round(selection.x1),

 8              marginTop: -Math.round(selection.y1)

 9         });

10

11         $("#preview").css({"width":selection.width,"height":selection.height}).show();

12

13         $('#x1').val(selection.x1);

14         $('#y1').val(selection.y1);

15         $('#x2').val(selection.x2);

16         $('#y2').val(selection.y2);

17         $('#w').val(selection.width);

18         $('#h').val(selection.height);

19 }
把预览图尺寸等比缩放的语句删除,预览图的上边距和左边距分别是选区左上角的横纵坐标,然后设置预览图外围 div 的宽度和高度直接设置为选区的宽度和高度并且显示,此时并不固定比例的选区的预览图也能正常预览,如图:
此时的完整 demo.html:

  1 <!DOCTYPE html>

  2 <html>

  3 <head>

  4 <meta charset="utf-8">

  5 <title>imgAreaSelect demo1</title>

  6   <link rel="stylesheet" type="text/css" href="css/imgareaselect-default.css" />

  7   <script type="text/javascript" src="scripts/jquery-1.8.3.min.js"></script>

  8   <script type="text/javascript" src="scripts/jquery.imgareaselect.js"></script>

  9

 10   <script type="text/javascript">

 11

 12     function preview(img, selection) {

 13         if (!selection.width || !selection.height)

 14             return;

 15

 16         $('#preview img').css({

 17

 18              marginLeft: -Math.round(selection.x1),

 19              marginTop: -Math.round(selection.y1)

 20         });

 21

 22         $("#preview").css({"width":selection.width,"height":selection.height}).show();

 23

 24         $('#x1').val(selection.x1);

 25         $('#y1').val(selection.y1);

 26         $('#x2').val(selection.x2);

 27         $('#y2').val(selection.y2);

 28         $('#w').val(selection.width);

 29         $('#h').val(selection.height);

 30     }

 31

 32     $(function () {

 33

 34         //onSelectChange: preview 使用缩略图

 35         //选区宽高比为1:1

 36         //$('#photo').imgAreaSelect({ aspectRatio: '1:1', handles: true, fadeSpeed: 200, onSelectChange: preview });

 37

 38         //选区最大宽度200,最大高度150

 39         //$('#photo').imgAreaSelect({ maxWidth: 200, maxHeight: 150, handles: true, fadeSpeed: 200, onSelectChange: preview });

 40

 41         //选区的起点和终点初始坐标

 42         //$('#photo').imgAreaSelect({ x1: 116, y1: 77, x2: 276, y2: 237, aspectRatio: '1:1', handles: true, fadeSpeed: 200, onSelectChange: preview });

 43

 44         //任意尺寸的选区

 45         $('#photo').imgAreaSelect({ handles: true, fadeSpeed: 200, onSelectChange: preview });

 46

 47         //缩略图的图片

 48         $("#preview img").attr("src",$("#photo").attr("src"));

 49

 50     });

 51 </script>

 52 </head>

 53

 54 <body>

 55

 56     <div id="container">

 57

 58         <!-- 原图 -->

 59         <div>

 60             <img id="photo" src="images/pic3.jpg"/>

 61         </div>

 62

 63         <!-- 选区预览图 -->

 64         <div id="preview" style="display:none; overflow: hidden;">

 65             <img style="position: relative;">

 66         </div>

 67

 68         <!-- 信息 -->

 69         <table style="margin-top: 1em;">

 70           <thead>

 71             <tr>

 72               <th colspan="2" style="font-size: 110%; font-weight: bold; text-align: left; padding-left: 0.1em;">

 73                 坐标

 74               </th>

 75               <th colspan="2" style="font-size: 110%; font-weight: bold; text-align: left; padding-left: 0.1em;">

 76                 尺寸

 77               </th>

 78             </tr>

 79           </thead>

 80           <tbody>

 81             <tr>

 82               <td style="width: 10%;"><b>X<sub>1</sub>:</b></td>

 83                   <td style="width: 30%;"><input type="text" id="x1" value="-"></td>

 84                   <td style="width: 20%;"><b>Width:</b></td>

 85                 <td><input type="text" value="-" id="w"></td>

 86             </tr>

 87             <tr>

 88               <td><b>Y<sub>1</sub>:</b></td>

 89               <td><input type="text" id="y1" value="-"></td>

 90               <td><b>Height:</b></td>

 91               <td><input type="text" id="h" value="-"></td>

 92             </tr>

 93             <tr>

 94               <td><b>X<sub>2</sub>:</b></td>

 95               <td><input type="text" id="x2" value="-"></td>

 96               <td></td>

 97               <td></td>

 98             </tr>

 99             <tr>

100               <td><b>Y<sub>2</sub>:</b></td>

101               <td><input type="text" id="y2" value="-"></td>

102               <td></td>

103               <td></td>

104             </tr>

105           </tbody>

106         </table>

107

108     </div>

109

110 </body>

111 </html>
此插件只是用 jQuery 获取到了选区的各点坐标,要真正实现剪裁功能要把坐标值传给 PHP 文件进行图片剪裁处理。
附:demo 下载地址。
其他关于此插件的教程可以点击:http://www.cnblogs.com/mizzle/archive/2011/10/13/2209891.html
基于此插件的模块还可见:主页:PHP & jQuery image upload and crop,demo 自带上传、剪裁和保存功能。
