看完这个你还不懂shiro吗,小例子(附源码)
看完这个你还不懂shiro吗,小例子(附源码)
前言
今天是学习Shiro的笔记哦,所有的学习笔记都是适合初学者的,如果你学习过Shiro也当作一次复习再过一遍,我就经常再拿回来看,这样快捷方便自己回顾很多东西,那看到这里还不点个赞?毕竟好多学习加上写笔记都要好几天,所以博主更新时快时慢,希望通过这篇博客对你有帮助;
我们最后通过一个小实例来学习Shiro的一个小应用吧,毕竟只有写代码才能更好的理解,源码在最后;
介绍
官网:https://shiro.apache.org/
来自百度百科:
Quickstart
首先我们进入官网,然后这里有一个下载,我们点击下载;
这里有最新版本更新到了1.9.1,点击然后就往下走了,让你去github上下载,我们用这个链接进入github
我们点击code下载一个zip压缩文件就可以了
打开文件里面有一个Quickstart十分钟快速上手,参考这个代码,我们看下
这个里面有很多英文注释,相信大家看到一看就懂了,而且很简单对不对,十分钟上手体验代码,这里我不是很懂留下来做个翻译;
/*
 * Licensed to the Apache Software Foundation (ASF) under one
 * or more contributor license agreements.  See the NOTICE file
 * distributed with this work for additional information
 * regarding copyright ownership.  The ASF licenses this file
 * to you under the Apache License, Version 2.0 (the
 * "License"); you may not use this file except in compliance
 * with the License.  You may obtain a copy of the License at
 *
 *     http://www.apache.org/licenses/LICENSE-2.0
 *
 * Unless required by applicable law or agreed to in writing,
 * software distributed under the License is distributed on an
 * "AS IS" BASIS, WITHOUT WARRANTIES OR CONDITIONS OF ANY
 * KIND, either express or implied.  See the License for the
 * specific language governing permissions and limitations
 * under the License.
 */

import org.apache.shiro.SecurityUtils;
import org.apache.shiro.authc.*;
import org.apache.shiro.ini.IniSecurityManagerFactory;
import org.apache.shiro.mgt.SecurityManager;
import org.apache.shiro.session.Session;
import org.apache.shiro.subject.Subject;
import org.apache.shiro.lang.util.Factory;
import org.slf4j.Logger;
import org.slf4j.LoggerFactory;


/**
 * Simple Quickstart application showing how to use Shiro's API.
 *
 * @since 0.9 RC2
 */
public class Quickstart {

    private static final transient Logger log = LoggerFactory.getLogger(Quickstart.class);


    public static void main(String[] args) {

        // The easiest way to create a Shiro SecurityManager with configured
        // realms, users, roles and permissions is to use the simple INI config.
        // We'll do that by using a factory that can ingest a .ini file and
        // return a SecurityManager instance:

        // Use the shiro.ini file at the root of the classpath
        // (file: and url: prefixes load from files and urls respectively):
        // 首先我们可以读取ini文件,里面的内容创建一个factory实例
        Factory<SecurityManager> factory = new IniSecurityManagerFactory("classpath:shiro.ini");
        // 然后我们可以从工厂中实例一个对象叫做securityManager
        SecurityManager securityManager = factory.getInstance();

        // for this simple example quickstart, make the SecurityManager
        // accessible as a JVM singleton.  Most applications wouldn't do this
        // and instead rely on their container configuration or web.xml for
        // webapps.  That is outside the scope of this simple quickstart, so
        // we'll just do the bare minimum so you can continue to get a feel
        // for things.
        // 我们可以把这个实例对象交给SecurityUtils这个工具类,然后它帮我们做一些步骤
        SecurityUtils.setSecurityManager(securityManager);

        // Now that a simple Shiro environment is set up, let's see what you can do:
        // 其实我们发现,前面几步骤,我们写过那么多代码了是不是都是固定死的啊,好比我们用jdbc创建链接到关闭链接
        // 然后我们这个时候得到了第一个可以认为是user的对象,第一个对象来了;
        // 我们记住这个对象
        // get the currently executing user:
        Subject currentUser = SecurityUtils.getSubject();

        // 我们还可以创建一个关于这个对象的session,这里的session可不是http里面的session,但是作用可以互相理解
        // Do some stuff with a Session (no need for a web or EJB container!!!)
        Session session = currentUser.getSession();

        // 可以用来存值和取值
        session.setAttribute("someKey", "aValue");
        String value = (String) session.getAttribute("someKey");
        if (value.equals("aValue")) {
            log.info("Retrieved the correct value! [" + value + "]");
        }

        // Shiro安全管理嘛,看到Authenticated一定知道是授权,看看有没有权限
        // let's login the current user so we can check against roles and permissions:
        if (!currentUser.isAuthenticated()) {
            UsernamePasswordToken token = new UsernamePasswordToken("lonestarr", "vespa");
            // 看单词就知道了,记住我功能
            token.setRememberMe(true);
            try {
                // 登录,他这个登录失败靠什么呢,异常
                currentUser.login(token);
            } catch (UnknownAccountException uae) {
                // 没有这个用户抛出这个异常UnknownAccountException
                log.info("There is no user with username of " + token.getPrincipal());
            } catch (IncorrectCredentialsException ice) {
                // 密码错误
                log.info("Password for account " + token.getPrincipal() + " was incorrect!");
            } catch (LockedAccountException lae) {
                // 没有权限
                log.info("The account for username " + token.getPrincipal() + " is locked.  " +
                        "Please contact your administrator to unlock it.");
            }
            // ... catch more exceptions here (maybe custom ones specific to your application?
            catch (AuthenticationException ae) {
                // 猜猜这是什么
                //unexpected condition?  error?
            }
        }

        //say who they are:
        //print their identifying principal (in this case, a username):、
        // 登录成功之后,我们可以拿到用户信息(这里是拿到有用户名)
        log.info("User [" + currentUser.getPrincipal() + "] logged in successfully.");

        //test a role:
        // 还可以是否有什么角色
        if (currentUser.hasRole("schwartz")) {
            log.info("May the Schwartz be with you!");
        } else {
            log.info("Hello, mere mortal.");
        }

        // 还可以看是否对资源有访问授权
        //test a typed permission (not instance-level)
        if (currentUser.isPermitted("lightsaber:wield")) {
            log.info("You may use a lightsaber ring.  Use it wisely.");
        } else {
            log.info("Sorry, lightsaber rings are for schwartz masters only.");
        }

        //a (very powerful) Instance Level permission:
        if (currentUser.isPermitted("winnebago:drive:eagle5")) {
            log.info("You are permitted to 'drive' the winnebago with license plate (id) 'eagle5'.  " +
                    "Here are the keys - have fun!");
        } else {
            log.info("Sorry, you aren't allowed to drive the 'eagle5' winnebago!");
        }

        // 退出登录
        //all done - log out!
        currentUser.logout();

        // 程序结束
        System.exit(0);
    }
}
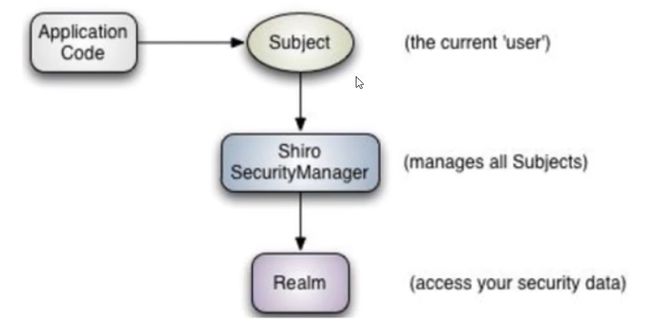
这里我们看这张图再细细理解一下,第一个subject可以理解为用户,然后通过securityManager进行管理,最后允许你访问数据;这是官方给出的小例子,快速入门,是不是就理解,如果没有理解看看咱下面的小例子;
小例子
首先小例子的那例子还是咱们springsecurity中的小例子,这里拿过来接着用,这里是springsecurity跟这个一样的教程:
看完这一篇你还不会springsecurity吗?springsecurity小实例,简单实现网站登录获权(附源码)
同样的我们先看下效果,这里主要完成页面,页面简单方便理解,实现功能就行;
首先就是进入主页,只有主页公共信息显示;
然后登录,我们这里有三个用户,然后实现不同用户展示不用界面,看一眼就明白哈
比如我们登录root用户
登录zhangsan
lisi就不用说了,这就是简单功能实现通过Shrio,我们看下代码:
新建项目,首先就是导入依赖
<dependencies>


    <dependency>
        <groupId>com.github.theborakompanionigroupId>
        <artifactId>thymeleaf-extras-shiroartifactId>
        <version>2.1.0version>
    dependency>


    <dependency>
        <groupId>org.apache.shirogroupId>
        <artifactId>shiro-spring-boot-web-starterartifactId>
        <version>1.9.0version>
    dependency>

    <dependency>
        <groupId>org.springframework.bootgroupId>
        <artifactId>spring-boot-starter-thymeleafartifactId>
    dependency>

    <dependency>
        <groupId>org.springframework.bootgroupId>
        <artifactId>spring-boot-starter-jdbcartifactId>
    dependency>
    <dependency>
        <groupId>org.springframework.bootgroupId>
        <artifactId>spring-boot-starter-webartifactId>
    dependency>

    <dependency>
        <groupId>org.projectlombokgroupId>
        <artifactId>lombokartifactId>
        <optional>trueoptional>
    dependency>
    <dependency>
        <groupId>org.springframework.bootgroupId>
        <artifactId>spring-boot-starter-testartifactId>
        <scope>testscope>
    dependency>


    <dependency>
        <groupId>mysqlgroupId>
        <artifactId>mysql-connector-javaartifactId>
    dependency>


    <dependency>
        <groupId>com.baomidougroupId>
        <artifactId>mybatis-plus-boot-starterartifactId>
        <version>3.0.5version>
    dependency>


    <dependency>
        <groupId>org.apache.velocitygroupId>
        <artifactId>velocity-engine-coreartifactId>
        <version>2.0version>
    dependency>

    <dependency>
        <groupId>com.spring4allgroupId>
        <artifactId>spring-boot-starter-swaggerartifactId>
        <version>1.5.1.RELEASEversion>
    dependency>

    <dependency>
        <groupId>org.freemarkergroupId>
        <artifactId>freemarkerartifactId>
        <version>2.3.30version>
    dependency>

    <dependency>
        <groupId>com.ibeetlgroupId>
        <artifactId>beetlartifactId>
        <version>3.3.2.RELEASEversion>
    dependency>


    <dependency>
        <groupId>com.alibabagroupId>
        <artifactId>fastjsonartifactId>
        <version>1.2.80version>
    dependency>

dependencies>
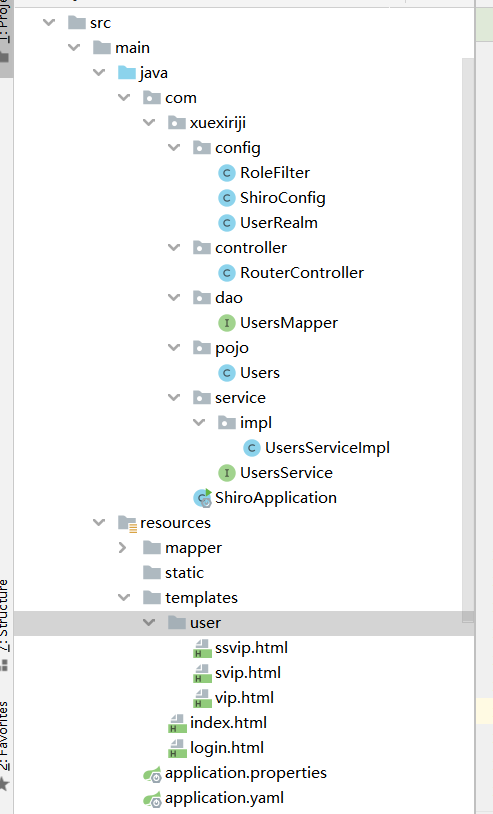
我们先看下项目结构:
首先我们用什么我们需要将这个注册到spring容器中,我们首先看下config配置,首先就是我们那个图里面的三个对象,然后互相创建有依赖关系,从上到下,固定的,跟我们刚才quickstart里面上面那几行代码就是那个,这里都是管理权限的;
@Configuration
public class ShiroConfig {

    //创建realm对象
    @Bean
    public UserRealm userRealm() {
        UserRealm realm = new UserRealm();
        /*        //设置加密算法为md5
        HashedCredentialsMatcher credentialsMatcher = new HashedCredentialsMatcher();
        credentialsMatcher.setHashAlgorithmName("md5");
        //设置加密次数
        credentialsMatcher.setHashIterations(1024);
        realm.setCredentialsMatcher(credentialsMatcher);*/
        return realm;
    }

    //DefaultWebSecurityManager 管理器
    @Bean
    public DefaultWebSecurityManager getDefaultWebSecurityManager(@Qualifier("userRealm") UserRealm userRealm) {
        DefaultWebSecurityManager securityManager = new DefaultWebSecurityManager();
        securityManager.setRealm(userRealm);
        return securityManager;
    }

    // 设置权限过滤器
    @Bean
    public ShiroFilterFactoryBean shiroFilterFactoryBean(
        @Qualifier("getDefaultWebSecurityManager") DefaultWebSecurityManager defaultWebSecurityManager) {
        ShiroFilterFactoryBean shiroFilterFactoryBean = new ShiroFilterFactoryBean();
        shiroFilterFactoryBean.setSecurityManager(defaultWebSecurityManager);


        /*
            anon: 任何人都可以访问
            authc: 必须认证才可以访问
            user: 使用记住我功能才可以使用
            perms[]: 拥有对应某个权限,资源才可以访问
            role: 角色拥有的权限才可以访问
         */
        // 存放自定义的filter
        LinkedHashMap<String, Filter> filtersMap = new LinkedHashMap<>();
        filtersMap.put("permsOrFilter", new RoleFilter());
        shiroFilterFactoryBean.setFilters(filtersMap);

        Map<String, String> filter = new LinkedHashMap<>();
        //设置登录退出
        filter.put("/logout", "logout");

        // 然后拥有什么权限 perms这里只能能达到单一权限单一认证,
        // 并不能达到我们想要的ssvip也可以访问vip服务
        // 所以这里我们重写下过滤器,然后我们可以这样实现

        /* filter.put("/user/ssvip", "perms[ssvip]");
        //想要ssvip也可以访问vip服务
        filter.put("/user/svip", "perms[svip]");
        filter.put("/user/vip", "perms[vip]");*/

        //        自定义 or角色 认证
        filter.put("/user/ssvip", "permsOrFilter[ssvip]");
        filter.put("/user/svip", "permsOrFilter[ssvip,svip]");
        filter.put("/user/vip", "permsOrFilter[ssvip,svip,vip]");
        //必须要授权才可以
        filter.put("/user/*", "authc");


        shiroFilterFactoryBean.setFilterChainDefinitionMap(filter);
        //没有登录去登录页面
        shiroFilterFactoryBean.setLoginUrl("/tologin");
        //未授权跳转到未授权页面
        //        shiroFilterFactoryBean.setUnauthorizedUrl("");

        return shiroFilterFactoryBean;
    }

    //shiro整合thymeleaf
    @Bean
    public ShiroDialect getShiroDialect(){
        return new ShiroDialect();
    }

}
这里是我们创建的UserRealm,用户信息首先是认证,然后授权,也就我们通过shrio框架登录方法,首先进入AuthenticationInfo通过前端获取的参数,去数据库查找,认证成功可以将对象信息放入Session,这里的Session不是httpSession
然后到AuthorizingRealm获取登录的用户权限;
public class UserRealm extends AuthorizingRealm {
    @Override
    protected AuthorizationInfo doGetAuthorizationInfo(PrincipalCollection principalCollection) {
        //授权
        SimpleAuthorizationInfo info = new SimpleAuthorizationInfo();
//        info.addStringPermission("ROLE_vip");
        //可以获取到下面的user对象
        Subject subject = SecurityUtils.getSubject();
        Users user = (Users) subject.getPrincipal();

        //添加当前用户的权限
        info.addStringPermission(user.getUserRole());

        return info;
    }

    @Autowired
    UsersService usersService;


    @Override
    protected AuthenticationInfo doGetAuthenticationInfo(AuthenticationToken authenticationToken) throws AuthenticationException {
        //认证
        /*String name ="root";
        String password = "root";*/

        UsernamePasswordToken usernamePasswordToken = (UsernamePasswordToken) authenticationToken;
        QueryWrapper<Users> queryWrapper = new QueryWrapper<>();
        queryWrapper.eq("user_name",usernamePasswordToken.getUsername());
        Users user = usersService.getOne(queryWrapper);


        if (!usernamePasswordToken.getUsername().equals(user.getUserName())) {
            return null; //自动抛出用户名错误异常,密码shiro会自己做
        }

        //我们可以把登录的对象存入session,这里的session并不是httpSession
        Subject subject = SecurityUtils.getSubject();
        Session session = subject.getSession();
        session.setAttribute("user",user);

        return new SimpleAuthenticationInfo(user, user.getUserPassword(), user.getUserName());
    }
}
因为我们想完成一个多权限也就是OR的认证,默认没有这样的认证,所以我们自己写了一个过滤器,对用户角色的权限的分配按优先级也就是你ssvip可以访问svip和vip这种的,配置进去就行了,其实很简单,自己做下debug想怎么改怎么改,这里是用的Role当然还可以做Permission等等
@Component
public class  RoleFilter extends RolesAuthorizationFilter {
    @Override
    public boolean isAccessAllowed(ServletRequest request, ServletResponse response, Object mappedValue)
            throws IOException {

        final Subject subject = getSubject(request, response);
        final String[] rolesArray = (String[]) mappedValue;

        if (rolesArray == null || rolesArray.length == 0) {
            // 无指定角色时,无需检查,允许访问
            return true;
        }

        for (String roleName : rolesArray) {
            System.out.println("==================");
            System.out.println(roleName);
            //如果我们设置的role我们可以使用这个
            System.out.println(subject.hasRole(roleName));
            System.out.println(subject.isPermitted(roleName));
            if (subject.isPermitted(roleName)) {
                return true;
            }
        }
        return false;
    }
}
我们通过前端获取用户名用户密码,然后通过异常进行错误信息的抛出提示,上面以下都是路由;
这就是基本流程,其他的都是mybaitis框架代码,这里不用关注;
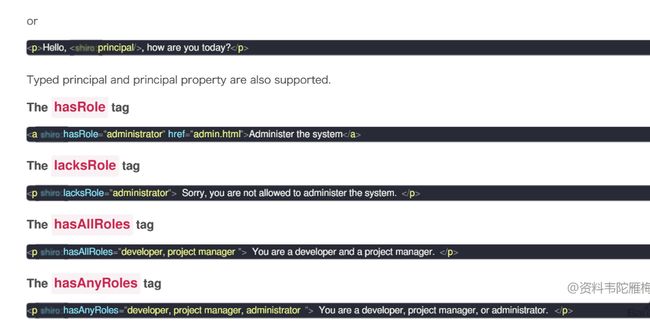
然后就是整合thymeleaf,上面有依赖记得导入依赖,然后就是config里面配置进去就可以了,注入一个bean,这些代码就很简单了,用session和一些shiro的标签:shiro:hasAnyPermissions,这些一看就知道了,没什么好说的吧;
如果说还想了解,可以搜一下更多,比如这里这些一看就知道吧:https://wenku.baidu.com/view/1b0c053dfc00bed5b9f3f90f76c66137ee064faf.html
主要就是自己动手尝试下就可以了,尝试写贼简单,一遍就会了,下面是源码,可以比对着实现下简单的功能;
链接:https://pan.baidu.com/s/1QNq66gCJMXMXW0kwlYltEQ?pwd=q41v
提取码:q41v
小结
最后就是通过这个小例子希望大家可以简单实用Shiro快速入门篇,一定要自己动手实现下,不然光看一遍怎么可以,跟着写一下小功能,都看到这里了还不给博主点个赞吗,留个关注也行啊,后面还有更多精彩内容,bye~


