Spring中的监听器与SpringMVC简述
目录
Spring中的监听器
SpringMVC概述
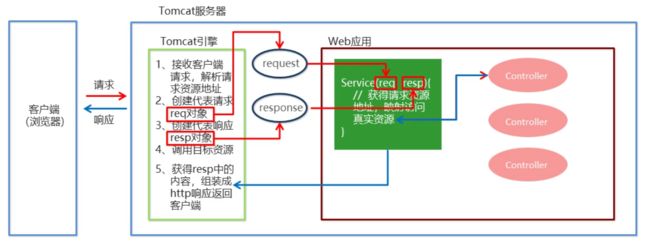
web层的框架完成的相应的操作图示
SpringMVC开发使用步骤
SpringMVC流程图示
Spring中的监听器
前一篇写出的手动实现的监听器,Spring提供了一个监听器ContextLoderListener就是对上述功能的封装,该监听器内部加载Spring配置文件,创建应用上下文对象,并存储到ServletContext域中,提供一个客户亿工具WebApplicationContextUtils供使用者获得上下文对象
要使用监听器,需要做两件事:
①:在web.xml中配置ContextLoaderListener监听器(导入spring-web坐标)
②:使用WebApplicationContextUtils获得应用上下文对象 ApplicationContext
在pim.xml中导入坐标
            org.springframework
            spring-web
            5.0.5.RELEASE
web.xml中
        ContextConfigLocation
        classpath:applicationContext.xml


        org.springframework.web.context.ContextLoaderListener
userServlet类中,使用WebApplicationUtils获得上下文
@WebServlet("/user")
public class UserServlet extends HttpServlet {
    @Override
    protected void doGet(HttpServletRequest req, HttpServletResponse resp) throws ServletException, IOException {
        //   ApplicationContext app= new ClassPathXmlApplicationContext("applicationContext.xml");
        ServletContext servletContext = req.getServletContext();
        //ApplicationContext app = (ApplicationContext) servletContext.getAttribute("app");
     //变动处
        //ApplicationContext app = WebApplicationContextUtils.getApplicationContext(servletContext);
        WebApplicationContext app = WebApplicationContextUtils.getWebApplicationContext(servletContext);
        UserService userService=app.getBean(UserService.class);

    }
}
这样就成功使用了spring给我们提供的监听器。
SpringMVC概述
SpringMVC(M:Model模型,V:views视图,C:Controller控制器)是一种基于Java的实现MVC设计模型的请求驱动类型的轻量级Web框架,属于SpringFrameWork的后续产品,已经融合在Spring Web Flow中。
SpringMVC已经成为目前最主流的MVC框架之一,并且随着Spring3.0的发布,全面超越Struct2,成为最优秀的MVC框架,他通过一套注解,让一个简单的Java类成为处理请求的控制器,而无须实现任何接口,同时他还支持RESTful编程分格的请求
web层的框架完成的相应的操作图示
SpringMVC的核心是前端控制器,SpringMVC使用Servlet充当前端控制器
SpringMVC开发使用步骤
需求::客户端发起请求,服务器接受请求,执行逻辑并进行视图跳转。
1、先导入SpringMVC的相关坐标
2、配置SpringMVC核心控制器DispathcerServlet
3、创建Controller类和视图界面
4、使用注解配置Controller类中业务方法的映射地址
5、配置SpringMVC核心文件spring-mvc.xml
6、客户端发起请求测试
②、导入坐标
            org.springframework
            spring-webmvc
            5.0.5.RELEASE
②、配置控制器
        DispatcherServlet
        org.springframework.web.servlet.DispatcherServlet

        1


    DispatcherServlet
    /
③、创建controller视图和视图界面④、使用注解映射地址
创建一个controller包,包下创建一个userController类,类中
package com.controller;

import org.springframework.stereotype.Controller;
import org.springframework.web.bind.annotation.RequestMapping;

//配置类,使用注解把这个类放到容器中
@Controller
public class userController {

//用注解给这个方法请求映射某个地址
    @RequestMapping("/quick")
    public String save(){
        System.out.println("controller save running");
       //就会跳转到KCandZH.jsp这个页面上去
        return "KCandZH.jsp";
    }
}
在webapp下创建一个KCandZH.jsp页面
<%@ page language="java" contentType="text/html; charset=utf-8" pageEncoding="utf-8" %>
<%
    String path = request.getContextPath();
    String basepath = request.getScheme() + "://" + request.getServerName() + ":" + request.getServerPort() + path + "/";
%>


    Insert title here


kCandZH forever
⑤、配置核心spring-mvc.xml(web.xml中)
        DispatcherServlet
        org.springframework.web.servlet.DispatcherServlet


            contextConfigLocation
            classpath:spring-mvc.xml


        1


    DispatcherServlet
    /
在resource下写一个spring-mvc.xml用于组件扫描
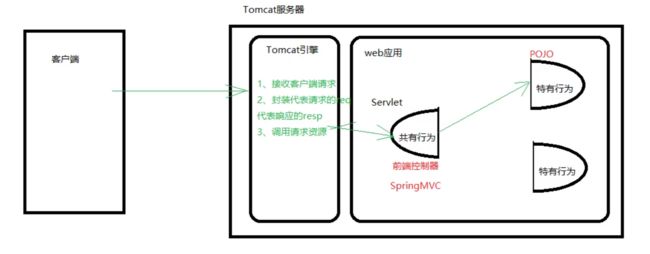
SpringMVC流程图示