Maven配置tomcat服务器和ApplicationContext应用上下文获取方法
目录
Maven配置tomcat服务器
使用maven手动创建web工程
ApplicationContext应用上下文获取方法
web.xml下配置监听器
优化代码
解耦合1
解耦合2
Maven配置tomcat服务器
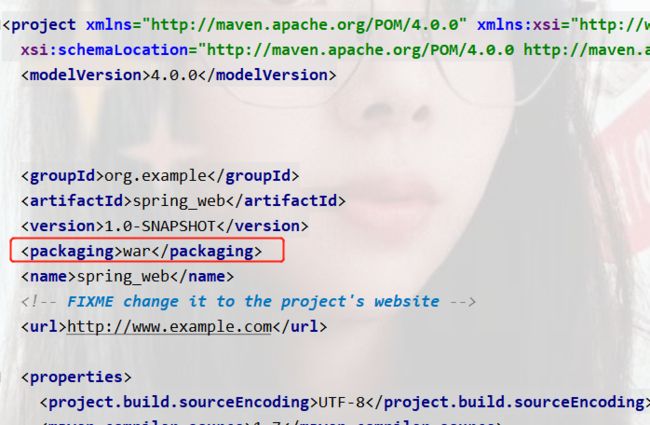
首先这得是war包,如果这是普通包得添加webapp,并将pom.xml中加入如下,表示这是一个web文件
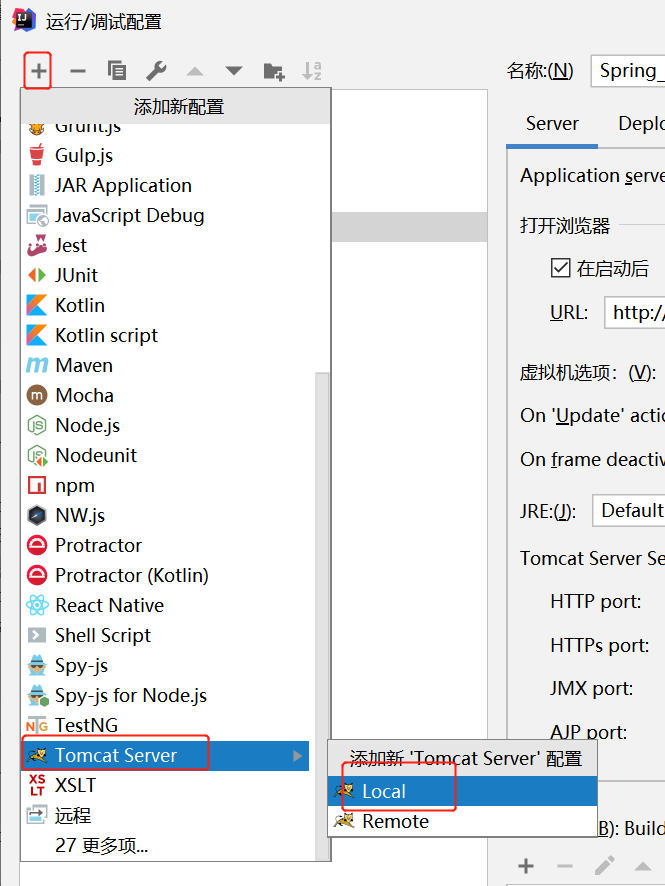
war 加完之后点击编辑配置
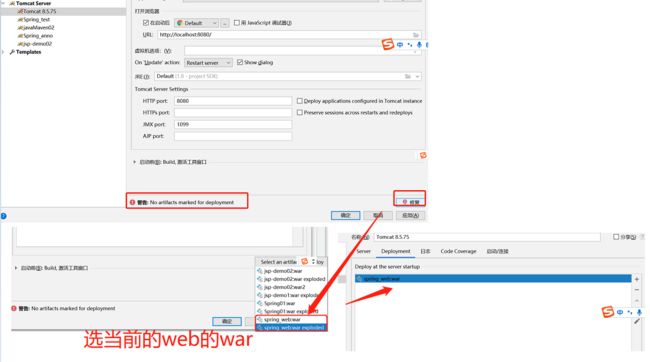
其下的war二选一即可
完成之后点击确认即可完成配置。
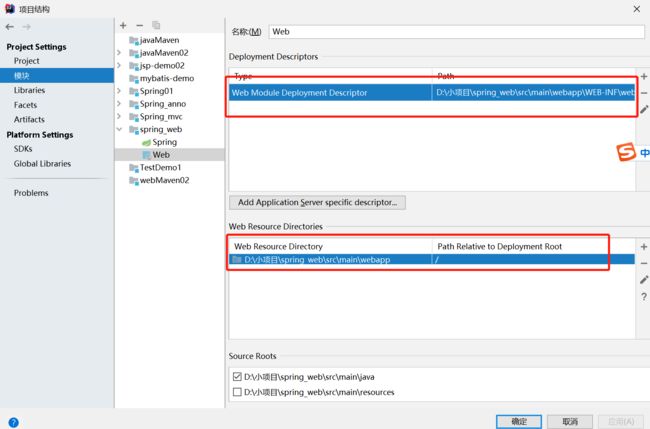
使用maven手动创建web工程
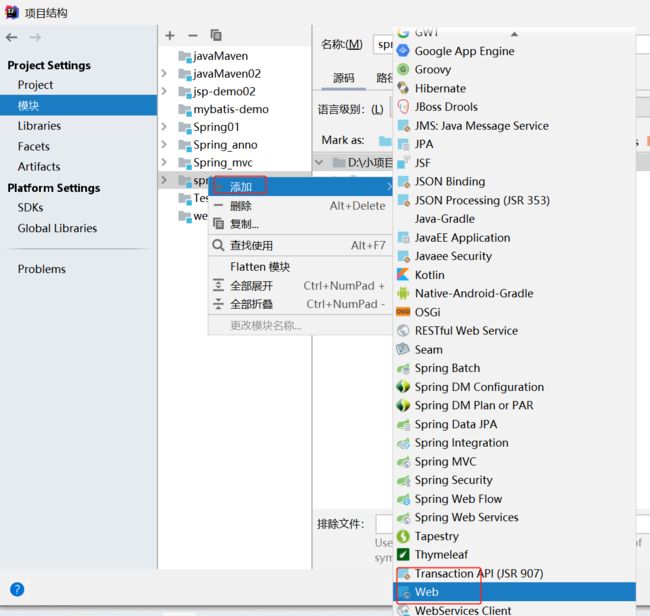
第一步,点击项目结构,选中 要添加的maven工程,右键添加web。
第二步,点击web工程,修改web工程路径
点击完成即可完成web工程的手动配置。
ApplicationContext应用上下文获取方法
应用上下文对象是通过new ClasspathXmlApplicationContext(spring配置文件)方式获取的,但是每次从容器中获得Bean时都要编写new ClasspathXmlApplicationContext(spring配置文件),这样的弊端是配置文件加载多次,应用上下文对象创建多次。
在Web项目中,可以使用ServletContextListener监听Web应用的启动,我们可以在Web应用启动时,就加载Sprina的配置文件,创建应用上下文对象ApplicationContext,在将其存储到最大的域servletContext域中,这样就可以在任意位置从域中获得应用上下文ApplicationContext对象了。
新建一个Listenter包下的ContextLoderListener
package com.Listener;

import org.springframework.context.ApplicationContext;
import org.springframework.context.support.ClassPathXmlApplicationContext;

import javax.servlet.ServletContext;
import javax.servlet.ServletContextEvent;
import javax.servlet.ServletContextListener;

public class ContextLoaderListener implements ServletContextListener {
    public void contextInitialized(ServletContextEvent servletContextEvent) {
        ApplicationContext app = new ClassPathXmlApplicationContext("applicationContext.xml");
        //将Spring的应用上下文对象存储到ServletContext域中
        ServletContext servletContext = servletContextEvent.getServletContext();
        servletContext.setAttribute("app", app);
        System.out.println("Spring容器创建完毕");

    }
    public void contextDestroyed(ServletContextEvent servletContextEvent) {

    }
}
web包下
package com.web;

import com.service.*;
import org.springframework.context.ApplicationContext;

import javax.servlet.ServletContext;
import javax.servlet.ServletException;
import javax.servlet.annotation.WebServlet;
import javax.servlet.http.HttpServlet;
import javax.servlet.http.HttpServletRequest;
import javax.servlet.http.HttpServletResponse;
import java.io.IOException;

@WebServlet("/user")
public class UserServlet extends HttpServlet {
    @Override
    protected void doGet(HttpServletRequest req, HttpServletResponse resp) throws ServletException, IOException {
     //   ApplicationContext app= new ClassPathXmlApplicationContext("applicationContext.xml");
    ServletContext servletContext = req.getServletContext();
    ApplicationContext app = (ApplicationContext) servletContext.getAttribute("app");
    UserService userService=app.getBean(UserService.class);

    }
}
web.xml下配置监听器
com.Listener.ContextLoaderListener
自动创建spring容器
优化代码
解耦合1
由于监听器内部我们将代码写固定了,不利于后期的维护操作,所以要解耦合,写在配置文件中进行解耦合。(“”引号内的名字任意)
ApplicationContext app = new ClassPathXmlApplicationContext("applicationContext.xml");
将此个代码写入到web.xml中进
        ContextConfigLocation
        applicationContext.xml
在ContextLoaderListenter类中
package com.Listener;

import org.springframework.context.ApplicationContext;
import org.springframework.context.support.ClassPathXmlApplicationContext;

import javax.servlet.ServletContext;
import javax.servlet.ServletContextEvent;
import javax.servlet.ServletContextListener;

public class ContextLoaderListener implements ServletContextListener {
    public void contextInitialized(ServletContextEvent servletContextEvent) {
        ServletContext servletContext = servletContextEvent.getServletContext();

        //读取web.xml中的全局参数
       String contextConfigLocation = servletContext.getInitParameter("ContextConfigLocation");
        ApplicationContext app = new ClassPathXmlApplicationContext(contextConfigLocation);
        //将Spring的应用上下文对象存储到ServletContext域中

        servletContext.setAttribute("app", app);
        System.out.println("Spring容器创建完毕");

    }

}
读取配置文件的值,这样就完成了解耦合
解耦合2
在userServlet类中
ApplicationContext app = (ApplicationContext) servletContext.getAttribute("app");
这样耦合了app代码,让这个只能叫做app,这样不利于后期维护和辨认。
所以我们这么改,在Listener包下创建一个工具类WebApplicationContextUtils
package com.Listener;

import org.springframework.context.ApplicationContext;

import javax.servlet.ServletContext;

public class WebApplicationContextUtils {
    public static ApplicationContext getApplicationContext(ServletContext servletContext){
        return (ApplicationContext) servletContext.getAttribute("app");
    }
}
在userServlet处代码修改为
package com.web;

        import com.Listener.WebApplicationContextUtils;
        import com.service.*;
        import org.springframework.context.ApplicationContext;

        import javax.servlet.ServletContext;
        import javax.servlet.ServletException;
        import javax.servlet.annotation.WebServlet;
        import javax.servlet.http.HttpServlet;
        import javax.servlet.http.HttpServletRequest;
        import javax.servlet.http.HttpServletResponse;
        import java.io.IOException;

@WebServlet("/user")
public class UserServlet extends HttpServlet {
    @Override
    protected void doGet(HttpServletRequest req, HttpServletResponse resp) throws ServletException, IOException {
        //   ApplicationContext app= new ClassPathXmlApplicationContext("applicationContext.xml");
        ServletContext servletContext = req.getServletContext();
        //ApplicationContext app = (ApplicationContext) servletContext.getAttribute("app");
     //变动处
        ApplicationContext app = WebApplicationContextUtils.getApplicationContext(servletContext);
        UserService userService=app.getBean(UserService.class);

    }
}
