基于opencv和np.repeat的图像马赛克和人脸检测马赛克(python源码)
文章目录
-
- 基于opencv和np.repeat实现的图像马赛克
-
- 包的导入:
- 原图像读取:
- 马赛克实现方式1: 原图像 -> resize缩小 -> resize放大还原为原来的尺寸
-
- 效果:
- 马赛克实现方式2:缩小n倍 -> 行重复n次 -> 列重复n次
-
- 效果:
- 马赛克实现方式3:每n个像素取一次值-> 用`cv.namedwindow`接收
-
- 效果:
- 图像的人脸马赛克:
-
- 手标位置实现:
-
- 效果:
- 级联分类器实现人脸的自动检测:
-
- 效果:
基于opencv和np.repeat实现的图像马赛克
包的导入:
import cv2 as cv
import numpy as np
原图像读取:
img = cv.imread(r'.\lena.jpg')
cv.imshow('lena', img)
马赛克实现方式1: 原图像 -> resize缩小 -> resize放大还原为原来的尺寸
img1 = cv.resize(img, (img.shape[0] // 20, img.shape[1] // 20))
img2 = cv.resize(img1, (512, 512))
cv.imshow('Mosaic', img2)
print(img.shape)
cv.waitKey(0)
效果:

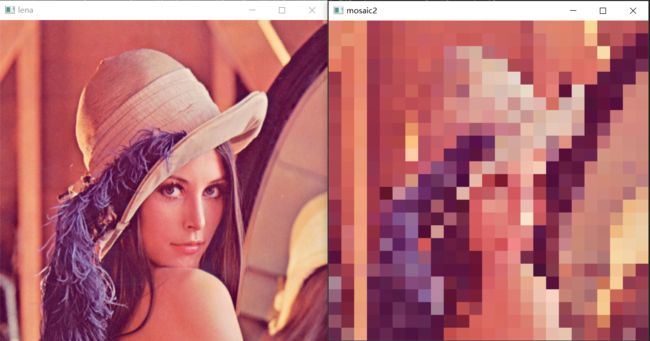
马赛克实现方式2:缩小n倍 -> 行重复n次 -> 列重复n次
cv.resize()相当于池化,按图像的宽和高分别隔几个像素取一个值,直到取够期望新图像的宽高。
np.repeat()可以将矩阵元素按行/列,乘以倍数,生成新的矩阵。例:
[ 1 2 3 4 ] → n p . r e p e a t ( [ 1 2 3 4 ] , 2 , a x i s = 0 ) → [ 1 2 1 2 3 4 3 4 ] → n p . r e p e a t ( [ 1 2 1 2 3 4 3 4 ] , 2 , a x i s = 1 ) → [ 1 1 2 2 1 1 2 2 3 3 4 4 3 3 4 4 ] \begin{bmatrix} 1 & 2 \\ 3 & 4 \end{bmatrix} \rightarrow np.repeat(\begin{bmatrix} 1 & 2 \\ 3 & 4 \end{bmatrix},2,axis=0) \rightarrow \begin{bmatrix} 1 & 2 \\ 1 & 2 \\3 & 4 \\ 3 & 4 \end{bmatrix}\rightarrow np.repeat(\begin{bmatrix} 1 & 2 \\ 1 & 2 \\3 & 4 \\ 3 & 4 \end{bmatrix},2,axis=1) \rightarrow \begin{bmatrix} 1 &1 & 2 & 2\\ 1&1 & 2&2 \\3 &3& 4&4 \\ 3&3 & 4&4 \end{bmatrix} [1324]→np.repeat([1324],2,axis=0)→⎣⎢⎢⎡11332244⎦⎥⎥⎤→np.repeat(⎣⎢⎢⎡11332244⎦⎥⎥⎤,2,axis=1)→⎣⎢⎢⎡1133113322442244⎦⎥⎥⎤
img1 = cv.resize(img,(img.shape[0] // 20, img.shape[1] // 20))
img2 = np.repeat(img1,20,axis=0) # 行重复十次,axis不给值,数据会变成一维
img3 = np.repeat(img2,20,axis=1) # 列重复十次
cv.imshow('mosaic2',img3)
cv.waitKey(0)
效果:
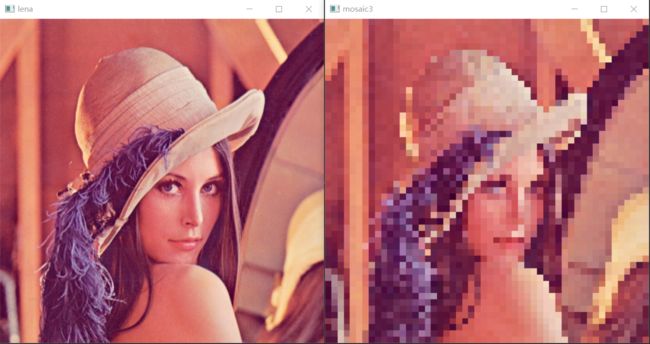
马赛克实现方式3:每n个像素取一次值-> 用cv.namedwindow接收
主要用到数组的切片操作,搁n为几,则搁几个值取数
[ 1 2 3 4 5 6 7 8 1 3 5 7 2 4 6 8 ] [ : : 2 , : : 2 ] → [ 2 4 3 7 ] \begin{bmatrix} 1 &2 & 3 & 4\\ 5&6 & 7&8 \\1 &3& 5&7 \\ 2&4 & 6&8 \end{bmatrix}\begin{bmatrix} ::2,::2\end{bmatrix} \rightarrow \begin{bmatrix} 2 & 4\\ 3& 7 \end{bmatrix} ⎣⎢⎢⎡1512263437564878⎦⎥⎥⎤[::2,::2]→[2347]
cv.resizeWindow()可以更改窗体的大小,将其改为原来的尺寸来接收图像并显示,等同于方式二的实现效果。本质上,还是先缩小,再原比例放大。
img1 = img[::10, ::10]
cv.namedWindow('mosaic3', flags=cv.WINDOW_NORMAL)
cv.resizeWindow('mosaic3',img.shape[0],img.shape[1])
cv.imshow('mosaic3', img1)
cv.waitKey(0)
效果:
图像的人脸马赛克:
有上面三种马赛克方式,基本已经可以满足我们日常的使用了
人脸马赛克,只需要找到人脸位置,并对人脸roi进行马赛克,再贴回原图的位置就好。
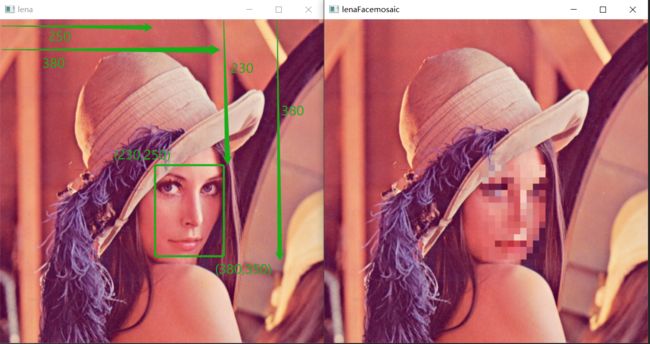
手标位置实现:
我们先简单的用手标记,对图像二维矩阵进行切片,看看效果。
img = cv.imread(r'.\lena.jpg')
cv.imshow('lena', img)

face = img[250:380,250:350]
# 使用马赛克方式2来马赛克人脸
face = face[::10,::10]
face = np.repeat(face,10,axis=0)
face = np.repeat(face,10,axis=1)

img[230:380, 250:350] = face # 填充
cv.imshow('lenaFaceMosaic', img)

cv.waitKey(0)
cv.destroyAllWindows()
效果:
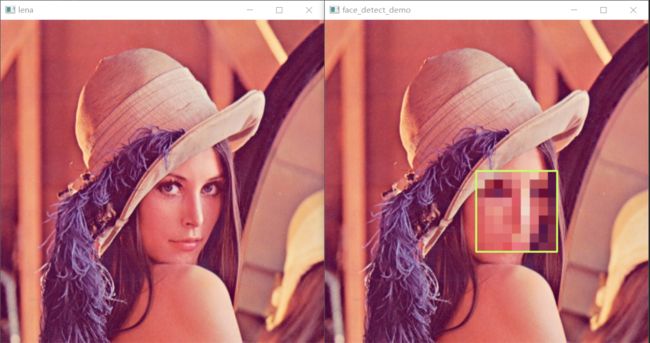
级联分类器实现人脸的自动检测:
根据级联分类器的xml文件(包含了对人脸所有特征的描述,生成一个人脸检测器),使用检测器自动找到人脸,并实现马赛克。
级联分类器的原理请移步:级联分类器原理 - wumh7 - 博客园 (cnblogs.com)
import cv2 as cv

img = cv.imread(r'.\lena.jpg')
gray = cv.cvtColor(img, cv.COLOR_BGR2GRAY)
# 人脸特征的详细说明,一万多行
# 级联分类器
face_detector = cv.CascadeClassifier(r".\lbpcascade_frontalface_improved.xml")
faces = face_detector.detectMultiScale(gray,
                                       scaleFactor=1.1,
                                       minNeighbors=3)
s = 15
for x, y, w, h in faces:
    face = img[y:y + h, x:x + w][::s, ::s]
    face = np.repeat(face, s, axis=0)
    face = np.repeat(face, s, axis=1)
    face = cv.resize(face, (h, w))
    img[y:y + h, x:x + w] = face
    cv.rectangle(img, (x, y), (x + w, y + h), (100, 255, 200), 2)
    cv.imshow('face_detect_demo', img)
    cv.waitKey(0)
    cv.destroyAllWindows()
效果: