iOS应用开发视频教程笔记(五)Protocols and Gestures
自动旋转
旋转设备之后,view的bounds跟着改变了。当设备旋转时controller发生了什么?一是controller的view会调整它们的frame,但只在controller允许的时候,可以实现这个方法:
- (BOOL)shouldAutorotateToInterfaceOrientation:(UIInterfaceOrientation)orientation

{

    return UIInterfaceOrientationIsPortrait(orientation); // only support portrait

    return YES; // support all orientations

    return (orientation != UIInterfaceOrientationPortraitUpsideDown); // anything but

}
返回controller是否允许它的view自动根据设备的旋转而旋转。这个自动旋转接口包括竖直、上下颠倒、左横向和右横向这4种情况。这儿有个宏UIInterfaceOrientationIsPortrait,返回它来检查是否是你想要的旋转方向。旋转的时候view的bounds会改变,它的子view的frame会变,子view的子view也会变。改变的衡量被称为struts和springs。
当view的bounds改变,drawRect不会再次被默认调用。

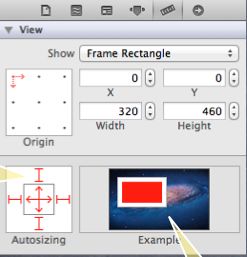
通过Xcode的size inspector设置struts和springs,红色的I就是struts,中间的红色箭头就是springs。右边红白色的显示屏似的就是用动画告诉你父view改变时它的变化,白色的是父view,红色的是你选中的view。中间的springs有两个方向,当父view改变大小时会在两个方向都改变大小。4个struts用来保持它到父view的边缘的距离,view会随着父view变大变小。
view里有个办法可以控制bound改变时造成延伸的情况,有个property叫做contentMode,它描述了你的view是做什么的,何时它的bound改变了。
主要有三种模式,第一种是上下左右等关于位置的,它的作用是把view的像素点移到规定的位置上。
@property (nonatomic) UIViewContentMode contentMode;

UIViewContentMode{Left,Right,Top,Right,BottomLeft,BottomRight,TopLeft,TopRight}
如果contentMode是right,那些点就移到右边去。
第二种模式是缩放、填充、内容填充、内容适应,这会对像素点进行拉伸,Tofill是默认的模式,它会自动缩放像素点以填满新的空间,这可能会扭曲图形。
UIViewContentModeScale{ToFill,AspectFill,AspectFit} // bit stretching/shrinking
第三种是重绘,也就是再次调用drawRect。
初始化一个UIView,如果想要为自定义view设置一些初始状态如contentMode,可以重载它的指定初始化initWithFrame,但当你的view离开了storyboard,它的init就不会被调用了。有个方法叫awakeFromNib,当veiw离开storyboard的时候它会被调用,所以任何关于设置的代码在两个方法里都会被调用。
-(void)setup { ... }

-(void)awakeFromNib { [self setup]; }

-(id)initWithFrame:(CGRect)aRect

{

     self = [super initWithFrame:aRect];

     [self setup];

     return self;

}
协议(protocol)
协议没有对应的@implementation,协议的实现在另一个对象里。协议就是一个方法和property的集合,它的实现则是由其它对象完成。
@protocol Foo <Other, NSObject> // implementors must implement Other and NSObject too

- (void)doSomething; // implementors must implement this (methods are @required by default)

@optional

- (int)getSomething; // implementors do not have to implement this

- (void)doSomethingOptionalWithArgument:(NSString *)argument; // also optional

@required

- (NSArray *)getManySomethings:(int)howMany; // back to being “must implement”

@property (nonatomic, strong) NSString *fooProp; // note that you must specify strength

@end
唯一注意的是,可以有一个协议依赖于另一个协议,如这个例子里有人实现协议Foo,就必须实现Other和NSObject。
所有的方法都是必须实现的,除非放到了optional里。@optional表示监听的方法是可选的,直到遇到@required,之后就又变成必须的了。
协议可以有自己的头文件如Foo.h,然后再import到实现和使用的地方。还可以定义在其它类的头文件中。
声明了协议,类就可以在@interface里用<>来实现协议。
#import “Foo.h” // importing the header file that declares the Foo @protocol

@interface MyClass : NSObject <Foo> // MyClass is saying it implements the Foo @protocol

...

@en
新的类型,id<protocol>,它表示一个指向未知类的对象。我可以以这种类型向这些对象发送在我协议里面的消息,而不用做任何内省,编译器会帮我检查。
id<Foo> obj = [[MyClass alloc] init];
不仅可以声明变量,还可以把它们当参数传递。
- (void)giveMeFooObject:(id <Foo>)anObjectImplementingFoo;

@property (nonatomic, weak) id <Foo> myFooProperty; // properties too!
这里的参数id<foo>,也就是一个能够回应foo方法的未知类的对象。
协议最主要的用途是委托(delegate)或数据源(datasource)。委托几乎都是weak的,因为被设为委托的对象通常都是委托对象的所有者或创建者。如controller常常把自己设为view的委托或数据源,你不想要它们互相用strong指针互指。所以view只会weak指向会controller。
scrollView例子,scrollView.h文件:
@protocol UIScrollViewDelegate

@optional

- (UIView *)viewForZoomingInScrollView:(UIScrollView *)sender;

- (void)scrollViewDidEndDragging:(UIScrollView *)sender willDecelerate:(BOOL)decelerate;

@end

@interface UIScrollView : UIView

@property (nonatomic, weak) id <UIScrollViewDelegate> delegate;

@end
@interface MyViewController : UIViewController <UIScrollViewDelegate>

@property (nonatomic, weak) IBOutlet UIScrollView *scrollView;

@end

@implementation MyViewController

- (void)setScrollView:(UIScrollView *)scrollView {

    _scrollView = scrollView;

self.scrollView.delegate = self; // compiler won’t complain

}

- (UIView *)viewForZoomingInScrollView:(UIScrollView *)sender { return ... };

@end
手势识别
手势识别是怎么工作的?手势识别是个对象,它监控view的点击事件。当它发现某种点击的时候比如挤压、滑动、拖动、点击之类的,它会发消息给手势识别处理者,就可以做相应的反应了。最基础的类是UIGestureRecognizer,它是抽象的,需要实现。
使用手势识别有两个步骤,先创建一个再把它附在view上,然后当手势被识别的时候进行处理。第一步通常是controller来做的,controller来决定它的view需要实现比如拖动和点击,本质上就是打开这两个开关。但是手势的处理常常是view做的,但还是让controller来添加手势到view上。另外一些手势的处理可能要靠controller来实现,就是涉及到修改model的手势。如果有个手势会改变model,controller会处理,因为view看不到model。所以通常都是controller在添加手势,view对自己添加手势也是可能的,某些view如果手势不能被识别就没有意义,那么就可以自己添加手势。controller可以移除手势。
- (void)setPannableView:(UIView *)pannableView

{

      _pannableView = pannableView;

      UIPanGestureRecognizer *pangr = [[UIPanGestureRecognizer alloc] initWithTarget:pannableView action:@selector(pan:)];

      [pannableView addGestureRecognizer:pangr];

}
这段代码用来添加手势识别到view上。target是手势识别之后的处理者,这里是view自身来处理。然后pan:是发送给view的消息,也就是action发给target。但pan:不是发送者,手势识别调用这个准备发送的消息,所以它不是发送者,手势识别才是。
怎么实现手势识别?每个手势都提供了自己的方法,比如拖动提供了这三个方法:
- (CGPoint)translationInView:(UIView *)aView;

- (CGPoint)velocityInView:(UIView *)aView;

- (void)setTranslation:(CGPoint)translation inView:(UIView *)aView;
第一个会给你一个坐标点告诉你,从上个手势点到这个点的距离。第二个告诉你手指移动的速度,每秒几个像素点。最后一个方法是第一个方法的setter,如果返回0,你就会得到增量的更新。重设translation就是为了得到增量的结果。
除了具体手势识别,还有一个很重要的抽象手势识别提供的property叫做sate。所以手势识别是个状态机。
@property (readonly) UIGestureRecognizerState state;
所有的手势识别初始状态都是possible。如果手势很短比如点击,那么状态就变成Recognized,所以你的处理函数被调用,状态变成Recognized。如果手势一直持续下去比如拖动、缩放,那么开始时候的状态是Began,变化中是Changed,手指抬起来是Ended。还有状态Failed和Cancelled,这两个只有当你实现一个操作的时候才用到。
那pan:到底是什么样的呢?
- (void)pan:(UIPanGestureRecognizer *)recognizer

{

     if ((recognizer.state == UIGestureRecognizerStateChanged) || (recognizer.state == UIGestureRecognizerStateEnded)) {

           CGPoint translation = [recognizer translationInView:self];

           // move something in myself (I’m a UIView) by translation.x and translation.y

           // for example, if I were a graph and my origin was set by an @property called origin

           self.origin = CGPointMake(self.origin.x+translation.x, self.origin.y+translation.y);

           [recognizer setTranslation:CGPointZero inView:self];

     }

}
参数是UIPanGestureRecognizer,我要做的是不管状态的拖动,只需要知道Changed和Ended,只关注移动的时候。需要translation也就是拖动的距离,然后要重设translation为0,因为下次拖动的时候我想要的是移动的增量。
UIPinchGestureRecognizer:缩放手势(pinch),缩放开始的时候是1。缩放也可以被重设,然后就得到增量的缩放;也有缩放的速度。
UIRotationGestureRecognizer:旋转手势,两个手指按下,然后旋转,是个弧度,不是角度。
UISwipeGestureRecognizer:滑动有好几种,一指两指都可以。只要创建一个滑动识别,再设置它的一个property表明需要识别多少手指。
UITapGestureRecognizer:点击手势,和滑动识别一样,可以识别多跟手指。
Demo
Model:int happiness,表示幸福度;
View:自定义的view叫做FaceView,会画一些。
Controller:HappinessViewController
关注(watch for):
要在drawRect里加入子程序、如何执行委托;
有两个手势,一个会被view处理,因为它只修改显示,另一个会被controller处理,因为它修改了model,它会改变幸福度。
新建一个项目,名叫Happiness,使用storyboard。
HappinessViewController.h 文件代码:
#import <UIKit/UIKit.h>


@interface HappinessViewController : UIViewController


@property (nonatomic) int happiness;  // 0 is sad; 100 is very happy


@end
HappinessViewController.m文件代码:
#import "HappinessViewController.h"

#import "FaceView.h"


@interface HappinessViewController()

@property (nonatomic, weak) IBOutlet FaceView *faceView;

@end


@implementation HappinessViewController


@synthesize happiness = _happiness;

@synthesize faceView = _faceView;


- (void)setHappiness:(int)happiness

{

    _happiness = happiness;

    [self.faceView setNeedsDisplay]; // any time our Model changes, redraw our View

}


- (void)setFaceView:(FaceView *)faceView

{

    _faceView = faceView;

    // enable pinch gestures in the FaceView using its pinch: handler

    [self.faceView addGestureRecognizer:[[UIPinchGestureRecognizer alloc] initWithTarget:self.faceView action:@selector(pinch:)]];

}


- (BOOL)shouldAutorotateToInterfaceOrientation:(UIInterfaceOrientation)toInterfaceOrientation

{

    return YES; // support all orientations

}


@end
FaceView.h文件代码:
#import <UIKit/UIKit.h>


@interface FaceView : UIView


@property (nonatomic) CGFloat scale;


- (void)pinch:(UIPinchGestureRecognizer *)gesture;


@end
FaceView.m文件代码:
#import "FaceView.h"


@implementation FaceView


@synthesize scale = _scale;


#define DEFAULT_SCALE 0.90


- (CGFloat)scale

{

    if (!_scale) {

        return DEFAULT_SCALE; // don't allow zero scale

    } else {

        return _scale;

    }

}


- (void)setScale:(CGFloat)scale

{

    if (scale != _scale) {

        _scale = scale;

        [self setNeedsDisplay]; // any time our scale changes, call for redraw

    }

}


- (void)pinch:(UIPinchGestureRecognizer *)gesture

{

    if ((gesture.state == UIGestureRecognizerStateChanged) ||

        (gesture.state == UIGestureRecognizerStateEnded)) {

        self.scale *= gesture.scale; // adjust our scale

        gesture.scale = 1;           // reset gestures scale to 1 (so future changes are incremental, not cumulative)

    }

}


- (void)setup

{

    self.contentMode = UIViewContentModeRedraw; // if our bounds changes, redraw ourselves

}


- (void)awakeFromNib

{

    [self setup]; // get initialized when we come out of a storyboard

}


- (id)initWithFrame:(CGRect)frame

{

    self = [super initWithFrame:frame];

    if (self) {

        [self setup]; // get initialized if someone uses alloc/initWithFrame: to create us

    }

    return self;

}


- (void)drawCircleAtPoint:(CGPoint)p withRadius:(CGFloat)radius inContext:(CGContextRef)context

{

    UIGraphicsPushContext(context);

    CGContextBeginPath(context);

    CGContextAddArc(context, p.x, p.y, radius, 0, 2*M_PI, YES); // 360 degree (0 to 2pi) arc

    CGContextStrokePath(context);

    UIGraphicsPopContext();

}


- (void)drawRect:(CGRect)rect

{

    CGContextRef context = UIGraphicsGetCurrentContext();


    CGPoint midPoint; // center of our bounds in our coordinate system

    midPoint.x = self.bounds.origin.x + self.bounds.size.width/2;

    midPoint.y = self.bounds.origin.y + self.bounds.size.height/2;


    CGFloat size = self.bounds.size.width / 2;

    if (self.bounds.size.height < self.bounds.size.width) size = self.bounds.size.height / 2;

    size *= self.scale; // scale is percentage of full view size


    CGContextSetLineWidth(context, 5.0);

    [[UIColor blueColor] setStroke];


    [self drawCircleAtPoint:midPoint withRadius:size inContext:context]; // head


#define EYE_H 0.35

#define EYE_V 0.35

#define EYE_RADIUS 0.10


    CGPoint eyePoint;

    eyePoint.x = midPoint.x - size * EYE_H;

    eyePoint.y = midPoint.y - size * EYE_V;


    [self drawCircleAtPoint:eyePoint withRadius:size * EYE_RADIUS inContext:context]; // left eye

    eyePoint.x += size * EYE_H * 2;

    [self drawCircleAtPoint:eyePoint withRadius:size * EYE_RADIUS inContext:context]; // right eye


#define MOUTH_H 0.45

#define MOUTH_V 0.40

#define MOUTH_SMILE 0.25


    CGPoint mouthStart;

    mouthStart.x = midPoint.x - MOUTH_H * size;

    mouthStart.y = midPoint.y + MOUTH_V * size;

    CGPoint mouthEnd = mouthStart;

    mouthEnd.x += MOUTH_H * size * 2;

    CGPoint mouthCP1 = mouthStart;

    mouthCP1.x += MOUTH_H * size * 2/3;

    CGPoint mouthCP2 = mouthEnd;

    mouthCP2.x -= MOUTH_H * size * 2/3;


    float smile = 1.0; // this should be delegated! it's our View's data!


    CGFloat smileOffset = MOUTH_SMILE * size * smile;

    mouthCP1.y += smileOffset;

    mouthCP2.y += smileOffset;


    CGContextBeginPath(context);

    CGContextMoveToPoint(context, mouthStart.x, mouthStart.y);

    CGContextAddCurveToPoint(context, mouthCP1.x, mouthCP2.y, mouthCP2.x, mouthCP2.y, mouthEnd.x, mouthEnd.y); // bezier curve

    CGContextStrokePath(context);

}


@end