Azure机器学习——数据集03:在训练中使用数据集
在训练中使用数据集
- 一、使用前提
- 二、连接和初始化工作区
- 三、创建试验
- 四、创建计算资源
- 五、直接在训练脚本中使用数据集
-
- 创建 TabularDataset
- 新建一个训练脚本
- 设置试验Python环境
- 配置估计器(Estimator)
- 提交试验
- 六、将文件mount到远程计算目标
-
- 创建 FileDataset
- 新建训练脚本
- 设置试验Python环境
- 装载与下载
- 配置估计器(Estimator)
- 提交试验
- 查看训练结果
- 七、总结
使用 Azure 机器学习数据集类,可以在让远程计算资源轻松访问数据集,不用自己设置连接字符串或数据路径。
Azure 机器学习数据集下面有TabularDataset和FileDataset两个类:
- 如果训练数据是结构化数据,请创建 TabularDataset,并直接在训练脚本中使用它。
- 如果训练数据是非结构化数据,请创建 FileDataset,并将文件mount到或下载到远程计算资源进行训练。
本节分别介绍如何在训练中使用这2种数据集。整个过程都在Jupyter notebook中运行。

图1 数据集在Azure机器学习中的管理和使用
一、使用前提
若要创建和使用数据集,需要:
- Azure 订阅和Azure机器学习工作区。创建方法:Azure机器学习(实战篇)——创建Azure机器学习服务
- 配置Azure机器学习开发环境。配置方法:Azure机器学习(实战篇)——配置 Azure 机器学习开发环境
- 建议阅读:Azure机器学习(实战篇)——数据集01和02节。
查看Azure机器学习版本:
# Check core SDK version number
import azureml.core

print('SDK version:', azureml.core.VERSION)
输出:
SDK version: 1.0.85
二、连接和初始化工作区
整个训练过程都是在Azure机器学习工作区内开展的。所以第一步是要连接到工作区。如果还没有工作区,请先创建一个,创建步骤详见:Azure机器学习(实战篇)——创建Azure机器学习服务的第二部分。
使用以下代码连接到Azure机器学习工作区:
ws = Workspace.from_config('config.json')
print('Workspace name: ' + ws.name, 'Azure region: ' + ws.location,
      'Subscription id: ' + ws.subscription_id, 'Resource group: ' + ws.resource_group, sep = '\n')
'config.json’是存在本地的连接工作区的配置文件,该文件生成方法详见:Azure机器学习(实战篇)——配置 Azure 机器学习开发环境的第四部分。
输出:

三、创建试验
在当前工作区中创建一个试验,以便在该试验下训练模型。
试验是工作区下面的一个逻辑容器,它涵盖了每一次模型训练的运行记录和结果信息。
from azureml.core import Experiment

experiment_name = 'train-with-datasets'
experiment = Experiment(ws, name=experiment_name)
试验创建成功后,可以在Azure机器学习studio中查看。
Azure机器学习studio是除Python SDK外使用Azure机器学习的另一种方式。
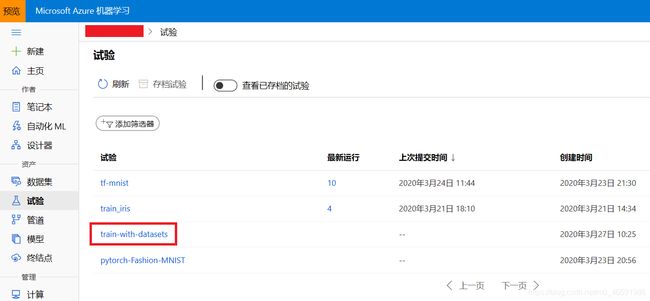
图2 在Azure机器学习studio中查看试验信息
四、创建计算资源
创建计算资源的详细过程可以参考上一节,这里我们直接使用已经创建好的名为“cpu-cluster"的计算集群。
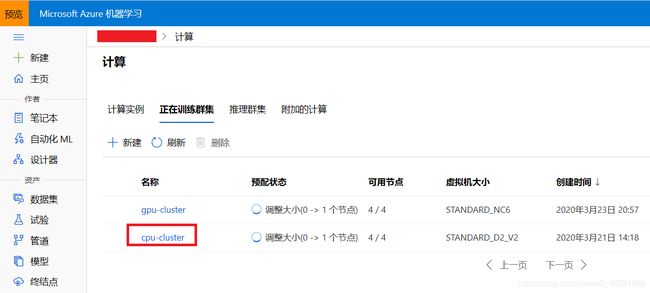
图3 在Azure机器学习studio中查看计算资源信息
使用现有的计算资源’cpu-cluster’:
from azureml.core.compute import AmlCompute
from azureml.core.compute import ComputeTarget
import os

# choose a name for your cluster
compute_name = os.environ.get('AML_COMPUTE_CLUSTER_NAME', 'cpu-cluster')
compute_min_nodes = os.environ.get('AML_COMPUTE_CLUSTER_MIN_NODES', 0)
compute_max_nodes = os.environ.get('AML_COMPUTE_CLUSTER_MAX_NODES', 4)

# This example uses CPU VM. For using GPU VM, set SKU to STANDARD_NC6
vm_size = os.environ.get('AML_COMPUTE_CLUSTER_SKU', 'STANDARD_D2_V2')


if compute_name in ws.compute_targets:
    compute_target = ws.compute_targets[compute_name]
    if compute_target and type(compute_target) is AmlCompute:
        print('found compute target. just use it. ' + compute_name)
else:
    print('creating a new compute target...')
    provisioning_config = AmlCompute.provisioning_configuration(vm_size=vm_size,
                                                                min_nodes=compute_min_nodes,
                                                                max_nodes=compute_max_nodes)

    # create the cluster
    compute_target = ComputeTarget.create(ws, compute_name, provisioning_config)

    # can poll for a minimum number of nodes and for a specific timeout.
    # if no min node count is provided it will use the scale settings for the cluster
    compute_target.wait_for_completion(show_output=True, min_node_count=None, timeout_in_minutes=20)

     # For a more detailed view of current AmlCompute status, use get_status()
    print(compute_target.get_status().serialize())
五、直接在训练脚本中使用数据集
我们先创建一个TabularDataset ,并将其用作用于训练的估计器(estimator )对象的直接输入。
创建 TabularDataset
可以从Azure Blob存储和公开的urls创建TabularDataset,数据集的创建详见:Azure机器学习(实战篇)——数据集02:创建和注册数据集
下面代码演示了从web url创建数据集:
from azureml.core.dataset import Dataset

web_path ='https://dprepdata.blob.core.windows.net/demo/Titanic.csv'
titanic_ds = Dataset.Tabular.from_delimited_files(path=web_path)
你也可以从Azure Blob存储创建TabularDataset,我们以Iris数据集为例,首先将数据集从本地上传到工作区默认的Blob存储下:
# 连接工作区默认的Blob存储
datastore = ws.get_default_datastore()
# 将数据集从本地上传到工作区默认的Blob存储
datastore.upload_files(files = ['./train-dataset/iris.csv'],
                       target_path = 'train-dataset/tabular/',
                       overwrite = True,
                       show_progress = True)
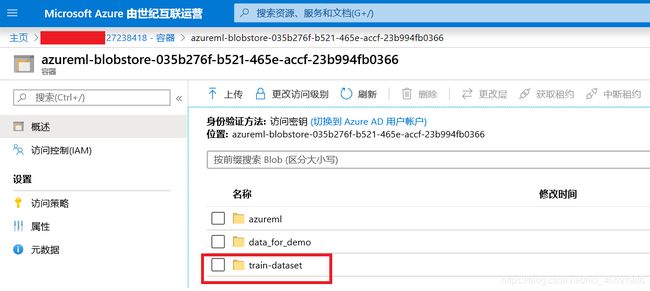
图4 本地文件成功上传到Blob存储
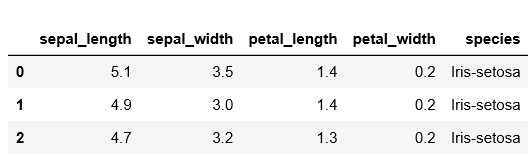
接下来我们用TabularDataset类创建一个Azure机器学习数据集(Dataset),TabularDataset类其实引用了Iris数据集在datastore中的路径。之后可以将数据集转化为pandas格式。
from azureml.core import Dataset
dataset = Dataset.Tabular.from_delimited_files(path = [(datastore, 'train-dataset/tabular/iris.csv')])

# preview the first 3 rows of the dataset
dataset.take(3).to_pandas_dataframe()
输出:
新建一个训练脚本
首先创建一个script_folder保存脚本文件:
script_folder = './train-dataset'
os.makedirs(script_folder, exist_ok=True)
创建训练脚本train_iris.py并将其copy到script_folder文件夹,脚本代码如下:
import os

from azureml.core import Dataset, Run
from sklearn.model_selection import train_test_split
from sklearn.tree import DecisionTreeClassifier
from sklearn.externals import joblib

run = Run.get_context()
# get input dataset by name
dataset = run.input_datasets['iris']

df = dataset.to_pandas_dataframe()

x_col = ['sepal_length', 'sepal_width', 'petal_length', 'petal_width']
y_col = ['species']
x_df = df.loc[:, x_col]
y_df = df.loc[:, y_col]

#dividing X,y into train and test data
x_train, x_test, y_train, y_test = train_test_split(x_df, y_df, test_size=0.2, random_state=223)

data = {'train': {'X': x_train, 'y': y_train},

        'test': {'X': x_test, 'y': y_test}}

clf = DecisionTreeClassifier().fit(data['train']['X'], data['train']['y'])
model_file_name = 'decision_tree.pkl'

print('Accuracy of Decision Tree classifier on training set: {:.2f}'.format(clf.score(x_train, y_train)))
print('Accuracy of Decision Tree classifier on test set: {:.2f}'.format(clf.score(x_test, y_test)))

os.makedirs('./outputs', exist_ok=True)
with open(model_file_name, 'wb') as file:
    joblib.dump(value=clf, filename='outputs/' + model_file_name)
以上代码通过的Run对象访问输入数据集。
设置试验Python环境
由于云上计算集群的节点是以docker容器的形式运行计算任务,而不同的试验任务会使用不同的Python环境和依赖。所以对每次试验运行,我们都要先定义一个Python环境,然后根据该环境创建docker镜像,计算节点再使用这些docker镜像初始化容器并执行计算。
一般来说,直接使用Azure机器学习Python SDK中现成的SKLearn、PyTorch和TensorFlow等框架提交试验任务,任务的Python环境都会自动配置好,基本不需要自行设置。但是在Mooncake上创建docker镜像时,因为网络原因conda和pip从默认源获取资源的速度非常慢,因此我们用下面的代码自己设置试验运行需要的依赖包和更新conda和pip的国内源。
更详细的介绍请参考:Azure机器学习(实战篇)——配置 Azure 机器学习Python环境
from azureml.core.environment import Environment
from azureml.core.conda_dependencies import CondaDependencies

# to install required packages
env = Environment('train_titanic-env')
cd = CondaDependencies.create(pip_packages=['numpy==1.16.2','azureml-dataprep[fuse]>=1.1.14', 'azureml-defaults'],
                              conda_packages = ['scikit-learn==0.22.1'])

env.python.conda_dependencies = cd

env.docker.enabled = True
# Specify docker steps as a string. Alternatively, load the string from a file.
dockerfile = r"""
FROM mcr.microsoft.com/azureml/base:intelmpi2018.3-ubuntu16.04
RUN conda config --add channels https://mirrors.ustc.edu.cn/anaconda/pkgs/main/ && \
conda config --add channels https://mirrors.ustc.edu.cn/anaconda/pkgs/free/ && \
conda config --add channels https://mirrors.ustc.edu.cn/anaconda/cloud/conda-forge/ && \
conda config --add channels https://mirrors.ustc.edu.cn/anaconda/cloud/msys2/ && \
conda config --add channels https://mirrors.ustc.edu.cn/anaconda/cloud/bioconda/ && \
conda config --add channels https://mirrors.ustc.edu.cn/anaconda/cloud/menpo/ && \
conda config --set show_channel_urls yes
RUN pip install -U pip
RUN pip config set global.index-url http://mirrors.aliyun.com/pypi/simple
RUN pip config set install.trusted-host mirrors.aliyun.com
RUN echo "Hello from custom container!"
"""

# Set base image to None, because the image is defined by dockerfile.
env.docker.base_image = None
env.docker.base_dockerfile = dockerfile

# Register environment to re-use later
env.register(workspace = ws)
配置估计器(Estimator)
估计器(Estimator)类其实是一个和配置环境相关的对象,它告诉远程计算资源如何准备运行环境。Azure机器学习SDK的train目录下有SKLearn、PyTorch、TensorFlow等估计器类,它们都预先配置了一部分运行所依赖的环境。
以下代码配置了一个SKLearn估计器类。
from azureml.train.sklearn import SKLearn

est = SKLearn(source_directory=script_folder,
              entry_script='train_iris.py',
              # pass dataset object as an input with name 'titanic'
              inputs=[dataset.as_named_input('iris')],
              environment_definition=env,
              compute_target=compute_target)
其中:
- source_directory是之前创建的本地文件夹,包含了train_iris.py这个脚本。
- entry_script是训练模型的脚本的相对路径。
- inputs是估计器的输入,它将上面定义的dataset命名为’iris’,在脚本中通过run.input_datasets[‘iris’]就可以使用这个数据集。
- Azure机器学习每次训练模型时都会创建docker容器来执行具体的计算,environment_definition表示创建docker容器时需要的镜像文件,该镜像文件定义了试验运行的Python环境等信息。
- compute_target是本次训练用到的计算集群。这里我们用云上的计算集群,但你也可以选择其他计算目标类型,例如 Azure Vm,甚至是本地计算机。
提交试验
运行以下代码将试验提交到云上进行计算:
run = experiment.submit(est)
查看试验运行状态:
from azureml.widgets import RunDetails

# monitor the run
RunDetails(run).show()
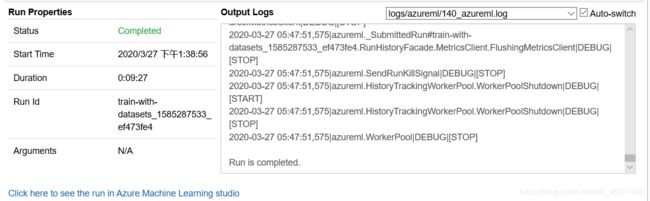
图5 试验运行状态输出
六、将文件mount到远程计算目标
这里使用FileDataset来将图像数据mount给远程计算资源以进行模型训练。
创建 FileDataset
首先从 web url 创建 FileDataset。
from azureml.core.dataset import Dataset

web_paths = [
            'http://yann.lecun.com/exdb/mnist/train-images-idx3-ubyte.gz',
            'http://yann.lecun.com/exdb/mnist/train-labels-idx1-ubyte.gz',
            'http://yann.lecun.com/exdb/mnist/t10k-images-idx3-ubyte.gz',
            'http://yann.lecun.com/exdb/mnist/t10k-labels-idx1-ubyte.gz'
            ]
mnist_ds = Dataset.File.from_files(path = web_paths)
这里我们通过web url引用了mnist数据集。
新建训练脚本
同理,首先创建一个script_folder保存脚本文件:
script_folder = './train-dataset_mount'
os.makedirs(script_folder, exist_ok=True)
创建训练脚本train.py和utils.py并将它们copy到script_folder文件夹,utils.py脚本代码如下:
import gzip
import numpy as np
import struct


# load compressed MNIST gz files and return numpy arrays
def load_data(filename, label=False):
    with gzip.open(filename) as gz:
        struct.unpack('I', gz.read(4))
        n_items = struct.unpack('>I', gz.read(4))
        if not label:
            n_rows = struct.unpack('>I', gz.read(4))[0]
            n_cols = struct.unpack('>I', gz.read(4))[0]
            res = np.frombuffer(gz.read(n_items[0] * n_rows * n_cols), dtype=np.uint8)
            res = res.reshape(n_items[0], n_rows * n_cols)
        else:
            res = np.frombuffer(gz.read(n_items[0]), dtype=np.uint8)
            res = res.reshape(n_items[0], 1)
    return res


# one-hot encode a 1-D array
def one_hot_encode(array, num_of_classes):
    return np.eye(num_of_classes)[array.reshape(-1)]
train.py脚本代码如下:
import argparse
import os
import numpy as np
import glob

from sklearn.linear_model import LogisticRegression
from sklearn.externals import joblib

from azureml.core import Run
from utils import load_data

# retrieve the 2 arguments configured through script_params in estimator
parser = argparse.ArgumentParser()
parser.add_argument('--data-folder', type=str, dest='data_folder', help='data folder mounting point')
parser.add_argument('--regularization', type=float, dest='reg', default=0.01, help='regularization rate')
args = parser.parse_args()

data_folder = args.data_folder
print('Data folder:', data_folder)

# get the file paths on the compute
X_train_path = glob.glob(os.path.join(data_folder, '**/train-images-idx3-ubyte.gz'), recursive=True)[0]
X_test_path = glob.glob(os.path.join(data_folder, '**/t10k-images-idx3-ubyte.gz'), recursive=True)[0]
y_train_path = glob.glob(os.path.join(data_folder, '**/train-labels-idx1-ubyte.gz'), recursive=True)[0]
y_test = glob.glob(os.path.join(data_folder, '**/t10k-labels-idx1-ubyte.gz'), recursive=True)[0]

# load train and test set into numpy arrays
X_train = load_data(X_train_path, False) / 255.0
X_test = load_data(X_test_path, False) / 255.0
y_train = load_data(y_train_path, True).reshape(-1)
y_test = load_data(y_test, True).reshape(-1)
print(X_train.shape, y_train.shape, X_test.shape, y_test.shape, sep = '\n')

# get hold of the current run
run = Run.get_context()

print('Train a logistic regression model with regularization rate of', args.reg)
clf = LogisticRegression(C=1.0/args.reg, solver="liblinear", multi_class="auto", random_state=42)
clf.fit(X_train, y_train)

print('Predict the test set')
y_hat = clf.predict(X_test)

# calculate accuracy on the prediction
acc = np.average(y_hat == y_test)
print('Accuracy is', acc)

run.log('regularization rate', np.float(args.reg))
run.log('accuracy', np.float(acc))

os.makedirs('outputs', exist_ok=True)
# note file saved in the outputs folder is automatically uploaded into experiment record
joblib.dump(value=clf, filename='outputs/sklearn_mnist_model.pkl')
确保’./train-dataset_mount’文件夹下面有这两个脚本:
print(os.listdir(script_folder))
输出:
['train.py', 'utils.py']
设置试验Python环境
本次运行所用的python环境和依赖包和上面的Iris运行用的没有变化,所以重复使用上次配置的环境”env".
装载与下载
从Blob存储创建的Azure机器学习数据集支持装载(mount)和下载(download)。
当装载(mount)一个数据集时,你是将数据集引用的文件附加到了某个目录(mount point),从而让计算资源可以使用这个数据集。装载(mount)操作可以在Linux系统的计算目标中使用。
下载(download)一个数据集是指将这个数据集引用的所有文件下载到了计算目标中。该操作可以在Azure机器学习所有的计算资源中使用。
当计算资源的应该可以容纳全部数据集时,建议使用下载(download)操作将数据集引用的所有文件一次性下载到计算资源上,这样可以避免在训练中反复传输数据。反之则建议使用装载(mount)操作。
更多关于Python的装载(mount)操作请参考tempfile — Generate temporary files and directories。
配置估计器(Estimator)
估计器(Estimator)类其实是一个和配置环境相关的对象,它告诉远程计算资源如何准备运行环境。Azure机器学习SDK的train目录下有SKLearn、PyTorch、TensorFlow等估计器类,它们都预先配置了一部分运行所依赖的环境。
以下代码配置了一个SKLearn估计器类。
from azureml.train.sklearn import SKLearn

script_params = {
    '--data-folder': mnist_ds.as_named_input('mnist').as_mount(),
    '--regularization': 0.5
}

mount_est = SKLearn(source_directory=script_folder,
                script_params=script_params,
                compute_target=compute_target,
                entry_script='train.py',
                environment_definition=env)
这里SKLearn估计器的参数和上面相比有些变化,其中:
- script_params是脚本的参数,这里我们定义了数据集文件和惩罚项,这两个最终会传递到训练脚本。
除了通过估计器中的 inputs 参数传递数据集外,还可以通过 script_params 传递数据集,并通过参数让训练脚本获取的数据路径(mounting point)。 这样,你就可以使训练脚本独立于 azureml-sdk。 换句话说,你将可以在任何云平台上使用相同的训练脚本进行本地调试和远程训练。
提交试验
运行以下代码将试验提交到云上进行计算:
run = experiment.submit(mount_est)
查看试验运行状态:
from azureml.widgets import RunDetails

# monitor the run
RunDetails(run).show()

图6 试验运行中
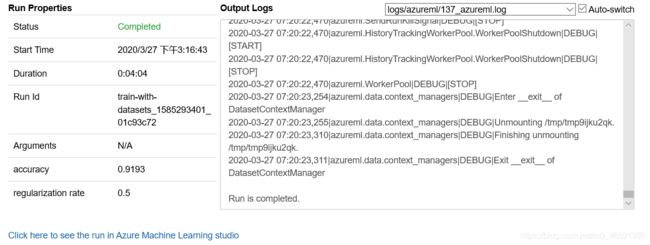
图7 试验完成
查看训练结果
print(run.get_metrics())
输出:
{'accuracy': 0.9193, 'regularization rate': 0.5}
七、总结
本节首先介绍了创建Azure机器学习数据集的2种方法:对于结构化数据,创建TabularDataset;对于非结构化数据,创建FileDataset。
然后介绍了在训练中使用上述2种数据集的方法:直接在训练脚本中使用和将文件mount到计算资源。