vue - element 表格使用总结(分页器、查询表单、多级表头、展开行、自定义列、后端排序、响应式高度)

参加工作工作半年了,平日里主要使用 element-ui 组件库,磕磕碰碰也踩了不少坑。今日闲来无事,针对该组件库中的 el-table 组件的使用做个总结,也方便以后查找。
TIPS:
- 本文只列出一些关键性的思路和代码,欲了解更多的信息,还是去看官网吧!
- 本文纯属个人实践总结所得,如有不足或错误,欢迎指出!
文章目录
-
-
-
- 1. 最最基础的表格
- 2. 带分页器的表格(后端分页)
- 3. 带查询表单的表格
- 4. 多级表头表格
- 5. 带展开行的表格
- 6. 自定义显示/隐藏列的表格
- 7. 带后端排序的表格
- 8. 响应式表格高度的表格
-
-
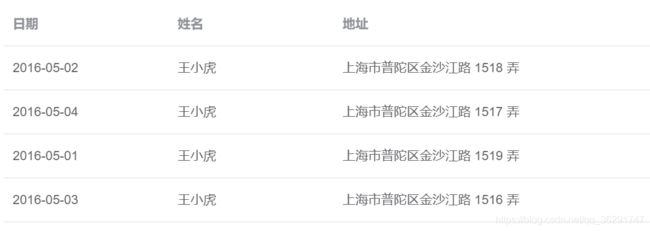
1. 最最基础的表格
千里之行始于足下。
在基础表格的基础上,添加分页器(分页功能)、过滤器(过滤数据),查询表单(列表数据查询),排序按钮(前端默认排序)、复选框(可对选择的一条或者多条数据进行操作)等,就能实现很多的功能。
表格常用属性说明如下:
| 参数 | 说明 | 类型 | 默认值 | 参考值 |
|---|---|---|---|---|
| data | 显示的数据 | array | ---- | 在表格初始化时,获取表格数据 |
| prop | 对应列内容的字段名,也可以使用 property 属性 | string | ---- | 在表格初始化时,获取表格数据 |
| label | 显示的标题 | string | ---- | ---- |
| width | 对应列的宽度 | string | ---- | ---- |
| min-width | 对应列的最小宽度,与 width 的区别是 width 是固定的,min-width 会把剩余宽度按比例分配给设置了 min-width 的列 | string | ---- | 将表格数据列的最后一列用 min-widtn 来设置最小宽度 |
| border | 为表格添加边框 | boolean | false | true |
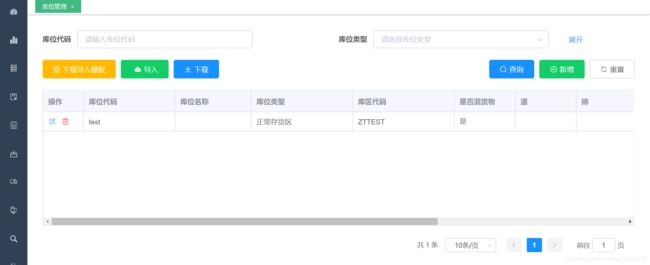
2. 带分页器的表格(后端分页)
数据量比较大时,分页功能就显得尤为重要了。
开发系统中所使用的表格,基本都带有分页器,实现上使用的是后端分页。
说明: 为表格添加分页功能,首先要在页面上增加分页器,其次就是将分页器的分页逻辑与表格数据绑定起来。分页能与其它功能配合使用,比如:查询功能、重置功能、筛选功能等。
关键代码示例如下所示:
<template>
  <div class="item-management-container">
    <div class="item-management-text">
      <el-table
        v-loading="loading"
        :data="tableData"
        stripe
        style="width: 100%"
        :header-cell-style="getHeaderStyle"
        min-height="380"
        :row-style="{ 'line-height': 0 }"
        :cell-style="{ 'padding': '4px' }"
      >
        <el-table-column
          prop="itemCode"
          label="货物代码"
          width="180"
          :show-overflow-tooltip="true"
        />
        <el-table-column
          prop="itemName"
          label="货物名称"
          width="180"
          :show-overflow-tooltip="true"
        />
       <!-- …… -->

      </el-table>

      <pagination
        :total="pagination.total"
        :page.sync="pagination.listQuery.page"
        :limit.sync="pagination.listQuery.limit"
        style="float: right; marginTop: -10px; marginBottom: -20px;"
        @pagination="getList"
      />

    </div>
    <!-- 返回页面顶部按钮 -->
    <back-to-top />
  </div>
</template>

<script>
import Pagination from '@/components/Pagination'
import BackToTop from '@/components/BackToTop'

export default {
  name: 'ItemManagement',
  components: { Pagination, BackToTop },
  data() {
    return {
      loading: false,
      // 表格数据
      tableData: [],
      // 分页器设置数据
      pagination: {
        total: 0,
        listQuery: {
          page: 1,
          limit: 10
        }
      },
      // 表格数据分页配置(可包括分页器数据和查询数据)
      pageConfig: {
        pageNum: 1,
        pageSize: 10
      },
    }
  },
  created() {
    // 页面初始化好以后加载必需的初始数据
    this.getTableData(this.pageConfig)
  },
  methods: {
    // 设置表格头部样式
    getHeaderStyle({ row, column, rowIndex, columnIndex }) {
      if (rowIndex === 0) {
        return {
          'background-color': '#F6F7FD',
          'line-height': 3,
          'padding': 0
        }
      }
    },

    getList(page, limit) {
      // 当分页器页码或分页数发生改变时,重新请求表格数据
      const pageConfig = {}
      pageConfig.pageNum = Number(page.page)
      pageConfig.pageSize = Number(page.limit)
      this.getTableData(pageConfig)
    }
	getTableData(pageConfig) {
		// 根据分页参数,发送 api 请求,获取表格数据,设置 tableData 和 loading
	}
  }
}
</script>
<style lang='scss' scoped>
.item-management {
  &-container {
    margin: 30px;
  }
  &-text {
    font-size: 30px;
    line-height: 46px;
  }
}
</style>
表格属性说明如下:
| 参数 | 说明 | 类型 | 默认值 | 参考值 |
|---|---|---|---|---|
| v-loading | 为表格添加加载中的效果 | boolean | false | ---- |
| stripe | 是否为斑马纹 table | boolean | false | ---- |
| header-cell-style | 表头单元格的 style 的回调方法,也可以使用一个固定的 Object 为所有表头单元格设置一样的 Style。 | Function({row, column, rowIndex, columnIndex})/Object | ---- | 可参考关键代码中的getHeaderStyle 函数 |
| row-style | 行的 style 的回调方法,也可以使用一个固定的 Object 为所有行设置一样的 Style。 | Function({row, rowIndex})/Object | ---- | { ‘line-height’: 0 } |
| cell-style | 单元格的 style 的回调方法,也可以使用一个固定的 Object 为所有单元格设置一样的 Style。 | Function({row, column, rowIndex, columnIndex})/Object | ---- | { ‘padding’: ‘4px’ }" |
| show-overflow-tooltip | 当内容过长被隐藏时显示 tooltip | boolean | false | true |
分页器属性说明如下:
| 参数 | 说明 | 类型 | 默认值 | 参考值 |
|---|---|---|---|---|
| total | 总条目数 | number | ---- | 从后台获取到数据后,用记录条数设置 |
| page | 当前页数 支持 .sync 修饰符 | number | ---- | ---- |
| limit | 每页显示条目个数,支持 .sync 修饰符 | number | 20 | 10 |
分页器事件说明如下:
| 事件名称 | 说明 | 回调参数 | 参考逻辑 |
|---|---|---|---|
| pagination | 当 limit 或者 page 发生改变时会触发 | { page, limit } | 当分页参数发生变化时,发送的查询请求不仅要有新的分页参数,还要始终带上查询参数,可参考关键代码中的 getList |
3. 带查询表单的表格
表格数据较多时,查询表单可以帮助用户快速找到需要的数据。
说明: 查询表单被放置在表格之前,带有展开/收起按钮。
查询操作的相关逻辑如下:
(1)用户点击查询按钮,前端向后端发送查询请求(包含用户输入关键字以及分页参数);获取到响应后,解析数据,刷新表格数据;可参考关键代码中的 handleSearch 方法。
(2)用户点击重置按钮,前端清空界面上查询表单里的数据,并向后端发送查询请求(只包含分页参数以及其它必要的参数,比如仓库ID),获得数据后,刷新表格数据;可参考关键代码中的 handleReset 方法。
关键代码示例如下所示:
<template>
  <div class="management-container">
    <div>
      <el-form ref="searchForm" :model="searchForm" :inline="true">
        <el-row>
          <el-col :span="12">
            <el-form-item :label="$t('labelLocationCode')">
              <el-input
                v-model="searchForm.locationCode"
                :placeholder="$t('form.placeholder39')"
                style="width: 27vw;"
              />
            </el-form-item>
          </el-col>
          <el-col :span="12">
            <el-form-item :label="$t('labelLocationType')">
              <el-select
                v-model="searchForm.locationTypeCode"
                filterable
                :placeholder="$t('form.placeholder40')"
                style="width: 27vw;"
              >
                <el-option
                  v-for="item in dictList_LOCATION_TYPE"
                  :key="item.id"
                  :label="item.locationTypeName"
                  :value="item.locationTypeCode"
                />
              </el-select>
              <el-button
                class="expand-btn"
                type="text"
                @click="isCollapsed = !isCollapsed"
              >{{ isCollapsed? $t('btnExpand') : $t('btnCollapse') }}</el-button>
            </el-form-item>
          </el-col>
        </el-row>
        <el-collapse-transition>
          <div v-show="!isCollapsed">
            <el-row>
              <el-col :span="12">
                <el-form-item :label="$t('labelZoneCode')">
                  <el-input
                    v-model="searchForm.zoneCode"
                    :placeholder="$t('form.placeholder37')"
                    style="width: 27vw;"
                  />
                </el-form-item>
              </el-col>
            </el-row>
          </div>
        </el-collapse-transition>
        <el-form-item class="btn-group">
          <el-button
            type="primary"
            icon="el-icon-search"
            @click="handleSearch"
          >{{ $t('btnSearch') }}</el-button>
          <el-button type="default" icon="el-icon-refresh" @click="handleReset">{{ $t('btnReset') }}</el-button>
        </el-form-item>
      </el-form>
      <el-table
        ref="table"
        v-loading="loading"
        :data="tableData"
        stripe
        border
        row-key="id"
        style="width: 100%"
        :header-cell-style="getHeaderStyle"
        height="calc(100vh - 310px)"
        :row-style="{ 'line-height': 0 }"
        :cell-style="{ 'padding': 0 }"
      >
        <el-table-column
          prop="locationCode"
          :label="$t('labelLocationCode')"
          width="180"
          :show-overflow-tooltip="true"
        />
        <el-table-column
          prop="locationName"
          v-if="colData[1].istrue"
          :label="$t('labelLocationName')"
          width="150"
          :show-overflow-tooltip="true"
        />
        <!-- .... -->
      </el-table>

      <pagination
        key="location"
        ref="location"
        :total="pagination.total"
        :page.sync="pagination.listQuery.page"
        :limit.sync="pagination.listQuery.limit"
        style="float: right; marginTop: -10px; marginBottom: -20px;"
        @pagination="getList"
      />
    </div>

    <!-- 返回页面顶部按钮 -->
    <back-to-top />
  </div>
</template>

<script>
import axios from "axios";
import { mapGetters } from "vuex";
import Pagination from "@/components/Pagination";
import BackToTop from "@/components/BackToTop";
import { Message, MessageBox } from "element-ui";
import {
  getLocations,
} from "@/api/base-data/location";

// 本地国际化数据
import local from "./locals/location";
const viewName = "location";

export default {
  name: "LocationManagement",
  components: { Pagination, BackToTop, UploadExcel },
  data() {
    return {
      loading: false,
      // 控制查询表单的展开或收起
      isCollapsed: true,
      // 查询表单
      searchForm: {
        locationCode: null,
        locationTypeCode: null
        // isFrozen: null
      },
      // 表格数据
      tableData: [],
      // 分页器设置数据
      pagination: { ...this.$global.pagination },
      // 表格数据分页配置(可包括分页器数据和查询数据)
      pageConfig: {
        pageNum: 1,
        pageSize: 10,
        whseId: getWarehouseId()
      },
      // 默认显示记录条数
      defaultPageSize: Number(localStorage.getItem("pageSize")) || 10,

    };
  },
  computed: {
    ...mapGetters(["device"]),
    searchData: function() {
      const { ...form } = this.searchForm;
      if (!form.locationCode || !form.locationCode.trim()) {
        form.locationCode = null;
      }
      if (!form.zoneCode || !form.zoneCode.trim()) {
        form.zoneCode = null;
      }
      return form;
    }
  },

  created() {
    if (!this.$i18n.getLocaleMessage("zh")[viewName]) {
      this.$i18n.mergeLocaleMessage("zh", local.zh);
      this.$i18n.mergeLocaleMessage("en", local.en);
    }

    this.pagination.listQuery.limit = this.defaultPageSize;
    this.pageConfig.pageSize = this.defaultPageSize;

    const pageConfig = {
      ...this.pageConfig,
      ...this.searchData
    };

    this.getTableData(pageConfig);
  },

  methods: {
    // 设置表格头部样式
    getHeaderStyle({ row, column, rowIndex, columnIndex }) {
      if (rowIndex === 0) {
        return {
          "background-color": "#F6F7FD",
          "line-height": 3,
          padding: 0
        };
      }
    },
    handleSearch() {
      const pageConfig = {
        ...this.pageConfig,
        ...this.searchData
      };
      this.$nextTick(() => {
        this.$refs.location.resetPagination()
      });
      this.getTableData(pageConfig);
    },
    handleReset() {
      this.searchForm = {};
      this.handleSearch();
    },
    getTableData(listConfig) {
      this.loading = true;
      getLocations(listConfig)
        .then(res => {
          this.tableData = res.result.records;
          // console.log(this.tableData)
          // 设置分页器
          this.pagination.total = res.result.total;
          this.loading = false;
        })
        .catch(err => {
          console.log("error: ", err);
          this.loading = false;
        });
    },
    getList(page, limit) {
      // 当分页器页码或分页数发生改变时,重新请求表格数据
      const pageConfig = { ...this.searchData };
      pageConfig.pageNum = Number(page.page);
      pageConfig.pageSize = Number(page.limit);
      this.getTableData(pageConfig);
    }
  }
};
</script>
<style lang='scss' scoped>
.management {
  &-container {
    margin: 30px;
  }
  &-text {
    font-size: 30px;
    line-height: 46px;
  }
}
.btn-group {
  float: right;
  margin-right: 0;
  // clear: both;
}
</style>
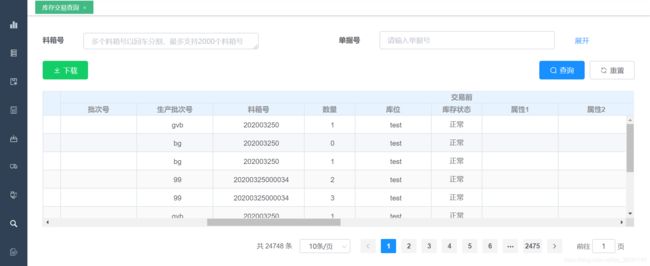
4. 多级表头表格
数据结构比较复杂的时候,可使用多级表头来展现数据的层次关系。
说明: 多级表头的实现,只需要用 el-table-column 标签嵌套其它的 el-table-column 标签。
关键代码示例如下所示:
<template>
  <div class="inventory-management-container">
    <div class="inventory-management-text¬¬¬">
      <el-table
        v-loading="loading"
        :data="tableData"
        ref="table"
        stripe
        :border="false"
        style="width: 100%;"
        :header-cell-style="{'padding': 0, 'textAlign': 'center', }"
        min-height="380"
        :row-style="{ 'line-height': 0 }"
        :cell-style="{ 'padding': .2, 'textAlign': 'center' }"
        @filter-change="handleFilter"
      >
        <el-table-column
          prop="itemCode"
          label="货物代码"
          width="180"
         :show-overflow-tooltip="true"
       />
        <el-table-column
          prop="storageNo"
          label="单据号"
          width="180"
          :show-overflow-tooltip="true"
        />
            <el-table-column label="交易前" :cell-style="{ 'padding': '-20px' }">
        		<el-table-column
                   prop="originSerialNo"
                   label="料箱号"
                   width="180"
     :show-overflow-tooltip="true"
               />
               <el-table-column
                   prop="originQty"
                   label="数量"
                   width="100"
     :show-overflow-tooltip="true"
               />
               <el-table-column
                   prop="originLocationCode"
                   label="库位"
                   width="150"
     :show-overflow-tooltip="true"
               />
               <el-table-column
                   prop="originStatus"
                   label="库存状态"
                   width="100"
     :show-overflow-tooltip="true"
               >
                   <template slot-scope="scope">
                       {{ scope.row.originStatus | formatInventoryStatus }}
                   </template>
               </el-table-column>
           </el-table-column>
        <el-table-column label="交易后" :cell-style="{ 'padding': '-20px' }">
          <!-- .... -->
        </el-table-column>

        <el-table-column
            prop="createUser"
            label="操作人员"
            width="150"
  :show-overflow-tooltip="true"
        />
        <el-table-column
            prop="createTime"
            label="操作时间"
            width="180"
  :show-overflow-tooltip="true"
        >
            <template slot-scope="scope">
                {{ scope.row.createTime | formatDateTime }}
            </template>
        </el-table-column>
      </el-table>

    </div>
    <!-- 返回页面顶部按钮 -->
    <back-to-top />
  </div>
</template>

<script>
import Pagination from '@/components/Pagination'
import BackToTop from '@/components/BackToTop'

export default {
  name: 'InventoryTradingQuery',
  components: { Pagination, BackToTop },
  data() {
    return {
      loading: false,
      // 表格数据
      tableData: [],
      // 分页器设置数据
      pagination: {
        total: 0,
        listQuery: {
          page: 1,
          limit: 10
        }
      },
      // 表格数据分页配置(可包括分页器数据和查询数据)
      pageConfig: {
        pageNum: 1,
        pageSize: 10,
        whseId: getWarehouseId()
      }
    }
  },
  created() {
    // 页面初始化好以后加载必需的初始数据
     const pageConfig = {
      ...this.pageConfig
    }
    this.getTableData(pageConfig)

  },
  methods: {
    // 设置表格头部样式
    getHeaderStyle({ row, column, rowIndex, columnIndex }) {
      if (rowIndex === 0) {
        return {
          'background-color': '#F6F7FD',
          'line-height': 1,
                    'padding': '-10px',
          'text-align': 'center'
        }
      }
    }
  }
}
</script>
<style lang='scss'>
.inventory-management {
  &-container {
    margin: 30px;
  }
  &-text {
    font-size: 30px;
    line-height: 46px;
    .form-item {
      float: left;
      margin-right: 90px;
    }
}
</style>
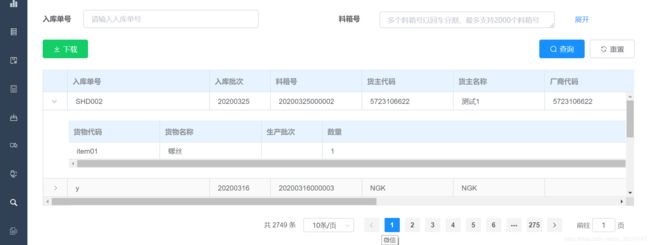
5. 带展开行的表格
当信息带有明显的主次之分时,可使用带有展开行的表格来呈现数据。
说明: 通过设置 type=“expand” 和 Scoped slot 可以开启展开行功能,el-table-column 的模板会被渲染成为展开行的内容,展开行可访问的属性与使用自定义列模板时的 Scoped slot 相同。
关键代码示例如下所示:
<template>
  <div class="management-container">
    <div class="management-text">
      <el-table
        v-loading="loading"
        :data="tableData"
        ref="table"
        stripe
        style="width: 100%"
        :header-cell-style="getHeaderStyle"
        min-height="380"
        :row-style="{ 'line-height': 0 }"
        :cell-style="{ 'padding': .1 }"
      >
        <el-table-column type="expand" fixed="left">
          <template scope="scope">
            <el-table
              v-loading="loading"
              :data="scope.row.detailsList"
              style="width: 100%"
              :header-cell-style="getHeaderStyle"
              min-height="380"
              :row-style="{ 'line-height': 0 }"
              :cell-style="{ 'padding': .1 }"
            >
              <el-table-column
                prop="itemCode"
                label="货物代码"
                width="180"
                :show-overflow-tooltip="true"
              />
              <el-table-column
                prop="itemName"
                label="货物名称"
                width="200"
                :show-overflow-tooltip="true"
              />
              <el-table-column
                prop="productionBatch"
                label="生产批次"
                width="120"
                :show-overflow-tooltip="true"
              />
              <el-table-column
                prop="qty"
                label="数量"
                min-width="100"
                :show-overflow-tooltip="true"
              />
            </el-table>
          </template>
        </el-table-column>
        <el-table-column
          prop="createUser"
          label="入库员"
          width="120"
          :show-overflow-tooltip="true"
        />
        <el-table-column
          prop="createTime"
          label="入库时间"
          width="200"
          :show-overflow-tooltip="true"
        >
          <template slot-scope="scope">
            {{ scope.row.createTime | formatDateTime }}
          </template>
        </el-table-column>
      </el-table>

    </div>
    <!-- 返回页面顶部按钮 -->
    <back-to-top />
  </div>
</template>

<script>
import Pagination from '@/components/Pagination'
import BackToTop from '@/components/BackToTop'
import { Message } from 'element-ui'
import { getInActs } from '@/api/in-acts/in-acts'
export default {
  name: 'InActsQuery',
  components: { Pagination, BackToTop },
  data() {
    return {
      loading: false,
       tableData: []
      }
    }
  },
  created() {
    // 页面初始化好以后加载必需的初始数据
    const pageConfig = {
      ...this.pageConfig
    }
    this.getTableData(pageConfig)

  },
  methods: {
    // 设置表格头部样式
    getHeaderStyle({ row, column, rowIndex, columnIndex }) {
      if (rowIndex === 0) {
        return {
          'background-color': '#F6F7FD',
          'line-height': 3,
          'padding': 0
        }
      }
    }

    getTableData(listConfig) {
      this.loading = true
      getInActs(listConfig).then(res => {
        this.tableData = res.result.records
        // 设置分页器
        this.pagination.total = res.result.total
        this.loading = false
      }).catch(err => {
        console.log('error: ', err)
        this.loading = false
      })
    }
  }
}
</script>
<style lang='scss' scoped>
.management {
  &-container {
    margin: 30px;
  }
  &-text {
    font-size: 30px;
    line-height: 46px;
  }
}
</style>
表格属性说明如下:
| 参数 | 说明 | 类型 | 默认值 | 参考值 |
|---|---|---|---|---|
| type | 对应列的类型。如果设置了 selection 则显示多选框;如果设置了 index 则显示该行的索引(从 1 开始计算);如果设置了 expand 则显示为一个可展开的按钮 | string | ---- | 可选值有:selection/index/expand。可展开的行:type=”expand”;带多选框的行:type=”selection” |
6. 自定义显示/隐藏列的表格
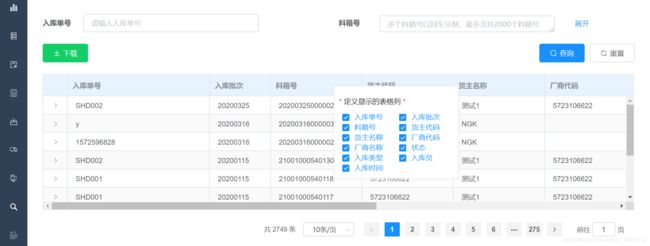
页面呈现的数据列可能比较多,而在实际使用时,用户可能只关注其中的几列数据,其它的一些数据就显得无关紧要了。这时候,这些无关数据,就是视觉噪点,应当被尽量“去除”。
说明: 本功能的交互流程为:用户在表格表头任意区域右键,在点击位置出现菜单显示选择复选框列表。用户取消某项的选择,意味着对应列的数据将会被隐藏。同时,对该表格做的最后的修改,数据将会保存在浏览器本地,下次进入该页面,仍然会使用上次的设置(前提是:用户没有清空本地缓存)。
关键代码示例如下所示:
<template>
  <div class="management-container">
    <div class="management-text">
      <el-form ref="searchForm" :model="searchForm">
 			<!-- …… -->
      </el-form>
      <el-table
        ref="table"
        v-loading="loading"
        :data="tableData"
        stripe
        border
        style="width: 100%"
        :header-cell-style="getHeaderStyle"
        :height="tableHeight"
        :row-style="{ 'line-height': 0 }"
        :cell-style="{ 'padding': .1 }"
        @header-contextmenu="contextmenu"
      >
	 <el-table-column
      prop="storageNo"
      v-if="colData[0].istrue"
      label="入库单号"
      width="280"
1.	      :show-overflow-tooltip="true"
2.	   />

        <!-- …… -->
      </el-table>

    <!-- colOptions:右击菜单内容 -->
    <div v-show="menuVisible" :style="{top:top+ "px",left:left+ "px"}" class="select-menu">
      <p>定义显示的表格列</p>
      <el-checkbox-group v-model="colOptions">
        <el-checkbox v-for="item in colSelect" :key="item" :label="item" class="custom-checkbox" />
      </el-checkbox-group>
    </div>
  </div>
</template>

<script>
import { stringifyObjArr, parseObjArr, stringifyArr, parseArr } from '@/utils/localStorage-json'

export default {
  name: 'InActsQuery',
  components: { Pagination, BackToTop },
  data() {
    return {
       // 实现动态表格列数据
      // colOptions,colSelect中内容的顺序必须与表格中表头的内容顺序保持一致
      colOptions: parseArr('colOptions_inActs')? parseArr('colOptions_inActs') : ['入库单号', '入库批次', '料箱号', '货主代码', '货主名称', '厂商代码', '厂商名称', '状态', '入库类型', '入库员', '入库时间'],
      colSelect: ['入库单号', '入库批次', '料箱号', '货主代码', '货主名称', '厂商代码', '厂商名称', '状态', '入库类型', '入库员', '入库时间'],
      colData: parseObjArr('colData_inActs')? parseObjArr('colData_inActs') : [
        { title: '入库单号', istrue: true },
        { title: '入库批次', istrue: true },
        { title: '料箱号', istrue: true },
        { title: '货主代码', istrue: true },
        { title: '货主名称', istrue: true },
        { title: '厂商代码', istrue: true },
        { title: '厂商名称', istrue: true },
        { title: '状态', istrue: true },
        { title: '入库类型', istrue: true },
        { title: '入库员', istrue: true },
        { title: '入库时间', istrue: true }
      ],
      menuVisible: false,
      top: 0,
      left: 0
    }
  },

  watch: {
    // 动态计算要显示的数据列
    colOptions(valArr) {
      var arr = this.colSelect.filter(i => valArr.indexOf(i) < 0) // 未选中
      this.colData.filter(i => {
        if (arr.indexOf(i.title) !== -1) {
          i.istrue = false
        } else {
          i.istrue = true
        }
      })
      // 本地保存数据列显示与否的设置数据
      stringifyObjArr('colData_inActs', this.colData)
      stringifyArr('colOptions_inActs', valArr)
    },
  },

  beforeUpdate() {
    // 重新布局表格
    this.$nextTick(() => {
      this.$refs.table.doLayout();
    });
  },

  methods: {
    // 控制表格列数据的动态显示
    contextmenu(row, event) {
      this.menuVisible = false // 先把右键菜单关死,解决用户在连续分别2个地方右键打// 开2个菜单的清空
      this.menuVisible = true // 显示自定义菜单
      window.event.returnValue = false  // 取消浏览器右击默认事件
      document.addEventListener('click', this.closeMenu)
      // 获取鼠标点坐标,设置右击菜单位置
      this.top = event.clientY
      this.left = event.clientX
    },
    closeMenu() {
      this.menuVisible = false // 关闭右键菜单
      document.removeEventListener('click', this.closeMenu) // 取消监听事件
    }
  }
}
</script>
<style lang='scss' scoped>

</style>
表格属性说明如下:
| 参数 | 说明 | 类型 | 默认值 | 参考值 |
|---|---|---|---|---|
| header-contextmenu | 当某一列的表头被鼠标右键点击时触发该事件 | Function(column, event) | ---- | 如上关键代码所示 |
7. 带后端排序的表格
表格排序,有前端排序和后端排序两种。而带有分页功能的表格,前端排序就不大适用了。因此,本系统采用了后端排序(这种方式需要后端接口配合)。
说明: 后端排序很简单,基本原理就是将用户设置的排序参数作为查询参数的一部分,查询得到表格数据。
关键代码示例如下所示:
<template>
  <div class="management-container">
    <div class="management-text">
      <el-form ref="searchForm" :model="searchForm">
        <!--  ……  -->
      </el-form>
      <el-table
        ref="table"
        v-loading="loading"
        :data="tableData"
        stripe
        border
        style="width: 100%"
        :header-cell-style="getHeaderStyle"
        :height="tableHeight"
        :row-style="{ 'line-height': 0 }"
        :cell-style="{ 'padding': .1 }"
        @sort-change="handleSortChange"
      >
        <!--  ……  -->
        <el-table-column
          prop="createTime"
          label="入库时间"
          min-width="200"
          sortable="custom"
        >
          <template slot-scope="scope">
            {{ scope.row.createTime | formatDateTime }}
          </template>
        </el-table-column>
      </el-table>
    </div>
  </div>
</template>

<script>
export default {
  name: 'InActsQuery',
  components: { Pagination, BackToTop },
  data() {
    return {
      // 查询表单
      searchForm: {
        storageNo: null,
         // ……
         // 自定义排序字段
        orderItems: []
      },
      // 表格数据
      tableData: []
    }
  },
  methods: {
    handleReset() {
      this.searchForm = { dateRange: null },
      this.filterData = {}
      // 重置自定义排序条件
      this.searchForm.orderItems = []
      this.$refs['table'].clearSort()
      // 重置查询表单时,连着分页器一起重置
      // 重置表格筛选条件
      this.$refs['table'].clearFilter()
      this.handleSearch()
    },

      // 自定义排序
    handleSortChange({column, prop, order}) {
      let asc = order === 'ascending'? true : false
      for (let i = 0; i < this.searchForm.orderItems.length; i++) {
        const element = this.searchForm.orderItems[i]
        if(element.column === prop) {
          element.asc = asc
          return
        }
      }
      let item = {
        asc: asc,
        column: prop
      }
      this.searchForm.orderItems.push(item)
    }
  }
}
</script>
<style lang='scss' scoped>
</style>
表格属性说明如下:
| 参数 | 说明 | 类型 | 默认值 | 参考值 |
|---|---|---|---|---|
| sort-change | 当表格的排序条件发生变化的时候会触发该事件 | Function(column, prop, order) | ---- | 如上关键代码所示 |
| sortable | 对应列是否可以排序,如果设置为 ‘custom’,则代表用户希望远程排序,需要监听 Table 的 sort-change 事件 | boolean, string(true, false, ‘custom’) | false | ‘custom’ |
8. 响应式表格高度的表格
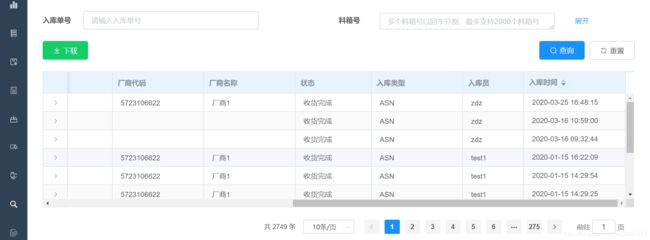
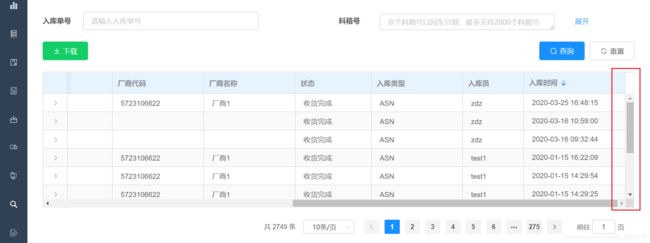
表格高度如果不限制的话,整个表格就是“展开”的状态。如果表格数据列很多,出现了横向的滚动条,用户想要操作最后一行的最后一列,操作就会显得比较繁琐。这时候,如果横向滚动条始终是显示在页面上的,这将大大简化用户的操作。
说明: 设置表格的高度本身是一件很容易的事。但,想要响应式的设置表格高度,就复杂一些了。其关键之处,就是要响应式地根据浏览器窗口尺寸的变化,动态计算设置表格高度。
表格高度 = 浏览器窗口高度 – 表格距离窗口顶部的距离 – 表格下方要预留的高度
关键代码示例如下所示:
<template>
  <div class="management-container">
    <div class="management-text">
      <el-form ref="searchForm" :model="searchForm">
         <!--  ……  -->
      </el-form>
      <el-table
        ref="table"
        v-loading="loading"
        :data="tableData"
        stripe
        border
        style="width: 100%"
        :header-cell-style="getHeaderStyle"
        :height="tableHeight"
        :row-style="{ 'line-height': 0 }"
        :cell-style="{ 'padding': .1 }"
      >
        <!--  ……  -->
      </el-table>

      <pagination
        :total="pagination.total"
        :page.sync="pagination.listQuery.page"
        :limit.sync="pagination.listQuery.limit"
        style="float: right; marginTop: -10px; marginBottom: -20px;"
        @pagination="getList"
      />
    </div>
  </div>
</template>

<script>
export default {
  name: 'InActsQuery',
  components: { Pagination, BackToTop },
  data() {
    return {
       // 表格初始化高度
       // 250  -> 表格距离浏览器顶端的距离
       // 90   -> 表格下方的分页器的高度
       // 这两个数据,需视具体情况进行调整,但计算公式是一样的
      tableHeight: (window.innerHeight || document.documentElement.clientHeight || document.body.clientHeight) - 90 - 250
    }
  },

  watch: {
    // 每次表格高度变化以后,等400ms,再进行高度的设置,这是为了减少表格的频繁的// 重绘重排
    tableHeight(val) {
      if(!this.timer) {
        this.tableHeight = val
        this.timer = true
        setTimeout(() => {
          this.timer = false
        }, 400)
      }
    }
  },

  mounted() {
    window.onresize = () => {
      return (() => {
        windowwindow.tableHeight = window.innerHeight || document.documentElement.clientHeight || document.body.clientHeight
        this.tableHeight = window.tableHeight - this.$refs.table.$el.offsetTop - 90
      })()
    }
  }
}
</script>
<style lang='scss' scoped>
</style>
表格属性说明如下:
| 参数 | 说明 | 类型 | 默认值 | 参考值 |
|---|---|---|---|---|
| height | Table 的高度,默认为自动高度。如果 height 为 number 类型,单位 px;如果 height 为 string 类型,则这个高度会设置为 Table 的 style.height 的值,Table 的高度会受控于外部样式。 | string/number | ---- | 如上关键代码所示 |
最简单的一种方式:
// table 高度设置:使用动态高度 100vh
height="calc(100vh - 310px)"
