树莓派4B使用MNN部署Yolov5-lite
文章目录
- 前言
- 一、pandas是什么?
- 二、使用步骤
- 1.引入库
- 2.读入数据
- 总结
一、树莓派配置MNN
下载MNN并编译
git clone https://gitee.com/mirrors/mnn.git
cd MNN
mkdir build
cmake ..
make -j4
完成后MNN文件夹如下

二、部署Yolov5-lite模型
1.将pt模型转换为onnx模型,并转换
参考上一篇博客树莓派4B使用NCNN部署Yolov5-lite_努力&&奋斗的博客-CSDN博客
2.将onnx模型转换为mnn模型
cd MNN/build
./MNNConvert -f ONNX --modelFile XXX.onnx --MNNModel XXX.mnn --bizCode biz
3.移植yolov5lite官方mnn_demo
github地址:GitHub - ppogg/YOLOv5-Lite: YOLOv5-Lite: lighter, faster and easier to deploy. Evolved from yolov5 and the size of model is only 930+kb (int8) and 1.7M (fp16). It can reach 10+ FPS on the Raspberry Pi 4B when the input size is 320×320~
将cpp_demo/mnn移植到树莓派中
4.修改main.cpp
跟ncnn类似,mnn中也需要修改anchors相关数据

第一列为输出层name,第二列为stride,其余跟v5lite-e.yaml中anchors保持一致
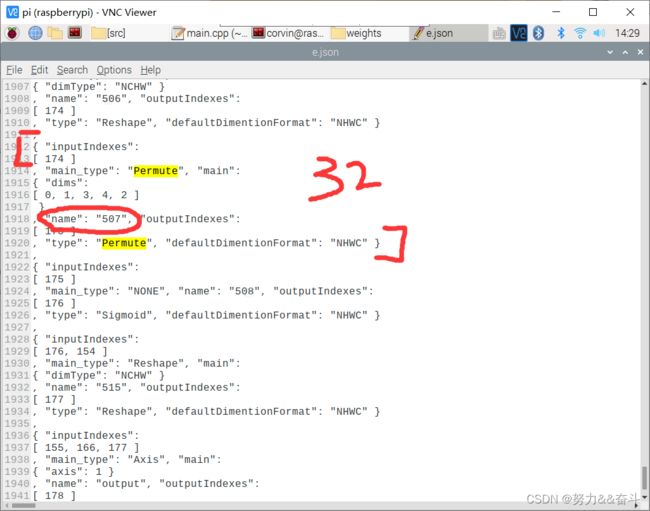
如何确定names
利用MNN自带的工具将mnn模型转换为json
cd MNN/build
./MNNDump2Json xxx.mnn xxx.json
打开json文件找到最后三个permute,分别对应stride8 16 32的name


5.编译并执行
cd mnn
mkdir build
cd build
cmake ..
make
../yolov5
bug1:
Error: can't find output: 451
Error: can't find output: 479
Error: can't find output: 507
此bug是由于未使用saveTensors保存输出节点,需要在MNN::Session *session = net->createSession(config);前加上saveTensors。具体修改如下
int main()
{

    std::string model_name = "weights/e.mnn";
    int num_classes=2;
    std::vector yolov5s_layers{
            {"507",    32, {{116, 90}, {156, 198}, {373, 326}}},
            {"479",    	16, {{30,  61}, {62,  45},  {59,  119}}},
            {"451", 	8,  {{10,  13}, {16,  30},  {33,  23}}},
    };
    std::vector & layers = yolov5s_layers;

    int net_size =640;
    // get output data
    std::string output_tensor_name0 = layers[2].name ;
    std::string output_tensor_name1 = layers[1].name ;
    std::string output_tensor_name2 = layers[0].name ;

    std::shared_ptr net = std::shared_ptr(MNN::Interpreter::createFromFile(model_name.c_str()));
    if (nullptr == net) {
        return 0;
    }

    MNN::ScheduleConfig config;
    config.numThread = 4;
    config.type      = static_cast(MNN_FORWARD_CPU);
    MNN::BackendConfig backendConfig;
    backendConfig.precision = (MNN::BackendConfig::PrecisionMode)2;
    // backendConfig.precision =  MNN::PrecisionMode Precision_Normal; // static_cast(Precision_Normal);
    config.backendConfig = &backendConfig;

    std::vector saveNamesVector;
    saveNamesVector.push_back(output_tensor_name0);
    saveNamesVector.push_back(output_tensor_name1);
    saveNamesVector.push_back(output_tensor_name2);

    config.saveTensors = saveNamesVector;

    MNN::Session *session = net->createSession(config);
cv::VideoCapture capture;
    capture.open(0);  //修改这个参数可以选择打开想要用的摄像头

    cv::Mat frame;
	while(1)
	{
		int INPUT_SIZE = 320;
		/*std::string image_name = "1.jpg";
		// load image
		cv::Mat raw_image    = cv::imread(image_name.c_str());
		cv::Mat image;
		*/
		capture >> frame;
		cv::Mat image;
		cv::flip(frame, image, 1);
        cv::Mat raw_image = image;

        cv::resize(raw_image, image, cv::Size(INPUT_SIZE, INPUT_SIZE));
		// preprocessing
		image.convertTo(image, CV_32FC3);
		// image = (image * 2 / 255.0f) - 1;
		image = image /255.0f;

		// wrapping input tensor, convert nhwc to nchw
		std::vector dims{1, INPUT_SIZE, INPUT_SIZE, 3};
		auto nhwc_Tensor = MNN::Tensor::create(dims, NULL, MNN::Tensor::TENSORFLOW);
		auto nhwc_data   = nhwc_Tensor->host();
		auto nhwc_size   = nhwc_Tensor->size();
		std::memcpy(nhwc_data, image.data, nhwc_size);

		auto inputTensor = net->getSessionInput(session, nullptr);
		inputTensor->copyFromHostTensor(nhwc_Tensor);

		// run network
		clock_t startTime,endTime;
		startTime = clock();//计时开始
		net->runSession(session);
		endTime = clock();//计时结束
		cout << "The forward time is: " <<(double)(endTime - startTime) / 1000.0 << "ms" << endl;

		MNN::Tensor *tensor_scores  = net->getSessionOutput(session, output_tensor_name0.c_str());
		MNN::Tensor *tensor_boxes   = net->getSessionOutput(session, output_tensor_name1.c_str());
		MNN::Tensor *tensor_anchors = net->getSessionOutput(session, output_tensor_name2.c_str());

		MNN::Tensor tensor_scores_host(tensor_scores, tensor_scores->getDimensionType());
		MNN::Tensor tensor_boxes_host(tensor_boxes, tensor_boxes->getDimensionType());
		MNN::Tensor tensor_anchors_host(tensor_anchors, tensor_anchors->getDimensionType());

		tensor_scores->copyToHostTensor(&tensor_scores_host);
		tensor_boxes->copyToHostTensor(&tensor_boxes_host);
		tensor_anchors->copyToHostTensor(&tensor_anchors_host);

		std::vector result;
		std::vector boxes;

		yolocv::YoloSize yolosize = yolocv::YoloSize{INPUT_SIZE,INPUT_SIZE};

		float threshold = 0.25;
		float nms_threshold = 0.5;

		// show_shape(tensor_scores_host.shape());
		// show_shape(tensor_boxes_host.shape());
		// show_shape(tensor_anchors_host.shape());


		boxes = decode_infer(tensor_scores_host, layers[2].stride,  yolosize, net_size, num_classes, layers[2].anchors, threshold);
		result.insert(result.begin(), boxes.begin(), boxes.end());

		boxes = decode_infer(tensor_boxes_host, layers[1].stride,  yolosize, net_size, num_classes, layers[1].anchors, threshold);
		result.insert(result.begin(), boxes.begin(), boxes.end());

		boxes = decode_infer(tensor_anchors_host, layers[0].stride,  yolosize, net_size, num_classes, layers[0].anchors, threshold);
		result.insert(result.begin(), boxes.begin(), boxes.end());

		nms(result, nms_threshold);

		// std::cout<= 0)
            break;
    }
    return 0;
}
bug2: Segmentation fault
Inputsize为640,onnx模型转换时的size为320,要保持一致,所以修改为320.
6.最终效果

总结
MNN相比于NCNN支持的算子更多,且推理速度也更快