云原生Java架构师(KubeSphere实战)中间件部署
目录
- 一、简介
- 二、部署MySQL
-
- 创建MySQL配置集(ConfigMap)
- 需要安装nfs-server 配置动态供应的默认存储类(如果已经操作过则略)
-
- 配置nfs-client(选做)
- 配置动态供应的默认存储类
- 创建存储卷(PVC)
- 创建有状态副本集
- 创建网络
- 三、部署Redis
-
- 创建配置集
- 创建有状态副本集
- 创建网络
- 四、部署Elasticsearch
-
- 首先使用Docker方式启动Es
- 创建Es配置集(ConfgiMap)
- 创建有状态副本集
- 五、从应用商店部署RabbitMQ
- 六、从应用仓库部署Zookeeper
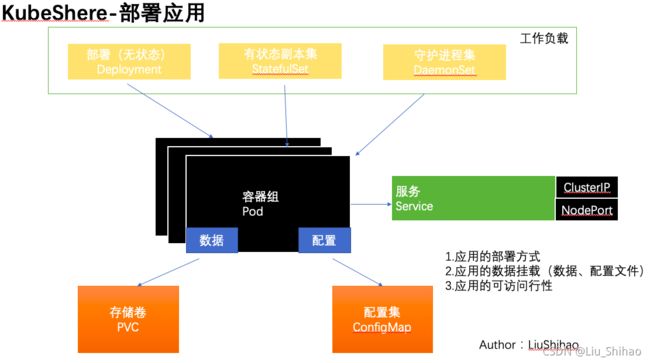
一、简介
- 应用的部署方式
- 应用的数据挂载(数据、配置文件)
- 应用的可访问行性
二、部署MySQL
创建MySQL配置集(ConfigMap)
[client]
default-character-set=utf8mb4

[mysql]
default-character-set=utf8mb4

[mysqld]
init_connect='SET collation_connection = utf8mb4_unicode_ci'
init_connect='SET NAMES utf8mb4'
character-set-server=utf8mb4
collation-server=utf8mb4_unicode_ci
skip-character-set-client-handshake
skip-name-resolve
需要安装nfs-server 配置动态供应的默认存储类(如果已经操作过则略)
# 在每个机器。
yum install -y nfs-utils


# 在master 执行以下命令
echo "/nfs/data/ *(insecure,rw,sync,no_root_squash)" > /etc/exports


# 执行以下命令,启动 nfs 服务;创建共享目录
mkdir -p /nfs/data


# 在master执行
systemctl enable rpcbind
systemctl enable nfs-server
systemctl start rpcbind
systemctl start nfs-server

# 使配置生效
exportfs -r


#检查配置是否生效
exportfs
配置nfs-client(选做)
showmount -e 172.31.0.4

mkdir -p /nfs/data

mount -t nfs 172.31.0.4:/nfs/data /nfs/data
配置动态供应的默认存储类
注意修改主节点的私网ip地址。
使用kubectl apply -f nfs-server.yml命令部署。
部署成功后可以在 存储管理 —— 存储类型 看到。

## 创建了一个存储类
apiVersion: storage.k8s.io/v1
kind: StorageClass
metadata:
  name: nfs-storage
  annotations:
    storageclass.kubernetes.io/is-default-class: "true"
provisioner: k8s-sigs.io/nfs-subdir-external-provisioner
parameters:
  archiveOnDelete: "true"  ## 删除pv的时候,pv的内容是否要备份

---
apiVersion: apps/v1
kind: Deployment
metadata:
  name: nfs-client-provisioner
  labels:
    app: nfs-client-provisioner
  # replace with namespace where provisioner is deployed
  namespace: default
spec:
  replicas: 1
  strategy:
    type: Recreate
  selector:
    matchLabels:
      app: nfs-client-provisioner
  template:
    metadata:
      labels:
        app: nfs-client-provisioner
    spec:
      serviceAccountName: nfs-client-provisioner
      containers:
        - name: nfs-client-provisioner
          image: registry.cn-hangzhou.aliyuncs.com/lfy_k8s_images/nfs-subdir-external-provisioner:v4.0.2
          # resources:
          #    limits:
          #      cpu: 10m
          #    requests:
          #      cpu: 10m
          volumeMounts:
            - name: nfs-client-root
              mountPath: /persistentvolumes
          env:
            - name: PROVISIONER_NAME
              value: k8s-sigs.io/nfs-subdir-external-provisioner
            - name: NFS_SERVER
              value: 172.31.0.4 ## 指定自己nfs服务器地址
            - name: NFS_PATH
              value: /nfs/data  ## nfs服务器共享的目录
      volumes:
        - name: nfs-client-root
          nfs:
            server: 172.31.0.4
            path: /nfs/data
---
apiVersion: v1
kind: ServiceAccount
metadata:
  name: nfs-client-provisioner
  # replace with namespace where provisioner is deployed
  namespace: default
---
kind: ClusterRole
apiVersion: rbac.authorization.k8s.io/v1
metadata:
  name: nfs-client-provisioner-runner
rules:
  - apiGroups: [""]
    resources: ["nodes"]
    verbs: ["get", "list", "watch"]
  - apiGroups: [""]
    resources: ["persistentvolumes"]
    verbs: ["get", "list", "watch", "create", "delete"]
  - apiGroups: [""]
    resources: ["persistentvolumeclaims"]
    verbs: ["get", "list", "watch", "update"]
  - apiGroups: ["storage.k8s.io"]
    resources: ["storageclasses"]
    verbs: ["get", "list", "watch"]
  - apiGroups: [""]
    resources: ["events"]
    verbs: ["create", "update", "patch"]
---
kind: ClusterRoleBinding
apiVersion: rbac.authorization.k8s.io/v1
metadata:
  name: run-nfs-client-provisioner
subjects:
  - kind: ServiceAccount
    name: nfs-client-provisioner
    # replace with namespace where provisioner is deployed
    namespace: default
roleRef:
  kind: ClusterRole
  name: nfs-client-provisioner-runner
  apiGroup: rbac.authorization.k8s.io
---
kind: Role
apiVersion: rbac.authorization.k8s.io/v1
metadata:
  name: leader-locking-nfs-client-provisioner
  # replace with namespace where provisioner is deployed
  namespace: default
rules:
  - apiGroups: [""]
    resources: ["endpoints"]
    verbs: ["get", "list", "watch", "create", "update", "patch"]
---
kind: RoleBinding
apiVersion: rbac.authorization.k8s.io/v1
metadata:
  name: leader-locking-nfs-client-provisioner
  # replace with namespace where provisioner is deployed
  namespace: default
subjects:
  - kind: ServiceAccount
    name: nfs-client-provisioner
    # replace with namespace where provisioner is deployed
    namespace: default
roleRef:
  kind: Role
  name: leader-locking-nfs-client-provisioner
  apiGroup: rbac.authorization.k8s.io
创建存储卷(PVC)
创建有状态副本集

点击下一步。
选择镜像:选择DockerHub上的mysql:5.7的镜像。

往下: 选择限制1核cpu 和 2000M 的内存。

往下:
勾选 环境变量 :MYSQL_ROOT_PASSWORD 密码:123456。
勾选同步主机时区。
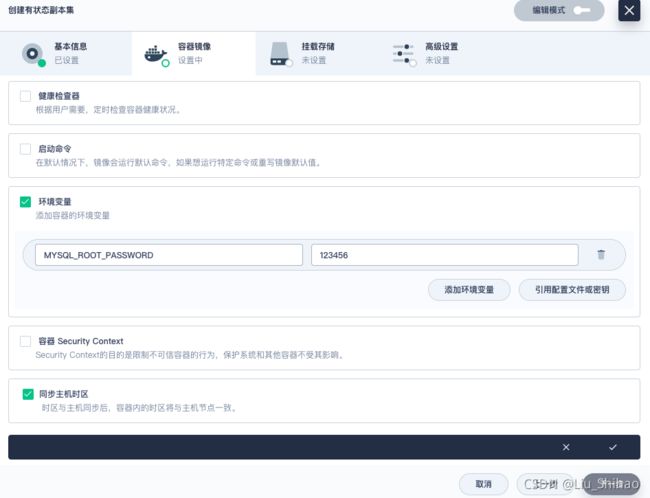
点击下一步:
选择存储卷 挂载目录:/var/lib/mysql 选择读写。
选择配置集 挂载目录:/etc/mysql/conf.d 选择只读。
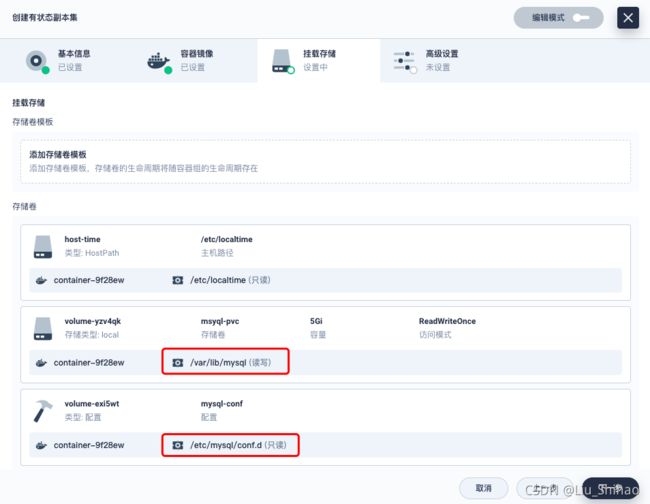
点击创建。
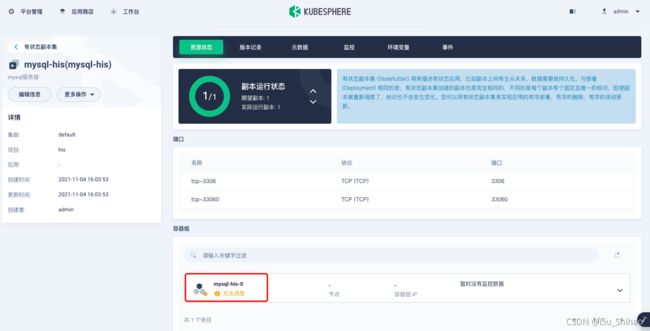
创建完成之后,我们发现:Pod无法调度。
kubectl get pod -n his
# 查看部署
kubectl describe pod -n his  mysql-his-0
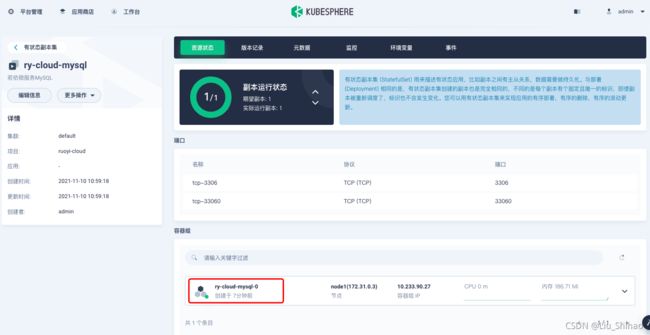
查看描述事件:kubectl describe pod -n ruoyi-cloud ry-cloud-mysql-0

部署成功后,会自动创建service:

在集群内部进行访问mysql:
查看服务(Service):

进入容器内部,使用域名连接:mysql -uroot -hry-cloud-mysel-i41g.ruoyi-cloud -p

创建网络
我们也可以把自动生成的service删除,自己创建Service服务:
集群内部访问:

使用集群内部访问无法在选择暴露外网。

此时创建服务的域名就是我们自己定义的不是随机生成的:

创建集群外部访问:
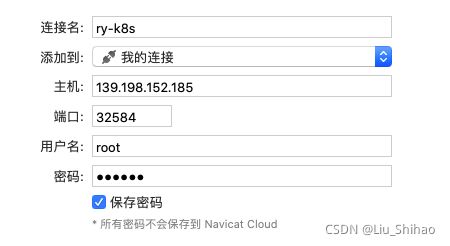
通过主机的公网IP加暴露的端口即可连接:
(注意开放安全组端口)

三、部署Redis
创建配置集
appendonly yes
port 6379
bind 0.0.0.0
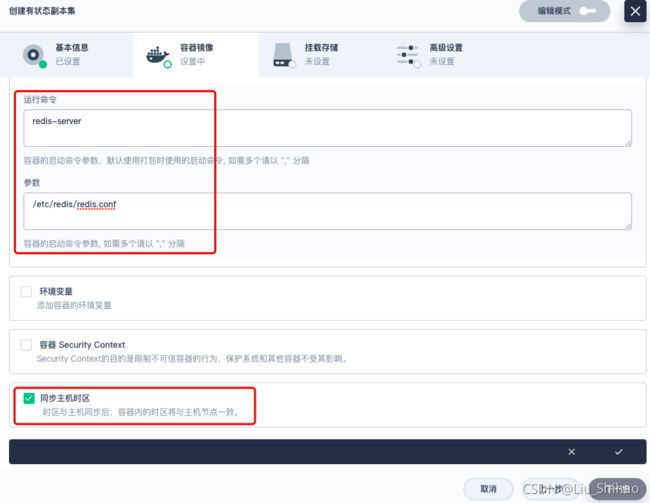
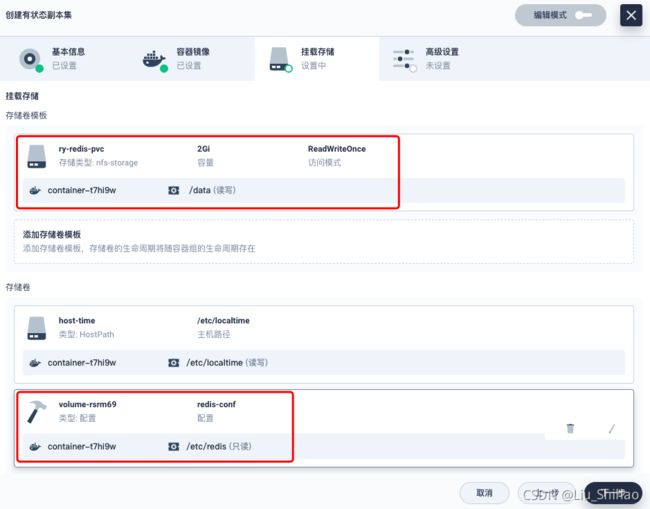
创建有状态副本集
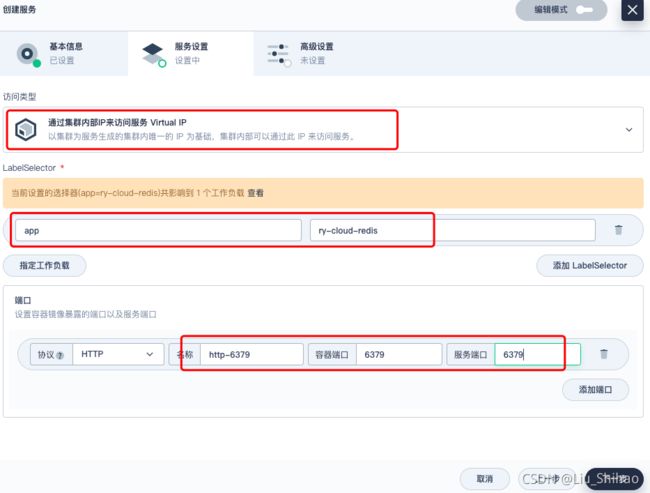
创建网络
创建集群外访问:
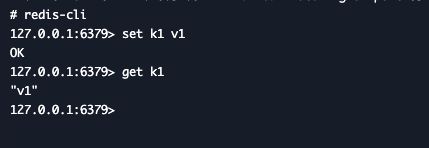
我们发现三个副本的Redis的数据是独立存储的。
四、部署Elasticsearch
首先使用Docker方式启动Es
创建数据目录:mkdir -p /mydata/es-01 && chmod 777 -R /mydata/es-01
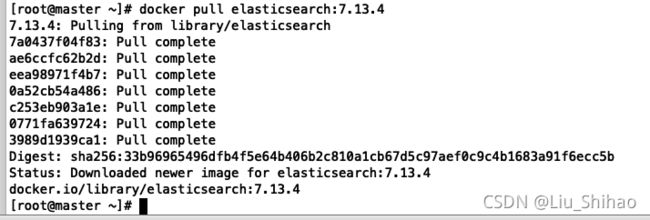
拉取Es镜像:docker pull elasticsearch:7.13.4
创建并启动容器:
docker run --restart=always -d -p 9200:9200 -p 9300:9300 \
-e "discovery.type=single-node" \
-e ES_JAVA_OPTS="-Xms512m -Xmx512m" \
-v es-config:/usr/share/elasticsearch/config \
-v /mydata/es-01/data:/usr/share/elasticsearch/data \
--name es-01 \
elasticsearch:7.13.4

如果容器启动失败可以使用docker logs 1db61ae4c711命令查看容器日志。
(注意 如果有报错,原因可能是 /mydata/es-01 目录 没有权限)
需要挂载的文件有两个在/usr/share/elasticsearch/config目录下的:jvm.options和elasticsearch.yml文件。

创建Es配置集(ConfgiMap)
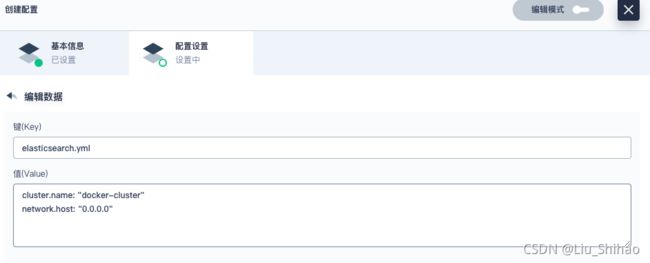
elasticsearch.yml
cluster.name: "docker-cluster"
network.host: "0.0.0.0"
jvm.options
创建有状态副本集
配置环境变量:
discovery.type single-node
ES_JAVA_OPTS -Xms512m -Xmx512m
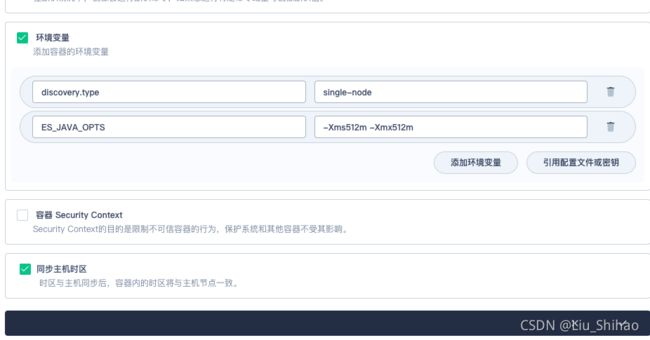
创建存储卷:
挂载目录:/usr/share/elasticsearch/data
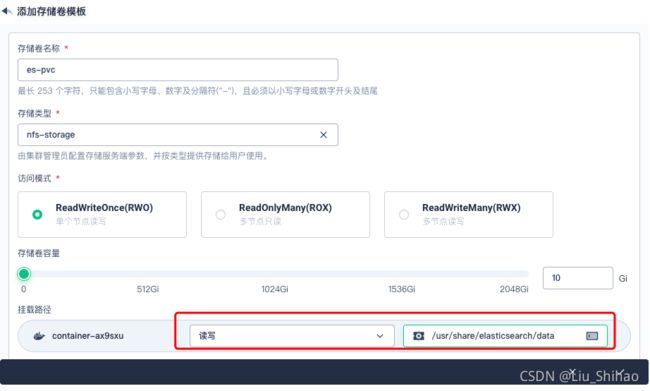
指定配置集:
(注意:如果一个文件夹是有多个的,但是只挂载几个文件不是全部的,则需要映射子路径,否则会全部覆盖!)
点击创建后发现无法调度,原因是因为:2核CPU不足

我们修改配置后重新部署:

五、从应用商店部署RabbitMQ
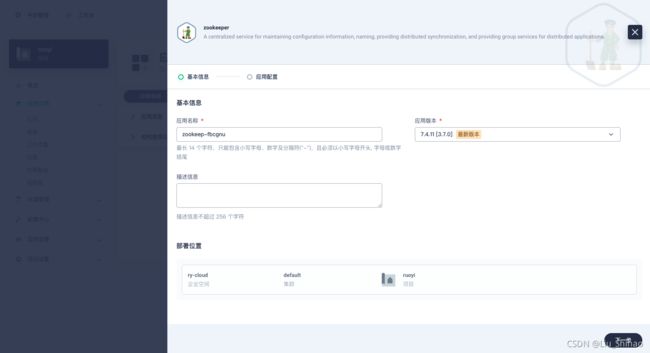
六、从应用仓库部署Zookeeper
应用仓库:https://artifacthub.io/
搜索Redis:


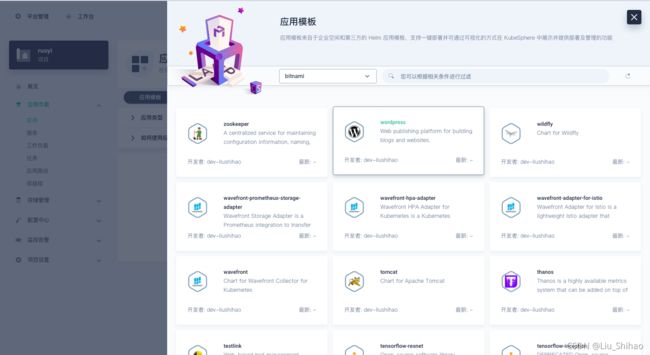
在 企业空间 – 应用管理 – 应用仓库:
点击添加仓库:https://charts.bitnami.com/bitnami
