记一次记忆深刻的springcloudgateway网关调优
某项目某地方客户自己部署,客户压测只压单机scg,不过nginx。
网关在一个8G16核的服务器并发竟然只能到2000。
即使加了5个副本以后并发也只能到6000,其他接口都直接拒绝。
而且在压测时数据返回的过程中经常卡住。
一开始是考虑到是不是路由过多造成的,但是公司的项目路由大概有一千多条也没有这么拉跨,某地项目路由最多10条。
我们尝试把地方项目压测使用的路由order调为1,情况会好一点,但提升并不明显,而且在这种情况下cpu竟然能飙到很高。在这里隐隐觉得有路由这里的问题。
然后我在我自己笔记本上进行压测,发现无论发出多少请求,scg只接受200个左右,其他多出的直接拒绝请求,就没有进入网关。
网上也大多都是批评的声音,性能不太好之类的。
先从路由方面入手,查到了一些资料
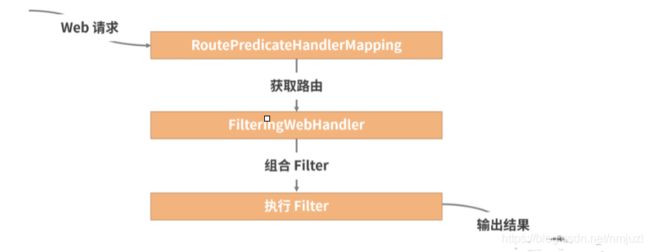
Spring Cloud Gateway 工作原理

找到源码
org.springframework.cloud.gateway.handler.RoutePredicateHandlerMapping
再看RoutePredicateHandlerMapping#lookupRoute的实现
protected Mono<Route> lookupRoute(ServerWebExchange exchange) {
		return this.routeLocator
				.getRoutes()
				//individually filter routes so that filterWhen error delaying is not a problem
				.concatMap(route -> Mono
						.just(route)
						.filterWhen(r -> {
							// add the current route we are testing
							exchange.getAttributes().put(GATEWAY_PREDICATE_ROUTE_ATTR, r.getId());
							return r.getPredicate().apply(exchange);
						})
						//instead of immediately stopping main flux due to error, log and swallow it
						.doOnError(e -> logger.error("Error applying predicate for route: "+route.getId(), e))
						.onErrorResume(e -> Mono.empty())
				)
				// .defaultIfEmpty() put a static Route not found
				// or .switchIfEmpty()
				// .switchIfEmpty(Mono.empty().log("noroute"))
				.next()
				//TODO: error handling
				.map(route -> {
					if (logger.isDebugEnabled()) {
						logger.debug("Route matched: " + route.getId());
					}
					validateRoute(route, exchange);
					return route;
				});

		/* TODO: trace logging
			if (logger.isTraceEnabled()) {
				logger.trace("RouteDefinition did not match: " + routeDefinition.getId());
			}*/
	}
遍历所有的路由规则直到找到一个符合的,路由过多是排序越往后自然越慢,但是也考虑到地方项目只有10个,但是我们还是试一试。
我们把这部分源码抽出来自己修改一下,先写死一个路由
protected Mono<Route> lookupRoute(ServerWebExchange exchange) {
		if (this.routeLocator instanceof CachingRouteLocator) {
            CachingRouteLocator cachingRouteLocator = (CachingRouteLocator) this.routeLocator;
            // 这里的getRouteMap()也是新加的方法
            return cachingRouteLocator.getRouteMap().next().map(map ->
                    map.get(“api-user”))
                    //这里写死一个路由id
                    .switchIfEmpty(matchRoute(exchange));
        }

        return matchRoute(exchange);
	}
重新压测后速度提升了10倍,cpu也只有在请求进入时较高,但是仍然存在被拒绝的请求以及卡顿。
于是根据这个情况以及我们实际设定的路由规则,在请求进入时对重要参数以及path进行hash保存下次进入时不再走原来的判断逻辑。
	protected Mono<Route> lookupRoute(ServerWebExchange exchange) {
		//String md5Key = getMd5Key(exchange);
		String appId = exchange.getRequest().getHeaders().getFirst("M-Sy-AppId");
		String serviceId = exchange.getRequest().getHeaders().getFirst("M-Sy-Service");
		String token = exchange.getRequest().getHeaders().getFirst("M-Sy-Token");
		String path = exchange.getRequest().getURI().getRawPath();
		StringBuilder value = new StringBuilder();
		String md5Key = "";
		if(StringUtils.isNotBlank(token)) {
			try {
				Map<String, Object> params =  (Map<String, Object>) redisTemplate.opsForValue().get("token:" + token);
				if(null !=params && !params.isEmpty()) {
					JSONObject user = JSONObject.parseObject(params.get("user").toString());
					appId = user.getString("appId");
					serviceId = user.getString("serviceid");
				}
			}catch(Exception e) {
				e.printStackTrace();
			}
		}
		if(StringUtils.isBlank(appId) || StringUtils.isBlank(serviceId)) {
			md5Key = DigestUtils.md5Hex(path);
		}else {
			value.append(appId);
			value.append(serviceId);
			value.append(path);
			md5Key = DigestUtils.md5Hex(value.toString());
		}

		if (logger.isDebugEnabled()) {
			logger.info("Route matched before: " + routes.containsKey(md5Key));
		}
		if ( routes.containsKey(md5Key)
         && this.routeLocator instanceof CachingRouteLocator) {
			final String key = md5Key;
            CachingRouteLocator cachingRouteLocator = (CachingRouteLocator) this.routeLocator;
            // 注意,这里的getRouteMap()也是新加的方法
            return cachingRouteLocator.getRouteMap().next().map(map ->
                    map.get(routes.get(key)))
                    // 这里保证如果适配不到,仍然走老的官方适配逻辑
                    .switchIfEmpty(matchRoute(exchange,md5Key));
        }

        return matchRoute(exchange,md5Key);
	}

	private Mono<Route> matchRoute(ServerWebExchange exchange,String md5Key) {
		//String md5Key = getMd5Key(exchange);
		return this.routeLocator
				.getRoutes()
				//individually filter routes so that filterWhen error delaying is not a problem
				.concatMap(route -> Mono
						.just(route)
						.filterWhen(r -> {
							// add the current route we are testing
							exchange.getAttributes().put(GATEWAY_PREDICATE_ROUTE_ATTR, r.getId());
							return r.getPredicate().apply(exchange);
						})
						//instead of immediately stopping main flux due to error, log and swallow it
						.doOnError(e -> logger.error("Error applying predicate for route: "+route.getId(), e))
						.onErrorResume(e -> Mono.empty())
				)
				// .defaultIfEmpty() put a static Route not found
				// or .switchIfEmpty()
				// .switchIfEmpty(Mono.empty().log("noroute"))
				.next()
				//TODO: error handling
				.map(route -> {
					if (logger.isDebugEnabled()) {
						logger.debug("Route matched: " + route.getId());
						logger.debug("缓存"+routes.get(md5Key));
					}
					// redisTemplate.opsForValue().set(ROUTE_KEY+md5Key,  route.getId(), 5, TimeUnit.MINUTES);
					routes.put(md5Key, route.getId());
					validateRoute(route, exchange);
					return route;
				});

		/* TODO: trace logging
			if (logger.isTraceEnabled()) {
				logger.trace("RouteDefinition did not match: " + routeDefinition.getId());
			}*/
	}
此次修改后路由有了一个较大的提升,开始继续分析拒绝请求以及卡顿问题。
考虑到是不是netty依据电脑的配置做了限制?在自己的笔记本上限制连接在200左右,在服务器上在2000左右
查了许多资料发现netty的对外配置并不是很多,不像tomcat、undertow等等
目前使用的scg版本较旧没有办法将netty修改为tomcat或者undertow,于是我在官网下载了最新的scg并将启动容器修改为tomcat和undertow依次进行了尝试,发现都没有200的限制。
然后开始查找netty方面的资料,发现了reactor.ipc.netty.workerCount
DEFAULT_IO_WORKER_COUNT:如果环境变量有设置reactor.ipc.netty.workerCount,则用该值;没有设置则取Math.max(Runtime.getRuntime().availableProcessors(), 4)))
JSONObject message = new JSONObject();
		  try {
		   Thread.sleep(30000);
		  } catch (InterruptedException e) {
		   // TODO Auto-generated catch block
		   e.printStackTrace();
		  }
		  ServerHttpResponse response = exchange.getResponse();
		  message.put("code", 4199);
		  message.put("msg", "模拟堵塞");

		  byte[] bits = message.toJSONString().getBytes(StandardCharsets.UTF_8);
		  DataBuffer buffer = response.bufferFactory().wrap(bits);
		  response.setStatusCode(HttpStatus.UNAUTHORIZED);
		  // 指定编码,否则在浏览器中会中文乱码
		  response.getHeaders().add("Content-Type", "application/json;charset=UTF-8");
		  return response.writeWith(Mono.just(buffer));
通过模拟堵塞测试,发现该参数用于控制接口的返回数量,这应该就是压测时接口卡顿返回的原因了,通过压测发现该参数在16核cpu的3倍时表现已经较好。16核cpu4倍时单机scg压测时没有卡顿,但是单机压15000时cpu大概在70-80。
通过找到该原因,怀疑人生的自己重拾信心通过百度reactor.ipc.netty.workerCount发现了另一个参数reactor.ipc.netty.selectCount
DEFAULT_IO_SELECT_COUNT:如果环境变量有设置reactor.ipc.netty.selectCount,则用该值;没有设置则取-1,表示没有selector thread
找到源码reactor.ipc.netty.resources.DefaultLoopResources
看到这段代码
if (selectCount == -1) {
			this.selectCount = workerCount;
			this.serverSelectLoops = this.serverLoops;
			this.cacheNativeSelectLoops = this.cacheNativeServerLoops;
		}
		else {
			this.selectCount = selectCount;
			this.serverSelectLoops =
					new NioEventLoopGroup(selectCount, threadFactory(this, "select-nio"));
			this.cacheNativeSelectLoops = new AtomicReference<>();
		}
我的天呐,星宿老仙,法力无边,神通广大,法驾中原!!!
然后我在自己的笔记本上进行压测到12000都没有发生请求被直接拒绝的问题了,至于为什么只到12000,则是因为再高我的笔记本就废了︿( ̄︶ ̄)︿
历经漫长的怀疑人生与越挫越勇(并没有),总共修改了2处,达成了一个10倍提升的小目标
1.修改原生路由查找逻辑
2.设置系统变量reactor.ipc.netty.workerCount为cpu核数的3倍或4倍;设置reactor.ipc.netty.selectCount的值为1(只要不是-1即可)
修改原生路由查找逻辑参考链接
https://blog.csdn.net/manzhizhen/article/details/115386684
系统变量的设置参考链接
https://blog.csdn.net/weixin_33849215/article/details/91664982