【毕业设计】基于单片机红外热成像仪 - stm32 物联网 嵌入式

文章目录

  • 1 简介
  • 2 项目简介
  • 3 主要器件
    • 3.1 MLX90640红外摄像头模块
      • 3.1.1 模块特性
      • 3.1.2相关参数
      • 3.1.2 应用场景
      • 3.1.3 接口说明(以接入 MCU 为例):
  • 4 实现效果
    • 4.1 STM32+LCD 图像显示
    • 4.2 Arduino+ESP32+LCD 图像显示
    • 4.3 树莓派 HDMI 显示屏显示
  • 5 部分相关驱动代码
  • 6 最后


1 简介

Hi,大家好,这里是丹成学长,今天向大家介绍一个非常非常炫酷的单片机项目

基于单片机红外成像仪

大家可用于 课程设计 或 毕业设计


单片机-嵌入式毕设选题大全及项目分享:

https://blog.csdn.net/m0_71572576/article/details/125409052


2 项目简介

红外热成像仪听起来是不是很酷、很高大尚? 它们可以清晰的显示出电路,发动机,管道,房屋隔热中的热量,可以用于消防,医学,法医,环境科学,搜索和救援,能量监测,化学反应,检测野生生物,检测侵入者中的热量。 它还能做什么? 在您的房子中找到最冷的地方? 微调超频游戏机中的冷却系统? 调查是否有人坐在您的躺椅上? 但是不幸的是这个相机的价格一直使它离我们遥不可及……直到现在。

Adafruit MLX90640红外热像仪突破性解决方案,使低分辨率热成像的成本大幅降低到大众能接受的程度。 它可以检测55度或110度视野内的32 x 24像素温度网格。 借助Adafruit的一些额外功能,您可以将它变成自己的微型热像仪。

3 主要器件

3.1 MLX90640红外摄像头模块
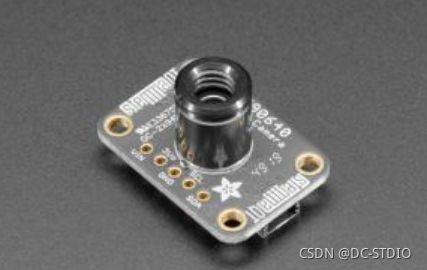
【毕业设计】基于单片机红外热成像仪 - stm32 物联网 嵌入式_第1张图片
该传感器包含24x32的红外热传感器阵列。 连接到微控制器(或Raspberry Pi)后,它将通过I2C返回768个独立红外温度读数的数组。 就像那些很酷的热像仪一样,但是它紧凑而简单,易于集成。

3.1.1 模块特性

该块一款红外热像仪模块,32×24 像素,I2C 接口通信,兼容 3.3V/5V 电平,支持 Raspberry Pi、
Arduino 等主控。

我采用 MLX90640 远红外热传感器阵列,可精确检测特定区域和温度范围内的目标物体,

尺寸小巧,可方便集成到各种工业或智能控制应用中。

  • 采用 MLX90640 远红外热传感器阵列,32×24 像素
  • 支持 I2C 接口通信,可设置为快速模式(速率可达 1MHz)
  • 噪声等效温差(NETD)仅为 0.1K RMS@1Hz 刷新率,噪声性能好
  • 板载电平转换电路,可兼容 3.3V/5V 的工作电平

3.1.2相关参数

  • 工作电压:3.3V/5V
  • 工作电流:<23mA
  • 通信接口:I2C (地址为 0x33)
  • 视场角(水平视角×垂直视角):
  • MLX90640-D55 Thermal Camera:55°×35° (角度小,适合远距离测量)
  • MLX90640-D110 Thermal Camera:110°×75° (角度大,适合近距离测量)
  • 工作温度:-40℃~85℃
  • 目标温度:-40℃~300℃
  • 检测精度:±1℃
  • 刷新速率:0.5Hz~64Hz (可编程设置)
  • 产品尺寸:28mm×16 mm
  • 固定孔尺寸:2.0mm

3.1.2 应用场景

  • 高精度非接触性物体温度检测
  • 红外热像仪、红外测温仪
  • 智能家居、智能楼宇、智能照明
  • 工业温度控制、安防、入侵/移动检测

3.1.3 接口说明(以接入 MCU 为例):

  • VCC:接 3.3V
  • GND:接 GND
  • SDA:接 MCU.I2C 数据线
  • SCL:接 MCU.I2C 时钟线

4 实现效果

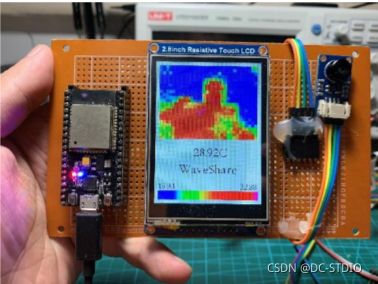
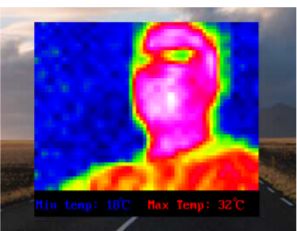
4.1 STM32+LCD 图像显示

【毕业设计】基于单片机红外热成像仪 - stm32 物联网 嵌入式_第2张图片

4.2 Arduino+ESP32+LCD 图像显示

【毕业设计】基于单片机红外热成像仪 - stm32 物联网 嵌入式_第3张图片

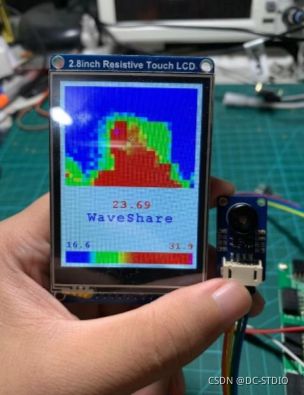
4.3 树莓派 HDMI 显示屏显示

【毕业设计】基于单片机红外热成像仪 - stm32 物联网 嵌入式_第4张图片

5 部分相关驱动代码

#include 
#include "Adafruit_Arcada.h"
Adafruit_MLX90640 mlx;
Adafruit_Arcada arcada;

#if !defined(USE_TINYUSB)
  #warning "Compile with TinyUSB selected!"
#endif

File myFile;

float mlx90640To[768];   // Here we receive the float vals acquired from MLX90640

#define DE_BOUNCE 200
  // Wait this many msec between button clicks
#define MENU_LEN 12
  // Number of total available menu choices
#define MENU_ROWS 9
  // Number of menu lines that can fit on screen
#define MENU_VPOS 6
#define GRAY_33 0x528A
#define BOTTOM_DIR "MLX90640"
#define DIR_FORMAT "/dir%05d"
#define BMP_FORMAT "/frm%05d.bmp"
#define CFG_FLNAME "/config.ini"
#define MAX_SERIAL 999

// BMP File Header, little end first, Photoshop ver.
const PROGMEM uint8_t BmpPSPHead[14] = {
 0x42, 0x4D,             // "BM" in hex
 0x38, 0x09, 0x00, 0x00, // File size, 2360
 0x00, 0x00,             // reserved for app data 1
 0x00, 0x00,             // reserved for app data 2
 0x36, 0x00, 0x00, 0x00  // Offset of first pixel, 54
};

// BMP 24-bit DIB Header, little end first, Photoshop ver.
const PROGMEM uint8_t DIBHeadPSP1[40] = {
 0x28, 0x00, 0x00, 0x00,  // Header size, 40
 0x20, 0x00, 0x00, 0x00,  // pixel width, 32
 0x18, 0x00, 0x00, 0x00,  // pixel height, 24
 0x01, 0x00,              // color planes, 1
 0x18, 0x00,              // bits per pixel, 24
 0x00, 0x00, 0x00, 0x00,  // Compression method, 0==none
 0x00, 0x00, 0x00, 0x00,  // Raw bitmap data size, dummy 0
 0x12, 0x0B, 0x00, 0x00,  // Pixels per meter H, 2834
 0x12, 0x0B, 0x00, 0x00,  // Pixels per meter V, 2834
 0x00, 0x00, 0x00, 0x00,  // Colors in palette, 0==default 2^n
 0x00, 0x00, 0x00, 0x00   // Number of important colors, 0
};

// BMP file data, 2 byte padding
const PROGMEM uint8_t PSPpad[2] = {0x00, 0x00};

//Byte arrays of bitmapped icons, 16 x 12 px:
const PROGMEM uint8_t battIcon[] = {
0x0f, 0x00, 0x3f, 0xc0, 0x20, 0x40, 0x20, 0x40, 0x20, 0x40, 0x20, 0x40, 
0x20, 0x40, 0x20, 0x40, 0x20, 0x40, 0x20, 0x40, 0x20, 0x40, 0x3f, 0xc0};

const PROGMEM uint8_t camIcon[] = {
0x01, 0xe0, 0x61, 0x20, 0xff, 0xf0, 0x80, 0x10, 0x86, 0x10, 0x89, 0x10, 
0x90, 0x90, 0x90, 0x90, 0x89, 0x10, 0x86, 0x10, 0x80, 0x10, 0xff, 0xf0};

const PROGMEM uint8_t SDicon[] = {
0x0f, 0xe0, 0x1f, 0xe0, 0x3c, 0x60, 0x78, 0x60, 0x70, 0x60, 0x60, 0x60, 
0x60, 0x60, 0x60, 0x60, 0x6f, 0x60, 0x60, 0x60, 0x7f, 0xe0, 0x7f, 0xe0};

const PROGMEM uint8_t snowIcon[] = {
0x15, 0x00, 0x4E, 0x40, 0xC4, 0x60, 0x75, 0xC0, 0x9F, 0x20, 0x0E, 0x00,
0x0E, 0x00, 0x9F, 0x20, 0x75, 0xC0, 0xC4, 0x60, 0x4E, 0x40, 0x15, 0x00};

uint8_t pixelArray[2304];   // BMP image body, 32 pixels * 24 rows * 3 bytes

// Some global values that several functions will use, including
// 5 floats to append to the BMP pixel data:
// coldest pixel, coldest color, center temp, hottest color, hottest pixel
float sneakFloats[5] = {3.1415926, 0.0, -11.7, 98.6, -12.34};      // Test values that get overwritten
uint16_t highAddr = 0, lowAddr = 0;                                // Append the pixel addresses, too

uint16_t backColor, lowPixel, highPixel, buttonRfunc = 1,
         emissivity = 95, frameRate = 4,
         thermRange = 0, paletteNum = 1, colorPal[256],            // Array for color palettes
         nextDirIndex = 0, nextBMPindex = 0, nextBMPsequence = 1;  // These keep count of SD files and dirs, 0==error
uint32_t deBounce = 0, buttonBits = 0;
boolean mirrorFlag = false, celsiusFlag = false, markersOn = true,
        screenDim = false, smoothing = false, showLastCap = false,
        save1frame = false, recordingInProg = false, buttonActive = false;
float battAverage = 0.0, colorLow = 0.0, colorHigh = 100.0;        // Values for managing color range
volatile boolean clickFlagMenu = false, clickFlagSelect = false;   // Volatiles for timer callback handling

setup()函数首先执行,每次启动仅执行一次。 它的工作是初始化系统,从Arcada代码及其将控制的板载硬件开始,例如屏幕和按钮等。

然后一组测试确定闪存是否准备好接收新的BMP文件。

void setup()
{
  if (!arcada.arcadaBegin()) {    // Start TFT and fill with black
    // Serial.print("Failed to begin");
    while (1);
  }
  arcada.filesysBeginMSD();       // Set up SD or QSPI flash as an external USB drive

  arcada.displayBegin();              // Activate TFT screen
  arcada.display->setRotation(1);     // wide orientation
  arcada.display->setTextWrap(false);
  arcada.setBacklight(255);           // Turn on backlight
  battAverage = arcada.readBatterySensor();

  Serial.begin(115200);
//  while(!Serial); // Wait for user to open terminal
  Serial.println("MLX90640 IR Array Example");

  if(arcada.filesysBegin()){              // Initialize flash storage, begin setting up indices for saving BMPs
    if(!arcada.exists(BOTTOM_DIR)) {      // Is base "MLX90640" directory absent?
      if(arcada.mkdir(BOTTOM_DIR))        // Can it be added?
        nextDirIndex = nextBMPindex = 1;  // Success, prepare to store numbered files & dirs
    } else {      // "MLX90640" directory exists, can we add files | directories?
      // Get the number of the next unused serial directory path
      nextDirIndex = availableFileNumber(1, BOTTOM_DIR + String(DIR_FORMAT));
      // and the next unused serial BMP name
      nextBMPindex = availableFileNumber(1, BOTTOM_DIR + String(BMP_FORMAT));
    }
  }  // By now each global index variable is either 0 (no nums available), or the next unclaimed serial num

单片机-嵌入式毕设选题大全及项目分享:

https://blog.csdn.net/m0_71572576/article/details/125409052

6 最后

你可能感兴趣的:(毕业设计,单片机,物联网,单片机,物联网,stm32,热成像仪,毕业设计)