opencv联合python1——文档扫描OCR识别,角点检测,图像拼接
超市小票的ORC识别
opencv 4.0版本以后,图像寻找边缘后返回的参数只有两个
- 边缘检测
- 轮廓检测
- 变换(平移,旋转)
- OCR识别
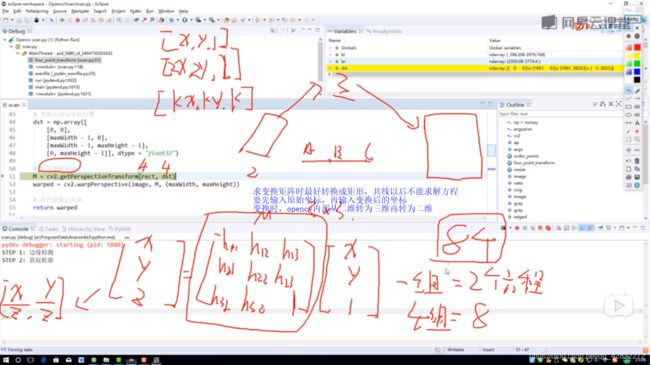
透视变换原理


#1.读入图像,获得图像缩小放大时的比例,重新定义大小
#2.预处理:灰度变换,高斯模糊,边缘检测
#3.轮廓检测,根据面积对轮廓进行排序sorted
#4.遍历轮廓,求轮廓近似,求周长arcLength,轮廓近似approxPolyDP,4个点时取出
#5. 画图,进行透视变换four_point_transform,转换成灰度图进行二值处理


import cv2
import numpy as np
import argparse
import pytesseract
from PIL import Image
import os

def order_points(pts):
    rect = np.zeros((4,2),dtype = "float32")
    #按顺序找到对应坐标0123分别是 左上,右上,右下,左下
    #计算左上,右下
    s = pts.sum(axis=1)
    rect[0] = pts[np.argmin(s)]
    rect[2] = pts[np.argmax(s)]
    #计算右上和左下
    diff = np.diff(pts,axis =1)
    rect[1] = pts[np.argmin(diff)]
    rect[3] = pts[np.argmax(diff)]
    return rect
def four_point_transform(img,pts):
    #获取输入坐标
    rect = order_points(pts)
    (tl, tr, br, bl) = rect
    #计算输入的w和h
    widthA = np.sqrt(((br[0]-bl[0])**2)+((br[1]-bl[1])**2))
    widthB = np.sqrt(((tr[0]-tl[0])**2)+((tr[1]-tl[1])**2))
    maxWidth = max(int(widthA),int(widthB))

    heightA = np.sqrt(((tr[0]-br[0])**2)+((tr[1]-br[1])**2))
    heightB = np.sqrt(((tl[0]-bl[0])**2)+((tl[1]-bl[1])**2))
    maxHeight = max(int(heightA),int(heightB))

    #变换后对应坐标位置
    dst = np.array([
        [0,0],[maxWidth-1,0],
        [maxWidth,maxHeight],[0,maxHeight-1]
        ],dtype = "float32")
    #计算变换矩阵
    M = cv2.getPerspectiveTransform(rect,dst)
    warped = cv2.warpPerspective(img,M,(maxWidth,maxHeight))
    #返回变换后结果
    return warped


def resize(image, width=None, height=None, inter=cv2.INTER_AREA):
	dim = None
	(h, w) = image.shape[:2]
	if width is None and height is None:
		return image
	if width is None:
		r = height / float(h)
		dim = (int(w * r), height)
	else:
		r = width / float(w)
		dim = (width, int(h * r))
	resized = cv2.resize(image, dim, interpolation=inter)
	return resized
img = cv2.imread("D:/receipt.jpg")
cv2.imshow("img",img)
ratio = img.shape[0]/500.0
orig = img.copy()
img = resize(orig,height = 500)
#预处理
gray = cv2.cvtColor(img, cv2.COLOR_BGR2GRAY)
gray = cv2.GaussianBlur(gray,(5,5),0)
edged = cv2.Canny(gray,75,200)
cv2.imshow("img1",img)
cv2.imshow("edged",edged)
#轮廓检测
cnts = cv2.findContours(edged.copy(),cv2.RETR_LIST,cv2.CHAIN_APPROX_SIMPLE)[0]
cnts = sorted(cnts,key = cv2.contourArea,reverse=True)[:5]
#遍历轮廓,轮廓近似,找出矩形
for c in cnts:
    #计算周长true 表示闭合
    peri = cv2.arcLength(c,True)
    #轮廓近似 c 表示输入的点集,准确的参数,True表示封闭
    approx = cv2.approxPolyDP(c,0.02*peri,True)
    if len(approx)==4:
        screenCnt = approx
        break
cv2.drawContours(img,[screenCnt],-1,(0,255,0),2)
cv2.imshow("img2",img)
cv2.waitKey(0)
cv2.destroyAllWindows()
#透视变换
warped = four_point_transform(orig, screenCnt.reshape(4, 2) * ratio)
#二值处理
warped = cv2.cvtColor(warped,cv2.COLOR_BGR2GRAY)
ref = cv2.threshold(warped,100,255,cv2.THRESH_BINARY)[1]
cv2.imwrite("D:/scan1.jpg",ref)
cv2.imshow("original",resize(orig,height = 650))
cv2.imshow("Scanned",resize(ref,height = 650))
cv2.waitKey(0)
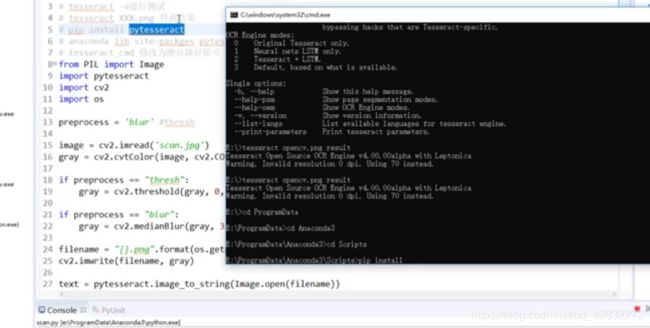
接上面
# https://digi.bib.uni-mannheim.de/tesseract/
# 配置环境变量如E:\Program Files (x86)\Tesseract-OCR
# tesseract -v进行测试
# tesseract XXX.png 得到结果
# pip install pytesseract
# anaconda lib site-packges pytesseract pytesseract.py
# tesseract_cmd 修改为绝对路径即可
import cv2
import numpy as np
import pytesseract
from PIL import Image
import os

preprocess = 'blur'
image = cv2.imread('D:/scan1.jpg')
gray = cv2.cvtColor(image,cv2.COLOR_BGR2GRAY)

if preprocess=="thresh":
    gray = cv2.threshold(gray,0,255,cv2.THRESH_BINARY|cv2.THRESH_OTSU)
if preprocess == "blur":
    gray = cv2.medianBlur(gray,3)

filename = "{}.png".format(os.getpid())
cv2.imwrite(filename, gray)
text = pytesseract.image_to_string(Image.open(filename))
print(text)
os.remove(filename)
img = cv2.rotate(image,cv2.ROTATE_90_COUNTERCLOCKWISE)
src = cv2.resize(img,(640,480))
cv2.imshow("Image",src)
#cv2.imshow("Output",gray)
cv2.waitKey(0)
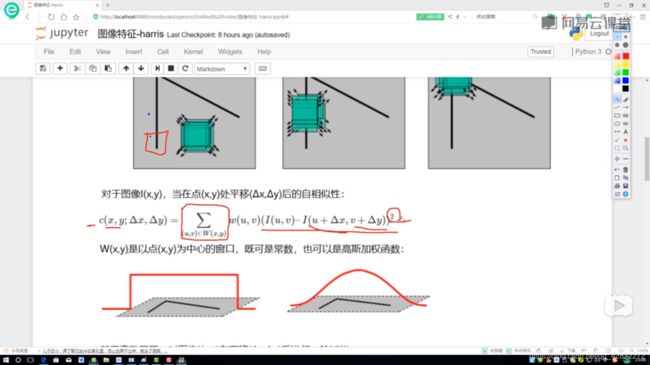
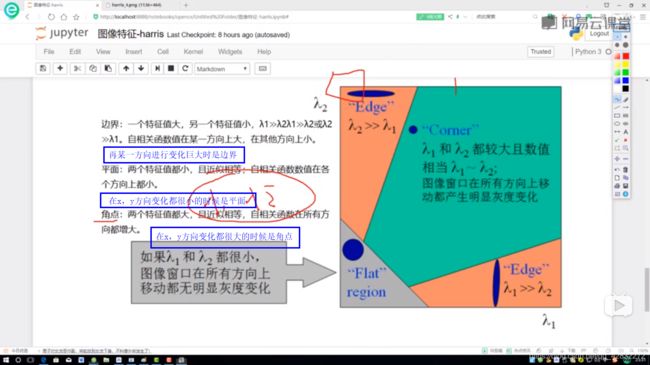
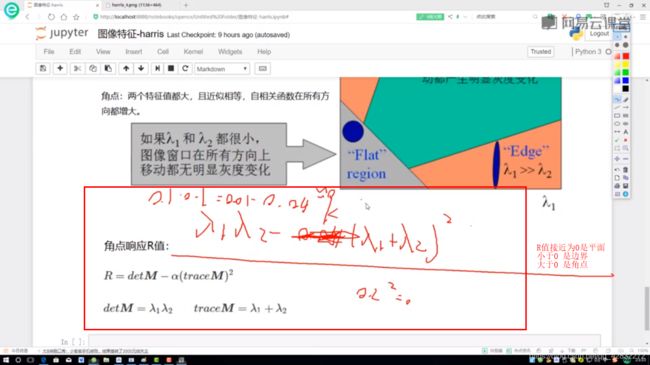
图像特征-harris角点检测


import cv2
import numpy as np

img = cv2.imread("test_1.jpg")
print("img.shape",img.shape)
gray = cv2.cvtColor(img,cv2.COLOR_BGR2GRAY)
#img:数据类型为float32的输入图像
# blockSize:角点检测中指定区域的大小
# ksize:Sobel求导中使用的窗口大小
# k:取值参数为[0.04,0.06]
#gray = np.float32(gray)
dst = cv2.cornerHarris(gray,2,3,0.04)  #检测角点
print("dst.shape",dst.shape)
#显示角点
img[dst>0.01*dst.max()] = [0,0,255]
cv2.imshow('dst',img)
cv2.waitKey(0)
图像特征SIFT

特征匹配
Brute-Force蛮力匹配


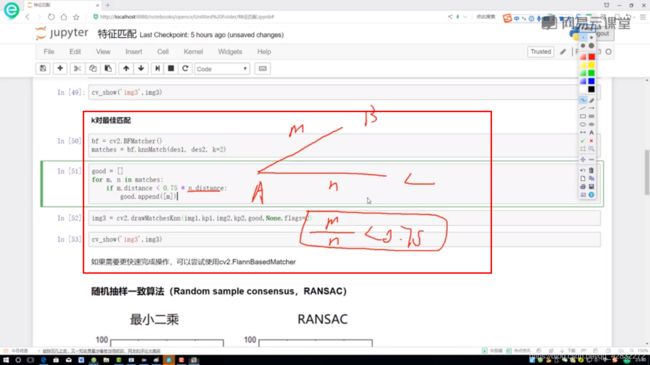
随机抽样一致算法

图像拼接:
import numpy as np
import cv2

class Stitcher:

    #拼接函数
    def stitch(self, images, ratio=0.75, reprojThresh=4.0,showMatches=False):
        #获取输入图片
        (imageB, imageA) = images
        #检测A、B图片的SIFT关键特征点,并计算特征描述子
        (kpsA, featuresA) = self.detectAndDescribe(imageA)
        (kpsB, featuresB) = self.detectAndDescribe(imageB)

        # 匹配两张图片的所有特征点,返回匹配结果
        M = self.matchKeypoints(kpsA, kpsB, featuresA, featuresB, ratio, reprojThresh)

        # 如果返回结果为空,没有匹配成功的特征点,退出算法
        if M is None:
            return None

        # 否则,提取匹配结果
        # H是3x3视角变换矩阵
        (matches, H, status) = M
        # 将图片A进行视角变换,result是变换后图片
        result = cv2.warpPerspective(imageA, H, (imageA.shape[1] + imageB.shape[1], imageA.shape[0]))
        self.cv_show('result', result)
        # 将图片B传入result图片最左端
        result[0:imageB.shape[0], 0:imageB.shape[1]] = imageB
        self.cv_show('result', result)
        # 检测是否需要显示图片匹配
        if showMatches:
            # 生成匹配图片
            vis = self.drawMatches(imageA, imageB, kpsA, kpsB, matches, status)
            # 返回结果
            return (result, vis)

        # 返回匹配结果
        return result
    def cv_show(self,name,img):
        cv2.imshow(name, img)
        cv2.waitKey(0)
        cv2.destroyAllWindows()

    def detectAndDescribe(self, image):
        # 将彩色图片转换成灰度图
        gray = cv2.cvtColor(image, cv2.COLOR_BGR2GRAY)

        # 建立SIFT生成器
        descriptor = cv2.xfeatures2d.SIFT_create()
        # 检测SIFT特征点,并计算描述子
        (kps, features) = descriptor.detectAndCompute(image, None)

        # 将结果转换成NumPy数组
        kps = np.float32([kp.pt for kp in kps])

        # 返回特征点集,及对应的描述特征
        return (kps, features)

    def matchKeypoints(self, kpsA, kpsB, featuresA, featuresB, ratio, reprojThresh):
        # 建立暴力匹配器
        matcher = cv2.BFMatcher()

        # 使用KNN检测来自A、B图的SIFT特征匹配对,K=2
        rawMatches = matcher.knnMatch(featuresA, featuresB, 2)

        matches = []
        for m in rawMatches:
            # 当最近距离跟次近距离的比值小于ratio值时,保留此匹配对
            if len(m) == 2 and m[0].distance < m[1].distance * ratio:
            # 存储两个点在featuresA, featuresB中的索引值
                matches.append((m[0].trainIdx, m[0].queryIdx))

        # 当筛选后的匹配对大于4时,计算视角变换矩阵
        if len(matches) > 4:
            # 获取匹配对的点坐标
            ptsA = np.float32([kpsA[i] for (_, i) in matches])
            ptsB = np.float32([kpsB[i] for (i, _) in matches])

            # 用RANSAC计算视角变换矩阵
            (H, status) = cv2.findHomography(ptsA, ptsB, cv2.RANSAC, reprojThresh)

            # 返回结果
            return (matches, H, status)

        # 如果匹配对小于4时,返回None
        return None

    def drawMatches(self, imageA, imageB, kpsA, kpsB, matches, status):
        # 初始化可视化图片,将A、B图左右连接到一起
        (hA, wA) = imageA.shape[:2]
        (hB, wB) = imageB.shape[:2]
        vis = np.zeros((max(hA, hB), wA + wB, 3), dtype="uint8")
        vis[0:hA, 0:wA] = imageA
        vis[0:hB, wA:] = imageB

        # 联合遍历,画出匹配对
        for ((trainIdx, queryIdx), s) in zip(matches, status):
            # 当点对匹配成功时,画到可视化图上
            if s == 1:
                # 画出匹配对
                ptA = (int(kpsA[queryIdx][0]), int(kpsA[queryIdx][1]))
                ptB = (int(kpsB[trainIdx][0]) + wA, int(kpsB[trainIdx][1]))
                cv2.line(vis, ptA, ptB, (0, 255, 0), 1)

        # 返回可视化结果
        return vis