一分钟教会您使用Yolov5训练自己的数据集并测试
1. 下载YOLO项目代码
点击这里下载并解压YOLO的官方代码:https://github.com/ultralytics/yolov5/tree/v5.0
2. 环境安装
cd进入到下载的YOLO文件目录下,在CMD终端里输入:pip install -r requirements.txt然后回车即可。
3. 数据集下载:
使用百度飞桨提供的3种水果检测的小数据集,百度网盘链接:https://pan.baidu.com/s/1XM1xdM6E7JcIm7EU8J0uMw
提取码:m9h6
下载后解压好,放入刚刚下载的YOLO项目的文件夹里边(注意:小白一定要放,跟着走就不会报错,如果是大神的话那就随意了)
4. xml格式的标注文件转为txt格式
本代码主要修改于炮哥的这篇博客,可以更灵活的导入数据集:https://blog.csdn.net/didiaopao/article/details/120022845?spm=1001.2014.3001.5502
用法:在下载的YOLO文件夹里新建一个py文件,随便命个名即可,复制我下边的代码过去,然后根据注释数据集的文件路径修改即可。(注意:这个代码默认是下载的数据集是放在YOLO文件夹下的,如果已经放在了,那就无需修改代码,如果没有,那就需要改代码的路径)
报错解决:cls = obj.find('name').text 这行代码可能会报错,那是因为你的xml文件的类别的名字不叫做’name’,解决方法是打开你的xml文件看看里边叫什么,替换掉’name’就行。
import xml.etree.ElementTree as ET
import pickle
import os
from os import listdir, getcwd
from os.path import join
import random
from shutil import copyfile

# 此函数用作把xml格式的标签,转为txt格式,并划分训练集合测试集
classes = ['apple', 'banana', 'orange']  # 类别名
TRAIN_RATIO = 80  # 训练集占得比例,80就是占80%

dir1 = r"fruit_detection/"  # 要处理的数据的主目录。前面的r不能删,后面的/一定要带上
dir2 = r""  # 要处理的数据的子目录。前面的r不能删,后面的/一定要带上

input_picPath_dir_name = r"JPEGimages/"  # 输入的图片所在的文件夹的名字。前面的r不能删,后面的/一定要带上
input_xmlPath_dir_name = r"Annotations/"  # 输入的xml标签所在的文件夹的名字。前面的r不能删,后面的/一定要带上
output_txtPath_dir_name = r"YOLOLabels/"  # 输出的txt标签所在的文件夹的名字。前面的r不能删,后面的/一定要带上

input_picPath = r"%s/%s/%s" % (dir1, dir2, input_picPath_dir_name)  # 输入的图片所在文件夹路径。前面的r不能删,后面的/一定要带上
input_xmlPath = r"%s/%s/%s" % (dir1, dir2, input_xmlPath_dir_name)  # 输入的xml标签文件保存路径。前面的r不能删,后面的/一定要带上
output_txtPath = r"%s/%s/%s" % (dir1, dir2, output_txtPath_dir_name)  # 输出的txt标签所在文件夹路径。前面的r不能删,后面的/一定要带上


def clear_hidden_files(path):
    dir_list = os.listdir(path)
    for i in dir_list:
        abspath = os.path.join(os.path.abspath(path), i)
        if os.path.isfile(abspath):
            if i.startswith("._"):
                os.remove(abspath)
        else:
            clear_hidden_files(abspath)


def convert(size, box):
    dw = 1. / size[0]
    dh = 1. / size[1]
    x = (box[0] + box[1]) / 2.0
    y = (box[2] + box[3]) / 2.0
    w = box[1] - box[0]
    h = box[3] - box[2]
    x = x * dw
    w = w * dw
    y = y * dh
    h = h * dh
    return (x, y, w, h)


def convert_annotation(image_id):
    # print(os.path.exists('%s/%s.xml' % (input_xmlPath, image_id)))
    # print('%s/%s.txt' % (output_txtPath, image_id))
    # exit()
    in_file = open('%s/%s.xml' % (input_xmlPath, image_id))
    out_file = open('%s/%s.txt' % (output_txtPath, image_id), 'w')
    tree = ET.parse(in_file)
    root = tree.getroot()
    size = root.find('size')
    w = int(size.find('width').text)
    h = int(size.find('height').text)

    for obj in root.iter('object'):
        difficult = obj.find('difficult').text
        cls = obj.find('name').text  # 这里可能要改,类别的名字,打开你的xml文件看看里边叫什么
        if cls not in classes or int(difficult) == 1:
            continue
        cls_id = classes.index(cls)
        xmlbox = obj.find('bndbox')
        b = (float(xmlbox.find('xmin').text), float(xmlbox.find('xmax').text), float(xmlbox.find('ymin').text),
             float(xmlbox.find('ymax').text))
        bb = convert((w, h), b)
        out_file.write(str(cls_id) + " " + " ".join([str(a) for a in bb]) + '\n')
    in_file.close()
    out_file.close()


wd = os.getcwd()
data_base_dir = os.path.join(wd, dir1)
if not os.path.isdir(data_base_dir):
    os.mkdir(data_base_dir)
work_sapce_dir = os.path.join(data_base_dir, dir2)
if not os.path.isdir(work_sapce_dir):
    os.mkdir(work_sapce_dir)
annotation_dir = os.path.join(work_sapce_dir, input_xmlPath_dir_name)
if not os.path.isdir(annotation_dir):
    os.mkdir(annotation_dir)
clear_hidden_files(annotation_dir)
image_dir = os.path.join(work_sapce_dir, input_picPath_dir_name)
if not os.path.isdir(image_dir):
    os.mkdir(image_dir)
clear_hidden_files(image_dir)
yolo_labels_dir = os.path.join(work_sapce_dir, output_txtPath_dir_name)
if not os.path.isdir(yolo_labels_dir):
    os.mkdir(yolo_labels_dir)
clear_hidden_files(yolo_labels_dir)
yolov5_images_dir = os.path.join(data_base_dir, "images/")
if not os.path.isdir(yolov5_images_dir):
    os.mkdir(yolov5_images_dir)
clear_hidden_files(yolov5_images_dir)
yolov5_labels_dir = os.path.join(data_base_dir, "labels/")
if not os.path.isdir(yolov5_labels_dir):
    os.mkdir(yolov5_labels_dir)
clear_hidden_files(yolov5_labels_dir)
yolov5_images_train_dir = os.path.join(yolov5_images_dir, "train/")
if not os.path.isdir(yolov5_images_train_dir):
    os.mkdir(yolov5_images_train_dir)
clear_hidden_files(yolov5_images_train_dir)
yolov5_images_test_dir = os.path.join(yolov5_images_dir, "val/")
if not os.path.isdir(yolov5_images_test_dir):
    os.mkdir(yolov5_images_test_dir)
clear_hidden_files(yolov5_images_test_dir)
yolov5_labels_train_dir = os.path.join(yolov5_labels_dir, "train/")
if not os.path.isdir(yolov5_labels_train_dir):
    os.mkdir(yolov5_labels_train_dir)
clear_hidden_files(yolov5_labels_train_dir)
yolov5_labels_test_dir = os.path.join(yolov5_labels_dir, "val/")
if not os.path.isdir(yolov5_labels_test_dir):
    os.mkdir(yolov5_labels_test_dir)
clear_hidden_files(yolov5_labels_test_dir)

train_file = open(os.path.join(wd, "yolov5_train.txt"), 'w')
test_file = open(os.path.join(wd, "yolov5_val.txt"), 'w')
train_file.close()
test_file.close()
train_file = open(os.path.join(wd, "yolov5_train.txt"), 'a')
test_file = open(os.path.join(wd, "yolov5_val.txt"), 'a')
list_imgs = os.listdir(image_dir)  # list image files
prob = random.randint(1, 100)
print("Probability: %d" % prob)
for i in range(0, len(list_imgs)):
    path = os.path.join(image_dir, list_imgs[i])
    if os.path.isfile(path):
        image_path = image_dir + list_imgs[i]
        voc_path = list_imgs[i]
        (nameWithoutExtention, extention) = os.path.splitext(os.path.basename(image_path))
        (voc_nameWithoutExtention, voc_extention) = os.path.splitext(os.path.basename(voc_path))
        annotation_name = nameWithoutExtention + '.xml'
        annotation_path = os.path.join(annotation_dir, annotation_name)
        label_name = nameWithoutExtention + '.txt'
        label_path = os.path.join(yolo_labels_dir, label_name)
    prob = random.randint(1, 100)
    print("Probability: %d" % prob)
    if (prob < TRAIN_RATIO):  # train dataset
        if os.path.exists(annotation_path):
            train_file.write(image_path + '\n')
            convert_annotation(nameWithoutExtention)  # convert label
            copyfile(image_path, yolov5_images_train_dir + voc_path)
            copyfile(label_path, yolov5_labels_train_dir + label_name)
    else:  # test dataset
        if os.path.exists(annotation_path):
            test_file.write(image_path + '\n')
            convert_annotation(nameWithoutExtention)  # convert label
            copyfile(image_path, yolov5_images_test_dir + voc_path)
            copyfile(label_path, yolov5_labels_test_dir + label_name)
train_file.close()
test_file.close()
运行完此代码后,打开数据集所在的文件夹,应该会出现我的这样的文件夹:其中images、labels和YOLOLables文件夹是刚刚运行代码后生成的:
5. 下载预训练权重
下载地址:https://github.com/ultralytics/yolov5/releases
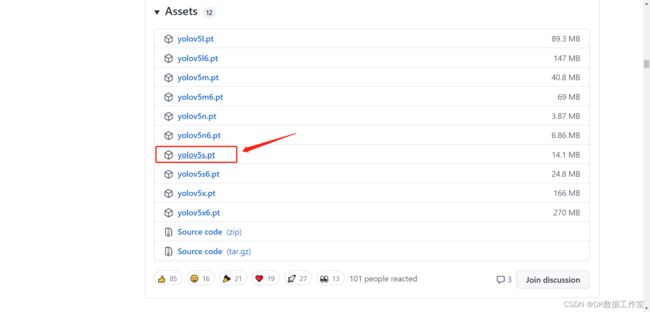
以下载yolov5s.pt权重为例,找到yolov5s.pt,点击就可以下载,所在位置如图所示:

下载好后,将下载的权重放到weights文件夹下,如图所示:

6. 修改.yaml配置文件
- 修改数据集配置文件:在data下找到voc.yaml,将其复制一份,并重命名为fruit_detection.yaml,然后打开它。
需要修改的地方就只有3个,train和val改成你的训练和测试集的路径,nc改成你的类别数,names改成你的类别名,如图所示:
- 修改模型配置文件:在models下找到yolov5s.yaml,将其复制一份,并重命名为fruit_detection.yaml,然后打开它。(注意:该教程是使用的yolov5s.pt这个权重,所以复制的是yolov5s.yaml这个配置文件,不同的权重对应不同的配置文件,弄错的话会报错的)
需要修改的地方只有1个,把nc改成你的数据集类别数即可,如图所示:
7. 修改train.py文件
只需修改4行:,weights、cfg、data、epochs和batch-size,如图所示:
weights:是下载的预训练的权重路径,照着我们操作的,就填:r'weights/yolov5s.pt'
cfg:是模型配置文件的路径,照着我们操作的,就填:r'models/fruit_detection.yaml'
data:是数据集配置文件的路径,照着我们操作的,就填:r'data/fruit_detection.yaml'
epochs:是训练次数,我这里设置成200次,可以得到比较好的效果
batch-size:是训练的批次,尽量不要设置的太大,会报CUDA显存不足的错误,我的RTX 2080ti显卡有11g,所以batch-size设置成50,是可以运行的。如果只有6g显存的朋友,设置成25估计是可以运行的

8. 修改其他py文件
- window的用户,请在utils文件夹下,找到datasets.py这个文件,把里面的81行里面的参数num_workers改成0,如图所示:

- 复制以下代码到models文件夹的common.py里,粘贴到最下面即可:
class SPPF(nn.Module):
    # Spatial Pyramid Pooling - Fast (SPPF) layer for YOLOv5 by Glenn Jocher
    def __init__(self, c1, c2, k=5):  # equivalent to SPP(k=(5, 9, 13))
        super().__init__()
        c_ = c1 // 2  # hidden channels
        self.cv1 = Conv(c1, c_, 1, 1)
        self.cv2 = Conv(c_ * 4, c2, 1, 1)
        self.m = nn.MaxPool2d(kernel_size=k, stride=1, padding=k // 2)

    def forward(self, x):
        x = self.cv1(x)
        with warnings.catch_warnings():
            warnings.simplefilter('ignore')  # suppress torch 1.9.0 max_pool2d() warning
            y1 = self.m(x)
            y2 = self.m(y1)
            return self.cv2(torch.cat([x, y1, y2, self.m(y2)], 1))
9. 运行train.py文件开始训练
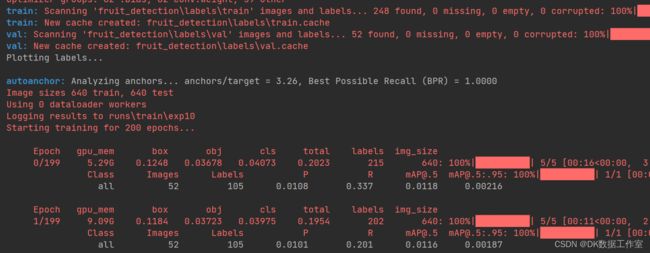
运行train.py文件后,如果看到以下界面,那么恭喜你!你已经成功地开始训练YOLO了!耐心等待训练结束即可。

10. 运行detect.py文件进行测试
要改的地方只有2个,weights和source,如图所示:
weights:就是你刚刚训练好的模型的权重,我们的权重是在这个路径下:r'runs\train\exp10\weights\best.pt'其中exp10表示你训练了几个模型,我这里是因为前面训练了9个模型,刚刚又训练了一个模型,所以是exp10。而best.pt表示的是效果最好的权重,肯定选他(还有一个last.pt,是最后一步训练的权重,一般不用)。
source:这是你的测试集图片所在的文件夹,严格按照我们上面操作的朋友,那一定是在r'fruit_detection\images\val'

然后运行detect.py文件,如果出现下面的图片,说明您已经测试成功了!!

在runs\detect\exp10这个路径下,可看到整个测试集的检测结果,一张大图展示一下心情~


