【目标检测-YOLO】YOLOv5-5.0v-数据处理(第三篇)
前文链接:
YOLOv5-v5.0-yolov5s网络架构详解(第一篇)_星魂非梦的博客-CSDN博客
YOLOv5-5.0v-yaml 解析(第二篇)_星魂非梦的博客-CSDN博客
1. 性能分析

- YOLOv5-P6 models: 4 output layers P3, P4, P5, P6 at strides 8, 16, 32, 64 trained at
--img 1280 - P6 models include an extra P6/64 output layer for detection of larger objects, and benefit the most from training at higher resolution. For this reason we trained all P5 models at 640, and all P6 models at 1280.
- 具体参考:https://github.com/ultralytics/yolov5/issues/2110

YOLOv5-P5 640 Figure
2. 架构分析
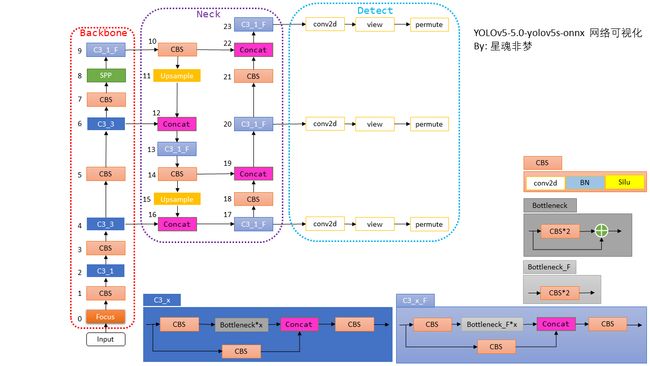
在 yolov5s.yaml 文件中,把上图 Neck 和 Detect 合为 head。
Neck 明显就是一个PAN结构(自上而下 -> 自下而上)。yolov5 网络结构设计中最大的优点个人认为是使用 yaml 文件配置不同网络,只修改了深度和宽度两个参数,代码很简洁。
由于 yolov5 没有论文, 我们姑且把 yolov5-5.0v的Backbone 叫做 C3Net。
3. 数据处理
数据处理主要包括三类:
 上图中,红色字体的操作表示需要修改labels,绿色的操作不需要修改labels
3.1 train.py中的Trainloader
3.1.1 流程图:

3.1.2 数据增强配置文件:
微调文件(data/hyp.finetune.yaml)
hsv_h: 0.0138     # hsv增强系数 色调
hsv_s: 0.664      # hsv增强系数 饱和度
hsv_v: 0.464      # hsv增强系数 亮度
degrees: 0.373    # random_perspective增强系数 旋转角度  (+/- deg)
translate: 0.245  # random_perspective增强系数 平移     (+/- fraction)
scale: 0.898      # random_perspective增强系数 图像缩放  (+/- gain)
shear: 0.602      # random_perspective增强系数 图像剪切  (+/- deg)
perspective: 0.0  # random_perspective增强系数 透明度    (+/- fraction), range 0-0.001
flipud: 0.00856   # 上下翻转数据增强(probability)
fliplr: 0.5       # 左右翻转数据增强(probability)
mosaic: 1.0       # mosaic数据增强(probability)
mixup: 0.243      # mixup数据增强(probability)
从头训练(data/hyp.scratch.yaml),其中没有采用 mixup。
hsv_h: 0.015        # image HSV-Hue augmentation (fraction)
hsv_s: 0.7          # image HSV-Saturation augmentation (fraction)
hsv_v: 0.4          # image HSV-Value augmentation (fraction)
degrees: 0.0        # image rotation (+/- deg)
translate: 0.1      # image translation (+/- fraction)
scale: 0.5          # image scale (+/- gain)
shear: 0.0          # image shear (+/- deg)
perspective: 0.0    # image perspective (+/- fraction), range 0-0.001
flipud: 0.0         # image flip up-down (probability)
fliplr: 0.5         # image flip left-right (probability)
mosaic: 1.0         # image mosaic (probability)
mixup: 0.0          # image mixup (probability)
3.1.3 代码解读:
3.1.3.1 程序入口:train.py
    # Trainloader
    dataloader, dataset = create_dataloader(train_path, imgsz, batch_size, gs, opt,
                                            hyp=hyp, augment=True, cache=opt.cache_images, rect=opt.rect, rank=rank,
                                            world_size=opt.world_size, workers=opt.workers,
                                            image_weights=opt.image_weights, quad=opt.quad, prefix=colorstr('train: '))
注:augment = True,rect 为 False:
parser.add_argument('--rect', action='store_true', help='rectangular training')我们训练时候不指定该参数,所以rect 为 False。rect: 是否开启矩形train/test,默认训练集关闭 ,验证集开启,可以加速。self.rect=True时,self.batch_shapes记载每个batch的shape(同一个batch的图片shape相同)。
create_dataloader函数定义:
def create_dataloader(path, imgsz, batch_size, stride, opt, hyp=None, augment=False, cache=False, pad=0.0, rect=False,
                      rank=-1, world_size=1, workers=8, image_weights=False, quad=False, prefix=''):
    """在train.py中被调用,用于生成Trainloader, dataset,testloader
    自定义dataloader函数: 调用LoadImagesAndLabels获取数据集(包括数据增强) + 调用分布式采样器DistributedSampler +
                        自定义InfiniteDataLoader 进行永久持续的采样数据
    :param path: 图片数据加载路径 train/test   如: ../datasets/VOC/images/train2007
    :param imgsz: train/test图片尺寸(数据增强后大小) 如:640
    :param batch_size: batch size 大小 8/16/32
    :param stride: 模型最大stride=32   [32 16 8]
    :param single_cls: 数据集是否是单类别 默认False
    :param hyp: 超参列表dict 网络训练时的一些超参数,包括学习率等,这里主要用到里面一些关于数据增强(旋转、平移等)的系数
    :param augment: 是否要进行数据增强  True
    :param cache: 是否cache_images False
    :param pad: 设置矩形训练的shape时进行的填充 默认0.0
    :param rect: 是否开启矩形train/test  默认训练集关闭 验证集开启
    :param rank:  多卡训练时的进程编号 rank为进程编号  -1且gpu=1时不进行分布式  -1且多块gpu使用DataParallel模式  默认-1 The (global) rank of the current process.
    :param world_size: The total number of processes. Should be equal to the total number of devices (GPU) used for distributed training.
    :param workers: dataloader的numworks 加载数据时的cpu进程数
    :param image_weights: 训练时是否根据图片样本真实框分布权重来选择图片  默认False
    :param quad: dataloader取数据时, 是否使用collate_fn4代替collate_fn  默认False
    :param prefix: 显示信息   一个标志,多为train/val,处理标签时保存cache文件会用到
    """
    # Make sure only the first process in DDP process the dataset first, and the following others can use the cache
    # 主进程实现数据的预读取并缓存,然后其它子进程则从缓存中读取数据并进行一系列运算。
    # 为了完成数据的正常同步, yolov5基于torch.distributed.barrier()函数实现了上下文管理器
    with torch_distributed_zero_first(rank):
        # 载入文件数据(增强数据集)
        dataset = LoadImagesAndLabels(path, imgsz, batch_size,
                                      augment=augment,  # augment images
                                      hyp=hyp,  # augmentation hyperparameters
                                      rect=rect,  # rectangular training
                                      cache_images=cache,
                                      single_cls=opt.single_cls,
                                      stride=int(stride),
                                      pad=pad,
                                      image_weights=image_weights,
                                      prefix=prefix)

    batch_size = min(batch_size, len(dataset)) # bs
    nw = min([os.cpu_count() // world_size, batch_size if batch_size > 1 else 0, workers])  # number of workers
    # 分布式采样器DistributedSampler
    sampler = torch.utils.data.distributed.DistributedSampler(dataset) if rank != -1 else None
    # 使用InfiniteDataLoader和_RepeatSampler来对DataLoader进行封装, 代替原先的DataLoader, 能够永久持续的采样数据
    loader = torch.utils.data.DataLoader if image_weights else InfiniteDataLoader
    # Use torch.utils.data.DataLoader() if dataset.properties will update during training else InfiniteDataLoader()
    dataloader = loader(dataset,
                        batch_size=batch_size,
                        num_workers=nw,
                        sampler=sampler,
                        pin_memory=True,
                        collate_fn=LoadImagesAndLabels.collate_fn4 if quad else LoadImagesAndLabels.collate_fn)
    return dataloader, dataset
关于 分布式 GPU 训练参考:
分布式 GPU 训练指南 - Azure Machine Learning | Microsoft Docs
Distributed communication package - torch.distributed — PyTorch 1.11.0 documentation
3.1.3.2 create_dataloader定义在utils/datasets.py
LoadImagesAndLabels 类
该类是 自定义数据集部分,继承自torch.utils.data.Dataset,需要重写__init__,__len__, __getitem()__等抽象方法,另外目标检测一般还需要重写collate_fn函数。所以,理解这三个函数是理解数据增强(数据载入)的重中之重。
这里只关注__getitem()__,这是数据增强函数,一般一次性执行batch_size次。
    def __getitem__(self, index):
        index = self.indices[index]  # linear, shuffled, or image_weights

        hyp = self.hyp
        mosaic = self.mosaic and random.random() < hyp['mosaic'] # Trainloader 时 self.mosaic = True, random.random() < hyp['mosaic'] = 1肯定满足;
        if mosaic:
            # Load mosaic
            img, labels = load_mosaic(self, index)
            shapes = None

            # MixUp https://arxiv.org/pdf/1710.09412.pdf
            if random.random() < hyp['mixup']:
                img2, labels2 = load_mosaic(self, random.randint(0, self.n - 1))
                r = np.random.beta(8.0, 8.0)  # mixup ratio, alpha=beta=8.0
                img = (img * r + img2 * (1 - r)).astype(np.uint8)
                labels = np.concatenate((labels, labels2), 0)

        else:
            # Load image
            img, (h0, w0), (h, w) = load_image(self, index)

            # Letterbox
            shape = self.batch_shapes[self.batch[index]] if self.rect else self.img_size  # final letterboxed shape
            img, ratio, pad = letterbox(img, shape, auto=False, scaleup=self.augment)
            shapes = (h0, w0), ((h / h0, w / w0), pad)  # for COCO mAP rescaling

            labels = self.labels[index].copy()
            if labels.size:  # normalized xywh to pixel xyxy format
                labels[:, 1:] = xywhn2xyxy(labels[:, 1:], ratio[0] * w, ratio[1] * h, padw=pad[0], padh=pad[1])

        if self.augment:
            # Augment imagespace
            if not mosaic:
                img, labels = random_perspective(img, labels,
                                                 degrees=hyp['degrees'],
                                                 translate=hyp['translate'],
                                                 scale=hyp['scale'],
                                                 shear=hyp['shear'],
                                                 perspective=hyp['perspective'])

            # Augment colorspace
            augment_hsv(img, hgain=hyp['hsv_h'], sgain=hyp['hsv_s'], vgain=hyp['hsv_v'])

            # Apply cutouts
            # if random.random() < 0.9:
            #     labels = cutout(img, labels)

        nL = len(labels)  # number of labels
        if nL:
            labels[:, 1:5] = xyxy2xywh(labels[:, 1:5])  # convert xyxy to xywh
            labels[:, [2, 4]] /= img.shape[0]  # normalized height 0-1
            labels[:, [1, 3]] /= img.shape[1]  # normalized width 0-1

        if self.augment:
            # flip up-down
            if random.random() < hyp['flipud']:
                img = np.flipud(img)
                if nL:
                    labels[:, 2] = 1 - labels[:, 2]

            # flip left-right
            if random.random() < hyp['fliplr']:
                img = np.fliplr(img)
                if nL:
                    labels[:, 1] = 1 - labels[:, 1]

        labels_out = torch.zeros((nL, 6))
        if nL:
            labels_out[:, 1:] = torch.from_numpy(labels)

        # Convert
        img = img[:, :, ::-1].transpose(2, 0, 1)  # BGR to RGB, to 3x416x416
        img = np.ascontiguousarray(img)

        return torch.from_numpy(img), labels_out, self.img_files[index], shapes
load_mosaic:
可以显著的提高小样本的mAP。代码是数据增强里面最难的, 也是最有价值的,mosaic是非常非常有用的数据增强trick, 一定要熟练掌握。
load_image
# Ancillary functions --------------------------------------------------------------------------------------------------
def load_image(self, index):
    """用在LoadImagesAndLabels模块的__getitem__函数和load_mosaic模块中
    从self或者从对应图片路径中载入对应index的图片 并将原图中hw中较大者扩展到self.img_size, 较小者同比例扩展
    loads 1 image from dataset, returns img, original hw, resized hw
    :params self: 一般是导入LoadImagesAndLabels中的self
    :param index: 当前图片的index
    :return: img: resize后的图片
            (h0, w0): hw_original  原图的hw
            img.shape[:2]: hw_resized resize后的图片hw(hw中较大者扩展到self.img_size, 较小者同比例扩展)
    """
    # 按index从self.imgs中载入当前图片, 但是由于缓存的内容一般会不够, 所以我们一般不会用self.imgs(cache)保存所有的图片
    img = self.imgs[index]
    # 图片是空的话, 就从对应文件路径读出这张图片
    if img is None:  # not cached 一般都不会使用cache缓存到self.imgs中
        path = self.img_files[index] # 图片路径
        img = cv2.imread(path)  # 读出BGR图片  (335, 500, 3)  HWC
        assert img is not None, 'Image Not Found ' + path
        h0, w0 = img.shape[:2]  # orig img hw
        # img_size 设置的是预处理后输出的图片尺寸   r=缩放比例
        r = self.img_size / max(h0, w0)  # resize image to img_size
        if r != 1:  # # if sizes are not equal # always resize down, only resize up if training with augmentation
            # cv2.INTER_AREA: 基于区域像素关系的一种重采样或者插值方式.该方法是图像抽取的首选方法, 它可以产生更少的波纹
            # cv2.INTER_LINEAR: 双线性插值,默认情况下使用该方式进行插值   根据ratio选择不同的插值方式
            # 将原图中hw中较大者扩展到self.img_size, 较小者同比例扩展
            interp = cv2.INTER_AREA if r < 1 and not self.augment else cv2.INTER_LINEAR
            img = cv2.resize(img, (int(w0 * r), int(h0 * r)), interpolation=interp)
        return img, (h0, w0), img.shape[:2]  # img, hw_original, hw_resized
    else:
        return self.imgs[index], self.img_hw0[index], self.img_hw[index]  # img, hw_original, hw_resized
load_image 根据图片index,从self 或者从对应图片路径中载入对应index的图片,并将原图中hw中较大者扩展到self.img_size,较小者同比例扩展。会被用在LoadImagesAndLabels模块的__getitem__函数和load_mosaic模块中载入对应index的图片。
上面代码核心点在:
r = self.img_size / max(h0, w0)。
interp = cv2.INTER_AREA if r < 1 and not self.augment else cv2.INTER_LINEAR # 这里self.augment = True,所以采用 interp = cv2.INTER_LINEAR。
假设这里:self.img_size = 640,那么得到以下结果。

原图:1280*720

load_image后图:640*360
注意:该函数并没有修正标注框的坐标,修正标注框的坐标是在utils/general.py--xywhn2xyxy函数实现的。
显然,经过load_image 后图像有三种情况:


w=640, h<=640 h=640, w<=640 w=640, h=640
random_perspective:
这个函数是进行随机透视变换,对mosaic整合后的图片进行随机旋转、缩放、平移、裁剪,透视变换,并resize为输入大小 img_size。
random_perspective函数代码:
def random_perspective(img, targets=(), segments=(), degrees=10, translate=.1, scale=.1, shear=10, perspective=0.0,
                       border=(0, 0)):
    # torchvision.transforms.RandomAffine(degrees=(-10, 10), translate=(.1, .1), scale=(.9, 1.1), shear=(-10, 10))
    # targets = [cls, xyxy]
    """这个函数会用于load_mosaic中用在mosaic操作之后
    随机透视变换  对mosaic整合后的图片进行随机旋转、缩放、平移、裁剪,透视变换,并resize为输入大小img_size
    :params img: mosaic整合后的图片img4 [2*img_size, 2*img_size]
    如果mosaic后的图片没有一个多边形标签就使用targets, segments为空  如果有一个多边形标签就使用segments, targets不为空
    :params targets: mosaic整合后图片的所有正常label标签labels4(不正常的会通过segments2boxes将多边形标签转化为正常标签) [N, cls+xyxy]
    :params segments: mosaic整合后图片的所有不正常label信息(包含segments多边形也包含正常gt)  [m, x1y1....]
    :params degrees: 旋转和缩放矩阵参数
    :params translate: 平移矩阵参数
    :params scale: 缩放矩阵参数
    :params shear: 剪切矩阵参数
    :params perspective: 透视变换参数
    :params border: 用于确定最后输出的图片大小 一般等于[-img_size, -img_size] 那么最后输出的图片大小为 [img_size, img_size]
    :return img: 通过透视变换/仿射变换后的img [img_size, img_size]
    :return targets: 通过透视变换/仿射变换后的img对应的标签 [n, cls+x1y1x2y2]  (通过筛选后的)
    """
    # 设定输出图片的 H W
    # border= -img_size // 2  所以最后图片的大小直接减半 [img_size, img_size, 3]
    height = img.shape[0] + border[0] * 2  # shape(h,w,c)
    width = img.shape[1] + border[1] * 2

    # ============================ 开始变换 =============================
    # 需要注意的是,其实opencv是实现了仿射变换的, 不过我们要先生成仿射变换矩阵M
    # Center 设置中心平移矩阵
    C = np.eye(3)
    C[0, 2] = -img.shape[1] / 2  # x translation (pixels)
    C[1, 2] = -img.shape[0] / 2  # y translation (pixels)

    # Perspective  设置透视变换矩阵
    P = np.eye(3)
    P[2, 0] = random.uniform(-perspective, perspective)  # x perspective (about y)
    P[2, 1] = random.uniform(-perspective, perspective)  # y perspective (about x)

    # Rotation and Scale 设置旋转和缩放矩阵
    R = np.eye(3)    # 初始化R = [[1,0,0], [0,1,0], [0,0,1]]    (3, 3)
    # a: 随机生成旋转角度 范围在(-degrees, degrees)
    # a += random.choice([-180, -90, 0, 90])  # add 90deg rotations to small rotations
    a = random.uniform(-degrees, degrees)
    # a += random.choice([-180, -90, 0, 90])  # add 90deg rotations to small rotations
    # s: 随机生成旋转后图像的缩放比例 范围在(1 - scale, 1 + scale)
    # s = 2 ** random.uniform(-scale, scale)
    s = random.uniform(1 - scale, 1 + scale)
    # s = 2 ** random.uniform(-scale, scale)
    # cv2.getRotationMatrix2D: 二维旋转缩放函数
    # 参数 angle:旋转角度  center: 旋转中心(默认就是图像的中心)  scale: 旋转后图像的缩放比例
    R[:2] = cv2.getRotationMatrix2D(angle=a, center=(0, 0), scale=s)

    # Shear   设置剪切矩阵
    S = np.eye(3)       # 初始化T = [[1,0,0], [0,1,0], [0,0,1]]
    S[0, 1] = math.tan(random.uniform(-shear, shear) * math.pi / 180)  # x shear (deg)
    S[1, 0] = math.tan(random.uniform(-shear, shear) * math.pi / 180)  # y shear (deg)

    # Translation 设置平移矩阵
    T = np.eye(3) # 初始化T = [[1,0,0], [0,1,0], [0,0,1]]    (3, 3)
    T[0, 2] = random.uniform(0.5 - translate, 0.5 + translate) * width  # x translation (pixels)
    T[1, 2] = random.uniform(0.5 - translate, 0.5 + translate) * height  # y translation (pixels)

    # Combined rotation matrix    @ 表示矩阵乘法  生成仿射变换矩阵
    M = T @ S @ R @ P @ C  # order of operations (right to left) is IMPORTANT
    # 将仿射变换矩阵M作用在图片上
    if (border[0] != 0) or (border[1] != 0) or (M != np.eye(3)).any():  # image changed
        if perspective:
            # 透视变换函数  实现旋转平移缩放变换后的平行线不再平行
            # 参数和下面warpAffine类似
            img = cv2.warpPerspective(img, M, dsize=(width, height), borderValue=(114, 114, 114))
        else:  # affine
            # 仿射变换函数  实现旋转平移缩放变换后的平行线依旧平行
            # image changed  img  [1472, 1472, 3] => [736, 736, 3]
            # cv2.warpAffine: opencv实现的仿射变换函数
            # 参数: img: 需要变化的图像   M: 变换矩阵  dsize: 输出图像的大小  flags: 插值方法的组合(int 类型!)
            #       borderValue: (重点!)边界填充值  默认情况下,它为0。
            img = cv2.warpAffine(img, M[:2], dsize=(width, height), borderValue=(114, 114, 114))

    # Visualize
    # import matplotlib.pyplot as plt
    # ax = plt.subplots(1, 2, figsize=(12, 6))[1].ravel()
    # ax[0].imshow(img[:, :, ::-1])  # base
    # ax[1].imshow(img2[:, :, ::-1])  # warped

    # Transform label coordinates
    # 同样需要调整标签信息
    n = len(targets)
    if n:
        # 判断是否可以使用segment标签: 只有segments不为空时即数据集中有多边形gt也有正常gt时才能使用segment标签 use_segments=True
        #                          否则如果只有正常gt时segments为空 use_segments=False
        use_segments = any(x.any() for x in segments)
        new = np.zeros((n, 4))  # [n, 0+0+0+0]
        # 如果使用的是segments标签(标签中含有多边形gt)
        if use_segments:  # warp segments
            # 先对segment标签进行重采样
            # 比如说segment坐标只有100个,通过interp函数将其采样为n个(默认1000)
            # [n, x1y2...x99y100] 扩增坐标-> [n, 500, 2]
            # 由于有旋转,透视变换等操作,所以需要对多边形所有角点都进行变换
            segments = resample_segments(segments)  # upsample
            for i, segment in enumerate(segments):  # segment: [500, 2]  多边形的500个点坐标xy
                xy = np.ones((len(segment), 3)) # [1, 1+1+1]
                xy[:, :2] = segment # [500, 2]
                # 对该标签多边形的所有顶点坐标进行透视/仿射变换
                xy = xy @ M.T  # transform
                xy = xy[:, :2] / xy[:, 2:3] if perspective else xy[:, :2]  # perspective rescale or affine

                # 根据segment的坐标,取xy坐标的最大最小值,得到边框的坐标  clip
                new[i] = segment2box(xy, width, height)  # xy [500, 2]
        # 不使用segments标签 使用正常的矩形的标签targets
        else:  # warp boxes
            # 直接对box透视/仿射变换
            # 由于有旋转,透视变换等操作,所以需要对四个角点都进行变换
            xy = np.ones((n * 4, 3))
            xy[:, :2] = targets[:, [1, 2, 3, 4, 1, 4, 3, 2]].reshape(n * 4, 2)  # x1y1, x2y2, x1y2, x2y1
            xy = xy @ M.T  # transform 每个角点的坐标
            xy = (xy[:, :2] / xy[:, 2:3] if perspective else xy[:, :2]).reshape(n, 8)  # perspective rescale or affine

            # create new boxes
            x = xy[:, [0, 2, 4, 6]]
            y = xy[:, [1, 3, 5, 7]]
            new = np.concatenate((x.min(1), y.min(1), x.max(1), y.max(1))).reshape(4, n).T

            # clip  去除太小的target(target大部分跑到图外去了)
            new[:, [0, 2]] = new[:, [0, 2]].clip(0, width)
            new[:, [1, 3]] = new[:, [1, 3]].clip(0, height)
        # filter candidates  过滤target 筛选box
        # 长和宽必须大于wh_thr个像素 裁剪过小的框(面积小于裁剪前的area_thr)  长宽比范围在(1/ar_thr, ar_thr)之间的限制
        # 筛选结果 [n] 全是True或False   使用比如: box1[i]即可得到i中所有等于True的矩形框 False的矩形框全部删除
        i = box_candidates(box1=targets[:, 1:5].T * s, box2=new.T, area_thr=0.01 if use_segments else 0.10)
        # 得到所有满足条件的targets
        targets = targets[i]
        targets[:, 1:5] = new[i]

    return img, targets
def load_mosaic(self, index):
"""用在LoadImagesAndLabels模块的__getitem__函数 进行mosaic数据增强
将四张图片拼接在一张马赛克图像中 loads images in a 4-mosaic
:param index: 需要获取的图像索引
:return: img4: mosaic和随机透视变换后的一张图片 numpy(640, 640, 3)
labels4: img4对应的target [M, cls+x1y1x2y2]
"""
# labels4: 用于存放拼接图像(4张图拼成一张)的label信息(不包含segments多边形)
# segments4: 用于存放拼接图像(4张图拼成一张)的label信息(包含segments多边形)
labels4, segments4 = [], []
s = self.img_size # 一般的图片大小
# 随机初始化拼接图像的中心点坐标 [0, s*2]之间随机取2个数作为拼接图像的中心坐标
yc, xc = [int(random.uniform(-x, 2 * s + x)) for x in self.mosaic_border] # mosaic center x, y
# 从dataset中随机寻找额外的三张图像进行拼接 [14, 26, 2, 16] 再随机选三张图片的index
indices = [index] + random.choices(self.indices, k=3) # 3 additional image indices
# 遍历四张图像进行拼接 4张不同大小的图像 => 1张[1472, 1472, 3]的图像
for i, index in enumerate(indices):
# load image 每次拿一张图片 并将这张图片resize到self.size(h,w)
img, _, (h, w) = load_image(self, index)
# place img in img4
if i == 0: # top left 原图[375, 500, 3] load_image->[552, 736, 3] hwc
# 创建马赛克图像 [1472, 1472, 3]=[h, w, c]
img4 = np.full((s * 2, s * 2, img.shape[2]), 114, dtype=np.uint8) # base image with 4 tiles
# 计算马赛克图像中的坐标信息(将图像填充到马赛克图像中) w=736 h = 552 马赛克图像:(x1a,y1a)左上角 (x2a,y2a)右下角
x1a, y1a, x2a, y2a = max(xc - w, 0), max(yc - h, 0), xc, yc # xmin, ymin, xmax, ymax (large image)
# 计算截取的图像区域信息(以xc,yc为第一张图像的右下角坐标填充到马赛克图像中,丢弃越界的区域) 图像:(x1b,y1b)左上角 (x2b,y2b)右下角
x1b, y1b, x2b, y2b = w - (x2a - x1a), h - (y2a - y1a), w, h # xmin, ymin, xmax, ymax (small image)
elif i == 1: # top right
# 计算马赛克图像中的坐标信息(将图像填充到马赛克图像中)
x1a, y1a, x2a, y2a = xc, max(yc - h, 0), min(xc + w, s * 2), yc
# 计算截取的图像区域信息(以xc,yc为第二张图像的左下角坐标填充到马赛克图像中,丢弃越界的区域)
x1b, y1b, x2b, y2b = 0, h - (y2a - y1a), min(w, x2a - x1a), h
elif i == 2: # bottom left
# 计算马赛克图像中的坐标信息(将图像填充到马赛克图像中)
x1a, y1a, x2a, y2a = max(xc - w, 0), yc, xc, min(s * 2, yc + h)
# 计算截取的图像区域信息(以xc,yc为第三张图像的右上角坐标填充到马赛克图像中,丢弃越界的区域)
x1b, y1b, x2b, y2b = w - (x2a - x1a), 0, w, min(y2a - y1a, h)
elif i == 3: # bottom right
# 计算马赛克图像中的坐标信息(将图像填充到马赛克图像中)
x1a, y1a, x2a, y2a = xc, yc, min(xc + w, s * 2), min(s * 2, yc + h)
# 计算截取的图像区域信息(以xc,yc为第四张图像的左上角坐标填充到马赛克图像中,丢弃越界的区域)
x1b, y1b, x2b, y2b = 0, 0, min(w, x2a - x1a), min(y2a - y1a, h)
# 将截取的图像区域填充到马赛克图像的相应位置 img4[h, w, c]
# 将图像img的【(x1b,y1b)左上角 (x2b,y2b)右下角】区域截取出来填充到马赛克图像的【(x1a,y1a)左上角 (x2a,y2a)右下角】区域
img4[y1a:y2a, x1a:x2a] = img[y1b:y2b, x1b:x2b] # img4[ymin:ymax, xmin:xmax]
# 计算pad(当前图像边界与马赛克边界的距离,越界的情况padw/padh为负值) 用于后面的label映射
padw = x1a - x1b # 当前图像与马赛克图像在w维度上相差多少
padh = y1a - y1b # 当前图像与马赛克图像在h维度上相差多少
# labels: 获取对应拼接图像的所有正常label信息(如果有segments多边形会被转化为矩形label)
# segments: 获取对应拼接图像的所有不正常label信息(包含segments多边形也包含正常gt)
labels, segments = self.labels[index].copy(), self.segments[index].copy()
if labels.size:
# normalized xywh normalized to pixel xyxy format
labels[:, 1:] = xywhn2xyxy(labels[:, 1:], w, h, padw, padh)
segments = [xyn2xy(x, w, h, padw, padh) for x in segments]
labels4.append(labels) # 更新labels4
segments4.extend(segments) # 更新segments4
# Concat/clip labels4 把labels4([(2, 5), (1, 5), (3, 5), (1, 5)] => (7, 5))压缩到一起
labels4 = np.concatenate(labels4, 0)
# 防止越界 label[:, 1:]中的所有元素的值(位置信息)必须在[0, 2*s]之间,小于0就令其等于0,大于2*s就等于2*s out: 返回
for x in (labels4[:, 1:], *segments4):
np.clip(x, 0, 2 * s, out=x) # clip when using random_perspective()
# 测试代码 测试前面的mosaic效果
# cv2.imshow("mosaic", img4)
# cv2.waitKey(0)
# cv2.destroyAllWindows()
# print(img4.shape) # (1280, 1280, 3)
# 随机偏移标签中心,生成新的标签与原标签结合 replicate
# img4, labels4 = replicate(img4, labels4)
#
# # 测试代码 测试replicate效果
# cv2.imshow("replicate", img4)
# cv2.waitKey(0)
# cv2.destroyAllWindows()
# print(img4.shape) # (1280, 1280, 3)
# Augment
# random_perspective Augment 随机透视变换 [1280, 1280, 3] => [640, 640, 3]
# 对mosaic整合后的图片进行随机旋转、平移、缩放、裁剪,透视变换,并resize为输入大小img_size
img4, labels4 = random_perspective(img4, labels4, segments4,
degrees=self.hyp['degrees'],
translate=self.hyp['translate'],
scale=self.hyp['scale'],
shear=self.hyp['shear'],
perspective=self.hyp['perspective'],
border=self.mosaic_border) # border to remove
# 测试代码 测试mosaic + random_perspective随机仿射变换效果
# cv2.imshow("random_perspective", img4)
# cv2.waitKey(0)
# cv2.destroyAllWindows()
# print(img4.shape) # (640, 640, 3)
return img4, labels4
mosaic算法步骤:
1、在 [img_size * 0.5 : img_size * 1.5] 之间随机选择一个拼接中心的坐标(xc, yc)。需要注意的是这里的img_size是我们需要的图片的大小, 而mosaic初步增强得到的图片的shape应该是2倍的img_size。
2、从 [0, len(label)-1] 之间随机选择3张图片的index, 与传入的图片index共同组成4张照片的集合indices.
-----------------------开始剪切img4-----------------------------------------------------------------------
3、for 4张图像:设当前图像为b
- 3.0)、如果是第一张图片,就初始化mosaic图片img4,像素值都为 114,维度为3D;
- 3.1)、得到 img4 的坐标信息(这个坐标区域是用来填充图像的):(x1a, y1a), (x2a, y2a);
- 3.2)、得到图像b截取的区域的坐标信息:(x1b,y1b),(x2b,y2b);
- 3.3)、将图像img的【(x1b,y1b),(x2b,y2b)】区域截取出来填充到马赛克图像的【(x1a,y1a),(x2a,y2a)】;
- 3.4)、计算当前图像边界与马赛克边界的距离,用于后面的label映射;
- 3.5)、拼接4张图像的labels信息为一张labels4。
--------------------------到这里就得到了img4[2 * img_size, 2*img_size, 3]---------------------
4、Concat labels4
5、clip labels4, 防止越界
--------------------------到这里又得到了labels4(相对img4的)---------------------------------------
6、random_perspective随机透视变换(random_perspective Augment),将img4[2 * img_size, 2*img_size, 3] => img4 [img_size, img_size, 3].
--------------------------到这里就得到了img4[img_size, img_size, 3]-----------------------------
7、最后retrun img4[img_size, img_size, 3] 和 labels4(相对img4的)

上图中绿色区域为 随机点 yc, xc 可能位置,因此 img4 中保留的4张图像可能是其中的全部或者部分,对应标注框坐标也需要改变,通过(padw, padh)。
xywhn2xyxy函数是用来把标签由xywh格式变成xyxy,同时考虑到 load_image 后 w, h 的改变,以及 masic 后位置的变化(padw, padh)。
def xywhn2xyxy(x, w=640, h=640, padw=0, padh=0):
    # Convert nx4 boxes from [x, y, w, h] normalized to [x1, y1, x2, y2] where xy1=top-left, xy2=bottom-right
    y = x.clone() if isinstance(x, torch.Tensor) else np.copy(x)
    y[:, 0] = w * (x[:, 0] - x[:, 2] / 2) + padw  # top left x
    y[:, 1] = h * (x[:, 1] - x[:, 3] / 2) + padh  # top left y
    y[:, 2] = w * (x[:, 0] + x[:, 2] / 2) + padw  # bottom right x
    y[:, 3] = h * (x[:, 1] + x[:, 3] / 2) + padh  # bottom right y
    return y
效果显示1:mosaic 后:shape = (1280, 1280, 3)
效果显示2:mosaic + random_perspective:shape = (640, 640, 3)
mixup
该函数是进行mixup数据增强:按比例融合两张图片。论文:https://arxiv.org/pdf/1710.09412.pdf。
更多原理细节请看博客:Data augmentation: MixUp、Random Erasing、CutOut、CutMix、Mosic。
具体要不要使用,概率是多少可以自己实验。
def mixup(im, labels, im2, labels2):
    """用在LoadImagesAndLabels模块中的__getitem__函数进行mixup增强
    mixup数据增强, 按比例融合两张图片  Applies MixUp augmentation
    论文: https://arxiv.org/pdf/1710.09412.pdf
    :params im:图片1  numpy (640, 640, 3)
    :params labels:[N, 5]=[N, cls+x1y1x2y2]
    :params im2:图片2  (640, 640, 3)
    :params labels2:[M, 5]=[M, cls+x1y1x2y2]
    :return img: 两张图片mixup增强后的图片 (640, 640, 3)
    :return labels: 两张图片mixup增强后的label标签 [M+N, cls+x1y1x2y2]
    """
    # 随机从beta分布中获取比例,range[0, 1]
    r = np.random.beta(32.0, 32.0)  # mixup ratio, alpha=beta=32.0
    # 按照比例融合两张图片
    im = (im * r + im2 * (1 - r)).astype(np.uint8)
    # 将两张图片标签拼接到一起
    labels = np.concatenate((labels, labels2), 0)
    return im, labels
在LoadImagesAndLabels模块中的__getitem__函数进行mixup增强:
            # MixUp https://arxiv.org/pdf/1710.09412.pdf
            # MixUp augmentation
            # mixup数据增强
            if random.random() < hyp['mixup']: # hyp['mixup']=0 默认为0则关闭 默认为1则100%打开
                # load_mosaic(self, random.randint(0, self.n - 1)) 随机从数据集中任选一张图片和本张图片进行mixup数据增强
                # img:   两张图片融合之后的图片 numpy (640, 640, 3)
                # labels: 两张图片融合之后的标签label [M+N, cls+x1y1x2y2]
                img2, labels2 = load_mosaic(self, random.randint(0, self.n - 1))
                r = np.random.beta(8.0, 8.0)  # mixup ratio, alpha=beta=8.0
                img = (img * r + img2 * (1 - r)).astype(np.uint8)
                labels = np.concatenate((labels, labels2), 0)
augment_hsv
这个函数是关于图片的色域增强模块,图片并不发生移动,所有不需要改变label,只需要 img 增强即可。
augment_hsv模块代码:
            # Augment colorspace
            augment_hsv(img, hgain=hyp['hsv_h'], sgain=hyp['hsv_s'], vgain=hyp['hsv_v'])
def augment_hsv(img, hgain=0.5, sgain=0.5, vgain=0.5):
"""用在LoadImagesAndLabels模块的__getitem__函数
hsv色域增强 处理图像hsv,不对label进行任何处理
:param img: 待处理图片 BGR [736, 736]
:param hgain: h通道色域参数 用于生成新的h通道
:param sgain: h通道色域参数 用于生成新的s通道
:param vgain: h通道色域参数 用于生成新的v通道
:return: 返回hsv增强后的图片 img
"""
# 随机取-1到1三个实数,乘以hyp中的hsv三通道的系数 用于生成新的hsv通道
r = np.random.uniform(-1, 1, 3) * [hgain, sgain, vgain] + 1 # random gains
hue, sat, val = cv2.split(cv2.cvtColor(img, cv2.COLOR_BGR2HSV)) # 图像的通道拆分 h s v
dtype = img.dtype # uint8
x = np.arange(0, 256, dtype=np.int16)
lut_hue = ((x * r[0]) % 180).astype(dtype) # 生成新的h通道
lut_sat = np.clip(x * r[1], 0, 255).astype(dtype) # 生成新的s通道
lut_val = np.clip(x * r[2], 0, 255).astype(dtype) # 生成新的v通道
# 图像的通道合并 img_hsv=h+s+v 随机调整hsv之后重新组合hsv通道
# cv2.LUT(hue, lut_hue) 通道色域变换 输入变换前通道hue 和变换后通道lut_hue
img_hsv = cv2.merge((cv2.LUT(hue, lut_hue), cv2.LUT(sat, lut_sat), cv2.LUT(val, lut_val))).astype(dtype)
# no return needed dst:输出图像
cv2.cvtColor(img_hsv, cv2.COLOR_HSV2BGR, dst=img) # no return needed还要注意的是这个hsv增强是随机生成各个色域参数的,所以每次增强的效果都是不同的.
flipud + fliplr
        if self.augment:
            # flip up-down
            if random.random() < hyp['flipud']:
                img = np.flipud(img)
                if nL:
                    labels[:, 2] = 1 - labels[:, 2]

            # flip left-right
            if random.random() < hyp['fliplr']:
                img = np.fliplr(img)
                if nL:
                    labels[:, 1] = 1 - labels[:, 1]
3.2 train.py中的 Testloader
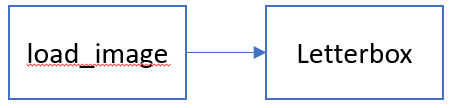
load_image-进行缩放
Letterbox-将上面缩放的缩放到当前batch所需要的尺度
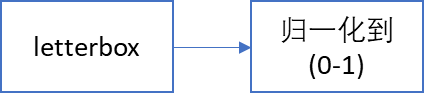
letterbox函数:用于Testloader 中 load_image 后,将 load_image 后 图像变成长边为给定长度,短边为相应比例的图像填充为 new_shape大小,letterbox计算出较小边需要填充的pad, 再将较小边两边pad到new_shape大小即可。
这里:auto=False(需要pad), scale_fill=False, scale_up=False。
def letterbox(img, new_shape=(640, 640), color=(114, 114, 114), auto=True, scaleFill=False, scaleup=True, stride=32):
    """用在LoadImagesAndLabels模块的__getitem__函数  只在val时才会使用
    将图片缩放调整到指定大小
    Resize and pad image while meeting stride-multiple constraints
    https://github.com/ultralytics/yolov3/issues/232
    :param img: 原图 hwc
    :param new_shape: 缩放后的最长边大小
    :param color: pad的颜色
    :param auto: True 保证缩放后的图片保持原图的比例 即 将原图最长边缩放到指定大小,再将原图较短边按原图比例缩放(不会失真)
                 False 将原图最长边缩放到指定大小,再将原图较短边按原图比例缩放,最后将较短边两边pad操作缩放到最长边大小(不会失真)
    :param scale_fill: True 简单粗暴的将原图resize到指定的大小 相当于就是resize 没有pad操作(失真)
    :param scale_up: True  对于小于new_shape的原图进行缩放,大于的不变
                     False 对于大于new_shape的原图进行缩放,小于的不变
    :return: img: letterbox后的图片 HWC
             ratio: wh ratios
             (dw, dh): w和h的pad
    """
    # Resize and pad image while meeting stride-multiple constraints
    shape = img.shape[:2]  # current shape [height, width]
    if isinstance(new_shape, int):
        new_shape = (new_shape, new_shape)

    # Scale ratio (new / old)
    r = min(new_shape[0] / shape[0], new_shape[1] / shape[1])
    # 只进行下采样 因为上采样会让图片模糊
    if not scaleup:  # only scale down, do not scale up (for better test mAP)
        r = min(r, 1.0)

    # Compute padding
    ratio = r, r  # width, height ratios
    new_unpad = int(round(shape[1] * r)), int(round(shape[0] * r))
    dw, dh = new_shape[1] - new_unpad[0], new_shape[0] - new_unpad[1]  # wh padding
    if auto:  # minimum rectangle
        dw, dh = np.mod(dw, stride), np.mod(dh, stride)  # wh padding
    elif scaleFill:  # stretch
        dw, dh = 0.0, 0.0
        new_unpad = (new_shape[1], new_shape[0])
        ratio = new_shape[1] / shape[1], new_shape[0] / shape[0]  # width, height ratios

    dw /= 2  # divide padding into 2 sides
    dh /= 2

    if shape[::-1] != new_unpad:  # resize
        img = cv2.resize(img, new_unpad, interpolation=cv2.INTER_LINEAR)
    top, bottom = int(round(dh - 0.1)), int(round(dh + 0.1))
    left, right = int(round(dw - 0.1)), int(round(dw + 0.1))
    img = cv2.copyMakeBorder(img, top, bottom, left, right, cv2.BORDER_CONSTANT, value=color)  # add border
    return img, ratio, (dw, dh)
3.3 detect.py中的LoadImages
detect.py utils/datasets.py
致谢:
感谢下面大佬的代码注释对我帮助很大!
https://blog.csdn.net/qq_38253797/category_11222727.html?spm=1001.2014.3001.5482