Minesweeper: GDI+ Line Scratch
本文将演示GDI+绘制的一些基本用法,首先,我们来作恶一下,在OnPaint事件中直接抛出异常:
protected
override
void
OnPaint(PaintEventArgs e)
{
base .OnPaint(e);
throw new Exception();
}
{
base .OnPaint(e);
throw new Exception();
}
为了抑制弹出提示为处理的异常抛出的对话框,可以在Main函数中加入下面一行:
Application.ThreadException
+=
(s, e)
=>
{ };
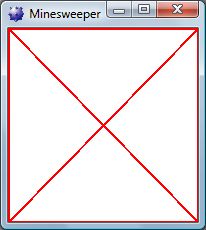
这样,我们就会得到红色边线和交叉线的窗口,下图所示,WinForms窗口绘制过程中发生异常时,系统将显示出此图形。这个图形不受Graphics的内部状态影响,像PageUnit, PageScale,反锯齿和Transform都不会影响这个图形。

接下来我们将使用GDI+的功能来模拟这个错误输出,只要对DrawLine和Pen了解,就能够达成这一目标。
我们先来绘制上边和左边的两条线段:
using
(Pen pen
=
new
Pen(Color.Red,
4
))
{
e.Graphics.DrawLine(pen, 0 , 0 , ClientSize.Width, 0 );
e.Graphics.DrawLine(pen, 0 , 0 , 0 , ClientSize.Height);
}
{
e.Graphics.DrawLine(pen, 0 , 0 , ClientSize.Width, 0 );
e.Graphics.DrawLine(pen, 0 , 0 , 0 , ClientSize.Height);
}
首先创建一个红色,宽度为4的Pen,绘线的时候自然就会是4个像素宽了。
有一点需要注意,如果要调试GDI+的绘制代码,想要看到中间输出的话,最好是配置双显示器,一边看代码,一边看输出,防止跟踪代码时Visual Studio挡住程序窗口,导致重绘,调试效果非常不理想。
除了在创建时指定Pen的颜色和宽度外,也可以通过其属性修改,因此不需要创建新的Pen对象就可以绘制余下的4条线,完整代码如下:
Rectangle rc
=
ClientRectangle;
using (Pen pen = new Pen(Color.Red, 4 ))
{
e.Graphics.DrawLine(pen, 0 , 0 , rc.Right, 0 );
e.Graphics.DrawLine(pen, 0 , 0 , 0 , rc.Bottom);
pen.Width = 2 ;
e.Graphics.DrawLine(pen, rc.Right, 0 , rc.Right, rc.Bottom);
e.Graphics.DrawLine(pen, 0 , rc.Bottom, rc.Right, rc.Bottom);
e.Graphics.DrawLine(pen, 0 , 0 , rc.Right, rc.Bottom);
e.Graphics.DrawLine(pen, 0 , rc.Bottom, rc.Right, 0 );
}
我们来看一下DrawLine的所有重载:
DrawLine(Pen, Point, Point)
DrawLine(Pen, PointF, PointF)
DrawLine(Pen, Int32, Int32, Int32, Int32)
DrawLine(Pen, Single, Single, Single, Single)
DrawLine(Pen, PointF, PointF)
DrawLine(Pen, Int32, Int32, Int32, Int32)
DrawLine(Pen, Single, Single, Single, Single)
可以通过2个点或者4个坐标来制定一条线段,但是为什么会有int和float两个重载呢?这就与GDI+中的Unit,Scale以及Transform有关了,浮点型的坐标是有其意义的,下一篇文章中讲专门介绍GDI+的坐标系和单位。
Graphics中还提供了一个DrawLines函数,通过坐标数组指定需要绘制的多个线段,因此绘制代码可以改进为:
Rectangle rc
=
ClientRectangle;
Point lt = rc.Location;
Point rt = new Point(rc.Right, 0 );
Point rb = new Point(rc.Size);
Point lb = new Point( 0 , rc.Bottom);
using (Pen pen = new Pen(Color.Red, 4 ))
{
e.Graphics.DrawLines(pen, new Point[] { lb, lt, rt });
pen.Width = 2 ;
e.Graphics.DrawLines(pen, new Point[] { rb, lb, rt, rb, lt });
}
可以看到中间的斜线会有明显的锯齿现象,后面的文章会介绍GDI+中的反锯齿功能。本文仅介绍了Pen的Color和Width属性,之后也会介绍其他常用属性。
勘误和更新会及时加到此文中,并且将更新记入到 Minesweeper系列索引中。