python对于grpc的简单操作(一)
(一)简介
gRPC 是 Google 开源的基于 Protobuf 和 Http2.0 协议的通信框架。gRPC 提供了一种简单的方法来定义服务,支持多种开发语言(Golang、Python、Java、C/C++等)。
(二)安装
pip install grpcio #安装grpc
pip install grpcio-tools #安装grpc tools
(三)使用介绍
grpc是基于protobuf来进行数据传输的
分为三种传输方式
1. 一元RPC模式
2. 单项流式 RPC (客户端放送流式数据或服务端发送流式数据)
3. 双向流式 RPC
下面先讲一元RPC模式模式,类似于http调用,一次请求,一次返回结果,python要想使用grpc就必须先定义grpc的服务和接口,一般是在一个以.proto结尾的文件中进行定义。
示例如下:
syntax = "proto3";   // 指定protobuf版本

package test;   // 此文件的标识符,不添加也可以,以防止协议消息类型之间的名称冲突

// 定义消息结构类型,数据后面的编号不能重复,request为数据结构名,可自由定义
message request {
	int32 age = 1;
	string name = 2;
}

// 定义消息结构类型,数据后面的编号不能重复,response为数据结构名,可自由定义
message response {
	string message = 1;
}

//定义服务,下面定义的这种为最简单的rpc服务,客户端发起请求,服务端返回结果
service UserInfo {
	rpc Info (request) returns (response) {}
}
编写完proto文件后,我们就要使用grpcio-tools工具(上面以安装)根据上面的proto文件生成两个py文件供我们后面的python客户端和服务端调用
python3  -m  grpc_tools.protoc  --python_out=./  --grpc_python_out=./  -I./ xxx.proto

python_out:指定xxx_pb2.py的输出路径,编译生成处理protobuf相关的代码路径。传入.,则默认生成到当前目录。
grpc_python_out:指定xxx_pb2_grpc.py的输出路径,编译生成处理grpc相关的代码路径,传入.,则默认生成到当前目录。
grpc_tools.protoc:工具包,刚安装的。
-I:这个参数指定协议文件的查找目录。
执行完上面这条命令后,我们的目录下就会生成两个py文件

(四)编写python服务端和客户端
server.py
from concurrent import futures
import logging

import grpc
import test_pb2
import test_pb2_grpc


class UserInfo(test_pb2_grpc.UserInfoServicer):  # 这里对应test.proto第17行定义的服务
    def Info(self, request, context):  # 这里对应test.proto第18行定义的info接口
        # print(request.name, request.age)
        return test_pb2.response(message='年龄是{}岁;姓名是{}'.format(request.age, request.name))


def serve():
    server = grpc.server(futures.ThreadPoolExecutor(max_workers=10))  # 开启多线程
    test_pb2_grpc.add_UserInfoServicer_to_server(UserInfo(), server)  # 注册本地服务
    server.add_insecure_port('[::]:10086')  # 指定端口以及IP
    # server.add_insecure_port('0.0.0.0:10086')# 指定端口以及IP
    server.start()  # 启动服务器 start()是非阻塞的, 将实例化一个新线程来处理请求
    server.wait_for_termination()  # 阻塞调用线程,直到服务器终止


if __name__ == '__main__':
    logging.basicConfig()
    serve()
client.py
from __future__ import print_function

import logging

import grpc
import test_pb2
import test_pb2_grpc


def run():
    with grpc.insecure_channel('localhost:10086') as channel:
        client = test_pb2_grpc.UserInfoStub(channel)  # 客户端使用Stub类发送请求,参数为频道,为了绑定链接
        response = client.Info(test_pb2.request(age=1, name='张三'))
        print("用户信息: " + response.message)


if __name__ == '__main__':
    logging.basicConfig()
    run()
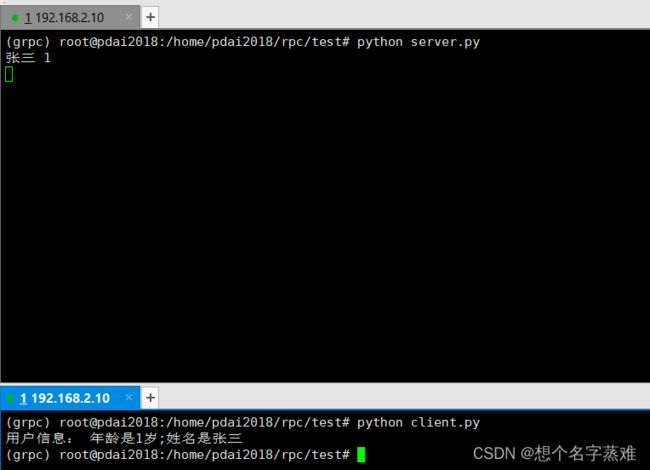
执行效果如下:
PS:proto文件下可以定义多个服务,并且每个服务都可以定义多个接口,还是很灵活的,当然,在修改proto文件后,就需要重新生成xxx_pb2_grpc.py和xxx_pb2.py文件
(五)图片的传输
先定义proto文件
syntax = "proto3";
package base_package;


service FormatData {   //定义服务,用在rpc传输中
  rpc DoFormat(request) returns (response){}
}
message request {
  string img = 1;
}
message response{
  string msg=1;
}
执行
python3 -m grpc_tools.protoc --python_out=./ --grpc_python_out=./ -I./ data.proto
server.py
import base64
from concurrent import futures
import grpc

import data_pb2
import data_pb2_grpc


class FormatData(data_pb2_grpc.FormatDataServicer):
    # 重写接口函数
    def DoFormat(self, request, context):
        img = request.img
        # 对数据字符做base64解码
        content = base64.b64decode(bytes(img, encoding='utf8'))
        with open('output.png', 'wb') as f:
            f.write(content)
        print('接收成功')
        return data_pb2.response(msg='传输成功')  # 返回一个类实例


def serve():
    # 定义服务器并设置最大连接数,corcurrent.futures是一个并发库,类似于线程池的概念
    grpcServer = grpc.server(futures.ThreadPoolExecutor(max_workers=4), options=[
        ('grpc.max_send_message_length', 256 * 1024 * 1024),  # 修改数据传输的大小限制,因为图片数据可能较大
        ('grpc.max_receive_message_length', 256 * 1024 * 1024),
    ])  # 创建一个服务器
    data_pb2_grpc.add_FormatDataServicer_to_server(FormatData(), grpcServer)  # 在服务器中添加派生的接口服务(自己实现了处理函数)
    grpcServer.add_insecure_port('0.0.0.0:10086')  # 添加监听端口
    grpcServer.start()  # 启动服务器
    grpcServer.wait_for_termination()  # 阻塞调用线程,直到服务器终止


if __name__ == '__main__':
    serve()
client.py
import base64
import grpc
import data_pb2
import data_pb2_grpc


def run():
    conn = grpc.insecure_channel('0.0.0.0:10086', options=[
        ('grpc.max_send_message_length', 256 * 1024 * 1024),  # 修改数据传输的大小限制,因为图片数据可能较大
        ('grpc.max_receive_message_length', 256 * 1024 * 1024),
    ])  # 监听频道
    client = data_pb2_grpc.FormatDataStub(channel=conn)  # 客户端使用Stub类发送请求,参数为频道,为了绑定链接
    with open('input.png', 'rb') as f:
        content = f.read()

    content = str(base64.b64encode(content), encoding='utf8')  # 对图片做base64转码
    response = client.DoFormat(data_pb2.request(img=content))  # 返回的结果就是proto中定义的类
    print("received: " + response.msg)


if __name__ == '__main__':
    run()
执行效果:

执行前目录结构

执行后目录结构
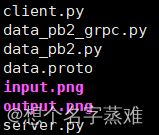
可以看出多了一张outpu.png,传输过来的图片是完全正常的,与原图一模一样,这里就不展示了。
(六)结语
如果有什么错误的地方,还请大家批评指正。最后,希望小伙伴们都能有所收获。