Image Classification (CNN-KERAS)
图像分类的思路是:
1. 首先,导入可用的工具包;
2. 加载数据并进行相应可视化操作;
3. 尝试一个简单的模型,并评估表现;
4. 由于数据有时候较少,因此使用预训练模型进行微调是比较好的选择;
导入数据包
在导包这块,有些包是必须要进行导入的;有一些需要进行问题的不同灵活选择导入
一般情况下必须导入的包:
import numpy as np  #(这个包逼着眼睛导入,无论是数据分析还是图像分析)

import os  #(这个包一般是加载文件路径使用  :  os.lisdir()   有妙用)

import seaborn as sns  (这个包数据可视化的首选,在数据分析更能发挥其作用,一行代码可视化若干变量之
                        间关系)

from sklearn.metrics import confusion_matrix  (这个包一般在分类问题中会考虑到,利用这个包可视化
                                              ,能清晰看到那个类与那个类之间容易混淆)

from sklearn.utils import shuffle      (这个包是必须的, 数据乱序)

import matplotlib.pyplot as plt         (绘图的)

import cv2                            (这个包在这里一般用作可视化显示图像吧,  cv2.imshow())

import tensorflow as tf               (嗯)

from tqdm import tqdm             (这个包的作用, 显示在运行过程中的进度条,瞬间高大上了)

import glob    (这个包用于加载子文件夹下的若干子文件,返回子文件下所有图片路径的列表)
试验的再现性:
机器学习与深度学习中有很多的不确定性,为了控制不确定性,有必要对其进行控制,下面代码就实现了相关的控制:
import tensorflow as tf
import imgaug as aug  #图像增强库
import numpy as np
import os
from keras import backend as K

# Set the seed for hash based operations in python
os.environ['PYTHONHASHSEED'] = '0'

# Set the numpy seed
np.random.seed(111)

# Disable multi-threading in tensorflow ops
session_conf = tf.ConfigProto(intra_op_parallelism_threads=1, inter_op_parallelism_threads=1)

# Set the random seed in tensorflow at graph level
tf.set_random_seed(111)

# Define a tensorflow session with above session configs
sess = tf.Session(graph=tf.get_default_graph(), config=session_conf)

# Set the session in keras
K.set_session(sess)

# Make the augmentation sequence deterministic
aug.seed(111)
分类标签的处理:
一般情况下,我们要处理分类问题,那么标签首先是要进行处理的,分类有二分类与多分类,不同任务有不同的分类目标,比如二分类与多分类。
但问题是在具体操作时,计算机可不认识猫还是狗的,那么带来的一个预处理标签的问题是将标签数字化.
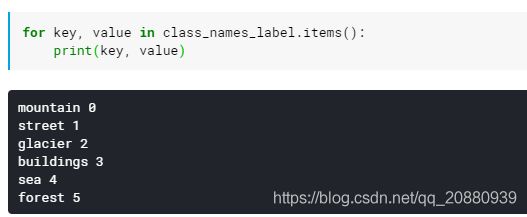
1. 我们可用字典将一个多分类标签进行数字化:
class_names = ['mountain', 'street', 'glacier', 'buildings', 'sea', 'forest']
class_names_label = {class_name:i for i, class_name in enumerate(class_names)}
上面的操作就是将每个分类的类别与一个数字相互关联。神经网络是一个拟合特征很强的结构,这里标签如果单纯这样输入网络,网络可能会对标签值进行过分的解读,而我们知道这个标签值是同等重要的,只是标记不同类别,为了体现出上述的思想,常常会对标签进行独热编码(one-hot ).
Loading the Data:
要完成分类等任务,首先就要加载数据,数据加载有很多不同的方式:
1. 你可以将所有数据显式加载到一个初始化为images = [] 的列表上。
大致思路是利用cv2.imread()函数读取每个图像,传入文件图片的路径,关键是在不同的文件夹下都有图片,所以这个时候就 是 import os发挥作用的时候了;
os 提供两个函数完成这个操作: os.listdir(图片路径) os.path.join(图片路径连接)
def load_data():
    """
        Load the data:
            - 14,034 images to train the network.
            - 3,000 images to evaluate how accurately the network learned to classify images.
    """

    datasets = ['../input/seg_train/seg_train', '../input/seg_test/seg_test']  #输入图片路径
    output = []

    # Iterate through training and test sets
    for dataset in datasets:

        images = []  #初始化存储图片列表
        labels = []

        print("Loading {}".format(dataset))

        # Iterate through each folder corresponding to a category
        for folder in os.listdir(dataset):
            label = class_names_label[folder]

            # Iterate through each image in our folder
            for file in tqdm(os.listdir(os.path.join(dataset, folder))):

                # Get the path name of the image 具体到文件夹下每张图片的路径地址
                img_path = os.path.join(os.path.join(dataset, folder), file)

                # Open and resize the img
                image = cv2.imread(img_path)  #读取在每个文件夹上的图片
                image = cv2.cvtColor(image, cv2.COLOR_BGR2RGB) #t图片通道转化
                image = cv2.resize(image, IMAGE_SIZE)  #图片大小设置

                #这里标签也是要处理的,要是多分类,则不需要直接处理,设置loss =
                #'to_categorical'就可以直接完毕,涉及到二分类等问题,可以将标签设置为one_hot
                # label = to_categorical(0, num_classes = 2)
                # label = to_categorical(1, num_classes = 2)

                # Append the image and its corresponding label to the output
                images.append(image)
                labels.append(label)

        images = np.array(images, dtype = 'float32')
        labels = np.array(labels, dtype = 'int32')

        output.append((images, labels))

    return output
os.listdir()的作用:
数据加载:
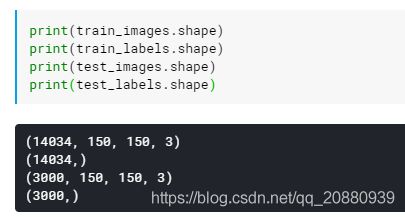
(train_images, train_labels), (test_images, test_labels) = load_data()总结: 这样数据加载方式本质上是将所有数据加载到一个列表上,观察一下数据的格式加载数据的形状
这样的数据方式很符合我们分类的预期, train_image格式:(数量,高度,宽度,通道数)
数据加载完毕后,将数据乱序是一个很好的习惯,即使用shuffle函数实现:
train_images, train_labels = shuffle(train_images, train_labels, random_state = 1)2. 在加载数据时使用数据增强技术与生成器(generator):
数据增强是一种非常有用的技术,一般在训练神经网络之前都需要分析一下训练样本数据的均衡性。这个是非常重要的。
试想一种极端的情况,我们做一个二分类的问题。正样本数据占比98%, 负样本占比2%. 那么也许。这个神经网络压根就不用训练,我们可以预测一个样本是正样本,就可以得到98%的准确率,但是没有任何意义。况且直接用这样的样本去训练神经网络肯定不会再实际的预测上获得较好的试验结果;
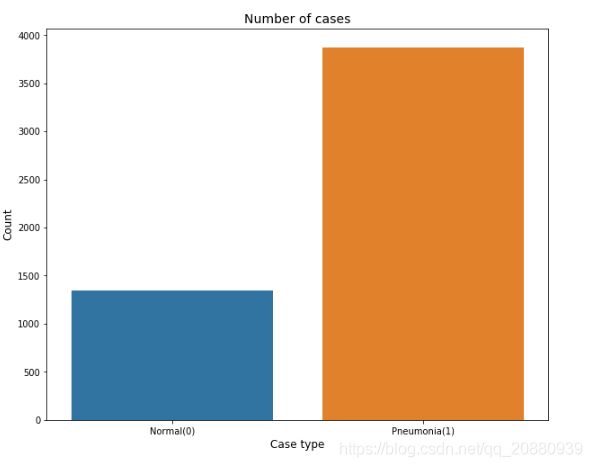
那么数据不均衡在实际的任务中是很常见的,但是并不会像上面这样的极端现象,但是会普遍存在;下图就是加载一个肺炎图片后经过分析的Normal(正常), Pneumonia(患肺炎)的样本的情况;
上图情况可直观分析出,Pneumonia的样本数大约是Normal的三倍。这样很明显在提示我们,在训练网络之前应该使用图像增强技术来增加Normal的样本;
关于如何增加样本数据,有很多方式,简单一点的,可以使用keras的ImageDataGenerator进行实现,可通过传入相关旋转、翻转、平移等相关参数数据,然后通过flow()等函数加载图像,就可以实现图像增强;
这里记录另外一种图像增强技术,即 imgaug
import imgaug as aug
import imgaug.augmenters as iaa
通过imgaug, 可以直观实现水平翻转,旋转,对比度变化等, 并且我们可以限定每次增强时只限定一种增强技术(这增加了图像增强的随机性)
# Augmentation sequence

seq = iaa.OneOf([
    iaa.Fliplr(),  # horizontal flips
    iaa.Affine(rotate = 20),   # rotation
    iaa.Multiply((1.2,1.5))])   #random brightness
seq就是定义生成的随机增强的序列,该增强技术中包含三种情况; 水平翻转, 旋转, 随机对比度变化, 调用seq时,每次使用增强技术的一种;
使用时, 调用形式为: img = seq.augment_image(img)
OK................................................................
在数据加载时,仍然要考虑的另外一个问题是是否使用生成器;在数据加载方式1中,如果实际使用时会发现,我们的全部训练数据是直接加载在一个列表中,然而我们在训练时训练数据是以batch添加在网络中的,我们也许不用一次加载全部数据到内存中,特别是当数据太大时,一种思路是我用一点就去去一点,没错,这就是生成器;
生成器实现方式扔然很多,keras有API支持,但是为了能具有更大的灵活性,可以自己实现生成器,需要在batch返回时添加关键字yield,
在batch生成函数内,可以实现图像大小转化,增强等技术
def data_gen(data, batch_size):
    # Get total number of samples in the data
    n = len(data)
    steps = n//batch_size

    # Define two numpy arrays for containing batch data and labels
    batch_data = np.zeros((batch_size, 224, 224, 3), dtype=np.float32)
    batch_labels = np.zeros((batch_size,2), dtype=np.float32)

    # Get a numpy array of all the indices of the input data
    indices = np.arange(n)

    # Initialize a counter
    i =0
    while True:
        np.random.shuffle(indices)
        # Get the next batch
        count = 0
        next_batch = indices[(i*batch_size):(i+1)*batch_size]
        for j, idx in enumerate(next_batch):
            img_name = data.iloc[idx]['image']
            label = data.iloc[idx]['label']

            # one hot encoding
            encoded_label = to_categorical(label, num_classes=2)
            # read the image and resize
            img = cv2.imread(str(img_name))
            img = cv2.resize(img, (224,224))

            # check if it's grayscale
            if img.shape[2]==1:
                img = np.dstack([img, img, img])

            # cv2 reads in BGR mode by default
            orig_img = cv2.cvtColor(img, cv2.COLOR_BGR2RGB)
            # normalize the image pixels
            orig_img = img.astype(np.float32)/255.

            batch_data[count] = orig_img
            batch_labels[count] = encoded_label

            # generating more samples of the undersampled class
            if label==0 and count < batch_size-2:
                aug_img1 = seq.augment_image(img) #图像增强
                aug_img2 = seq.augment_image(img)
                aug_img1 = cv2.cvtColor(aug_img1, cv2.COLOR_BGR2RGB)
                aug_img2 = cv2.cvtColor(aug_img2, cv2.COLOR_BGR2RGB)
                aug_img1 = aug_img1.astype(np.float32)/255.  #图像归一化
                aug_img2 = aug_img2.astype(np.float32)/255.

                batch_data[count+1] = aug_img1
                batch_labels[count+1] = encoded_label
                batch_data[count+2] = aug_img2
                batch_labels[count+2] = encoded_label
                count +=2

            else:
                count+=1

            if count==batch_size-1:
                break

        i+=1
        yield batch_data, batch_labels

        if i>=steps:
            i=0
--------------------------------------------------------------------------------------------------------------------------------------------------------
Explore the dataset:
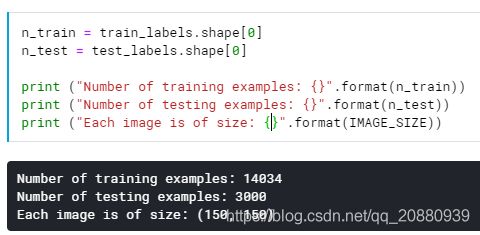
对构建模型之前进行数据的探索是很重要的(虽然没有数据分析特征工程那么重要)。为了就是消除样本的不均衡问题,让我们对训练的数据有一个直观的了解:
我们可以问自己下面三个问题:
1. 训练样本数与测试样本数各自是多少?
2. 图片的大小是多少?
3. 每种类型的比例各自是多少?
实际上解决上面问题最好的方式是进行可视化操作。从图像上显示更加直观。
1. 显示训练样本与测试样本的数量;
2. 可视化每种类别得数目
3. 可视化每种类别得比例:
图像数值的归一化:
图像数值的归一化是图像预处理必须进行的一个操作,因为神经网络的权重会受到数值较大的输入的影响,所以必须要对像素点的数值进行归一化操作;
不同处理方式具有不同归一化操作,如果将图像数据加载到一个列表上,可以直接归一化,如果不是,可以使用相应高级API进行归一化;
1. 图像加载到列表上的归一化相当直观:
train_images = train_images/255.0
test_images = test_images/255.0
-------------------------------------------------------------------------------------------------------------------------------------------------------------
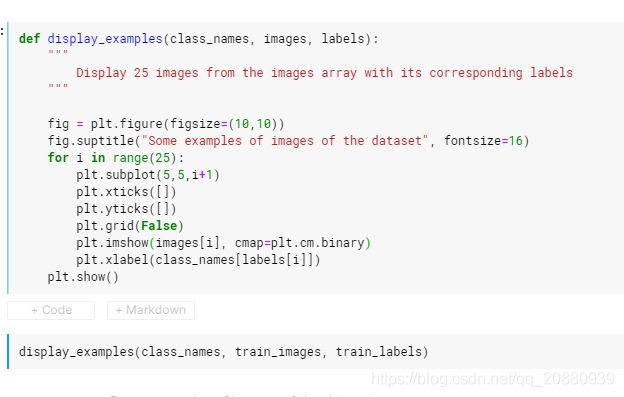
图像数据的可视化:
上面展示的是可视化数据的过程;
-------------------------------------------------------------------------------------------------------------------------------------------------------------------------
Model Selection:
当完成前面一系列步骤后,就可以进行模型选择与训练了;
这里涉及到模型的问题,基本上使用keras API 搭建神经网络模块,这个是不变的;但是这涉及到两个方面思想:从头训练网络还是迁移学习训练网络;
搭建网络的基本步骤始终不变:
1. build the model;(各种模型)
2. Compile the model;
3. Train/fit the data to model;
4. Evaluate the model on test model;
5. Carry out an error analysis of our model;
1. 自己搭建简单网络;
1> build the model:
model = tf.keras.Sequential([
    tf.keras.layers.Conv2D(32, (3, 3), activation = 'relu', input_shape = (150, 150, 3)),
    tf.keras.layers.MaxPooling2D(2,2),
    tf.keras.layers.Conv2D(32, (3, 3), activation = 'relu'),
    tf.keras.layers.MaxPooling2D(2,2),
    tf.keras.layers.Flatten(),
    tf.keras.layers.Dense(128, activation=tf.nn.relu),
    tf.keras.layers.Dense(6, activation=tf.nn.softmax)
])
2> compile the model:
model.compile(optimizer = 'adam', loss = 'sparse_categorical_crossentropy', metrices = ['accuracy'])这里的loss = 'sparse_categorical_crossentropy'的原因是我们没有将标签进行独热编码,使用这个损失函数可以自动将标签进行毒人编码,但是如果我们之前已经对标签进行过独热编码了,那么我们可以直接使用loss = 'categorical_crossentropy'进行实现;
3> Train/fit the data to model (model.fit())
history = model.fit(train_images, train_labels, batch_size = batch_size, epoch = 20, validation_data = 0.2)
这里, history包含了四个部分:
history.history.keys(): 'loss', 'acc', 'val_loss', 'val_acc'
我们可以利用上面得四个变量进行图形的绘制,观察的目的是观察是否出现了过拟合
def plot_accuracy_loss(history):
    """
        Plot the accuracy and the loss during the training of the nn.
    """
    fig = plt.figure(figsize=(10,5))

    # Plot accuracy
    plt.subplot(221)
    plt.plot(history.history['acc'],'bo--', label = "acc")
    plt.plot(history.history['val_acc'], 'ro--', label = "val_acc")
    plt.title("train_acc vs val_acc")
    plt.ylabel("accuracy")
    plt.xlabel("epochs")
    plt.legend()

    # Plot loss function
    plt.subplot(222)
    plt.plot(history.history['loss'],'bo--', label = "loss")
    plt.plot(history.history['val_loss'], 'ro--', label = "val_loss")
    plt.title("train_loss vs val_loss")
    plt.ylabel("loss")
    plt.xlabel("epochs")

    plt.legend()
    plt.show()
plot_accuracy_loss(history)图像模式如下: 直观可以看出发生过拟合,这是正常的现象:
4> 评估在测试集上的效果:
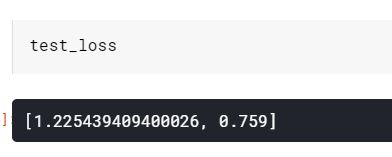
test_loss = model.evaluate(test_images, test_labels)
发生了明显的过拟合;
1. 构建自己的神经网络(+ 前几层预训练权重初始化):
这种方式扔然是一种自己构建神经网络的形式,先自己构建一个神经网络架构。但是这里的初始化有说法,是使用已经训练好的预训练模型的网络前几层来初始化我们自己构建神经网络的前面几层的权重;这种做法的意思是:从卷积可视化得出,网络的前几层一般都是提取网络的轮廓,纹理等细节处的特征,所以用预训练前几层的权重初始化我们神经网络的前几层的架构,便于更好的提取特征‘
但我认为这种做法只是在前期初始化时进行的权重的赋予,并没有采用权重冻结的方式。所以在训练过程中,权重扔然是可变化的。特别是前期,由于自身构建网络的后面的权重是随机变化的,所以我认为在训练初期时,梯度的反向传播扔然会污染我们加载预训练模型的权重,所以这种方式的效果还需要看实际的情况;
’另外,权重初始化时,我们自身构建网络要替换的层权重结构一定要与预训练替换权重相同;
keras函数式API构建自己的识别网络模型,下面使用了深度可分离卷积,使用这个结构有很多有点,在《python deeping learning》这本书中我看到了最好的关于是用他的解释;
def build_model():
    input_img = Input(shape=(224,224,3), name='ImageInput')
    x = Conv2D(64, (3,3), activation='relu', padding='same', name='Conv1_1')(input_img)
    x = Conv2D(64, (3,3), activation='relu', padding='same', name='Conv1_2')(x)
    x = MaxPooling2D((2,2), name='pool1')(x)

    x = SeparableConv2D(128, (3,3), activation='relu', padding='same', name='Conv2_1')(x)
    x = SeparableConv2D(128, (3,3), activation='relu', padding='same', name='Conv2_2')(x)
    x = MaxPooling2D((2,2), name='pool2')(x)

    x = SeparableConv2D(256, (3,3), activation='relu', padding='same', name='Conv3_1')(x)
    x = BatchNormalization(name='bn1')(x)
    x = SeparableConv2D(256, (3,3), activation='relu', padding='same', name='Conv3_2')(x)
    x = BatchNormalization(name='bn2')(x)
    x = SeparableConv2D(256, (3,3), activation='relu', padding='same', name='Conv3_3')(x)
    x = MaxPooling2D((2,2), name='pool3')(x)

    x = SeparableConv2D(512, (3,3), activation='relu', padding='same', name='Conv4_1')(x)
    x = BatchNormalization(name='bn3')(x)
    x = SeparableConv2D(512, (3,3), activation='relu', padding='same', name='Conv4_2')(x)
    x = BatchNormalization(name='bn4')(x)
    x = SeparableConv2D(512, (3,3), activation='relu', padding='same', name='Conv4_3')(x)
    x = MaxPooling2D((2,2), name='pool4')(x)

    x = Flatten(name='flatten')(x)
    x = Dense(1024, activation='relu', name='fc1')(x)
    x = Dropout(0.7, name='dropout1')(x)
    x = Dense(512, activation='relu', name='fc2')(x)
    x = Dropout(0.5, name='dropout2')(x)
    x = Dense(2, activation='softmax', name='fc3')(x)

    model = Model(inputs=input_img, outputs=x)
    return model
现在我们要利用vgg16的前几层权重来初始化我们构建网络的前几层的权重,操作如下;
# Open the VGG16 weight file
f = h5py.File('../input/vgg16/vgg16_weights_tf_dim_ordering_tf_kernels_notop.h5', 'r')

# Select the layers for which you want to set weight.

w,b = f['block1_conv1']['block1_conv1_W_1:0'], f['block1_conv1']['block1_conv1_b_1:0']
model.layers[1].set_weights = [w,b]

w,b = f['block1_conv2']['block1_conv2_W_1:0'], f['block1_conv2']['block1_conv2_b_1:0']
model.layers[2].set_weights = [w,b]

w,b = f['block2_conv1']['block2_conv1_W_1:0'], f['block2_conv1']['block2_conv1_b_1:0']
model.layers[4].set_weights = [w,b]

w,b = f['block2_conv2']['block2_conv2_W_1:0'], f['block2_conv2']['block2_conv2_b_1:0']
model.layers[5].set_weights = [w,b]
这样我们就完成了利用预训练模型前几层的权重来替换我们自己构建网络的前几层的权重。后面的步骤都是一样的。
---------------------------------------------------------------------------------------------------------------------------------------------------------------
Error analysis:
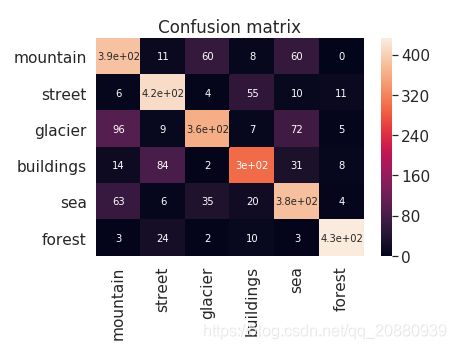
1. 误差分析可以让我们清楚理解哪类与哪类之间容易发生错误,最常用的就是混淆矩阵,这样看最为直观;
def print_mislabeled_images(class_names, test_images, test_labels, pred_labels):
    """
        Print 25 examples of mislabeled images by the classifier, e.g when test_labels != pred_labels
    """
    BOO = (test_labels == pred_labels)
    mislabeled_indices = np.where(BOO == 0)
    mislabeled_images = test_images[mislabeled_indices]
    mislabeled_labels = pred_labels[mislabeled_indices]

    title = "Some examples of mislabeled images by the classifier:"
    display_examples(class_names,  mislabeled_images, mislabeled_labels)
print_mislabeled_images(class_names, test_images, test_labels, pred_labels)绘制混淆矩阵:
CM = confusion_matrix(test_labels, pred_labels)
ax = plt.axes()
sn.heatmap(CM, annot=True,
           annot_kws={"size": 10},
           xticklabels=class_names,
           yticklabels=class_names, ax = ax)
ax.set_title('Confusion matrix')
plt.show()
从上面混淆矩阵中可以清晰看到,那两个类之间容易分辨不来;
2. 准确率与召回率:
当我们处理一个二分类问题时,准确率可能是我们衡量处理结果的一个方面,另外一个可能更重要的指标是召回率(即在实际所有的正样本中,当我们预测时,到底有多少个正样本预测对了)
准确率与召回率的权衡取决于要解决的实际问题。理论上,提高准确率,召回率势必降低,反之同理,不可能两者同时增长;
# Calculate Precision and Recall
tn, fp, fn, tp = cm.ravel()

precision = tp/(tp+fp)
recall = tp/(tp+fn)
------------------------------------------------------------------------------------------------------------------------------------------------------------------------
2. 迁移学习:
利用迁移学习预训练模型进行图像识别有两个大致的方向:
1. 直接使用预训练模型的卷积基(include_top = False)进行特征提取,直接提取所有的训练图像的特征;
然后,自己搭建全连接网络,将上面提取的相关特征作为输入,将特征作为输入数据,fit创建的全连接网络,这么做的缺点是我们相当于冻结预训练模型的卷积基,无法对预训练模型进行微调;
from keras.applications.vgg16 import VGG16
from keras.preprocessing import image
from keras.applications.vgg16 import preprocess_input

model = VGG16(weights='imagenet', include_top=False)
上面使用vgg16作为预训练模型, model即为加载的模型;
weights是预训练模型的权重,如果设置 weights = ‘imagenet’, 那么模型会自动下载相应权重;
如果这里添加.h5 文件的路径,可以直接添加路径变量;
这里由于我们直接想将训练数据测试数据的图像特征直接提取出来作为新搭建网络的输入,直观想法是利用
model.predict()方法就可以;
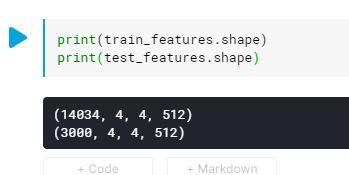
train_features = model.predict(train_images)
test_features = model.predict(test_images)
这恰好就是vgg16网络卷积层的最后输出结构,(4,4,512), 14034是图片的数量;
train_features and test_features 就是经过预训练网络提取的特征;
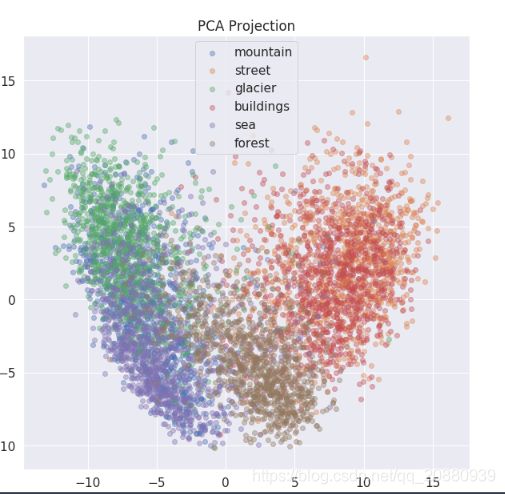
(Visualize the features through PCA 利用PCA将分类特征可视化)
n_train, x, y, z = train_features.shape
n_test, x, y, z = test_features.shape
numFeatures = x * y * z

from sklearn import decomposition

pca = decomposition.PCA(n_components = 2)

X = train_features.reshape((n_train, x*y*z))
pca.fit(X)

C = pca.transform(X) # Représentation des individus dans les nouveaux axe
C1 = C[:,0]
C2 = C[:,1]

### Figures

plt.subplots(figsize=(10,10))

for i, class_name in enumerate(class_names):
    plt.scatter(C1[train_labels == i][:1000], C2[train_labels == i][:1000], label = class_name, alpha=0.4)
plt.legend()
plt.title("PCA Projection")
plt.show()
上面聚类清晰显示出,我们的street 与 buildings 完全是混合在一起的,所以网络很难将其进行区分,所以出现那种错误就并不奇怪了;
提取完特征后,我们就可以在VGG网络的基础上搭建全连接网络,实现网络的训练;
model2 = tf.keras.Sequential([
    tf.keras.layers.Flatten(input_shape = (x, y, z)),
    tf.keras.layers.Dense(50, activation=tf.nn.relu),
    tf.keras.layers.Dense(6, activation=tf.nn.softmax)
])

model2.compile(optimizer = 'adam', loss = 'sparse_categorical_crossentropy', metrics=['accuracy'])

history2 = model2.fit(train_features, train_labels, batch_size=128, epochs=15, validation_split = 0.2)
------------------------------------------------------------------------------------------------------------------------------------------------------------------------------
2. 构建 (预训练模型+自己搭建全连接)的模式,这样可以灵活冻结网络层,进行模型的微调;
如果要对模型进行微调,那么首先我们要先搭建自己的网络模型;
这里搭建的模型要完全是整个模型(vgg+自身构建结构,这样才能进行微调)
---------------------------------------------------------------------------------------------------------------------------------------
3. ensemble Neural Networks:
我们定义n_estimators个神经网络进行结果的融合;(这种方法只适合先将特征全部提取出来的方式,否则会导致计算量太大了)
np.random.seed(seed=1997)
# Number of estimators
n_estimators = 10
# Proporition of samples to use to train each training
max_samples = 0.8

max_samples *= n_train
max_samples = int(max_samples)
We define n_estimators Neural Networks.
Each Neural Network will be trained on random subsets of the training dataset.
Each subset contains max_samples samples.
models = list()
random = np.random.randint(50, 100, size = n_estimators)

for i in range(n_estimators):

    # Model
    model = tf.keras.Sequential([ tf.keras.layers.Flatten(input_shape = (x, y, z)),
                                # One layer with random size
                                    tf.keras.layers.Dense(random[i], activation=tf.nn.relu),
                                    tf.keras.layers.Dense(6, activation=tf.nn.softmax)
                                ])

    model.compile(optimizer = 'adam', loss = 'sparse_categorical_crossentropy', metrics=['accuracy'])

    # Store model
    models.append(model)

histories = []

for i in range(n_estimators):
    # Train each model on a bag of the training data
    train_idx = np.random.choice(len(train_features), size = max_samples)
    histories.append(models[i].fit(train_features[train_idx], train_labels[train_idx], batch_size=128, epochs=10, validation_split = 0.1))
predictions = []
for i in range(n_estimators):
    predictions.append(models[i].predict(test_features))

predictions = np.array(predictions)
predictions = predictions.sum(axis = 0)
pred_labels = predictions.argmax(axis=1)
from sklearn.metrics import accuracy_score
print("Accuracy : {}".format(accuracy_score(test_labels, pred_labels)))
