使用IDEA新建一个SpringMVC项目
SpringMVC入门
- 前言
- 一、修改IDEA语言
- 二、开始搭建SpringMVC项目
- 三、配置SpringMVC
-
- 1、配置POM.XML
- 2、添加Controller和JSP文件
- 3、配置WEB.XML
- 4、编写后台Controller和Jsp调用
前言
本次教程多数是个人理解部分,大佬轻喷
一、修改IDEA语言
相信大部分小白刚上手一看全英文已经懵一半了,好在IDEA可以直接安装语言包修改多语言,下面就开始手把手教学。
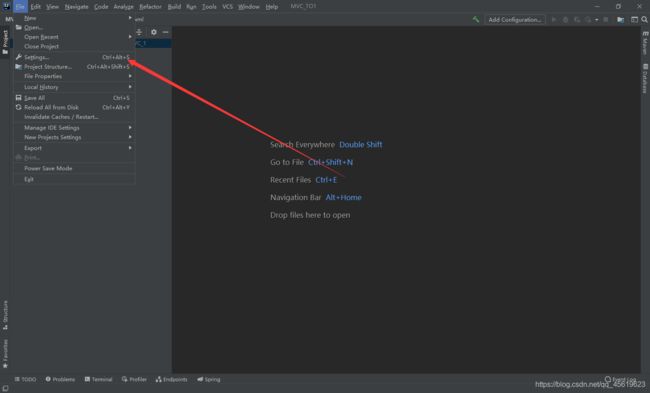
左上角选择FILE > 然后Setting
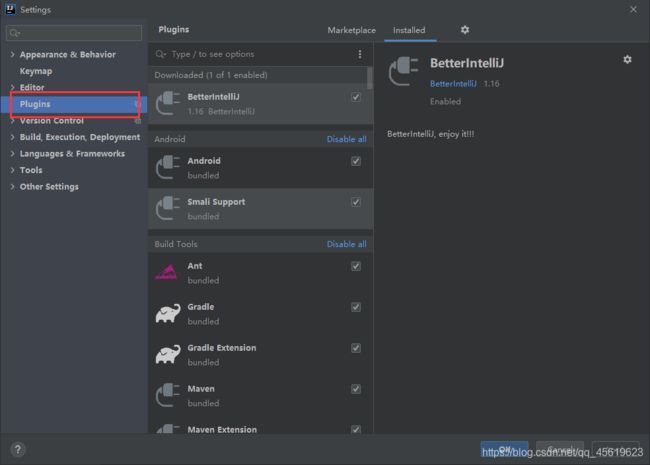
进来之后选择Plugins,就是IDEA的插件,在里面输入Chinese,点击回车

然后你就会看到那个硕大的汉,没错那个就是汉化的语言插件,直接点击Install安装,点击后稍稍等会,然后会有个弹窗提示你是否重启IDEA,直接点击重启
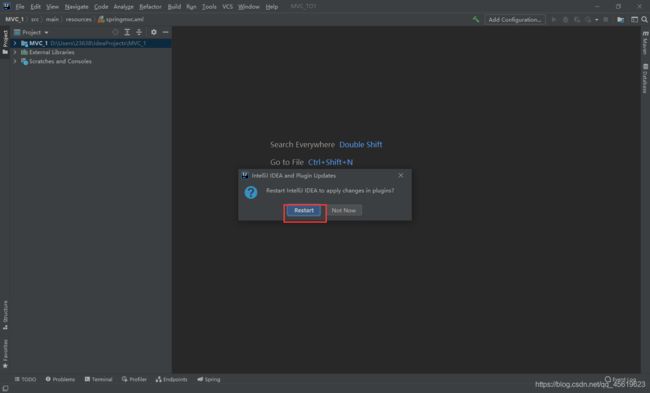
重启完成整个界面就变成中文版了;
二、开始搭建SpringMVC项目
点击文件>新建>项目,然后选择空项目,直接下一步重命名完成
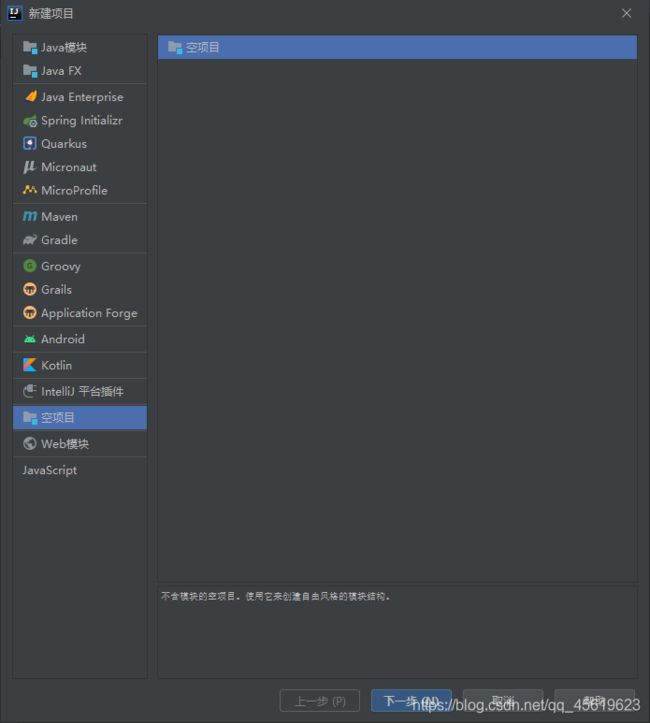
然后会弹出一个新窗口让你选择模块,至于为啥我不直接使用Maven,因为直接选择目录都没新建,对于新手来讲太麻烦了,程序能建的东西我不想自己手动写(手动狗头);
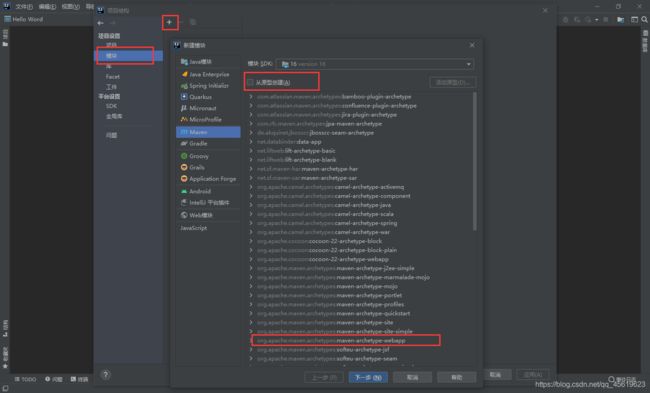
依次的顺序为:点击模块>+号>新建模块>选择Maven>勾选从原型创建>然后往下找到一个webapp结尾的点选中,再下一步重命名完成;
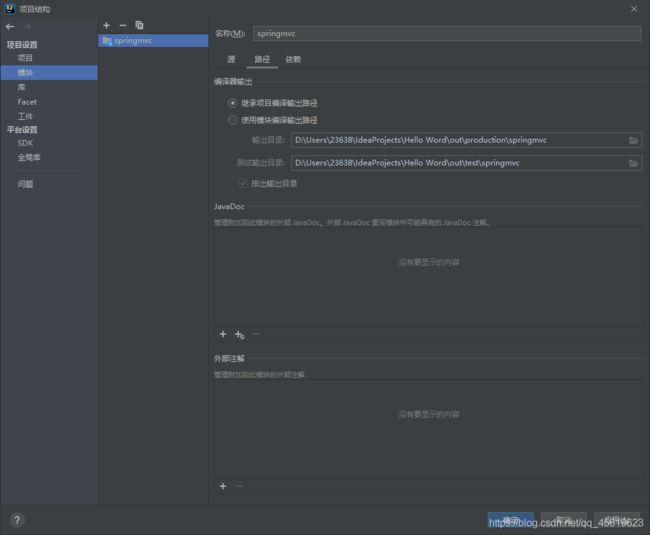
点击完成一个大致的mvc项目就出来了,但是还没完,目前只是架子有了!
坐等下面转圈圈的都不转的时候,代表项目已经生成成功,下面我们就可以开始填代码了!
三、配置SpringMVC
先看一下项目结构,明显不对,java的目录都没有,所以我们新建一下
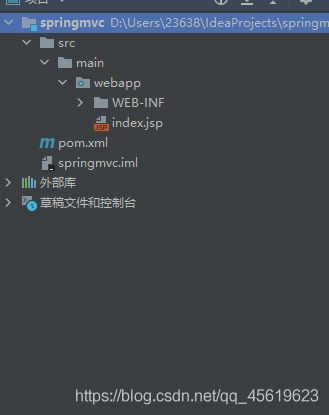
在main上面右键新建目录命名java,一定是java。为什么不能用别的,别问为什么,这就是规矩

再新建resources文件夹,IDEA很贴心知道你要这个,所以不用打字直接点中就行!

到这目录差不多了,我们开始配置项目
1、配置POM.XML

我们先把运行版本的版本号改成11,然后下面自动生成的build全部删掉,不是我们想要的
删除成功后先配置一下,引入SpringMVC
    <dependency>
      <groupId>org.springframeworkgroupId>
      <artifactId>spring-webmvcartifactId>
      <version>5.3.1version>
    dependency>
这个是包含在dependencies标签里面的,不要写出来了,会报错!
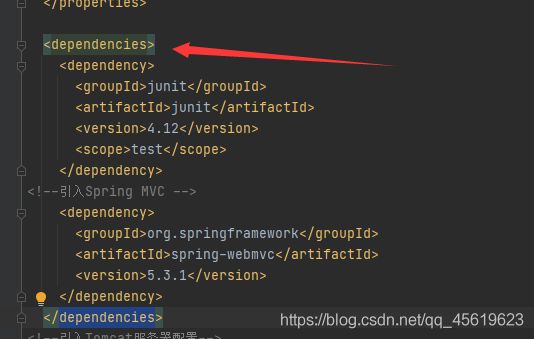
第二部配置Tomcat服务器,因为IDEA不像Vs那样,都自动给你配置IIS服务器,这个不行必须手动配置!在dependencies标签外面新建
  <build>
    <plugins>
       <plugin>
         <groupId>org.apache.tomcat.mavengroupId>
         <artifactId>tomcat7-maven-pluginartifactId>
         <version>2.2version>
         <configuration>
           <port>8080port>
           <path>/path>
         configuration>
       plugin>
    plugins>
  build>
这里的参数是配置Tomcat的信息,版本、路径、端口啥的
完整POM.XML
<project xmlns="http://maven.apache.org/POM/4.0.0" xmlns:xsi="http://www.w3.org/2001/XMLSchema-instance"
  xsi:schemaLocation="http://maven.apache.org/POM/4.0.0 http://maven.apache.org/xsd/maven-4.0.0.xsd">
  <modelVersion>4.0.0modelVersion>

  <groupId>org.examplegroupId>
  <artifactId>MVC_1artifactId>
  <version>1.0-SNAPSHOTversion>
  <packaging>warpackaging>

  <name>MVC_1 Maven Webappname>

  <url>http://www.example.comurl>

  <properties>
    <project.build.sourceEncoding>UTF-8project.build.sourceEncoding>
    <maven.compiler.source>11maven.compiler.source>
    <maven.compiler.target>11maven.compiler.target>
  properties>

  <dependencies>
    <dependency>
      <groupId>junitgroupId>
      <artifactId>junitartifactId>
      <version>4.12version>
      <scope>testscope>
    dependency>

    <dependency>
      <groupId>org.springframeworkgroupId>
      <artifactId>spring-webmvcartifactId>
      <version>5.3.1version>
    dependency>
  dependencies>

  <build>
    <plugins>
       <plugin>
         <groupId>org.apache.tomcat.mavengroupId>
         <artifactId>tomcat7-maven-pluginartifactId>
         <version>2.2version>
         <configuration>
           <port>8080port>
           <path>/path>
         configuration>
       plugin>
    plugins>
  build>

project>
注意别全部复制,名称不一样会报错的!!!!
2、添加Controller和JSP文件
在我们之前创建的java 目录上面右键,新增软件包!(如果没看到软件包的右键,将目录标记为源/根)
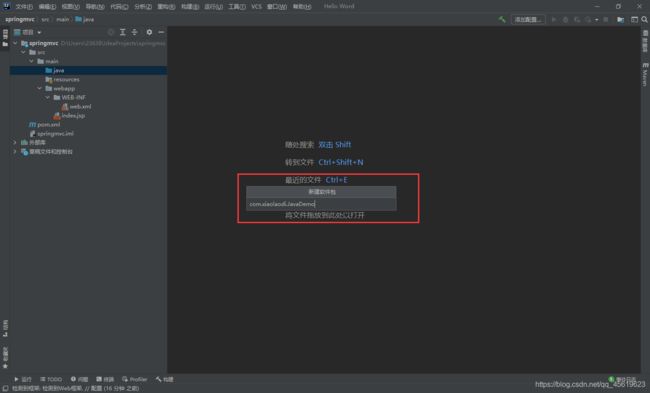
这里的命名注意,一定是com开头,中间两个.这种。
创建成功再在软件包上面右键新建java类,我们新建一个Hello类

到这里后台的类就建好了,但是目前他还不是Controller,因为我们没有配置路由,前台访问不到!然后我们把前端的目录也建好,在WEB-INF文件上右键新建目录,再在jsp目录新建一个index.jsp文件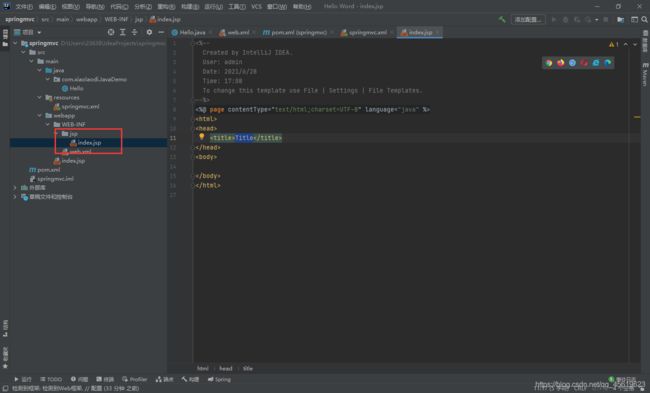
3、配置WEB.XML
我们打开web.xml,然后在web-app标签里面加入
  <servlet-mapping>
    <servlet-name>springmvcservlet-name>

    <url-pattern>/url-pattern>
  servlet-mapping>
这里是声明servlet,就是哪些请求会被我当前的Servlet拦截到。这里还标注了几种拦截方式,这里我们直接用第三种;
前端web.xml完整配置
<web-app>
  <display-name>Archetype Created Web Applicationdisplay-name>
  <servlet>
    <servlet-name>springmvcservlet-name>
    <servlet-class>org.springframework.web.servlet.DispatcherServletservlet-class>
    <init-param>
      <param-name>contextConfigLocationparam-name>
      <param-value>classpath:springmvc.xmlparam-value>
    init-param>
  servlet>

  <servlet-mapping>
    <servlet-name>springmvcservlet-name>

    <url-pattern>/url-pattern>
  servlet-mapping>
web-app>
这里我们配置里面有个
<param-value>classpath:springmvc.xmlparam-value>
这里是后端配置文件的名称地址,下面就开始配置后端的Servlet
配置了前端的Servlet后,我们还要去配置一下后台的;
在Resource文件夹上邮件新建>XML文件>Spring配置
如果没有这个文件夹的,就回到pom.xml文件里面,右上角有个maven重建,点击后项目会重构成Spring项目,这个时候就有了。
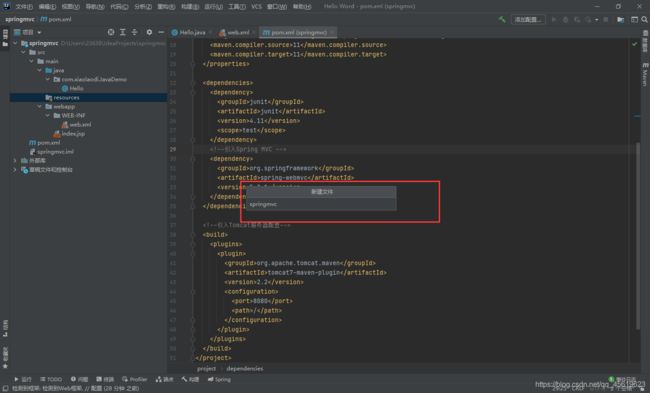
新建好了就是这个样子
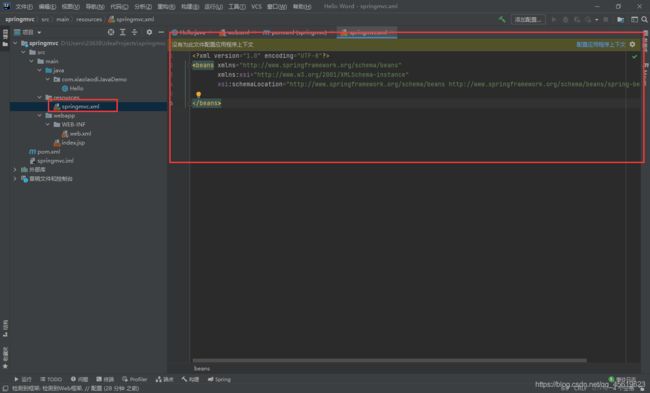
下面我们开始进行配置
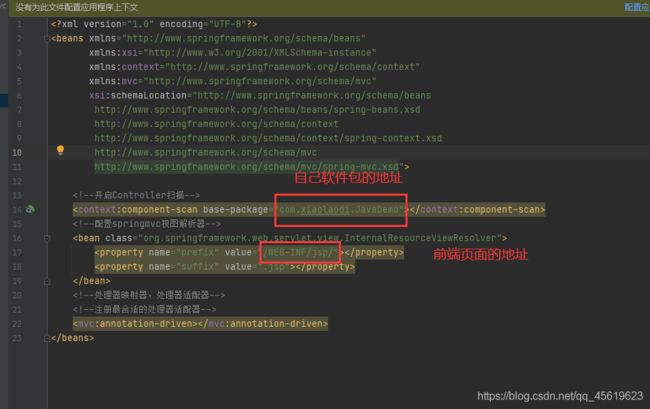
这里的都有标识出来配置是什么;
完整springmvc.xml配置
<beans xmlns="http://www.springframework.org/schema/beans"
       xmlns:xsi="http://www.w3.org/2001/XMLSchema-instance"
       xmlns:context="http://www.springframework.org/schema/context"
       xmlns:mvc="http://www.springframework.org/schema/mvc"
       xsi:schemaLocation="http://www.springframework.org/schema/beans
        http://www.springframework.org/schema/beans/spring-beans.xsd
        http://www.springframework.org/schema/context
        http://www.springframework.org/schema/context/spring-context.xsd
        http://www.springframework.org/schema/mvc
        http://www.springframework.org/schema/mvc/spring-mvc.xsd">


    <context:component-scan base-package="com.xiaolaodi.JavaDemo">context:component-scan>

    <bean class="org.springframework.web.servlet.view.InternalResourceViewResolver">
        <property name="prefix" value="/WEB-INF/jsp/">property>
        <property name="suffix" value=".jsp">property>
    bean>


    <mvc:annotation-driven>mvc:annotation-driven>
beans>
至此配置就基本OK了,现在我们要去写后台了
4、编写后台Controller和Jsp调用
来到刚才新建的Hello类,现在他还不是Controller,所以要成Controller我们要申明一下,并申明路由
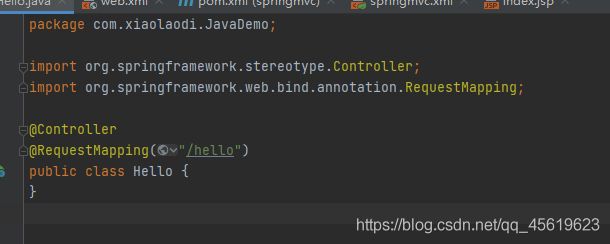
上面的Import不用自己手打,下面的写出来IDEA会自动给你补全!
说一下这里的路由是什么意思,看下这个路径
http://localhost:8080/hello/Getdate
我们申明的 @RequestMapping("/hello")意思就是我这整个Controller是负责处理路径后面是hello开头的操作的。当路径后面跟着是hello的时候就会被拦截到我当前的Controller里面来;接着往下写,链接进来了我们还要接着处理
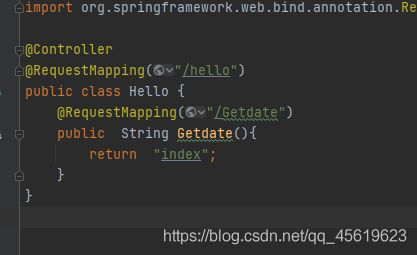
新建一个Getdate方法,然后标识路由是Getdate,拿上面链接举例就是跟着hello后面,叫做Getdate的方法就会被拦截到我当前的方法来处理,这里我们先返回String,下面的Index是前端页面的路径,为什么我没写全名Index.jsp,或者/WEB-INF/jsp/index.jsp呢?还记得我们前面配置后台的xml的时候嘛,配置了一个springmvc视图解析器。这里你只写了jsp页面的名字,其他部分配置文件会帮你自动补全,下面试试是不是真的可以跳转。
我们回到index.jsp随便打一句话
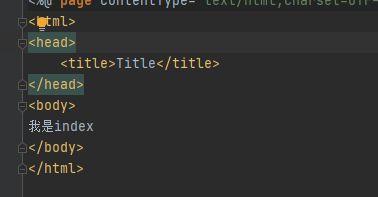
然后点击屏幕右边的Maven控制台,点击插件下面有个Tomcat7,然后点开有个run
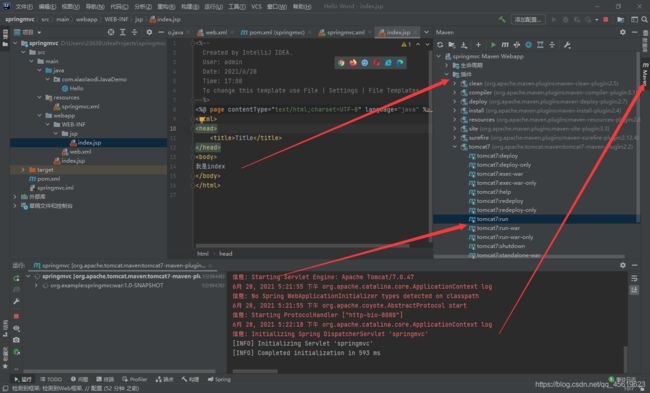
到浏览器输入地址 http://localhost:8080/hello/Getdate

看到我是Index的时候证明前后台已经跑通了,下面我们坐点升级操作,从后端返回数据
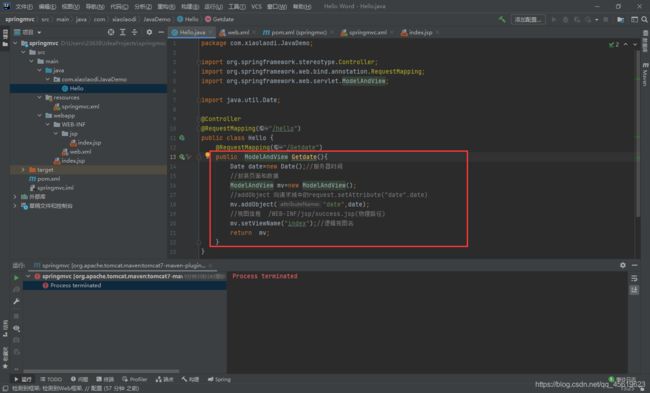
这里我们来个返回后台服务器时间,New一个Date类;ModelAndView的意思是从名字就能看出是数据和视图,就是将数据和视图一起绑定,返回给前端视图拿到数据,注意这里返回值也不是String了,是ModelAndView了。写完Controller后我们去前端取值。

参数名字需要和后台保持一致,不然取不到的;写好了点击run运行

