你真的了解Ioc与AOP 吗?(5)
六、利用Ioc在不修改任何原有代码的情况下实现Remoting
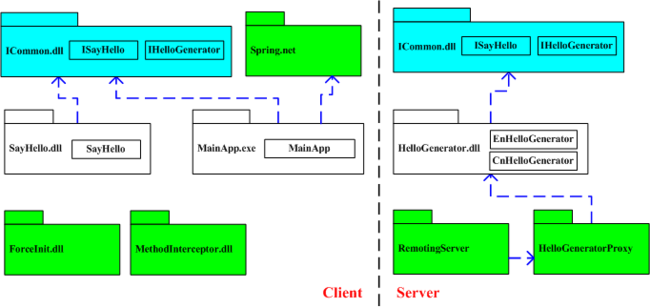
上文我们提到,为了实现对HelloGenerator.dll的分布式调用,我们不得不修改了原有程序的多处代码。那么有没有可能在不动任何原有代码的情况下,单纯靠添加组件、修改配置文件实现远程访问呢?当然可以。这次我们还是使用Spring.net完成这个工作。 经过调整后的系统组件构成如下图所示:
该方案没有修改“src\Step3”中的任何代码,仅仅通过修改配置文件和添加了若干个组件就实现了远程访问。修改方案如下:
(1)使用Proxy模式代理原有HelloGenerator
如果要让某个对象具有分布式的功能,必须使其继承自MarshalByRefObject。但是由于不能修改任何原有代码,所以这次我们只能绕道而行, 借助Proxy模式代理原有的HelloGenerator。在RemotingServer项目中,我们定义了一个新类 HelloGeneratorProxy继承自MarshalByRefObject,通过委派的方式对原有的HelloGenerator进行调用,代码如下:
using System;
namespace IocInCSharp
{
   public class HelloGeneratorProxy : MarshalByRefObject, IHelloGenerator
   {
      private IHelloGenerator _helloGen;
      public IHelloGenerator HelloGenerator
      {
         get { return _helloGen; }
         set { _helloGen = value; }
      }
      public string GetHelloString(string name)
      {
         if(_helloGen != null)
            return _helloGen.GetHelloString(name);
         return null;
      }
   }
}
仔细观察,我们会发现HelloGeneratorProxy持有一个对IHelloGenerator的引用,该属性是可以Set的,因此我们可以借助Ioc的威力,通过调整Sping.net的配置文件动态决定远程服务器究竟发布EnHelloGenerator还是 CnHelloGenerator。
(2)发布HelloGeneratorProxy
通过RemotingServer.exe,我们将HelloGeneratorProxy发布出去,客户端实际上调用的是Proxy对象(不用担心,由于“针对接口编程”,客户端只知道它是IHelloGenerator类型对象)。服务器端代码如下:
using System;
using System.Configuration;
using System.Collections;
using System.Runtime.Remoting;
using System.Runtime.Remoting.Channels;
using System.Runtime.Remoting.Channels.Http;
using System.Runtime.Serialization.Formatters;
using Spring.Context;
namespace IocInCSharp
{
   public class Server
   {
      public static void Main()
      {
         int port = Convert.ToInt32(ConfigurationSettings.AppSettings["LocalServerPort"]);
         try
         {
            BinaryServerFormatterSinkProvider serverProvider = new BinaryServerFormatterSinkProvider();
            BinaryClientFormatterSinkProvider clientProvider = new BinaryClientFormatterSinkProvider();
            serverProvider.TypeFilterLevel = TypeFilterLevel.Full;
            IDictionary props = new Hashtable();
            props["port"] = port;
            props["timeout"] = 2000;
            HttpChannel channel = new HttpChannel(props, clientProvider, serverProvider);
            ChannelServices.RegisterChannel(channel);
            IApplicationContext ctx = ConfigurationSettings.GetConfig("spring/context") as IApplicationContext;
            HelloGeneratorProxy proxy = (HelloGeneratorProxy)ctx.GetObject("myHelloGeneratorProxy");
            RemotingServices.Marshal(proxy, "HelloGenerator.soap");
            Console.WriteLine("Server started!\r\nPress ENTER key to stop the server...");
            Console.ReadLine();
         }
         catch
         {
            Console.WriteLine("Server Start Error!");
         }
      }
   }
}
注意其中的几条命令:
IApplicationContext ctx = ConfigurationSettings.GetConfig("spring/context") as IApplicationContext;
HelloGeneratorProxy proxy = (HelloGeneratorProxy)ctx.GetObject("myHelloGeneratorProxy");
RemotingServices.Marshal(proxy, "HelloGenerator.soap");
我们使用Ioc向HelloGeneratorProxy注入具体的HelloGenerator对象,并通过 RemotingServices.Marshal(proxy, "HelloGenerator.soap")命令将该实例发布出去。服务器端的配置文件如下:
<?xml version="1.0" encoding="utf-8" ?>
<configuration>
   <configSections>
      <sectionGroup name="spring">
         <section name="context" type="Spring.Context.Support.ContextHandler, Spring.Core" />
         <section name="objects" type="Spring.Context.Support.DefaultSectionHandler, Spring.Core" />
      </sectionGroup>
   </configSections>
   <spring>
      <context>
         <resource uri="config://spring/objects" />
      </context>
      <objects xmlns="http://www.springframework.net">
         <object id="myHelloGeneratorProxy" type="IocInCSharp.HelloGeneratorProxy, RemotingServer">
            <property name="HelloGenerator">
               <ref object="myCnHelloGenerator" />
            </property>
         </object>
         <object id="myEnHelloGenerator" type="IocInCSharp.EnHelloGenerator, HelloGenerator" />
         <object id="myCnHelloGenerator" type="IocInCSharp.CnHelloGenerator, HelloGenerator" />
      </objects>
   </spring>
   <appSettings>
      <add key="LocalServerPort" value="8100" />
   </appSettings>
</configuration>
用户可以尝试将配置文件中<ref object="myCnHelloGenerator" />更改为<ref object="myEnHelloGenerator" />,重新启动服务后看看客户端调用结果是什么?
(3)客户端实现技术-1
客户端实现起来要麻烦一些。由于不允许修改MainApp中的任何代码,我们必须能够在合适的时机拦截代码运行并创建远程连接,同时确保在Ioc注入时注入的是远程对象。所有这些工作Sping.net都考虑的很周到。它提供了depends-on属性,允许在执行某一操作前强制执行某段代码。在客户端的配置文件中,我们可以看到如下的配置选项:
         <object id="mySayHello" type="Spring.Aop.Framework.ProxyFactoryObject" depends-on="force-init">
         .........
         <object id="force-init" type="Spring.Objects.Factory.Config.MethodInvokingFactoryObject, Spring.Core">
            <property name="TargetType" value="IocInCSharp.ForceInit, ForceInit" />
            <property name="TargetMethod" value="Init" />
         </object>
这表示,当我们初始化mySayHello时,要先去调用ForceInit.dll文件中ForceInit类的Init方法。 ForceInit是一个新编写的类,其主要目的就是创建并注册一个用于远程通讯的Channel。代码实现如下:
using System;
using System.Collections;
using System.Runtime.Remoting;
using System.Runtime.Remoting.Channels;
using System.Runtime.Remoting.Channels.Http;
using System.Runtime.Serialization.Formatters;
namespace IocInCSharp
{
   public class ForceInit
   {
      public static void Init()
      {
         //建立连接
         BinaryServerFormatterSinkProvider serverProvider = new BinaryServerFormatterSinkProvider();
         BinaryClientFormatterSinkProvider clientProvider = new BinaryClientFormatterSinkProvider();
         serverProvider.TypeFilterLevel = TypeFilterLevel.Full;
         IDictionary props = new Hashtable();
         props["port"] = 8199;
         props["name"] = "myHttp";
         HttpChannel channel = new HttpChannel(props, clientProvider, serverProvider);
         //获得当前已注册的通道;
         IChannel[] channels = ChannelServices.RegisteredChannels;
         //关闭指定名为MyHttp的通道;
         foreach (IChannel eachChannel in channels)
            if (eachChannel.ChannelName == "myHttp")
               ChannelServices.UnregisterChannel(eachChannel);
         ChannelServices.RegisterChannel(channel);
      }
   }
}
(4)客户端实现技术-2
剩下的工作就是为mySayHello的HelloGenerator注入远程对象。通常情况下我们需要使用 Activator.GetObject方法调用远程对象,不过Spring.net已经将其封装起来,我们只需修改一下配置文件,就可以确保调用到远程对象。配置文件对应部分如下:
         <object id="mySayHello" type="Spring.Aop.Framework.ProxyFactoryObject" depends-on="force-init">
            <property name="target">
               <object id="myLocalSayHello" type="IocInCSharp.SayHello, SayHello">
                  <property name="HelloGenerator">
                     <ref object="myHelloGenerator" />
                  </property>
               </object>
            </property>
            ......
         </object>
         <object name="myHelloGenerator" type="Spring.Remoting.SaoFactoryObject, Spring.Services">
            <property name="ServiceInterface">
               <value>IocInCSharp.IHelloGenerator, ICommon</value>
            </property>
            <property name="ServiceUrl">
               <value>http://127.0.0.1:8100/HelloGenerator.soap</value>
            </property>
         </object>
借助Spring.Remoting.SaoFactoryObject,我们轻松实现了远程对象访问,不必书写一行代码。(目前SAO在 Spring.net的实现尚不完整,按照Spring.net帮助手册上的做法,通过配置文件只能实现客户端访问远程对象,还做不到服务器端发布远程对象)
(5)使用AOP拦截调用
Sping.net目前已经实现AOP功能,我们可以很容易的对方法进行拦截和调用。需要做的工作就是设计相应的Interceptor,然后修改配置文件。目前Sping.net使用的AOP功能是AopAlliance的实现,因此代码编写时命名空间引用让人感觉多少有些别扭,不是以Sping 开头。我编写的MethodInterceptor代码如下:
using System;
using AopAlliance.Intercept;
namespace IocInCSharp
{
   class MethodInterceptor : IMethodInterceptor
   {
      public object Invoke(IMethodInvocation invocation)
      {
         Console.WriteLine("Before Method Call...");
         object returnValue = invocation.Proceed();
         Console.WriteLine("After Method Call...");
         return returnValue;
      }
   }
}
在方法调用前打印"Before Method Call...",在方法调用后打印"After Method Call..."。剩下的工作就是修改配置文件,将其应用到相应的方法上。配置文件片断如下:
         <object id="MethodAdvice" type="Spring.Aop.Support.RegexpMethodPointcutAdvisor">
            <property name="pattern" value="SayHelloTo" />
            <property name="advice">
               <object type="IocInCSharp.MethodInterceptor, MethodInterceptor" />
            </property>
         </object>
         <object id="mySayHello" type="Spring.Aop.Framework.ProxyFactoryObject" depends-on="force-init">

                  ......

            <property name="interceptorNames">
               <list>
                  <value>MethodAdvice</value>
               </list>
            </property>
         </object>
通过以上操作,我们在没有修改任何原有代码的情况下,让原有系统实现了远程分布式访问。
请大家访问示例代码的“bin\Step5"目录,下面有3个子目录:Server、Client、WithoutRemoting。首先运行 Server目录下的RemotingServer.exe,然后运行Client目录下的MainApp.exe进行远程调用。系统通过 Remoting完成远程调用。关闭所有程序后,进入到WithoutRemoting目录,里面有个Readme.txt文件,按照操作步骤将文件:
..\Server\HelloGenerator.dll
..\Client\MainApp.exe
..\Client\ICommon.dll
..\Client\SayHello.dll
..\Client\Spring.Core.dll
..\Client\log4net.dll
拷贝到该目录,再次运行MainApp.exe,你会发现它是一个地地道道的本地应用程序!本地与远程唯一的区别就是配置文件的不同以及增加了几个其它的DLL。这正式我们这个示例的价值体现。
到此为止,我们完成了对Ioc应用的一系列模拟。Ioc写得多一些,AOP写得少了点。欢迎大家批评指正。
