使用springboot+vue+mybatis-plus+element ui做一个简单的增删改查
tips:
本人刚学编程 纯纯的小白一个,内容不算好,但是可以值得借鉴;希望能靠这篇文章能得到大神的指点;我本来也就打算用文章复习一下刚学的知识;本篇文章主要是介绍增删改查,其余的配置代码也就一笔带过。如果内容不好,勿喷。
题外话:
后端基础学不好,学了就忘,前端也一样,让人很难受。做这个增删改查的时候可费了我大把大把的时间,刚开始学难免明知有坑还是要往里面跳,但这也不是个坏事,写代码不就是一遍一遍地去尝试,写的多了,踩得坑多了,你的知识你的认知就会越来越丰富。
刚开始写这个增删改查的时候,不会写就去网上查各种例子,例子很多,五花八门,愣是一个也看不懂,看的我是脑子嗡嗡的,以至于后面有一段时间就感觉脑袋很沉,转不动了,有没有刚学编程的同学和我有一样的感受;前话说的有点多了,不说了,下面开整。
一.springboot+vue+mybatis-plus增删改查
工具:后台Eclipse
前台VsCode
数据库MySQL
先给大家献上后端的所有类
学过springboot的都知道上面几个层都有啥作用吧,其实有的层我也不知道有何作用,其中有的层命名不一样,按照自己命名方式来主要是舒服。有的我都觉着多余,但就是这么写,我也不敢违抗啊。
层级调用:controller层-servic层-manager层-dao层
正片开始了
pom文件的依赖
			org.springframework.boot
			spring-boot-starter-web


					org.apache.logging.log4j
					log4j-to-slf4j


			org.springframework.boot
			spring-boot-devtools


			io.springfox
			springfox-staticdocs
			${io.springfox.version}
			test


			org.springframework.boot
			spring-boot-starter-aop


			org.springframework.boot
			spring-boot-starter-cache


			org.springframework.boot
			spring-boot-configuration-processor
			true


			commons-logging
			commons-logging
			1.2


			commons-lang
			commons-lang
			2.6


			mysql
			mysql-connector-java


			com.alibaba
			druid
			1.1.8


			com.baomidou
			mybatis-plus-boot-starter
			3.3.1


			com.thetransactioncompany
			cors-filter
			2.6


			com.thetransactioncompany
			java-property-utils
			1.9.1


			com.alibaba
			fastjson
			1.2.58


			net.sf.json-lib
			json-lib
			2.4
			jdk15


			joda-time
			joda-time


			org.jodd
			jodd-http
			3.9.1


			com.thoughtworks.xstream
			xstream
			1.4.11.1


			org.projectlombok
			lombok


			io.springfox
			springfox-swagger2
			2.8.0


			io.springfox
			springfox-swagger-ui
			2.8.0


			commons-codec
			commons-codec


			commons-fileupload
			commons-fileupload
			1.3.2


			com.alibaba
			easyexcel
			2.2.6


			org.json
			json
			20171018


			io.springfox
			springfox-swagger2
			2.9.2


			io.springfox
			springfox-swagger-ui
			2.9.2
yml配置文件
端口:7002,可以自己更改,没必要按我的端口。
数据库:需要修改的也就最下面三行,连接自己的数据库,密码和用户
mybatis-plus:注释里有说明
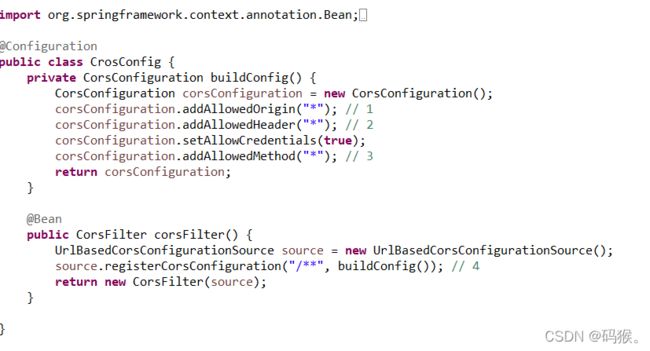
前后分离就要跨域,所以要先配置跨域
最后的最后配置
mybatis-plus的配置
这是一个分页的配置
1.后端代码:
dao类
就这一段极少的代码,却拥有超强的功能,这也归功于继承的BaseMapper,简单来说继承了它,增删改查的语句我们也就不用写了,直接调用dao就行了。
@Repository
public interface UserDao extends BaseMapper{

}
manager类
上面图片里的manager写错了
这是我在网上找到对manager的解释
A)对第三方平台封装的层,预处理返回结果及转化异常信息;
B)对 Service 层通用能力的下沉,如缓存方案、中间件通用处理;
C)与 DAO 层交互,对多个 DAO 的组合复用。
@Component
public class UserMannger {
	@Autowired
	private UserDao userDao;
	//获取全部用户
	public List getAllUsers(){
		QueryWrapper wrapper=new QueryWrapper();
		return userDao.selectList(wrapper);
	}
	//根据id获取用户
	public User getById(String id) {
		return userDao.selectById(id);
	}
	//根据姓名获取用户
	public User getByName(String username) {
		QueryWrapper wrapper=new QueryWrapper();
		wrapper.eq("username", username);
		return userDao.selectOne(wrapper);
	}
	//根据角色获取用户
	public List getByRole(String role) {
		QueryWrapper wrapper=new QueryWrapper();
		wrapper.eq("role",role);
		return userDao.selectList(wrapper);
	}
	//添加用户
	public int insert(User user) {
		return userDao.insert(user);
	}
	//删除用户
	public int delete(String id) {
		return userDao.deleteById(id);
	}
	//编辑用户
	public int update(User  user) {
		return userDao.updateById(user);
	}

}
service类
@Service
public class UserService {
	@Autowired
	private UserMannger userMannger;

	//获取全部用户
	public List getAllUsers(){
		return userMannger.getAllUsers();
	}
	//根据id获取用户
	public User getById(String id) {
		return userMannger.getById(id);
	}
	//根据姓名获取
	public User getByName(String name) {
		return userMannger.getByName(name);
	}
	//根据角色获取
	public List getByRole(String role) {
		return userMannger.getByRole(role);
	}
	//增加
	public int insert(User user) {
		return userMannger.insert(user);
	}
	//删除
	public int delete(String id) {
		return userMannger.delete(id);
	}
	//修改
	public int update(User user) {
		return userMannger.update(user);
	}
}
controller类
@RequestMapping("/UserController")
@RestController
public class UserController {
	@Autowired
	private UserService userService;
	@Autowired
	private LoginService loginService;

	//获取全部用户
	@RequestMapping("/getAllUsers")
	public List getAllUsers() {
		return userService.getAllUsers();
	}
    //根据id获取用户
	@RequestMapping("/getById")
	public User getById(@RequestBody User user) {
		return userService.getById(user.getId());
	}
    //根据姓名获取用户
	@RequestMapping("getByName")
	public User getByName(@RequestBody User user) {
		return userService.getByName(user.getUsername());
	}
    //根据角色获取用户
	@RequestMapping("/getByRole")
	public List getByRole(@RequestBody User user) {
		return userService.getByRole(user.getRole());
	}
    //新增
	@RequestMapping("/addUser")
	public int addUser(@RequestBody User user) {
		return userService.insert(user);
	}
    //删除
	@RequestMapping("/deleteUser/{id}")
	public int deleteUser(@PathVariable("id") String id) {
		return userService.delete(id);
	}
    //修改
	@RequestMapping("/editUser")
	public int editUser(@RequestBody User user) {
		return userService.update(user);
	}
}
后端代码也就这么多,下面献上前端代码
2.前端代码
自从学习了一点点的vue,我感觉我写代码就是Ctrl+c,很方便,但也有弊端,这样我就不能敲键盘了,键盘敲不烂,我就没理由换新键盘了。又说了点题外话,本人比较喜欢聊天,所以就说多了,哈哈哈哈哈哈哈哈。
直接给大家上代码。
main.js的代码
import Vue from 'vue'
import App from './App.vue'
import router from './router'
import store from './store'
import axios from 'axios';

import ElementUI from 'element-ui';
import 'element-ui/lib/theme-chalk/index.css';

Vue.config.productionTip = false


Vue.use(ElementUI);

Vue.prototype.$axios = axios;
new Vue({
  router,
  store,
  render: h => h(App)
}).$mount('#app')
index.js
这个index是router里的index文件不要写到别处了。
import Vue from 'vue'
import VueRouter from 'vue-router'


Vue.use(VueRouter)

const routes = [

  {
    path: '/UserForm',
    name: 'UserForm',
    component: () => import(/* webpackChunkName: "about" */ '../views/UserForm.vue')
  },

]

const router = new VueRouter({
  routes
})

export default router
App.vue
UserForm.vue
查询所有用户
根据id查询
根据姓名查询
根据角色查询
添加用户
删除
编辑
附上一段操作,看看结果如何,页面不精致,只求结果。


