Vue总结(二)—— 整合axios
文章目录
- Vue总结(二)—— 整合axios
-
- 1、axios
-
- 1.1 axios 简介
- 1.2 axios基本使用
- 1.3 axios拦截器(interceptor)
-
- 1.3.1 封装axios
- 2、代理配置(解决跨域)
-
- 2.1 方法一
- 2.2 方法二
- 2.3 示例代码
- 3、vue整合axios
-
- 3.1 创建vue-cli 项目
- 3.2 封装axios
- 3.3 main.js 引入,添加到vue原型对象
- 3.4 代理配置(解决跨域问题)
- 3.5 使用
Vue总结(二)—— 整合axios
本文参考:
vue项目中axios模块封装和axios拦截器interceptors使用
vue项目中对axios的二次封装
vue-axios interceptors(拦截器)实际应用(一)
vue-axios interceptors(拦截器)实际应用(二)
vue-axios interceptors(拦截器)实际应用(三)
vue.js添加拦截器,实现token认证(使用axios)
Promise初步详解(resolve,reject,catch)
1、axios
1.1 axios 简介
axios前端异步请求库类似jouery ajax技术,
ajax用来在页面发起异步请求到后端服务,并将后端服务响应数据渲染到页面上,
jq推荐ajax技术,但vue里面并不榷荐在使用jquery框架,vue推荐使用axios异步请求库。
axios总结:
用来在前端页面发起一个异步请求,请求之后页面不动,响应回来刷新页面局部;
官方定义: axios 异步请求库并不是vue官方库第三方异步库﹑在vue中推荐axios;
特点:易用、简洁且高效的http库—>发送http异步请求库。
axios官网:[官方网站](http : / /www . axios-js.com/) 或 看云-axios文档
axios GitHub:axios GitHub
特性:
- 从浏览器中创建XLHttpRequests从node.js 创建http请求
- 支持Promise API
- 拦截请求和响应
- 转换请求数据和响应数据取消请求
- 自动转换JSON数据,客户端支持防御XSRF
1.2 axios基本使用
-
下载核心js文件
- https://unpkg.com/[email protected]/dist/axios.min.js
-
页面引入axios核心js文件
<script src="js/axios.min.js ">script> -
发送异步请求之GET方式(查询)
axios.get("http://localhost:8081/demo?id=21&name=xiaowang ").then( function(res){
    //代表请求成功之后处理
	console.log(res);
	console.1og (res.data);
}).catch( function (err){
    //代表请求失败之后处理
	alert ('进入catch ')
	console.log (err);
});
// 为给定 ID 的 user 创建请求 axios.get('/user?ID=12345') .then(function (response) { console.log(response); }) .catch(function (error) { console.log(error); }); // 可选的,上面的请求可以这样做 axios.get('/user', { params: { ID: 12345 } }) .then(function (response) { console.log(response); }) .catch(function (error) { console.log(error); }); -
发送异步请求之POST方式(添加)
axios.post('/user', { firstName: 'Fred', lastName: 'Flintstone' }) .then(function (response) { console.log(response); }) .catch(function (error) { console.log(error); }); -
其他方式的请求
axios.put(.then( ).catch ( ); //修改 axios.patch( ).then( ).catch( ); axios.delete( "ur1?id=21").then ( ).catch ( ); //删除 -
axios创建默认实例发送请求
//创建axios的配置对象 var instance = axios. create({ baseURL: 'http://localhost:8081/', timeout: 5000, });instance.get("/demo?id=21&name=xiaowang ").then( function(res) { //代表请求成功之后处理 console.log(res); console.1og (res.data); }).catch( function (err) { //代表请求失败之后处理 alert ('进入catch '); console.log (err); });
1.3 axios拦截器(interceptor)
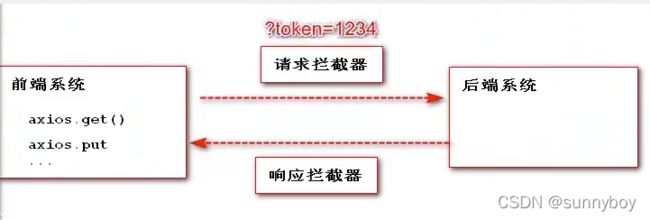
分类:
- 请求拦截器:在请求发送前进行必要操作处理,例如添加统一的cookie、请求体加验证、设置请求头等,相当于是对每个接口里相同操作的一个封装;
- 响应拦截器:对响应结果(响应体)进行处理,通常是数据统一处理等,也常来判断登录失效等。
作用:
- 用来将axios中共有参数,响应公共处理等公共部分,交给拦截器处理,
- 减少axios发送请求时代码冗余。
拦截器一般做什么?
- 修改请求头的一些配置项
- 给请求的过程添加一些请求的图标
- 给请求添加参数
- 对响应结果进行处理
1.3.1 封装axios
1、在项目代码src目录下,创建一个 util 文件夹, 在util文件夹中创建一个http.js文件用来封装axios。(也可以叫interceptor.js,随意)
2、封装代码如下:
import axios from 'axios'
//引入elementUI的 消息提醒组件、加载组件
import { Message, Loading } from 'element-ui';
import router from './router'

let loading    //定义loading变量
// 开启加载动画
function startLoading() {    //使用Element loading-start 方法
    loading = Loading.service({
        lock: true,
        text: '加载中...',
        background: 'rgba(0, 0, 0, 0.7)'
    })
}
// 关闭加载动画
function endLoading() {    //使用Element loading-close 方法
    loading.close()
}

//创建axios的配置对象
const http = axios.create({
  baseURL: 'http://localhost:8081/',
  timeout: 10000,
  headers: { 'X-Client-Info': '{"a":"3000","ch":"1002","v":"5.0.4","e":"1611800680438168268570625","bc":"310100"}' }
})

// axios 拦截器
// 请求拦截
// http.interceptors.request()
// 响应拦截
// http.interceptors.response()

// 1、请求拦截器:在请求发送之前进行一些处理
http.interceptors.request.use(function (config) {
  // 在发起异步请求时,启动 loading
  startLoading()

config.withCredentials = true // 允许携带token ,这个是解决跨域产生的相关问题
  config.timeout = 6000
  let token = sessionStorage.getItem('access_token')
  let csrf = store.getters.csrf
  if (token) {
   config.headers = {
    'access-token': token,
    'Content-Type': 'application/x-www-form-urlencoded'
   }
  }
  if (config.url === 'refresh') {
   config.headers = {
    'refresh-token': sessionStorage.getItem('refresh_token'),
    'Content-Type': 'application/x-www-form-urlencoded'
   }
  }

  return config
}, function (error) {
  // 请求出错处理
  return Promise.reject(error) //上一次请求的响应结果,作为下一次请求(处理)的参数,类似于链式调用
})

// 2、响应拦截器:在响应结果进行一些处理
http.interceptors.response.use(response => {
  // 在拿到响应的数据后
  // 定时刷新access-token
  if (!response.data.value && response.data.data.message === 'token invalid') {
  // 刷新token
   store.dispatch('refresh').then(response => {
    sessionStorage.setItem('access_token', response.data)
   }).catch(error => {
     // 停止加载
    endLoading()
    //错误提醒,使用红色错误提醒
    Message.error(error.response.data)

    throw new Error('token刷新' + error)
   })
  }

  // 停止加载动画
  endLoading()
  return response
 }, error => {
 // 响应出错处理
  return Promise.reject(error) //上一次请求的响应结果,作为下一次处理的参数,类似于链式调用
})

export default http
也可以参考其他博客封装的,如下:
import axios from 'axios'
import { Notify } from 'vant';
// import Vue from 'vue'
// import store from '@/store'  // 我此项目没有用到vuex,所以vuex代码的都注释了,需要的自己打开使用

// import {ACCESS_TOKEN} from '@/store/mutation-types'

// 创建 axios 实例
const requests = axios.create({
  baseURL: process.env.VUE_APP_API, // 基础url,如果是多环境配置这样写,也可以像下面一行的写死。
  // baseURL: 'http://168.192.0.123',
  timeout: 6000 // 请求超时时间
})

// 错误处理函数
const err = (error) => {
  if (error.response) {
    const data = error.response.data
    // const token = Vue.ls.get(ACCESS_TOKEN)
    if (error.response.status === 403) {
        Notify({ type: 'danger', message: data.message||data.msg });
    }
    if (error.response.status === 401) {
        Notify({ type: 'danger', message: '你没有权限。' });
      // if (token) {
      //   store.dispatch('Logout').then(() => {
      //     setTimeout(() => {
      //       window.location.reload()
      //     }, 1500)
      //   })
      // }
    }
  }
  return Promise.reject(error)
}

// request interceptor(请求拦截器)
requests.interceptors.request.use(config => {
//   const token = Vue.ls.get(ACCESS_TOKEN)
  const token = localStorage.getItem('token')
  if (token) {
    config.headers['token'] = token // 让每个请求携带自定义 token 请根据实际情况自行修改
  }
  return config
}, err)

// response interceptor(接收拦截器)
requests.interceptors.response.use((response) => {
  const res = response.data
  if (res.code !== 0&&res.code!==200) {
    Notify({ type: 'danger', message: res.message||res.msg });
    // 401:未登录;
    if (res.code === 401||res.code === 403||res.code===999) {
      Notify({ type: 'danger', message: '请登录'});
    }
    return Promise.reject('error') //解决回调函数嵌套多的问题
  } else {
    return res
  }
}, err)

//默认暴露
export default {
  requests
}
Promise的几种状态:
pending: 初始状态,成功或失败状态。
fulfilled: 意味着操作成功完成。
rejected: 意味着操作失败。
3、在项目中使用
<script>
// 使用时先导入封装好的 http
// import http from '../util/http' // 项目中 别名  @ ==> src的绝对路径
import http from '@/util/http' // 项目中 别名  @ ==> src的绝对路径


export default {
  data () {
    return {
      filminfo: null, // null为假, 空数组[]和空对象{}都是真, null 是为了语境
      isShow: false
    }
  },
  mounted () { // 在详情的组件中利用mounted生命周期获取传过来的数据
    // console.log('利用获取的id, 发送ajax请求数据', this.$route) // this.$route内包含整router对象
    // console.log('通过params获得的id数据:', this.$route.params.id)

    //axios的配置对象
    http({
      url: `/gateway?filmId=${this.$route.query.id}&k=4689903`,
      headers: {
        'X-Host': 'mall.film-ticket.film.info'
      }
    }).then(res => {
      console.log(res.data.data.film)
      this.filminfo = res.data.data.film
    })
  }
}
<script>
总结
在需要拦截请求or响应的地方,就可以使用封装好的axios实例来发起异步请求;
而不需要拦截请求/响应的地方,就可以直接使用没有封装的axios来发起异步请求。
2、代理配置(解决跨域)
2.1 方法一
在vue.config.js中添加如下配置:(vue.config.js在项目根路径创建,不是在src目录下创建)
devServer:{
  //开启代理服务器(不指定端口就默认和当前前端项目所处服务器端口一致:8080)
  proxy:"http://localhost:5000" //请求资源所处服务器(端口为5000)
}
说明:
- 优点:配置简单,请求资源时直接发给前端(8080)即可。
- 缺点:不能配置多个代理,不能灵活的控制请求是否走代理。
- 工作方式:若按照上述配置代理,当请求了前端不存在的资源时,那么该请求会转发给服务器 (优先匹配前端资源,请求的资源在前端项目服务器有的话,它就不会走代理服务器)。
2.2 方法二
编写vue.config.js配置具体代理规则:(vue.config.js在项目根路径创建,不是在src目录下创建)
module.exports = {
	devServer: {
      proxy: {
      '/api1': {// 匹配所有以 '/api1'开头的请求路径(请求前缀),告诉代理服务器只要请求前缀为/api1的请求,一律转发给目标资源服务器
        target: 'http://localhost:5000',// 代理目标的基础路径
        changeOrigin: true,
        pathRewrite: {'^/api1': ''} //请求路径重写,匹配路径中所有/api1字符,并替换为空字符
      },
      '/api2': {// 匹配所有以 '/api2'开头的请求路径(请求前缀),告诉代理服务器只要请求前缀为/api2的请求,一律转发给目标资源服务器
        target: 'http://localhost:5001',// 代理目标的基础路径
        changeOrigin: true,
        pathRewrite: {'^/api2': ''}
      }
    }
  }
}
/*
   changeOrigin设置为true时,服务器收到的请求头中的host为:localhost:5000(来自代理服务器5000端口,欺骗服务器,也叫跨域伪造)
   changeOrigin设置为false时,服务器收到的请求头中的host为:localhost:8080(真实来自代理服务器8080端口,不欺骗服务器)
   changeOrigin默认值为true(欺骗服务器,也叫跨域伪造)

   pathRewrite: {'^/api1': ''} //请求路径重写,匹配路径中所有/api1字符,并替换为空字符,不写的话,代理服务器会把端口号后面的所有字符,当做要请求的资源名称,会发生404错误
*/
说明:
- 优点:可以配置多个代理,且可以灵活的控制请求是否走代理。
- 缺点:配置略微繁琐,请求资源时必须加前缀(加在端口号的后面),并进行请求路径重写。
2.3 示例代码
vue.config.js
module.exports = {
  pages: {
    index: {
      //入口文件(默认为src/main.js)
      entry: 'src/main.js',
    },
  },
	lintOnSave:false, //关闭语法检查
	//开启代理服务器(方式一)
	/* devServer: {
    proxy: 'http://localhost:5000'
  }, */
	//开启代理服务器(方式二)
	devServer: {
    proxy: {
      '/api': {
        target: 'http://localhost:5000',
				pathRewrite:{'^/api':''},
        // ws: true, //用于支持websocket,websocket是前后端通信的一种方式(http长连接)
        // changeOrigin: true //用于控制请求头中的host值
      },
      '/demo': {
        target: 'http://localhost:5001',
				pathRewrite:{'^/demo':''},
        // ws: true, //用于支持websocket
        // changeOrigin: true //用于控制请求头中的host值
      }
    }
  }
}
App.vue
<template>
	<div>
		<button @click="getStudents">获取学生信息button>
		<button @click="getCars">获取汽车信息button>
	div>
template>

<script>
	import axios from 'axios'
	export default {
		name:'App',
		methods: {
            //获取学生信息
			getStudents() {
                //没有加请求前缀,不走代理,该请求由前端项目服务器自己处理
				axios.get('http://localhost:8080/students').then(
					response => {
						console.log('请求成功了',response.data)
					},
					error => {
						console.log('请求失败了',error.message)
					}
				)
			},
            //获取汽车信息
			getCars() {
                //加了请求前缀(demo),走代理
				axios.get('http://localhost:8080/demo/cars').then(
					response => {
						console.log('请求成功了',response.data)
					},
					error => {
						console.log('请求失败了',error.message)
					}
				)
			}
		},
	}
script>
3、vue整合axios
官网文档:vue整合axios
步骤:
- 创建vue-cli 项目
- 封装axios
- 在项目代码src目录下,创建一个 util 文件夹, 在util文件夹中创建一个
http.js文件用来封装axios。(也可以叫interceptor.js,随意)- 在
main.js中引入,并添加到vue原型对象- 开发环境如果要跨域,解决跨域问题(设置代理,生产环境不需要配置)
- 修改配置文件后,记得重启项目,配置才能重新生效
- 在项目中使用
- 在需要拦截请求or响应的地方,就可以使用封装好的axios实例来发起异步请求;
- 而不需要拦截请求/响应的地方,就可以直接使用没有封装的axios来发起异步请求。
3.1 创建vue-cli 项目
此处省略,需要的话可以参考:使用vue-cli(vue脚手架)快速搭建项目
3.2 封装axios
参考本博客的 【1.3.1 封装axios】
3.3 main.js 引入,添加到vue原型对象
不添加到Vue原型对象上的话,要在用到axios配置对象的话,要引入,
添加到Vue原型对象上的话,就可以通过this调用axios配置对象(此处命名为$http)。
import http from '@util/http.js'   // 记得改为你的路径
Vue.prototype.$http = http  // 添加到vue原型对象,此处命名为$http,你可以改,添加到原型对象上后,就可以通过this的.语法,如:this.$http使用axios配置对象了,进而使用get、post等函数了。
3.4 代理配置(解决跨域问题)
此处可参考本博客的【2、代理配置(解决跨域)】,也可按照下面的方式进行配置。
开发环境如果要跨域,解决跨域问题(设置代理):
-
vue-cli 3.0的在 package.json 同级目录新建一个 vue.config.js 文件,
-
加入下面代码,其他版本找到配置文件的devServer加入代码:
module.exports = {
    //axios域代理,解决axios跨域问题
    baseUrl: '/',
    devServer: {
        proxy: {
            '': {
                target: 'http://192.168.0.108:8090',
                changeOrigin: true,
                ws: true,
                pathRewrite: {

                }
            }
        }
    }
}
添加或修改完配置后,一定要记得重启项目!!!配置才能生效。
3.5 使用
在确定开发环境没有问题,一些必要的前置工作完成后就可以进行代码编写和开发了。
可参考本博客的【2.3 示例代码】,也可参照下面的代码。
this.$http.get('/api/product/get?productChannelId='+this.productChannelId).then(res=>{
    console.log(res)
})

// 传对象参数
// get请求记得加params
this.$http.get('/api/product/get,{params:{name:'abc'}}).then(res=>{
    console.log(res)
})

this.$http.post('/api/product/get,{name:'abc'}).then(res=>{
    console.log(res)
})


