SpringCloud 学习笔记总结 (六)
文章目录
- 1. SpringCloud Bus 之 消息总线 介绍
- 2. SpringCloud Bus 之 搭建RabbitMQ
- 3. SpringCloud Bus 之 动态刷新全局广播的设计思想和选型
- 4. SpringCloud Bus 之 动态刷新全局广播配置实现
- 5. SpringCloud Stream 之 消息驱动 介绍
- 6. SpringCloud Stream 之 设计思想
- 7. SpringCloud Stream 之 消息驱动 搭建生产者
- 8. SpringCloud Stream 之 消息驱动 搭建消费者
- 9. SpringCloud Stream 之 多台消费者重复消费的问题
- 10. SpringCloud Stream 之 消息持久化
- 10. SpringCloud Sleuth 之 分布式请求链路跟踪
- 11. SpringCloud Sleuth 之 zipkin搭建安装
- 11. SpringCloud Sleuth 之 链路监控展现
1. SpringCloud Bus 之 消息总线 介绍
SpringCloud Bus的作用:
- 分布式自动刷新配置功能。
- Spring Cloud Bus 配合 Spring Cloud Config 使用可以实现配置的动态刷新。
Bus支持两种消息代理:RabbitMQ 和 Kafka。
2. SpringCloud Bus 之 搭建RabbitMQ
见:https://blog.csdn.net/IT_Holmes/article/details/124251437
3. SpringCloud Bus 之 动态刷新全局广播的设计思想和选型
第一种:利用消息总线触发一个客户端/bus/refresh,而刷新所有客户端的配置。
第二种:利用消息总线触发一个服务端ConfigServer的/bus/refresh端点,而刷新所有客户端的配置。 (推荐使用!)
4. SpringCloud Bus 之 动态刷新全局广播配置实现
第一步:创建项目,安装依赖。(直接使用之前已经创建好的config server也是可以的!)
<dependency>
    <groupId>org.springframework.cloudgroupId>
    <artifactId>spring-cloud-starter-bus-amqpartifactId>
dependency>


<dependency>
    <groupId>org.springframework.cloudgroupId>
    <artifactId>spring-cloud-config-serverartifactId>
dependency>


<dependency>
    <groupId>org.springframework.cloudgroupId>
    <artifactId>spring-cloud-starter-netflix-eureka-clientartifactId>
dependency>

<dependency>
    <groupId>org.springframework.bootgroupId>
    <artifactId>spring-boot-starter-webartifactId>
dependency>

<dependency>
    <groupId>org.springframework.bootgroupId>
    <artifactId>spring-boot-starter-actuatorartifactId>
dependency>

<dependency>
    <groupId>org.springframework.bootgroupId>
    <artifactId>spring-boot-devtoolsartifactId>
    <scope>runtimescope>
    <optional>trueoptional>
dependency>

<dependency>
    <groupId>org.projectlombokgroupId>
    <artifactId>lombokartifactId>
    <optional>trueoptional>
dependency>

<dependency>
    <groupId>org.springframework.bootgroupId>
    <artifactId>spring-boot-starter-testartifactId>
    <scope>testscope>
dependency>

<dependency>
    <groupId>com.itholmes.springcloudgroupId>
    <artifactId>cloud-api-commonsartifactId>
    <version>${project.version}version>
dependency>
第二步:修改application.yml配置文件。
- 服务端配置文件:
server:
  port: 3344
spring:
  application:
    name: cloud-config-center # 微服务名称
  cloud:
    config:
      server:
        git:
          uri: https://gitee.com/lixiaogou/sprincloud-config.git #GitHub上面的git仓库名字
          search-paths: #搜索目录
            - springcloud-config
      label: master #读取分支

# rabbitmq相关配置
rabbitmq:
  host: 127.0.0.1
  password: 0818
  username: admin
  port: 5672

# 服务注册到eureka地址
eureka:
  client:
    service-url:
      defaultZone: http://localhost:7001/eureka

# Rabbitmq相关配置,暴露bus刷新配置的端点
management:
  endpoint: # 暴露bus刷新配置的端点
    web:
      exposure:
        include: 'bus-refresh'
- 客户端配置文件:(bootstrap.yml)
server:
  port: 3355

spring:
  application:
    name: config-client
  cloud:
    # SpringCloud Config 客户端配置
    config:
      label: master # 分支名称
      name: config # 配置文件名称
      profile: dev # 读取后缀名称
      # 上述三个综合: master分支上config-dev.yml的配置文件被读取http://config-3344.com:3344/master/config-dev.yml
      uri: http://localhost:3344 # 配置中心地址

# 服务注册到eureka地址
eureka:
  client:
    service-url:
      defaultZone: http://localhost:7001/eureka

# 暴露监控端点
management:
  endpoints:
    web:
      exposure:
        include: "*"
运维工程师得发布通知公式(刷新顶点通知):
5. SpringCloud Stream 之 消息驱动 介绍
SpringCloud Stream是一个构建消息驱动微服务的框架。
Stream消息驱动的作用:屏蔽底层消息中间件的差异,降低切换成本,统一消息的编程模型。

6. SpringCloud Stream 之 设计思想
通过定义绑定器Binder作为中间层,完美实现应用程序与消息中间件细节之间的隔离。

input对应生产者。
output对应消费者。
Stream中的小心通信方式遵循了发布-订阅模式。
Stream标准流的三个流程:
7. SpringCloud Stream 之 消息驱动 搭建生产者
第一步:创建项目,配置依赖。
- 导入rabbit就导入stream-rabbit;导入kafka就导入stream-kafka。
<dependency>
    <groupId>org.springframework.cloudgroupId>
    <artifactId>spring-cloud-starter-stream-rabbitartifactId>
dependency>


<dependency>
    <groupId>org.springframework.cloudgroupId>
    <artifactId>spring-cloud-starter-netflix-eureka-clientartifactId>
dependency>

<dependency>
    <groupId>org.springframework.bootgroupId>
    <artifactId>spring-boot-starter-webartifactId>
dependency>

<dependency>
    <groupId>org.springframework.bootgroupId>
    <artifactId>spring-boot-starter-actuatorartifactId>
dependency>

<dependency>
    <groupId>org.springframework.bootgroupId>
    <artifactId>spring-boot-devtoolsartifactId>
    <scope>runtimescope>
    <optional>trueoptional>
dependency>

<dependency>
    <groupId>org.projectlombokgroupId>
    <artifactId>lombokartifactId>
    <optional>trueoptional>
dependency>

<dependency>
    <groupId>org.springframework.bootgroupId>
    <artifactId>spring-boot-starter-testartifactId>
    <scope>testscope>
dependency>

<dependency>
    <groupId>com.itholmes.springcloudgroupId>
    <artifactId>cloud-api-commonsartifactId>
    <version>${project.version}version>
dependency>
第二步:配置yml文件。
- 要注意mq是本地还是云服务器。
server:
  port: 8801


# 如果是使用的自己的服务器来配置,则需要修改配置文件,将rabbitmq的配置信息移动到application.yml中的spring节点下
spring:
  application:
    name: cloud-stream-provider
  # 设置云服务器的mq
  rabbitmq:
    host: 150.158.199.52
    port: 5672
    username: "admin"
    password: "0818"
  cloud:
    stream:
      binders: # 在此处配置要绑定的rabbitmq的服务信息;
        defaultRabbit: # 表示定义的名称,用于于binding整合
          type: rabbit # 消息组件类型
      #          environment: # 设置本地rabbitmq的相关的环境配置
      #            spring:
      #              rabbitmq:
      #                host: localhost
      #                port: 5672
      #                username: guest
      #                password: guest
      bindings: # 服务的整合处理
        output: # 这个名字是一个通道的名称
          destination: studyExchange # 表示要使用的Exchange名称定义
          content-type: application/json # 设置消息类型,本次为json,文本则设置“text/plain”
          binder: defaultRabbit  # 设置要绑定的消息服务的具体设置

eureka:
  client: # 客户端进行Eureka注册的配置
    service-url:
      defaultZone: http://localhost:7001/eureka
#  instance:
#    lease-renewal-interval-in-seconds: 2 # 设置心跳的时间间隔(默认是30秒)
#    lease-expiration-duration-in-seconds: 5 # 如果现在超过了5秒的间隔(默认是90秒)
#    instance-id: send-8801.com  # 在信息列表时显示主机名称
#    prefer-ip-address: true     # 访问的路径变为IP地址
第三步:搭建service层。
- 使用注解来配置,发送消息如下一样。
package com.itholmes.springcloud.service.impl;

import com.itholmes.springcloud.service.IMessageProvider;
import org.springframework.cloud.stream.annotation.EnableBinding;
import org.springframework.cloud.stream.messaging.Source;
import org.springframework.messaging.MessageChannel;
import org.springframework.messaging.support.MessageBuilder;

import javax.annotation.Resource;
import java.util.UUID;


/**
 * @author: itholmes
 * @description:
 *      @EnableBinding注解: 指信道channel和exchange绑定在一起。
 *      Source.class的作用定义消息的推送管道。
 * @date: 2022/8/3 22:52
 */
@EnableBinding(Source.class)
public class MessageProviderImpl implements IMessageProvider {

    // 消息发送管道
    @Resource
    private MessageChannel output;

    @Override
    public String send() {
        String serial = UUID.randomUUID().toString();
        output.send(MessageBuilder.withPayload(serial).build());
        System.out.println("*****serial:" + serial);
        return null;
    }

}
第四步:注入controller层。
package com.itholmes.springcloud.controller;

import com.itholmes.springcloud.service.IMessageProvider;
import org.springframework.web.bind.annotation.GetMapping;
import org.springframework.web.bind.annotation.RestController;

import javax.annotation.Resource;

/**
 * @author: itholmes
 * @description: TODO
 * @date: 2022/8/3 23:02
 */
@RestController
public class SendMessageController {

	//直接注入进来就可以
    @Resource
    private IMessageProvider messageProvider;

    @GetMapping(value = "/sendMessage")
    public String sendMessage(){
        return messageProvider.send();
    }

}
8. SpringCloud Stream 之 消息驱动 搭建消费者
第一步:创建项目,导入依赖。
<dependency>
    <groupId>org.springframework.cloudgroupId>
    <artifactId>spring-cloud-starter-stream-rabbitartifactId>
dependency>


<dependency>
    <groupId>org.springframework.cloudgroupId>
    <artifactId>spring-cloud-starter-netflix-eureka-clientartifactId>
dependency>

<dependency>
    <groupId>org.springframework.bootgroupId>
    <artifactId>spring-boot-starter-webartifactId>
dependency>

<dependency>
    <groupId>org.springframework.bootgroupId>
    <artifactId>spring-boot-starter-actuatorartifactId>
dependency>

<dependency>
    <groupId>org.springframework.bootgroupId>
    <artifactId>spring-boot-devtoolsartifactId>
    <scope>runtimescope>
    <optional>trueoptional>
dependency>

<dependency>
    <groupId>org.projectlombokgroupId>
    <artifactId>lombokartifactId>
    <optional>trueoptional>
dependency>

<dependency>
    <groupId>org.springframework.bootgroupId>
    <artifactId>spring-boot-starter-testartifactId>
    <scope>testscope>
dependency>

<dependency>
    <groupId>com.itholmes.springcloudgroupId>
    <artifactId>cloud-api-commonsartifactId>
    <version>${project.version}version>
dependency>
第二步:配置application.yml文件。
- 与上面不同的是,这里是input接受。
server:
  port: 8802

# 如果是使用的自己的服务器来配置,则需要修改配置文件,将rabbitmq的配置信息移动到application.yml中的spring节点下
spring:
  application:
    name: cloud-stream-provider
  rabbitmq:
    host: 150.158.199.52
    port: 5672
    username: "admin"
    password: "0818"
  cloud:
    stream:
      binders: # 在此处配置要绑定的rabbitmq的服务信息;
        defaultRabbit: # 表示定义的名称,用于于binding整合
          type: rabbit # 消息组件类型
      bindings: # 服务的整合处理
        input: # 这个名字是一个通道的名称 , 这里是接受!!!
          destination: studyExchange # 表示要使用的Exchange名称定义
          content-type: application/json # 设置消息类型,本地为json,文本就是text/plain
          binder: defaultRabbit # 设置要绑定的消息服务的具体设置


# 服务注册到eureka地址
eureka:
  client:
    service-url:
      defaultZone: http://localhost:7001/eureka
  instance:
    lease-renewal-interval-in-seconds: 2 # 设置心跳的时间间隔(默认30秒)
    lease-expiration-duration-in-seconds: 5 # 如果现在超过了5秒间隔(默认90秒)
    instance-id: receive-8802.com # 在信息列表时显示主机名称
    prefer-ip-address: true # 访问的路径变为IP地址
第三步:创建启动类,创建controller层Sink接受。
package com.itholmes.springcloud.controller;

import org.springframework.beans.factory.annotation.Value;
import org.springframework.cloud.stream.annotation.EnableBinding;
import org.springframework.cloud.stream.annotation.StreamListener;
import org.springframework.cloud.stream.messaging.Sink;
import org.springframework.messaging.Message;
import org.springframework.stereotype.Component;

/**
 * @description:
 *      注解:@EnableBinding(Sink.class)的作用
 *            注解@EnableBinding指信道channel和exchange绑定在一起
 *            Sink.class代表接受
 * @date: 2022/8/4 13:26
 *
 */
@Component
@EnableBinding(Sink.class)
public class ReceiveMessageListenerController {

    @Value("${server.port}")
    private String serverPort;

    //监听Sink的INPUT
    @StreamListener(Sink.INPUT)
    public void input(Message<String> message){
        System.out.println("消费者1号,-----》 接受到的消息: " + message.getPayload() + "\t port:" + serverPort);
    }

}
9. SpringCloud Stream 之 多台消费者重复消费的问题
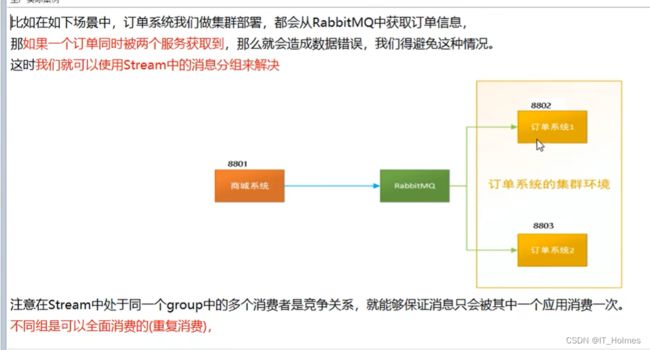
问题场景:就是Stream生产者发送的消息,能够让多台Stream消费者接收到!对于有些场景是不适用的!
通过使用Stream中的消息分组来解决这个问题:
Stream消息分组的特点:
- 不同组是可以全面消费的(重复消费)。
- 同一组内会发生竞争关系,只有其中一个可以消费。
修改Stream分组,通过配置application.yml文件:
- 通过定义group属性(类似加锁的方式来达到效果)。
server:
  port: 8803

# 如果是使用的自己的服务器来配置,则需要修改配置文件,将rabbitmq的配置信息移动到application.yml中的spring节点下
spring:
  application:
    name: cloud-stream-provider
  rabbitmq:
    host: localhost
    port: 5672
    username: "admin"
    password: "0818"
  cloud:
    stream:
      binders: # 在此处配置要绑定的rabbitmq的服务信息;
        defaultRabbit: # 表示定义的名称,用于于binding整合
          type: rabbit # 消息组件类型
      bindings: # 服务的整合处理
        input: # 这个名字是一个通道的名称
          destination: studyExchange # 表示要使用的Exchange名称定义
          content-type: application/json # 设置消息类型,本地为json,文本就是text/plain
          binder: defaultRabbit # 设置要绑定的消息服务的具体设置
          group: itholmesB # 通过修改为同一个组就可以避免重复消费了。


# 服务注册到eureka地址
eureka:
  client:
    service-url:
      defaultZone: http://localhost:7001/eureka
  instance:
    lease-renewal-interval-in-seconds: 2 # 设置心跳的时间间隔(默认30秒)
    lease-expiration-duration-in-seconds: 5 # 如果现在超过了5秒间隔(默认90秒)
    instance-id: receive-8803.com # 在信息列表时显示主机名称
    prefer-ip-address: true # 访问的路径变为IP地址
group设置为一样的微服务,接收到消息就会被加锁,这个组里面只有一个微服务能消费。
10. SpringCloud Stream 之 消息持久化
同上,设置了group分组的消息是持久化的,微服务停机了,重新启动也是能接受到消息的。
没有配置group分组的消息不是持久化的,微服务停机了,停机期间的消息不会再被微服务接收到了。

10. SpringCloud Sleuth 之 分布式请求链路跟踪
随着业务的发展,单体架构变为微服务架构,并且系统规模也变得越来越大,各微服务间的调用关系也变得越来越复杂。在微服务的应用中,一个由客户端发起的请求在后端系统中会经过多个不同的微服务调用来协同产生最后的请求结果,每一个前端请求都会形成一条复杂的分布式服务调用链路,链路中的任何一环出现高延时或错误都会引起整个请求最后的失败。
一句话总结:sleuth可以解决分布式系统的追踪问题。
Spring Cloud Sleuth 提供了一套完整的服务跟踪的解决方案。
11. SpringCloud Sleuth 之 zipkin搭建安装
SpringCloud从F版起已经不需要自己构建Zipkin Server了,只需要调用jar包即可。
第一步:zipkin server的jar包下载:https://repo1.maven.org/maven2/io/zipkin/java/zipkin-server/2.12.9/zipkin-server-2.12.9-exec.jar
这样zipkin就启动成功了。
链路追踪的原理流程:
11. SpringCloud Sleuth 之 链路监控展现
第一步:导入sleuth + zipkin。
<dependency>
    <groupId>org.springframework.cloudgroupId>
    <artifactId>spring-cloud-starter-zipkinartifactId>
dependency>
第二步:application.yml的配置。
server:
  port: 8801


# 如果是使用的自己的服务器来配置,则需要修改配置文件,将rabbitmq的配置信息移动到application.yml中的spring节点下
spring:
  application:
    name: cloud-stream-provider
  # zipkin的相关配置
  zipkin:
    base-url: http://localhost:9411
  sleuth:
    sampler:
      # 采样率介于0到1之间,1则表示全部采集。
      probability: 1


