SpringBoot2.3.1+MyBais+MyBatis分页插件+Oracle、Mysql多数据源+Log4j2
一、使用Idea创建SpringInitializr项目,Pom.xml配置如下:
"1.0" encoding="UTF-8"?>
"http://maven.apache.org/POM/4.0.0" xmlns:xsi="http://www.w3.org/2001/XMLSchema-instance"
         xsi:schemaLocation="http://maven.apache.org/POM/4.0.0 https://maven.apache.org/xsd/maven-4.0.0.xsd">
    4.0.0</modelVersion>

        org.springframework.boot</groupId>
        spring-boot-starter-parent</artifactId>
        2.3.1.RELEASE</version>
        /> <!-- lookup parent from repository -->
    </parent>
    com.byky</groupId>
    sendmessage</artifactId>
    0.0.1-SNAPSHOT</version>
    war</packaging>
    sendmessage</name>
    发送门店pos消费消息</description>


        .version>1.8</java.version>
    </properties>


            org.springframework.boot</groupId>
            spring-boot-starter-data-redis</artifactId>


                    spring-boot-starter-logging</artifactId>
                    org.springframework.boot</groupId>
                </exclusion>
            </exclusions>
        </dependency>

            org.apache.commons</groupId>
            commons-pool2</artifactId>
        </dependency>
        <!-- 需要单独添加thymeleaf的布局模块 -->

            nz.net.ultraq.thymeleaf</groupId>
            thymeleaf-layout-dialect</artifactId>
        </dependency>

            org.springframework.boot</groupId>
            spring-boot-starter-thymeleaf</artifactId>


                    spring-boot-starter-logging</artifactId>
                    org.springframework.boot</groupId>
                </exclusion>
            </exclusions>
        </dependency>

            org.springframework.boot</groupId>
            spring-boot-starter-web</artifactId>


                    org.springframework.boot</groupId>
                    spring-boot-starter-tomcat</artifactId>
                </exclusion>
            </exclusions>
        </dependency>

            org.mybatis.spring.boot</groupId>
            mybatis-spring-boot-starter</artifactId>
            2.1.3</version>


                    spring-boot-starter-logging</artifactId>
                    org.springframework.boot</groupId>
                </exclusion>
            </exclusions>
        </dependency>


            org.springframework.boot</groupId>
            spring-boot-devtools</artifactId>
            runtime</scope>
            true</optional>
        </dependency>

            com.oracle.ojdbc</groupId>
            ojdbc8</artifactId>
            runtime</scope>
        </dependency>

            mysql</groupId>
            mysql-connector-java</artifactId>
            runtime</scope>
        </dependency>

            org.springframework.boot</groupId>
            spring-boot-starter-tomcat</artifactId>
            provided</scope>
        </dependency>

            org.springframework.boot</groupId>
            spring-boot-starter-test</artifactId>
            test</scope>


                    org.junit.vintage</groupId>
                    junit-vintage-engine</artifactId>
                </exclusion>
            </exclusions>
        </dependency>

            org.springframework.boot</groupId>
            spring-boot-starter-log4j2</artifactId>
        </dependency>

            org.mybatis.generator</groupId>
            mybatis-generator-core</artifactId>
            1.4.0</version>
        </dependency>
        <!--分页插件-->

            com.github.pagehelper</groupId>
            pagehelper</artifactId>
            5.1.11</version>
        </dependency>

            net.sf.json-lib</groupId>
            json-lib</artifactId>
            2.4</version>
            jdk15</classifier>
        </dependency>

            javax.servlet</groupId>
            javax.servlet-api</artifactId>
            4.0.1</version>
        </dependency>
        <!-- 用于解决: uncategorized SQLException; SQL state [99999]; error code [17056]; 不支持的字符集 (在类路径中添加 orai18n.jar): ZHS16GBK; nested exception is java.sql.SQLException: 不支持的字符集 (在类路径中添加 orai18n.jar): ZHS16GBK] with root cause java.sql.SQLException: 不支持的字符集 (在类路径中添加 orai18n.jar): ZHS16GBK -->

            cn.easyproject</groupId>
            orai18n</artifactId>
            12.1.0.2.0</version>
        </dependency>
    </dependencies>


                org.springframework.boot</groupId>
                spring-boot-maven-plugin</artifactId>
            </plugin>
            <!--mybatis逆向工程maven插件-->

                org.mybatis.generator</groupId>
                mybatis-generator-maven-plugin</artifactId>
                1.4.0</version>

                    <!--允许移动生成的文件-->
                    true</verbose>
                    <!--允许覆盖生成的文件-->
                    true</overwrite>
                    <!--配置文件的路径 默认resources目录下-->
                    src/main/resources/generatorConfig.xml</configurationFile>
                </configuration>
                <!--插件依赖的jar包-->


                        com.oracle.ojdbc</groupId>
                        ojdbc8</artifactId>
                        19.3.0.0</version>
                    </dependency>

                        cn.easyproject</groupId>
                        orai18n</artifactId>
                        12.1.0.2.0</version>
                    </dependency>
                </dependencies>
            </plugin>
        </plugins>
    </build>

</project>
打包方式选择的是War方式,所以在web的依赖中排除tomcat依赖,代码如下:
            org.springframework.boot</groupId>
            spring-boot-starter-web</artifactId>


                    org.springframework.boot</groupId>
                    spring-boot-starter-tomcat</artifactId>
                </exclusion>
            </exclusions>
        </dependency>
tomcat的编译方式选择provided,只在编译和测试时使用,打包时不发布,因为启动时使用的war发布到Tomcat容器。
二、排除SpringBoot2.3.1默认使用的日志依赖。改为Log4j2日志系统
1、在pom.xml文件中引入log4j2的依赖,上步中已经引入了,此处摘选出代码片段
            org.springframework.boot</groupId>
            spring-boot-starter-log4j2</artifactId>
        </dependency>
2、在idea中打开依赖关系图,方式如下
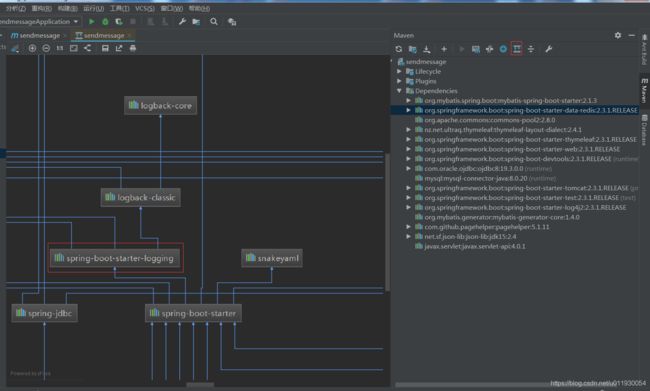 图中小红框时如何打开图中右侧依赖关系图的按钮,图中左侧大红框所选的spring-boot-starter-logging它依赖于logback-classic,logback是springboot2.X的默认日志实现,所以这里点击红框所选的spring-boot-starter-logging,然后右击点击排除,图下图
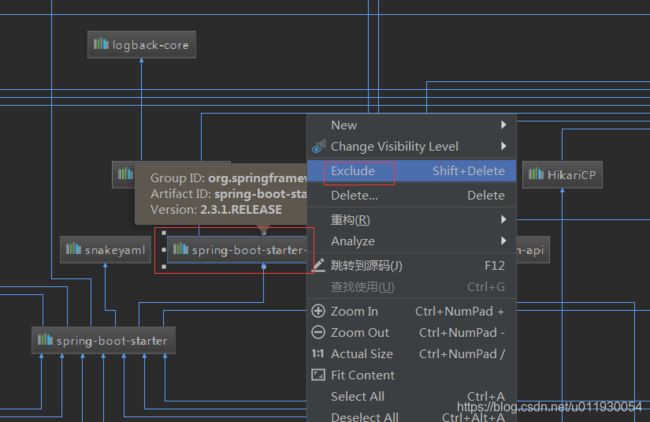 此时就排除了默认使用的logback日志包了,具体排除后一些包中排除效果在pom.xml中是这样的
            org.mybatis.spring.boot</groupId>
            mybatis-spring-boot-starter</artifactId>
            2.1.3</version>


                    spring-boot-starter-logging</artifactId>
                    org.springframework.boot</groupId>
                </exclusion>
            </exclusions>
        </dependency>
            org.springframework.boot</groupId>
            spring-boot-starter-thymeleaf</artifactId>


                    spring-boot-starter-logging</artifactId>
                    org.springframework.boot</groupId>
                </exclusion>
            </exclusions>
        </dependency>
如果按照上面步骤排除后,运行时报错提示slf4j等日志重复就说明没有排除干净,按照上面步骤在依赖引用图中再次查找spring-boot-starter-logging,找到后右键排除。只要报日志重复错误就需要排除一次。
到此,日志系统已经改成log4j2,下面需要将log4j2的配置文件放置到资源文件夹中。
三、引入MyBatis分页插件及代码生成器
pom.xml中增加两个依赖,一个是分页插件,一个是代码生成器
            org.mybatis.generator</groupId>
            mybatis-generator-core</artifactId>
            1.4.0</version>
        </dependency>
        <!--分页插件-->

            com.github.pagehelper</groupId>
            pagehelper</artifactId>
            5.1.11</version>
        </dependency>
在Pom.xml中中添加代码生成器插件,代码如下
                org.springframework.boot</groupId>
                spring-boot-maven-plugin</artifactId>
            </plugin>
            <!--mybatis逆向工程maven插件-->

                org.mybatis.generator</groupId>
                mybatis-generator-maven-plugin</artifactId>
                1.4.0</version>

                    <!--允许移动生成的文件-->
                    true</verbose>
                    <!--允许覆盖生成的文件-->
                    true</overwrite>
                    <!--配置文件的路径 默认resources目录下-->
                    src/main/resources/generatorConfig.xml</configurationFile>
                </configuration>
                <!--插件依赖的jar包-->


                        com.oracle.ojdbc</groupId>
                        ojdbc8</artifactId>
                        19.3.0.0</version>
                    </dependency>

                        cn.easyproject</groupId>
                        orai18n</artifactId>
                        12.1.0.2.0</version>
                    </dependency>
                </dependencies>
            </plugin>
        </plugins>
    </build>
注意下面这个插件是代码生成器,生成器插件中需要依赖数据库驱动包。
另外需要加入orai18n依赖解决" 不支持的字符集 (在类路径中添加 orai18n.jar): ZHS16GBK"报错。
添加后,将代码生成器配置文件generatorConfig.xml放在资源文件夹中,配置文件代码如下:
"1.0" encoding="UTF-8"?>
<!DOCTYPE generatorConfiguration
PUBLIC "-//mybatis.org//DTD MyBatis Generator Configuration 1.0//EN"
"http://mybatis.org/dtd/mybatis-generator-config_1_0.dtd">
<!--
targetRuntime="MyBatis3", 生成 Example相关类及方法
targetRuntime="MyBatis3Simple",不生成 Example相关类及方法
-->
"MysqlTables" targetRuntime="MyBatis3">
<!-- 指定生成 Mapper 的继承模板 -->
<!--type="tk.mybatis.mapper.generator.MapperPlugin">
"mappers" value="" />
</plugin>-->
<!-- 生成 JavaBean 对象重写 toString方法 -->
type="org.mybatis.generator.plugins.ToStringPlugin" />
<!-- 生成 JavaBean 对象继承 Serializable 类 -->
type="org.mybatis.generator.plugins.SerializablePlugin" />
<!-- 生成 JavaBean 对象重写 equals 和 hashCode 方法 -->
<!--type="org.mybatis.generator.plugins.EqualsHashCodePlugin" />-->
"suppressDate" value="true"/>
<!-- 是否去除自动生成的注释 true:是 : false:否 -->
"suppressAllComments" value="true"/>
</commentGenerator>
<!--数据库链接URL,用户名、密码 -->
"com.mysql.cj.jdbc.Driver"
connectionURL="jdbc:mysql://192.168.1.110:3306/lovemall?useSSL=false&useUnicode=true&characterEncoding=utf8&autoReconnect=true&rewriteBatchedStatements=TRUE&serverTimezone=UTC"
userId="root"
password="abc7048461">
</jdbcConnection>
<!-- 默认false,把JDBC DECIMAL 和 NUMERIC 类型解析为 Integer,为 true时把JDBC DECIMAL 和
NUMERIC 类型解析为java.math.BigDecimal -->
"forceBigDecimals" value="true"/>
</javaTypeResolver>
<!-- 生成模型的包名和位置-->
"com.example.testboot.repository" targetProject="src/main/java">
"enableSubPackages" value="true"/>
"trimStrings" value="true"/>
</javaModelGenerator>
<!-- 生成映射文件的包名和位置-->
"com.dao" targetProject="src/main/resources">
"enableSubPackages" value="true"/>
</sqlMapGenerator>
<!--
生成DAO的包名和位置
type="ANNOTATEDMAPPER", 生成Java Model 和基于注解的Mapper对象
type="MIXEDMAPPER", 生成基于注解的Java Model 和相应的Mapper对象
type="XMLMAPPER", 生成SQLMap XML文件和独立的Mapper接口
-->
type="ANNOTATEDMAPPER" targetPackage="com.example.testboot.dao" targetProject="src/main/java">
"enableSubPackages" value="true"/>
</javaClientGenerator>
<!-- 要生成的表 tableName是数据库中的表名或视图名 domainObjectName是实体类名-->
"c_customer" domainObjectName="Customer">
<!--"id" sqlStatement="JDBC" identity="true"/>-->
<!-- Mysql 配置 -->
"sys_Id" sqlStatement="Mysql" identity="true" />
<!-- Oracle 配置 -->
<!-- "id" sqlStatement="select SEQ_{1}.nextval from dual" identity="false" type="pre"/> -->
</table>
<!--"person" domainObjectName="Person"
enableCountByExample="false" enableUpdateByExample="false"
enableDeleteByExample="false" enableSelectByExample="false"
selectByExampleQueryId="false">
</table>-->
</context>
</generatorConfiguration>
注意里面的一些参数需要修改,比如数据库连接地址,账户密码,生成文件存放位置等。
然后配置要生成表的信息:
"c_customer" domainObjectName="Customer">
<!--"id" sqlStatement="JDBC" identity="true"/>-->
<!-- Mysql 配置 -->
"sys_Id" sqlStatement="Mysql" identity="true" />
<!-- Oracle 配置 -->
<!-- "id" sqlStatement="select SEQ_{1}.nextval from dual" identity="false" type="pre"/> -->
</table>
配置后,在Maven的Plugins中选择代码生成器插件双击生成文件即可。
 四、SpringBoot2.3 配置MyBatis
1、配置application.properties中两个数据源的属性
# 开启模板缓存(默认值:true)
spring.thymeleaf.cache=false
# 最大上传文件及最大请求文件大小
spring.servlet.multipart.max-file-size=10MB
spring.servlet.multipart.max-request-size=10MB
# 多数据源连接池配置
app.datasource.first.driver-class-name=oracle.jdbc.driver.OracleDriver
app.datasource.first.jdbc-url=jdbc:oracle:thin:@192.168.2.143:1521:testdb
app.datasource.first.username=sa
app.datasource.first.password=abc123456
app.datasource.first.type=com.zaxxer.hikari.HikariDataSource
app.datasource.first.hikari.minimum-idle=5
app.datasource.first.hikari.maximum-pool-size=500
app.datasource.first.hikari.auto-commit=true
app.datasource.first.hikari.idle-timeout=30000
app.datasource.first.hikari.pool-name=DatebookHikariCP1
app.datasource.first.hikari.max-lifetime=1800000
app.datasource.first.hikari.connection-timeout=30000
app.datasource.first.hikari.connection-test-query=SELECT 1
app.datasource.second.driver-class-name=com.mysql.cj.jdbc.Driver
app.datasource.second.jdbc-url=jdbc:mysql://192.168.1.111:3306/love?&serverTimezone=UTC&autoReconnect=true&useUnicode=true&characterEncoding=utf-8&allowMultiQueries=true
app.datasource.second.username=root
app.datasource.second.password=abc777777
app.datasource.second.type=com.zaxxer.hikari.HikariDataSource
app.datasource.second.hikari.minimum-idle=5
app.datasource.second.hikari.maximum-pool-size=500
app.datasource.second.hikari.auto-commit=true
app.datasource.second.hikari.idle-timeout=30000
app.datasource.second.hikari.pool-name=DatebookHikariCP2
app.datasource.second.hikari.max-lifetime=1800000
app.datasource.second.hikari.connection-timeout=30000
app.datasource.second.hikari.connection-test-query=SELECT 1
2、在springboot入口类上进行配置
/**
* @SpringBootApplication开启了组件扫描及自动配置功能,实际上它将三个注解组合在一起
* @Configuration @ComponentScan @EnableAutoConfiguration
* exclude = {DataSourceAutoConfiguration.class}禁止springboot自动注入数据源配置
*/
@SpringBootApplication(exclude = {DataSourceAutoConfiguration.class})
@MapperScan(basePackages="com.byky.sendmessage.mapper",sqlSessionFactoryRef="firstSqlSessionFactory")
public class SendmessageApplication {
public static void main(String[] args) {
SpringApplication.run(SendmessageApplication.class, args);
}
//放置tomcat阻止上传文件过大的代码,具体上传参数在配置文件中设置
@Bean
public TomcatServletWebServerFactory tomcatEmbedded() {
TomcatServletWebServerFactory tomcat = new TomcatServletWebServerFactory();
tomcat.addConnectorCustomizers((TomcatConnectorCustomizer) connector -> {
if ((connector.getProtocolHandler() instanceof AbstractHttp11Protocol<?>)) {
//-1 means unlimited
((AbstractHttp11Protocol<?>) connector.getProtocolHandler()).setMaxSwallowSize(-1);
}
});
return tomcat;
}
}
首先:在@SpringBootApplication排除数据源自动配置类,方便手动配置数据源进行多数据源设置
第二步:在配置类上增加Mybatis的@MapperScan注解,注解中指明mapper类的位置及要引用的SqlSessionFactory Bean的名称(这个bean是需要手动定义的)
@MapperScan(basePackages=“com.byky.sendmessage.mapper”,sqlSessionFactoryRef=“firstSqlSessionFactory”)
第三步:定义Mybatis需要的数据源、SqlSessionFactory、事务管理器等bean。代码如下:
@Configuration
public class MyBatisDataSourceConfig {
/**
* 第一个数据源配置
*/
@Bean(name="firstDataSource")
@ConfigurationProperties(prefix="app.datasource.first")//application.properties文件中前缀配置引用
@Primary//多个数据源时首先注入
public DataSource firstDataSource() {
return DataSourceBuilder.create().build();
}
@Bean(name = "firstSqlSessionFactory")
@Primary
public SqlSessionFactory firstSqlSessionFactory(@Qualifier("firstDataSource") DataSource dataSource) throws Exception {
SqlSessionFactoryBean bean = new SqlSessionFactoryBean();
bean.setDataSource(dataSource);
//mybatis分页插件拦截器配置
Interceptor interceptor = new PageInterceptor();
Properties properties = new Properties();
properties.setProperty("helperDialect", "oracle");
properties.setProperty("offsetAsPageNum", "true");
properties.setProperty("rowBoundsWithCount", "true");
properties.setProperty("reasonable", "true");
properties.setProperty("supportMethodsArguments", "true");
interceptor.setProperties(properties);
bean.setPlugins(new Interceptor[]{interceptor});
//bean.setMapperLocations(new PathMatchingResourcePatternResolver().getResources(MAPPER_LOCATION));
return bean.getObject();
}
@Bean(name = "firstTransactionManager")
@Primary
public DataSourceTransactionManager firstTransactionManager(@Qualifier("firstDataSource") DataSource dataSource) {
return new DataSourceTransactionManager(dataSource);
}
@Bean(name="firstSqlSessionTemplate")
@Primary
public SqlSessionTemplate firstSqlSessionTemplate(@Qualifier("firstSqlSessionFactory") SqlSessionFactory sqlSessionFactory) {
return new SqlSessionTemplate(sqlSessionFactory);
}
/**
* 第二个数据源配置代码,与第一个一样,只不过bean命名上修改及不使用@Primary注解
*/
@Bean(name="secondDataSource")
@ConfigurationProperties(prefix="app.datasource.second")//application.properties文件中前缀配置引用
//@Primary//多个数据源时首先注入
public DataSource secondDataSource() {
return DataSourceBuilder.create().build();
}
@Bean(name = "secondSqlSessionFactory")
// @Primary
public SqlSessionFactory secondSqlSessionFactory(@Qualifier("secondDataSource") DataSource dataSource) throws Exception {
SqlSessionFactoryBean bean = new SqlSessionFactoryBean();
bean.setDataSource(dataSource);
// LogUtils.error(dataSource.getClass().getName());
//mybatis分页插件拦截器配置
Interceptor interceptor = new PageInterceptor();
Properties properties = new Properties();
properties.setProperty("helperDialect", "mysql");
properties.setProperty("offsetAsPageNum", "true");
properties.setProperty("rowBoundsWithCount", "true");
properties.setProperty("reasonable", "true");
properties.setProperty("supportMethodsArguments", "true");
//properties.setProperty("params", "pageNum=pageNumKey;pageSize=pageSizeKey;");
interceptor.setProperties(properties);
bean.setPlugins(new Interceptor[]{interceptor});
return bean.getObject();
}
@Bean(name = "secondTransactionManager")
public DataSourceTransactionManager secondTransactionManager(@Qualifier("secondDataSource") DataSource dataSource) {
return new DataSourceTransactionManager(dataSource);
}
@Bean(name="secondSqlSessionTemplate")
public SqlSessionTemplate secondSqlSessionTemplate(@Qualifier("secondSqlSessionFactory") SqlSessionFactory sqlSessionFactory) {
return new SqlSessionTemplate(sqlSessionFactory);
}
此时一个完整的springboot+mybatis已经配置好了。上面代码中在定义SqlSessionFactory 时,里面增加了一个分页拦截器配置文件,在pom.xml中引入分页依赖后在定义SqlSessionFactory时加入分页拦截器的配置参数后,分页文件就可以直接在mapper中进行定义。
关于分页这里有几点需要记录:
1、分页插件详情请看https://pagehelper.github.io/
2、分页插件需要引入依赖和在SqlSessionFactory定义时配置了拦截器参数
3、使用分页时,可以直接在mapper的具体方法中,增加@Param(“pageNum”) int pageNum,@Param(“pageSize”) int pageSize类型参数,系统会自动分页。
如果是复杂查询,传入的参数是实例类型的,只需要在实例的类中定义 int pageNum, int pageSize属性即可直接实现分页。
你可能感兴趣的:(SpringBoot2.X,mybatis,spring)