原生微信小程序自定义组件以及组件间通讯
文章目录
- 前言
- 一、新建组件
- 二、文件介绍
-
-
- 1.index.json
- 2.index.js
-
- 三、在父组件中引入子组件
- 四、父子组件通讯
-
-
- 属性绑定
- 事件绑定
- 获取组件实例
-
- 总结
前言
当我们在开发项目时,有时候会发现,在不同的页面中会用到相同的功能模块,,此时我们就可以将这些相同的部分提取出来并且单独设为一个"页面",然后在要应用到它的地方引用就可以了, 在vue 、react 等框架中,组件化开发的概念相信大家都很熟悉了,下面我来介绍介绍原生微信小程序如何定义组件,如果有纰漏欢迎大家指正。
一、新建组件
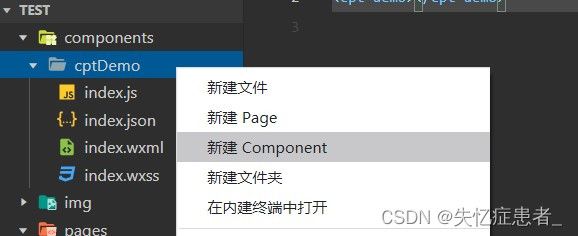
首先在根目录下新建一个 components 文件夹用来盛放我们所有的自定义组件,在文件夹下建立第一个自定义组件 cptDemo

二、文件介绍
以下文件都为 cptDemo 下的文件。
1.index.json
要在自定义组件的 json 中进行自定义组件声明,也就是告诉开发者这是一个组件:
{
  "component": true
}
2.index.js
- data:用于定义组件模板渲染的私有数据;
- methods方法:定义事件处理函数和自定义方法;
- properties属性:用来接受外部数据;
//子组件 wxml
<view>
    {{cliname}}
</view>

//子组件 js
properties:{
    cliname: {
            type:String,
            value: ''
        }
}

//父组件 wxml
<cpt-demo cliname='{{cliname}}'></cpt-demo>

//父组件 js
data:{
    cliname:"传递给子组件的值"
}
- observers:属性监听器,用于监听和响应任何属性和数据字段的变化,从而执行特定的操作
//数据监听器支持监听对象中单个或多个属性的变化
//使用通配符**来监听对象所有属性的变化
    observers:{
        '字段A,字段B':function(字段A的的新值,字段B的新值){
            //do something
        }
    }
- 自定义组件的生命周期 lifetimes
Component({
//新的写法
  lifetimes: {
     created:function(){
      //在组件实例刚刚创建时执行
      //此时不能调用setData
      //只能给组件的this添加一些自定义的属性字段
     },

     ready: function() {
      // 在组件在视图层布局完成后执行
     },

     moved: function() {
      // 在组件实例被移动到节点树另一个位置时执行
    },


    attached: function() {
      // 在组件实例进入页面节点树时执行
      //this.data已经被初始化完毕
      //绝大多数的初始化工作都在这里完成(发送获取初始数据...)
    },

    detached: function() {
      // 在组件实例被从页面节点树移除时执行
      //退出一个页面时,会触发页面内每个自定义组件的detached生命周期函数
      //适合做一些清理工作
    },

    error: function() {
      // 每当组件方法抛出错误时执行
    },

  },
  // 以下是旧式的定义方式,可以保持对 <2.2.3 版本基础库的兼容
  attached: function() {
    // 在组件实例进入页面节点树时执行
  },
  detached: function() {
    // 在组件实例被从页面节点树移除时执行
  },
  // ...
})
- 组件页面的生命周期 pageLifetimes
//当页面发生变化时触发函数
   pageLifetimes:{
       show(){ //页面被展示
           console.log('show');
       },
       hide(){ //页面被隐藏
           console.log('hide');
       },
       resize(){ //页面尺寸发生变化
           console.log('resize');
       }
   }
- 插槽
Component({
    options:{
        //开启多slot支持
        multipleSlots:true
    },
    })
 //自定义组件
 <!--components/test4/test4.wxml-->
<view>test4组件</view>
<slot></slot>
<slot name="m1"></slot>

//使用组件
<test4>
<view>slot</view>
<view slot="m1">m1</view>
</test4>
三、在父组件中引入子组件
在父组件的 json文件中引入,这种方式叫局部引用,全局引用可在 app.js
{
    "usingComponents": {
        "cpt-demo":"/components/cptDemo/index"
    }
}
在父组件wxml文件使用
<cpt-demo></cpt-demo>
四、父子组件通讯
我总结了下面三种组件通讯方式:
- 属性绑定
用于父组件向子组件的指定属性设置数据,仅能设置 JSON 兼容的数据(只能传递数据,不能传递方法) - 事件绑定
用于子组件向父组件传递数据,可以传递任意数据(包括数据和方法) - 获取组件实例
父组件还可以通过 this.selectComponent() 获取子组件实例对象,这样就可以直接访问子组件的任意数据和方法
属性绑定
- 属性绑定用于实现父向子传值,而且只能传递普通类型的数据,无法将方法传递给子组件;
- 实现: 通过父组件向子组件传递数据,子组件通过 properties 接收;
//父组件 .js - 定义要传递的值
 data: {
   count: 0
 }

//父组件 .wxml - 将名为count的值传递給子组件cpt-demo
 <cpt-demo count="{{count}}"></cpt-demo>

//子组件通过 properties 接收父组件传递过来的 count
 properties: {
   count: {
   type:Number
}
 },
事件绑定
-
事件绑定用于实现子向父传值,可以传递任何类型的数据;
-
实现:
在子组件的 js 中,在特定的时机通过调用 this.triggerEvent (‘自定义事件名称’, { 参数对象 }) 产生一个自定义事件,并且可以带上事件参数对象
在父组件的 wxml 中的子组件标签中,使用 bind :自定义事件名称=“事件处理函数” 来监听自定义事件;
在父组件的 js 中,定义一个接收传递自定义事件的函数,并通过 e.detail 获取到子组件传递过来的数据;
子组件 - 在特定的时机通过调用 this.triggerEvent 产生一个自定义事件
// .wxml - 绑定点击事件,每次点击时触发子组件向传递父组件的方法
<button bindtap="sonCount">点我传递</button>
// .js - 定义触发的方法
data: { count: 11 }
methods: {
sonCount(){
// 使用 triggerEvent 来通过定义事件 sync 传递属性值 value
this.triggerEvent('sync', {value: this.data.count} )
}
},
父组件 - 使用 bind :自定义事件名称=“事件处理函数” 监听自定义事件
<test bind:sync="syncCount"></test>
父组件 - 定义一个接收传递自定义事件的函数,并通过 e.detail 获取到子组件传递过来的数据
 syncCount(e) {
     console.log('执行 syncCount', e)

     // 通过 e.detail.value 获取获取子组件传递过来的数据 value
      console.log(e.detail.value) // 11
   },
获取组件实例
- 通过在子组件标签上定义 id或class选择器,并在父组件里调用 this.selectComponent(“标签选择器”) 来获取子组件的实例对象,从而 直接访问子组件的任意数据和方法;
- 实现:定义标签选择器并通过 this.selectComponent(“标签选择器”) 来获取子组件实例对象;
//父组件 wxml 定义子组件的class选择器或id选择器
 <cpt-demo class="son" id="sonID"></cpt-demo>
 <button bindtap="getChild">获取</button>

//父组件 .js
   getChild(){
     // 通过 selectComponent('#sonID') 获取 id 为sonID的实例对象
     const child = this.selectComponent('#sonID');

     // --- 获取到子组件的实例对象,就可以对子组件的属性方法进行操作

     console.log(child); // 查看子组件实例对象
     console.log(child.data.count); // 查看 count 属性
     child.addCount(); // 调用子组件上的方法
   }
