前言
sentry介绍
sentry是国外出的一款异常监控平台,支持市面上大多数的语言和框架。
就 react-native 来说:
- 能自动捕获包括 native 错误和 js 错误。
- 上报的信息包括机型,系统版本号、app版本号、consolex.log 信息、错误栈信息、异常源码位置、commit记录等。
- 功能包括错误信息看板、监控预警、性能监控等。
优点:
- 免费
- 上报信息丰富
缺点:
- 需要科学上网
- 还没有汉化版
接入步骤
创建项目
登录
注册并登录sentry账号。
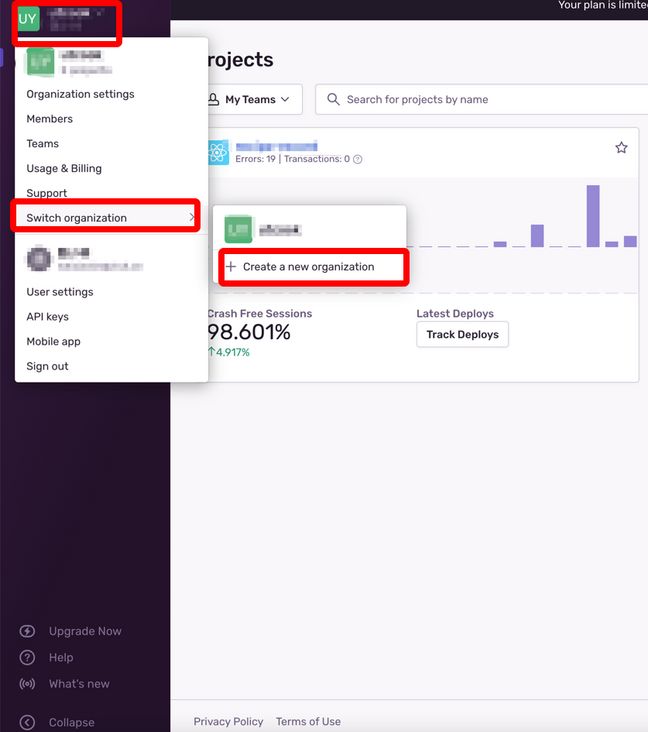
创建组织
点击后输入组织名称,确认即可。我创建了一个叫 test 的组织。
创建项目
选择 react-native,可以修改项目名称和组织,这里我就不改了,点创建项目。
配置sentry
安装
npm install --save @sentry/react-native
# or
yarn add @sentry/react-native
修改原生配置
npx @sentry/wizard -i reactNative -p ios android
# or
yarn sentry-wizard -i reactNative -p ios android

# 上面命令完成后记得更新ios依赖
npx pod-install这个时候,命令行会打开浏览器(如果没打开,手动点击命令行出现的链接),然后你选择一个项目,这里选择test / react-native 项目。代表 test 组织下面的 react-native 项目。
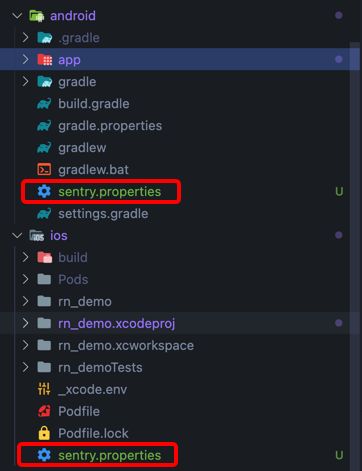
选择完成后会自动配置四个文件(本文编写的时候 sentry 版本为 4.2.4,以后新版本也许会不一样)。
修改内容
iOS 和 android
都多了一个 sentry.properties 文件。
sentry.properties 里面的内容是一样的:
defaults.url=https://sentry.io/
defaults.org=test-5yn
defaults.project=react-native
auth.token=4824f7eb99fc06e55d01ad794dd9743fdxxxxxxxxxxx- url:官网地址
- org:组织名称
- project:项目名称
- token:鉴权令牌
注意,不要试图在 sentry.properties 文件加注释,不然上传sourcemap的时候会报错,上传的时候会用到 url 参数。
android
android还修改了android/app/build.gradle文件。
iOS
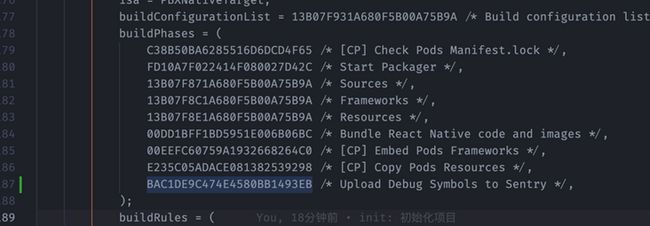
ios修改了 ios/rn_demo.xcodeproj/project.pbxproj 文件。
其中加入了一个构建阶段任务。任务内容大概就是打包的时候上传一些内容到sentry平台,方便定位异常。估计是为了定位 native 异常。
然后还改了一下 react-native 原来的打包任务:
这里格式化一下脚本内容:
原脚本
set -e

WITH_ENVIRONMENT="../node_modules/react-native/scripts/xcode/with-environment.sh"
REACT_NATIVE_XCODE="../node_modules/react-native/scripts/react-native-xcode.sh"

/bin/sh -c "$WITH_ENVIRONMENT $REACT_NATIVE_XCODE"
修改后的脚本
export SENTRY_PROPERTIES=sentry.properties
export EXTRA_PACKAGER_ARGS="--sourcemap-output $DERIVED_FILE_DIR/main.jsbundle.map"
set -e

WITH_ENVIRONMENT="../node_modules/react-native/scripts/xcode/with-environment.sh"
../node_modules/@sentry/cli/bin/sentry-cli react-native xcode REACT_NATIVE_XCODE="../node_modules/react-native/scripts/react-native-xcode.sh"

/bin/sh -c "$WITH_ENVIRONMENT $REACT_NATIVE_XCODE"
大概变化就是加一个 sentry 的 cli 命令,然后上传 sourcemap 便于定位 js 异常位置。
初始化SDK
import * as Sentry from '@sentry/react-native';

Sentry.init({
  dsn: 'https://[email protected]/6692866', // 这里替换成你项目的dsn
  tracesSampleRate: 1.0, // 上传异常的比例,1.0代表百分之百上传
});
包裹你的App
修改 App.tsx :
export default Sentry.wrap(App);验证
js错误
throw new Error("My first Sentry error!");在后台查看:
native错误
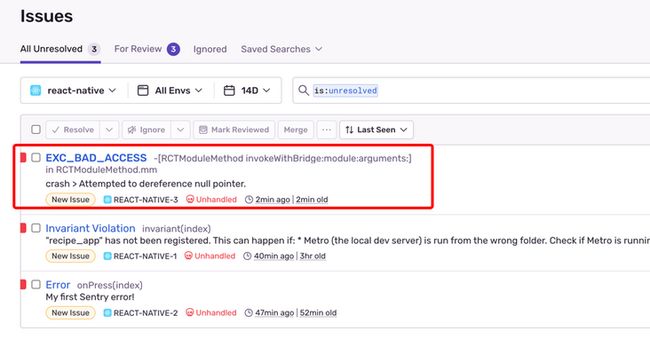
Sentry.nativeCrash();在后台查看:
踩坑记录
error: No such file or directory (os error 2)
新版本rn会出现下列问题,版本>0.69的。
解决方案
需要手动修改一下打包脚本,将下列代码复制到图片所示的地方:
set -e
export SENTRY_PROPERTIES=sentry.properties
export EXTRA_PACKAGER_ARGS="--sourcemap-output $DERIVED_FILE_DIR/main.jsbundle.map"
WITH_ENVIRONMENT="../node_modules/react-native/scripts/xcode/with-environment.sh"
REACT_NATIVE_XCODE="../node_modules/react-native/scripts/react-native-xcode.sh"
SENTRY_CLI_PATH="../node_modules/@sentry/cli/bin/sentry-cli"
/bin/sh -c "$WITH_ENVIRONMENT \"$SENTRY_CLI_PATH react-native xcode $REACT_NATIVE_XCODE\""
env: node: No such file or directory
如果使用nvm管理node,运行时会出现下列问题:
解决方案
创建一个node的软连接:
ln -s $(which node) /usr/local/bin/node后记
对于被墙的问题,可以考虑私有化部署,详情可以查看:https://github.com/getsentry/...。
参考:sentry官方文档


