vue3.0项目实战 - ElementUI框架版
系列文章目录
第一章
论vue3.0和vue2.0区别之编程方式及例子详解
第二章
同一台电脑 实现 vue-cli2和vue-cli3同时并存 及 常见命令
第三章
vue3.0项目实战 - ElementUI框架版
第四章
【TypeScript】在vue3中遇到的问题及解决方案,未完待续
第五章
vue3.0项目实战系列文章 - 登录页面
第六章
vue3.0项目实战系列文章 - 使用周期函数
目录
系列文章目录
项目实战
1.Vue运行环境安装,为什么需要安装运行环境
2.npm镜像安装
3.VueCli脚手架安装
4.Vue-Cli基础
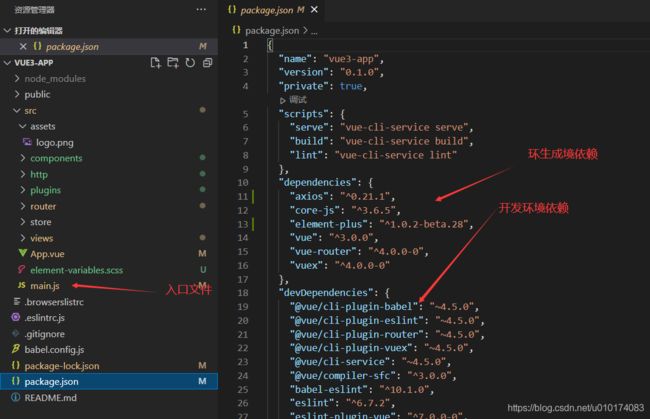
5.使用Vue-Cli构建Vue3项目
编辑
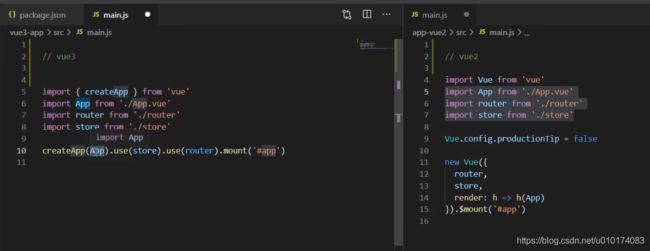
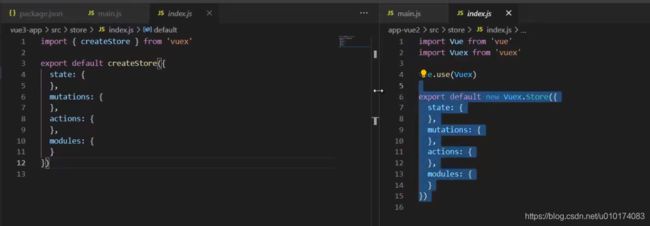
6.Vue3与Vue2 main.js对比
7.Vue3生命周期变化
编辑 编辑
8.ref,reactive响应式api
9.引入http请求框架axios +封装
10.Vue路由
11.Vue3 vs Vue2
12.父子组件相互调用
13. setup函数
14.ts
框架配置
1.vite.config.js
ElementUI
1、使用element-plus框架
2、安装:
3、引用:
4、首页布局实现 - 参考Element官网
5、开发疑问+解答
项目实战
1.Vue运行环境安装,为什么需要安装运行环境
预装环境 :node v8+ (Vue3需要node 版本8以上)
为什么需要运行环境? VUE项目==文件类型是.vue他是需要被编译成.js文件,才可以被浏览器识别 安装复杂度
安装node环境 下载 | Node.js 中文网 http://nodejs.cn/download/
查看node版本: node –v
2.npm镜像安装
3.VueCli脚手架安装
4.Vue-Cli基础
Vue CLI 和 Vue的区别
脚手架是一个基于 Vue.js 进行快速开发的完整系统,通过@vue/cli 实现快速搭建标准化项目的脚手架
Vue的版本和VueCLI的版本的关系
Vue版本不受脚手架版本的影响 使用VueCLI构建项目过程,可以根据需求选择相应版本的Vue
查看VueCLI版本号: vue -v
5.使用Vue-Cli构建Vue3项目
详见博主文章
同一台电脑 实现 vue-cli2和vue-cli3同时并存 及 常见命令 未完待续。。。_BMG-Princess的博客-CSDN博客
6.Vue3与Vue2 main.js对比

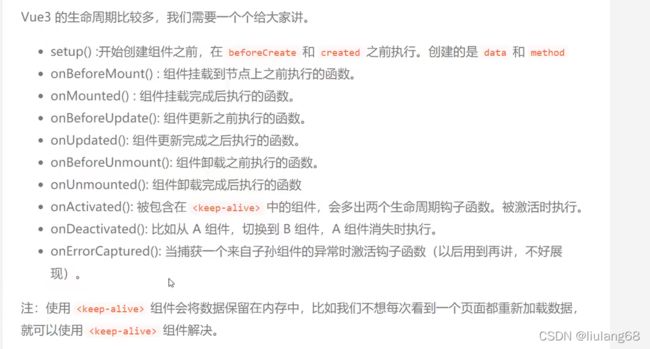
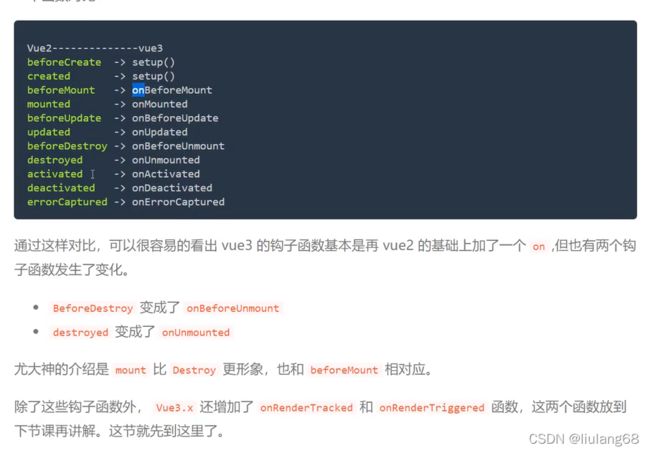
7.Vue3生命周期变化
与 2.x 版本生命周期相对应的组合式 API
1.beforeCreate -> 使用 setup()
2.created -> 使用 setup()
3.beforeMount -> onBeforeMount
4.mounted -> onMounted
5.beforeUpdate -> onBeforeUpdate
6.updated -> onUpdated
7.beforeDestroy -> onBeforeUnmount
8.destroyed -> onUnmounted
9.errorCaptured -> onErrorCaptured
onRenderTracked 检查依赖被追踪。当render函数被调用时,会检查哪个响应式数据被收集依赖 onRenderTriggered 当执行update操作时,会检查哪个响应式数据导致组件重新渲染。
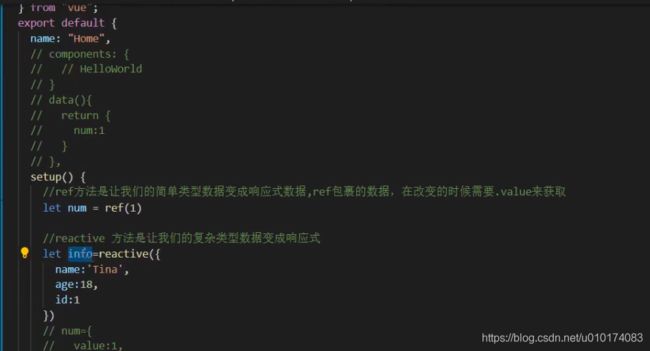
8.ref,reactive响应式api
reactive与ref
被响应式api标记过的数据才可以成为响应式数据
ref--用来标记简单类型数据
reactive—标记复杂类型数据(深度响应式)
如果用ref对象/数组, 会自动将对象/数组转换为reactive的代理对象
ref的数据操作: 在js中要.value, 在模板中不需要(内部解析会自动添加.value)
9.引入http请求框架axios +封装
http.js说明
export function 可导出多个 ;此例只导出post;;后续补充get...
import axios from 'axios'
// import router from '@/router'
// import qs from "qs"
import { ElMessage } from 'element-plus'

//响应拦截器
axios.interceptors.response.use(
  response => {
    return response
  },
  error => {
    if (error.response) {
      switch (error.response.status) {
        // 401: 未登录
        // 只有在当前路由不是登录页面才跳转
        case 401:
          router.replace({
            path: '/',
          });
          break;
          // 403 token过期
          // 清除本地token
          // 跳转登录页面
        case 403:
          ElMessage.error('登录过期,请重新登录')
          router.replace({
            path: '/',
          });
          break;
          // 404请求不存在
        case 404:
          ElMessage.error('网络请求不存在')
          // router.replace({
          //   path: '/',
          // });
          break;
          // 其他错误,直接抛出错误提示
        default:
          ElMessage.error(error.response.data.message)
      }
    }
  })
//post
export function post(url, params) {
      return new Promise((resolve, reject) => {
        axios({
            url: url,
            method: 'post',
            data: params,
            timeout: 1000 * 60,
            headers: {
              'Content-Type': 'application/json;charset=utf-8',
              // 'token': Dcookie.getCookie('token'),
            }
          })
          .then(res => {
            if (res.data.code == 1000) {
              ElMessage.error(res.data.msg)
            //   localStorage.clear();
            //   Dcookie.setCookie('token', '', -1, '/', 'derunht.cn')
            //   router.push({
            //     path: "/"
            //   });
            } else {
              resolve(res.data);
            }
          })
          .catch(err => {
            reject(err)
          });
      });
  }
api.js说明
//接口统一管理
import { post } from './http.js'

//角色列表
export const roleList = params => post('/power-dev/role/water/list', params);
10.Vue路由
import { createRouter, createWebHashHistory } from 'vue-router'
import Home from '../views/Home.vue'
import Login from '../views/login.vue'

const routes = [
  {
    path: '/Home',
    name: 'Home',
    component: Home,
    meta:{
      isShow:false,
    },
    children:[
      {
        path: '/courseList',
        name: 'CourseListin',
        meta:{
          isShow:true,
          title:'课程列表'
        },
        component: () => import(/* webpackChunkName: "login" */ '../views/courseList.vue')
      },
      {
        path: '/teacherList',
        name: 'TeacherList',
        meta:{
          isShow:true,
          title:'讲师列表'
        },
        component: () => import(/* webpackChunkName: "login" */ '../views/teacherList.vue')
      },
      {
        path: '/personal',
        name: 'Personal',
        meta:{
          isShow:true,
          title:'个人中心'
        },
        component: () => import(/* webpackChunkName: "login" */ '../views/personal.vue')
      }
    ]
  },
  {
    path: '/',
    name: 'Login',
    component: Login,
    meta:{
      isShow:false,
    }
  },

]

const router = createRouter({
  history: createWebHashHistory(),
  routes
})

export default router
11.Vue3 vs Vue2
12.父子组件相互调用
子组件调用父组件方法2 父组件不变,子组件 2.父组件调用子组件方法 父组件 子组件 3.父子组件相互调用-合并代码 父组件 子组件
子组件 setup是compositon Api在Vue3中的入口 beforeCreate和created会在setup中执行 无法使用this拿到当前组件的相关数据 setup只能同步执行,不可以异步。 因为使用了ts语法,所以写明 index 为 number 类型。 将文件夹vite.config.js修改为以下,直接复制粘贴即可,跨域地址自行修改 官方组件库: Button 按钮 | Element Plus (gitee.io) 更新到最新版本 我引入的element-plus版本是^2.2.13;vue ^3.2.36 新版本引入,main.js文件(引入中文+图标+css样式) vue3.0项目实战系列文章 - 登录页面 这里引入上传的资源,等待整理ing... TypeScript + vue3.0项目实战中遇到的问题及解决方案const addItemShow = () => {}13. setup函数
setup(){
  const list = ref(["1","2","3"]);
  const aa = ref('');
  //index: boolean
  //index: string[]
  //index:number
  const selectClick=(index:number)=>{
    aa.value = list.value[index]
  }
}
框架配置
1.vite.config.js
// 使用 vite 创建项目完成后会自动生成 一个 vite.config.js 代码如下
import {
    defineConfig
} from 'vite' // 帮手函数,这样不用 jsdoc 注解也可以获取类型提示
import vue from '@vitejs/plugin-vue'
const {
    resolve
} = require('path')

export default defineConfig({
    plugins: [ //配置需要使用的插件列表
        vue()
    ],
    // 强制预构建插件包
    optimizeDeps: {
        //检测需要预构建的依赖项
        entries: [],
        //默认情况下,不在 node_modules 中的,链接的包不会预构建
        include: ['schart.js', 'axios'],
        exclude: ['your-package-name'] //排除在优化之外
    },
    //静态资源服务的文件夹
    publicDir: "public",
    base: './',// 设置打包路径
    //静态资源处理
    assetsInclude: "",
    //控制台输出的级别 info 、warn、error、silent
    logLevel: "info",
    // 设为false 可以避免 vite 清屏而错过在终端中打印某些关键信息
    clearScreen: false,
    resolve: {
        alias: [ //配置别名
            {
                find: '@',
                replacement: resolve(__dirname, 'src')// 设置 `@` 指向 `src` 目录
            }
        ],
        // 情景导出 package.json 配置中的exports字段
        conditions: [],
        // 导入时想要省略的扩展名列表
        // 不建议使用 .vue 影响IDE和类型支持
        extensions: ['.mjs', '.js', '.ts', '.jsx', '.tsx', '.json']
    },
    css: {
        devSourcemap: true,
        // 配置 css modules 的行为
        modules: {},
        // postCss 配置
        postcss: {},
        //指定传递给 css 预处理器的选项
        preprocessorOptions: {
            scss: {
                additionalData: `$injectedColor:orange;`
            }
        }
    },
    json: {
        //是否支持从 .json 文件中进行按名导入
        namedExports: true,
        //若设置为 true 导入的json会被转为 export default JSON.parse("..") 会比转译成对象字面量性能更好
        stringify: false
    },
    //继承自 esbuild 转换选项,最常见的用例是自定义 JSX
    esbuild: {
        jsxFactory: "h",
        jsxFragment: "Fragment",
        jsxInject: `import Vue from 'vue'`
    },
    //本地运行配置,以及反向代理配置
    server: {
        overlay: {
            warning: false,
            err: false
        },
        hot: true,
        hotOnly: true, // 是否热更新
        host: 'localhost',
        port: 8080,
        autoOpenBrowser: false, //是否自动打开浏览器
        errorOverlay: true,
        notifyOnErrors: true,
        poll: false,
        devtool: 'cheap-module-eval-source-map',
        cacheBusting: true,
        cssSourceMap: true,
        // 反向代理配置
        proxy: {
            //告诉node, 我接口只要是'/power-dev'开头的才用代理
            '/power-dev': {
                target: 'http://backstage***.backs**ge-vue',
                changeOrigin: true, //是否允许跨域
                // secure: true,   //是否https接口
                logLevel: 'debug',
                pathRewrite: {
                    //'^/power-dev': ''的含义是将路径中/power-dev替换成空
                    '^/power-dev': '/power-dev'
                }
            },
        },
        disableHostCheck: true
    },
    //打包配置
    build: {
        //浏览器兼容性  "esnext"|"modules"
        target: "modules",
        //指定输出路径
        outDir: "dist",
        //生成静态资源的存放路径
        assetsDir: "assets",
        //小于此阈值的导入或引用资源将内联为 base64 编码,以避免额外的 http 请求。设置为 0 可以完全禁用此项
        assetsInlineLimit: 4096,
        //启用/禁用 CSS 代码拆分
        cssCodeSplit: true,
        //构建后是否生成 source map 文件
        sourcemap: false,
        //自定义底层的 Rollup 打包配置
        rollupOptions: {},
        //@rollup/plugin-commonjs 插件的选项
        commonjsOptions: {},
        //构建的库
        lib: {},
        //当设置为 true,构建后将会生成 manifest.json 文件
        manifest: false,
        // 设置为 false 可以禁用最小化混淆,
        // 或是用来指定使用哪种混淆器
        // boolean | 'terser' | 'esbuild'
        minify: "terser", //terser 构建后文件体积更小
        //传递给 Terser 的更多 minify 选项。
        terserOptions: {},
        //设置为 false 来禁用将构建后的文件写入磁盘
        write: true,
        //默认情况下,若 outDir 在 root 目录下,则 Vite 会在构建时清空该目录。
        emptyOutDir: true,
        //启用/禁用 brotli 压缩大小报告
        brotliSize: true,
        //chunk 大小警告的限制
        chunkSizeWarningLimit: 500
    },
    ssr: {
        // 列出的是要为 SSR 强制外部化的依赖
        external: [],
        //列出的是防止被 SSR 外部化依赖项
        noExternal: []
    }
})
ElementUI
1、使用element-plus框架
2、安装:
npm install element-plusnpm install element-plus --save3、引用:
import {
    createApp
} from 'vue'
import App from './App.vue'
import router from './router'
import store from './store'

/* 优先放前面 */
// import "./assets/css/elementUi.css";
import "./assets/css/public.css";
import "./assets/css/color-dark.css";

// 全局引用
import ElementPlus from 'element-plus';
// 引用所有样式
import 'element-plus/dist/index.css';
// 引入中文语言
import zhCn from 'element-plus/es/locale/lang/zh-cn'

import * as ElementPlusIconsVue from '@element-plus/icons-vue'
const app = createApp(App)
for (const [key, component] of Object.entries(ElementPlusIconsVue)) {
    app.component(key, component)
}
app
    .use(store)
    .use(router)
    .use(ElementPlus, {
        locale: zhCn,
        size: 'small',
        zIndex: 3000
    })
    .mount('#app')
4.子页面使用详见:
5、首页布局实现 - 参考Element官网
6、开发疑问+解答