猿创征文|OpenCV-选取图像局部区域(java版)
OpenCV-选取图像局部区域
- 1.imshow()
-
- 1.单行或单列选择
- 2.多行或多列选择
- 2.submat()函数
-
- 1.Rect
- 2.Range
- 3.submat()
- 4.diag()
Mat类提供了多种获取图像局部区域的方法
1.imshow()
1.单行或单列选择
获取图像的某一行或某一列,可以使用row()函数或者col()函数
| 方法 | 说明 |
| row(int y) | 提取第y行图像 |
| col(int x) | 提取第x列数据 |
示例:
    public static void main(String[] args) {
        String libraryPath= System.getProperty("user.dir")+"\\lib\\opencv_java460.dll";
        System.load(libraryPath);
        //创建一个200*200 8位3通道的蓝色图像
        Mat mat =new Mat(200,200, CvType.CV_8UC3,new Scalar(255,0,0));
        //为第一行赋值
        for (int i=0;i<200;i++){
            //为演示明显,为图像的第一行和最后一行赋像素值
            mat.put(0,i,0,255,0);
            mat.put(199,i,0,0,255);
        }
        //提取图像的第1行
        HighGui.imshow("matRow",mat.row(0));
        //提取图像的第2列
        HighGui.imshow("matCol",mat.col(1));
        HighGui.imshow("mat",mat);
        HighGui.waitKey(0);
    }
2.多行或多列选择
Range 对象可以用来表示矩阵的多个连续的行或者多个连续的列。其表示的范围为从 start
到 end,包含 start,但不包含 end。
| 方法 | 说明 |
| Range(Range r)( 提取第s到e行(列)之间的图像) | |
| rowRange(Range r) | 提示第s到e行之间的图像 |
| colRange(Range r) | 提示第s到e列之间的图像 |
示例:
    public static void main(String[] args) {
        String libraryPath= System.getProperty("user.dir")+"\\lib\\opencv_java460.dll";
        System.load(libraryPath);
        //创建一个200*200 8位3通道的蓝色图像
        Mat mat =new Mat(200,200, CvType.CV_8UC3,new Scalar(255,0,0));
        //用Range选择多行或多列,从第0行(列)到第20行(列)
        HighGui.imshow("matRowRange",mat.rowRange(new Range(0,20)));
        HighGui.imshow("matColRange",mat.colRange(new Range(0,20)));
        HighGui.waitKey(0);
    }
2.submat()函数

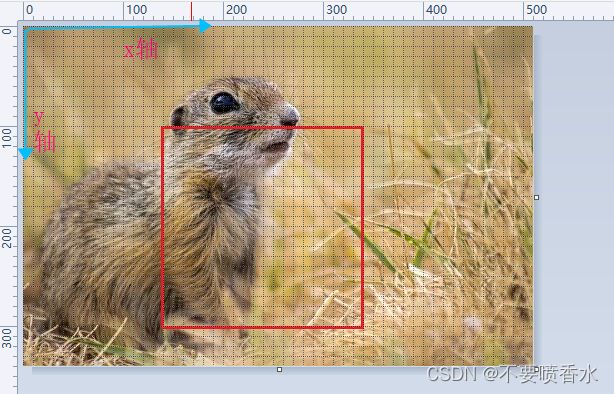
为演示效果明显,用上图做演示。图像 宽:510 高: 340
Imgcodecs.imread()表示读取图像。
1.Rect
| 方法 | 说明 |
| Rect(int x, int y, int width, int height) | 从图像坐标x,y的地方为起点,提取宽width高height 的图像(从左上角开始到右下角) |
    public static void main(String[] args) {
        String libraryPath= System.getProperty("user.dir")+"\\lib\\opencv_java460.dll";
        System.load(libraryPath);
        Mat img = Imgcodecs.imread("shu.jpg");
        int rows=img.rows();
        int cols=img.cols();
        System.out.println("原img>>rows:"+rows+" cols:"+cols);
        //1.rect 在第140列,100行的地方提取宽200高200的图像(左上角开始到右下角结束)
        Rect rect = new Rect(140,100,200,200);
        Mat submat = img.submat(rect);
        rows=submat.rows();
        cols=submat.cols();
        System.out.println("submat>>rows:"+rows+" cols:"+cols);
        HighGui.imshow("submat",submat);
        //HighGui.imshow("img",img);
        HighGui.waitKey(0);
    }
原img>>rows:340 cols:510
submat>>rows:200 cols:200
2.Range
| 方法 | 说明 |
| Range(Range r)( 提取第s到e行(列)之间的图像) | |
| submat(Range rowRange, Range colRange) | 顾名思义,提取s到e行,s列到e列之间的交集图像 |
| submat(Range[] ranges) | 数组,将rowRange和colRange放在数组中,效果与上方效果一样,默认ranges[0]为rowRange,ranges[0]为colRange |
submat(Range rowRange, Range colRange)
    public static void main(String[] args) {
        String libraryPath= System.getProperty("user.dir")+"\\lib\\opencv_java460.dll";
        System.load(libraryPath);
        Mat img = Imgcodecs.imread("shu.jpg");
        int rows=img.rows();
        int cols=img.cols();
        System.out.println("原img>>rows:"+rows+" cols:"+cols);
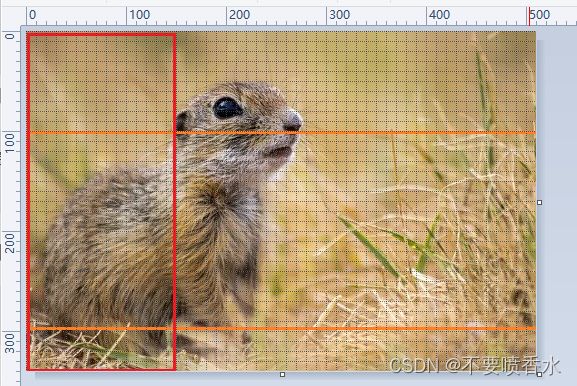
        //提取0到145行,100列到300列之间的交集图像
        Range rowRange = new Range(0,145);
        Range colRange = new Range(100,300);
        Mat submat = img.submat(rowRange,colRange);
        rows=submat.rows();
        cols=submat.cols();
        System.out.println("submat>>rows:"+rows+" cols:"+cols);
        HighGui.imshow("submat",submat);
        HighGui.waitKey(0);
    }
原img>>rows:340 cols:510
submat>>rows:145 cols:200
submat(Range[] ranges)
将上文代码修改下,为验证效果,反转下range值
    public static void main(String[] args) {
        String libraryPath= System.getProperty("user.dir")+"\\lib\\opencv_java460.dll";
        System.load(libraryPath);
        Mat img = Imgcodecs.imread("shu.jpg");
        int rows=img.rows();
        int cols=img.cols();
        System.out.println("原img>>rows:"+rows+" cols:"+cols);
        Range rowRange = new Range(0,145);
        Range colRange = new Range(100,300);
        //rowRange 与 colRange 反转验证
        Range[] ranges ={colRange,rowRange};
        Mat submat = img.submat(ranges);
        rows=submat.rows();
        cols=submat.cols();
        System.out.println("submat>>rows:"+rows+" cols:"+cols);
        HighGui.imshow("submat",submat);
        HighGui.waitKey(0);
    }
3.submat()
| 方法 | 说明 |
| submat(int rowStart, int rowEnd, int colStart, int colEnd) | 从rowStart行到rowEnd行,colStart列到colEnd列提取图像 |
用法和submat(Range rowRange, Range colRange)一样
4.diag()
取对角线元素,参数 d=0 时,表示取主对角线;当参数 d>0 时,表示取主对角线下方的次对角线,如 d=1 时,表示取主对角线下方,且紧贴主多角线的元素;当参数 d<0 时,表示取主对角线上方的次对角线。


