angular学习笔记(三十)-指令(6)-transclude()方法(又称linker()方法)-模拟ng-repeat指令
在angular学习笔记(三十)-指令(4)-transclude文章的末尾提到了,如果在指令中需要反复使用被嵌套的那一坨,需要使用transclude()方法.
在angular学习笔记(三十)-指令(5)-link文章也提到了link函数的第五个参数linker.
这篇文章就来讲解一下transclude()方法(linker()方法),是怎么使用的,另外,它也是compile函数的第三个参数,用法一样.
下面就通过自己写一个简易的模拟ngRepeat的指令cbRepeat,来了解linker函数是怎么工作的.同时可以增进对指令的理解.
html:
<!DOCTYPE html>

<html ng-app="dirAppModule">

<head>

  <title>20.8.1 指令-link和compile</title>

  <meta charset="utf-8">

  <script src="../angular.min.js"></script>

  <script type="text/ng-template" id="text.html">

    <div>

      <h3 ng-transclude></h3>

    </div>

  </script>

  <script src="script.js"></script>


  <style type="text/css">

    h3 {

      color:#CB2027

    }

  </style>

</head>

<body>

  <div ng-controller="compileCtrl">

    <span ng-click="reset()">添加一个元素</span>

    <span ng-click="resetBunny()">修改一个元素</span>

    <div cb-repeat="thing in things">

      <my-widget><span>{{thing}}</span></my-widget>

    </div>

  </div>

</body>

</html>
js:
/*20.8.1 指令-compile和link*/

var appModule = angular.module('dirAppModule',[]);

appModule.controller('compileCtrl',function($scope){

    $scope.things=['bunny','cat','dog'];

    $scope.reset=function(){

        $scope.things.push('pig')

    };

    $scope.resetBunny=function(){

        $scope.things[0]='Bunny'

    }

});

appModule.directive('cbRepeat',function(){

    return {

        restrict:'A',

        transclude:'element',

        compile:function(tEle,tAttrs,trans){

            console.log('compile-cbRepeat');

            return function(scope,iEle,iAttrs,ctrl,linker){

                console.log('post-cbRepeat');

                //scope.$new()创建一个作用域的子作用域

                //console.log(scope.$new().$parent==scope);

                var myLoop = iAttrs.cbRepeat,

                    match = myLoop.match(/\s*(.+)\s+in\s+(.*)\s*/),

                    indexString = match[1],

                    collectionString = match[2],

                    parentEle = iEle.parent(),

                    elements = [];

                scope.$watchCollection(collectionString,function(collection){

                    if(elements.length>0){

                        for(var i= 0;i<elements.length;i++){

                            elements[i].el.remove();

                            elements[i].scope.$destroy();

                        }

                        elements = [];

                    }

                    for(var i=0;i<scope[collectionString].length;i++){

                        var newScope = scope.$new();

                        newScope[indexString] = scope[collectionString][i];

                        linker(newScope,function(clone){

                            parentEle.append(clone);

                            var element = {};

                            element.el = clone;

                            element.scope = newScope;

                            element.scope.$on('$destroy',function(){

                                console.log('被移除')

                            });

                            elements.push(element);

                        })

                    }

                })

            }

        }

    }

});

appModule.directive('myWidget',function(){

    return {

        restrict:'E',

        templateUrl:'text.html',

        replace:true,

        transclude:true,

        scope:true,

        compile:function(tEle,tAttrs,trans){

            //compile函数的tEle是原始的templateElement,也就是<div><h3 ng-transclude></h3></div>

            console.log('compile-myWidget'+tEle.html());

            return function(scope,iEle,iAttrs){

                //link函数的iEle是tEle经过实例化以后的instanceElement,也就是

                //<div><h3 ng-transclude=""><span class="ng-binding ng-scope">{{thing}}</span></h3></div>

                console.log('post-myWidget'+iEle.html())

            }

        }

        //简单的说,tElement就是原始的,元素一开始是什么样子,它还是什么样子,所以它没有作用域.

        //而iElement是经过ng编译的,添加了ng-binding,ng-scope,所以它有作用域.

    }

});
显示结果:
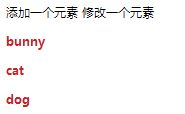 →点击'添加一个元素':
 →点击'修改一个元素':
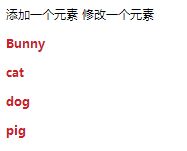
下面来解释这整个过程:
1.获取指令元素的cb-repeat属性.
2.通过正则匹配出cb-repeat的值的in前后的内容. indexString 和 collectionString
3.获取指令元素的父元素
4.新建一个element数组,用于存放被重复的元素,其中每一项都是一个对象,这个对象有两个属性:
(1)el属性,就是相应的dom元素
(2)scope属性,每一个dom元素独立的scope,在ng-repeat中,如果是'list in lists',那么,每个被repeat出来的元素,都有一个scope,而各个list则会被绑定到各个scope下.
5.使用$watchCollection监测数据模型的变化,$watchCollection监测的是数组的长度是否发生变化,仅当数组中的元素发生增减时,才会触发回调.这里只是个简单的模拟,所以当数据模型发生增减变化时,更新cb-repeat视图,实际中数组中每一项内容发生变化应该都要更新视图...
6.首先检查element数组是否为空,如果不为空,则需要先清空element数组,清空element数组分为三步:
(1).将数组中每个对象的el属性,也就是每个dom元素,都从视图中remove掉
(2).将数组中每个对象的scope属性,也就是每个dom元素对应的scope都destroy掉
(3).清空数组中的所有对象.
7.循环数据模型.根据最新的数据模型创建对应的视图,分为以下几个步骤:
(1).为循环出来的元素创建一个独立的scope,这个scope必须继承父scope:
代码里被注释的有这么两句:
      scope.$new()创建一个作用域的子作用域

      console.log(scope.$new().$parent==scope);       结果是true
也就是说,每个scope都有一个$new()方法,创建一个子作用域,子作用域继承了父作用域.子作用域的$parent属性可以访问到父作用域
(2).newScope[indexString] = scope[collectionString][i];
将数据模型数组里的每个对象分别绑定到各自的作用域下
(3).通过link的第五个参数linker(同compile第三个参数),来创建repeat元素:
                        linker(newScope,function(clone){

                            parentEle.append(clone);

                            var element = {};

                            element.el = clone;

                            element.scope = newScope;

                            element.scope.$on('$destroy',function(){

                                console.log('被移除')

                            });

                            elements.push(element);

                        })
linker函数有两个参数,第一个参数是一个scope,第二个参数是一个函数,函数接受一个参数clone,clone的内容就相当于transclude里面提到的被嵌套的那一坨内容(angular学习笔记(三十)-指令(4)-transclude).并且clone被封装成jqLite对象.可以调用jqLite的方法.最重要的是,clone这个元素的作用域就是第一个被传入的参数scope.
然后在函数中我们操作clone.新建一个对象,它的el属性就是clone元素.它的scope属性就是clone的scope.然后给scope绑定$destroy事件.然后一一push到element数组里去.
*需要被注意的是,$destroy这个事件,名字上是销毁作用域,意义上也是销毁作用域.但是这个作用域它其实还是存在的.它最主要的作用只是绑定自定义的事件,然后当销毁作用域的时候触发这个事件并且冒泡.比如这里我定义的$destroy事件为function(){console.log('被移除')},那么,在上面elements[i].scope.$destroy()的时候,就会触发这个回调.
另外,注意一下这两个指令的compile和link的执行顺序问题:
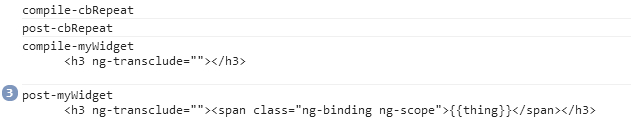
这个顺序就是angular学习笔记(三十)-指令(7)-compile和link(3)这篇文章里的第一种情况.
注意myWidget由于是复制出来的,所以它的compile只会执行一次,link还是会执行多次.
这个cbRepeat只是一个简单的模拟,和真正的ngRepeat还是区别很大的.仅作了解尝试.
完整代码: https://github.com/OOP-Code-Bunny/angular/blob/master/OREILLY/20.8.1%20%E6%8C%87%E4%BB%A4.html
https://github.com/OOP-Code-Bunny/angular/blob/master/OREILLY/script.js