LNMP网站架构
目录
- LNMP概述
-
- LNMP介绍
- LNMP工作流程
- LNMP部署
-
- Nginx服务部署
- MySQL服务部署
- PHP服务部署
- LNMP建立关系
-
- Nginx + PHP建立关系
- PHP + MySQL建立关系
- 部署搭建网站页面(代码上线)
- LNMP问题总结
-
- 上传主题时出现413状态码?
- LNMP架构如何与存储服务器建立关系?
- LNMP架构如何与数据库服务器建立关系?
- web01代码迁移到web02服务器,修改域名出现域名跳转问题
LNMP概述
LNMP介绍
LNMP,Web服务环境组合(Linux、Nginx、MySQL、PHP)。其中Nginx服务用于处理用户静态请求;PHP服务用于处理用户的动态请求,并负责与数据库建立连接;MySQL用于存储用户的字符串数据信息。
LNMP工作流程
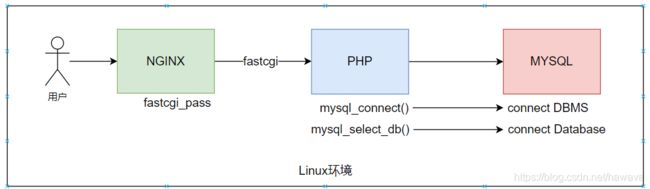
- 当LNMP组合工作时,首先用户通过浏览器输入域名请求Nginx Web服务;
- 如果请求的是静态资源,则由Nginx解析返回给用户;
- 如果是动态请求,则Nginx将它通过FastCGI接口发送给PHP引擎服务(FastCGI进程php-fpm)进行解析(nginx fastcgi_pass指令与php php-fpm进程通过fastcgi接口建立通讯);
- 如果该动态请求要读取数据库数据,那么PHP会继续通过PHP解析器向后请求数据库以读取所需的数据,并最终通过Nginx服务将获取的数据返回给用户。
LNMP部署
Nginx服务部署
-
更新nginx官方yum源
yum官方下载地址
拉到网址最下面找到Linux Package

点击RHEL/CentOS版本

根据帮助文档进行操作(设置稳定版本的yum源)

[root@web01 ~]# vim /etc/yum.repos.d/nginx.repo [root@web01 ~]# cat /etc/yum.repos.d/nginx.repo [nginx-stable] name=nginx stable repo baseurl=http://nginx.org/packages/centos/$releasever/$basearch/ gpgcheck=1 enabled=1 gpgkey=https://nginx.org/keys/nginx_signing.key module_hotfixes=true -
yum安装nginx软件
[root@web01 ~]# yum install -y nginx -
启动nginx服务
[root@web01 ~]# systemctl start nginx -
访问IP,查看nginx是否正确安装

MySQL服务部署
-
安装数据库软件
yum install -y mariadb mariadb-server -
启动数据库服务
systemctl start mariadb.service
systemctl enable mariadb.service -
设置数据库密码
mysqladmin -u root password ‘redhat’
登录
mysql -u root -predhat(密码明文计入history)
mysql -u root -p(不显示密码明文)
PHP服务部署
- 更新yum源
rpm -Uvh https://dl.fedoraproject.org/pub/epel/epel-release-latest-7.noarch.rpm
rpm -Uvh https://mirror.webtatic.com/yum/el7/webtatic-release.rpm - 安装php软件
yum install -y php71w php71w-cli php71w-common php71w-devel php71w-embedded php71w-gd php71w-mcrypt php71w-mbstring php71w-pdo php71w-xml php71w-fpm php71w-mysqlnd php71w-opcache php71w-pecl-memcached php71w-pecl-redis php71w-pecl-mongodb - 编写配置文件
vim /etc/php-fpm.d/www.conf
user = www
group = www
注意: 保证nginx进程的管理用户和php服务进程的管理用户保持一致 - 启动php服务
systemctl start php-fpm
systemctl enable php-fpm
LNMP建立关系
Nginx + PHP建立关系
- 编写nginx配置文件
重启nginx服务[root@web01 ~]# vim /etc/nginx/conf.d/blog.conf server { listen 80; server_name blog.hello.com; location / { root /usr/share/nginx/html/blog; index index.html; } location ~ \.php$ { root /usr/share/nginx/html/www; fastcgi_index index.php; # 如果URI以斜线结尾,该指令设置的文件将追加到URI后面,这个值将存储在变量$fastcgi_script_name中(设置默认文件) fastcgi_param SCRIPT_FILENAME $document_root$fastcgi_script_name; # 设置fastcgi请求中的参数 fastcgi_pass 127.0.0.1:9000; # 指定将http代理到哪个fastcgi端口 include fastcgi_params; # 变量配置文件,$document_root等变量要能识别需要加载该文件 } }[root@web01 ~]# systemctl reload nginx - 编写动态资源文件
[root@web01 www]# vim /usr/share/nginx/html/www/test_php.php <?php phpinfo(); ?> - 访问测试

PHP + MySQL建立关系
[root@web01 ~]# vim /usr/share/nginx/html/blog/test_mysql.php

 <?php
        $servername = "localhost";
        $username = "root";
        $password = "redhat";
        ......
        $conn = mysqli_connect($servername, $username, $password);
        if ($conn) {
              echo "mysql successful by root !\n";
        }
        else{
              die("Connection failed: " . mysqli_connect_error());
        }
?>
部署搭建网站页面(代码上线)
-
获取代码(企业常用方式 git)
下载博客网站源代码:WordPress源代码 -
将代码解压并将解压信息放入站点目录
[root@web01 ~]# cd /usr/share/nginx/html/blog/ [root@web01 blog]# tar xf wordpress-5.8-zh_CN.tar.gz [root@web01 blog]# mv wordpress/* . # 将解压信息移动到站点目录(实战中一定记得备份站点目录) -
修改站点目录权限
[root@web01 html]# chown -R www.www blog/ -
对数据库服务进行配置
创建数据库:create database wordpress;
查看数据库:show databases;
进入数据库:use wordpress;
创建数据库管理用户:grant all on wordpress.* to ‘wordpress’@‘localhost’ identified by ‘redhat’;
查看数据库管理用户:select user,host from mysql.user;+-----------+-----------+ | user | host | +-----------+-----------+ | root | 127.0.0.1 | | root | ::1 | | | localhost | | root | localhost | | wordpress | localhost | | | web01 | | root | web01 | +-----------+-----------+ -
网站页面初始化操作
在浏览器输入blog.hello.com/index.php

根据以上数据库的配置填下以下内容

填写站点信息

-
利用blog网站发表博文
登录出现403问题

解决:编辑网站配置文件/etc/nginx/conf.d/blog.conf 在默认首页文件中加入index.php

重启nginx再次登录,问题解决

原因分析:http://blog.hello.com/wp-admin/没有以.php结尾,会自动匹配第一个location,而在没有加入index.php之前,找不到.php结尾文件无法匹配第二个location;而加入index.php文件后,根据index.php匹配到第二个location,通过fastcgi接口与127.0.0.1:9000端口交互获得动态资源。
LNMP问题总结
上传主题时出现413状态码?

原因:413 Request Entiry Too large表示上传文件失败,请求实体太大。这是因为nginx有个参数client_max_body_size在限制请求实体的大小,client_max_body_size默认值为1M,在配置文件中将该参数的值改大一点即可。
Syntax:	client_max_body_size size;
Default:
client_max_body_size 1m;
Context:	http, server, location

然后修改php.ini配置文件,将upload_max_filesize参数修改的更大一点,使得PHP接受用户上传的数据更大。
LNMP架构如何与存储服务器建立关系?
-
找到图片存储位置
第一种方法:根据图片链接地址获取图片存储位置http://blog.hello.com /wp-content/uploads/2021/08/test-1024x640.jpg
URL URI[root@web01 blog]# cd wp-content/uploads/2021/08/ [root@web01 08]# ls test-1024x640.jpg ...第二种方法:定位数据存放在站点目录
- find /usr/share/nginx/html/blog -type f -mmin -5
- inotifywait -mrq /usr/share/nginx/html/blog
-
Web服务器与NFS服务器建立连接
1)检查存储服务是否正常运行[root@nfs01 ~]# showmount -e 172.16.1.31 Export list for 172.16.1.31: /data 172.16.1.0/242)查看存储目录是否可以正常挂载
[root@web01 ~]# mount -t nfs 172.16.1.31:/data /mnt
[root@web01 ~]# df -h | grep /data
172.16.1.31:/data         18G  4.8G   13G  28% /mnt
3)编辑存储服务器nfs配置文件并重启nfs服务
[root@nfs01 ~]# vim /etc/exports
/data/blog      172.16.1.0/24(rw,sync)
/data/www       172.16.1.0/24(rw,sync)

[root@nfs01 ~]# systemctl reload nfs
4)暂时将web服务器blog存储数据的目录中的迁移出去,以便将该目录作为一个挂载点与存储服务器存储目录建立连接
[root@web01 ~]# mv /usr/share/nginx/html/blog/wp-content/uploads/* /tmp    # 将数据迁移出去

[root@web01 ~]# mount -t nfs 172.16.1.31:/data/blog /usr/share/nginx/html/blog/wp-content/uploads    # 临时挂载
[root@web01 ~]# vim /etc/fstab    # 永久挂载
172.16.1.31:/data/blog  /usr/share/nginx/html/blog/wp-content/uploads    nfs defaults 0 0

[root@web01 ~]# df -h | grep /blog    # 查看挂载信息
172.16.1.31:/data/blog    18G  4.8G   13G  28% /usr/share/nginx/html/blog/wp-content/uploads
5)将数据迁移回原目录
[root@web01 ~]# mv /tmp/2021 /usr/share/nginx/html/blog/wp-content/uploads
mv: cannot create directory ‘/usr/share/nginx/html/blog/wp-content/uploads/2021’: Permission denied
出现问题:权限阻止
问题原因:Web存储器在存储数据时使用www用户存储(nginx.conf配置文件中设置),进入nfs存储服务器地盘时用户映射为nfsnobody(在nfs配置文件exports中设置,可以使用参数anonuid=UID,anongid=GID改变默认映射用户),而blog目录只有root用户才有写权限。[root@nfs01 ~]# ll /data/ total 0 drwxr-xr-x 2 root root 6 Aug 10 20:43 blog drwxr-xr-x 2 root root 6 Aug 10 20:43 www解决问题:
a. nfs服务器添加www用户(nfs服务器和web服务器),并将存储目录所有者所属组递归设定为www[root@nfs01 ~]# useradd -M -u 1001 -s /sbin/nologin www [root@nfs01 ~]# chown -R www.www /data/blogb. 修改nfs配置文件,定义映射用户为www,并重启nfs服务
[root@nfs01 ~]# vim /etc/exports
/data/blog      172.16.1.0/24(rw,sync,anonuid=1001,anongid=1001)
/data/www       172.16.1.0/24(rw,sync,anonuid=1001,anongid=1001)

[root@nfs01 ~]# systemctl reload nfs
c. Web服务器将数据迁移回原目录即可成功
[root@web01 ~]# mv /tmp/2021 /usr/share/nginx/html/blog/wp-content/uploads
[root@web01 ~]# ls /usr/share/nginx/html/blog/wp-content/uploads
2021
[root@nfs01 ~]# ls /data/blog/
2021
LNMP架构如何与数据库服务器建立关系?
-
将Web服务器本地数据库数据进行备份
[root@web01 ~]# mysqldump -uroot -predhat --all-database > /tmp/web_back.sql -
将备份数据迁移数据库服务器
[root@web01 ~]# scp -rp /tmp/web_back.sql 172.16.1.51:/tmp -
数据库服务器恢复数据信息
[root@db01 ~]# mysql -uroot -predhat < /tmp/web_back.sql -
修改数据库服务器中数据库用户信息
MariaDB [(none)]> select user,host from mysql.user;
+-----------+-----------+
| user      | host      |
+-----------+-----------+
| root      | 127.0.0.1 |
| root      | ::1       |
|           | localhost |
| root      | localhost |
| wordpress | localhost |
|           | web01     |
| root      | web01     |
+-----------+-----------+
7 rows in set (0.01 sec)
优化:删除无用用户信息
MariaDB [(none)]> delete from mysql.user where user="" and host="localhost";
Query OK, 1 row affected (0.54 sec)

MariaDB [(none)]> delete from mysql.user where user="" and host="web01";
Query OK, 1 row affected (0.00 sec)
添加新的用户信息
MariaDB [(none)]> grant all on wordpress.* to 'wordpress'@'172.16.1.%' identified by 'redhat';
Query OK, 0 rows affected (0.01 sec)
Web服务器测试连接
[root@web01 ~]# mysql -uwordpress -predhat -h 172.16.1.51 Welcome to the MariaDB monitor. Commands end with ; or \g. Your MariaDB connection id is 6 Server version: 5.5.68-MariaDB MariaDB Server Copyright (c) 2000, 2018, Oracle, MariaDB Corporation Ab and others. Type 'help;' or '\h' for help. Type '\c' to clear the current input statement. MariaDB [(none)]> -
修改Web服务器代码文件信息
[root@web01 ~]# vim /usr/share/nginx/html/blog/wp-config.php define( 'DB_HOST', '172.16.1.51' ); -
停止Web服务器上数据库服务
[root@web01 ~]# systemctl stop mariadb.service
web01代码迁移到web02服务器,修改域名出现域名跳转问题
web01代码迁移到web02服务器,并且修改了网站域名,无法正确访问新域名且会自动跳转到老的域名。
方法一:修改wordpress后台设置信息,将后台中老的域名修改为新的域名
方法二:修改数据库中的一个表,在表中修改一个和域名相关的条目信息(update phpmyadmin)。