2019独角兽企业重金招聘Python工程师标准>>> ![]()
传统的 Maven项目一般将需要被复用的组件做成 Module来进行管理,以便二次调用;而在 Spring Boot项目中我们则可以使用更加优雅的 Spring Boot Starter来完成这一切。
基于Spring Boot开发应用的过程可谓是幸福感满满,其开箱即用的特性分析已经在 《SpringBoot 应用程序启动过程探秘》一文中详细叙述过了。这个开箱即用的魔法特性很大程度上来源于各式各样 Spring Boot Starter的加持,而且随着版本的迭代 Starter家族成员日益庞大,而且各种优秀开源作者也提供了很多非常好用的Spring Boot Starter。
本文则尝试自制一个Spring Boot Starter并推送到远端仓库进行管理。
一、新建项目
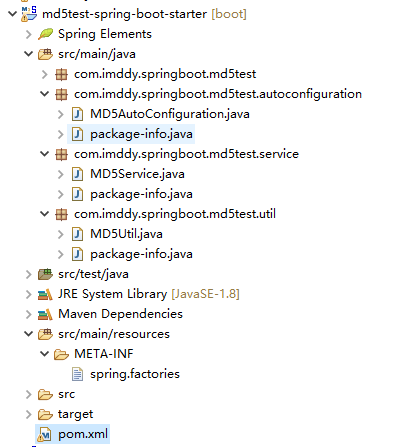
本文准备封装一个简单的 MD5摘要工具的 Starter,命名为 md5test-spring-boot-starter,其本质就是一个 Maven项目,只不过我们需要完善pom文件的相关依赖:
				org.springframework.boot
				spring-boot-dependencies
				2.1.1.RELEASE
				pom
				import


        ......

			org.springframework.boot
			spring-boot-autoconfigure
1、编写业务逻辑
首先提供一个 MD5Util工具类,负责实际的 MD5加密:(这只是个案例,jdk8直接提供MD5加密,非常方便使用),放在 util 包下
package com.imddy.springboot.md5test.util;

public class MD5Util {

	public static String getMD5(String source) {
		return getMD5(source.getBytes());
	}

	public static String getMD5(byte[] source) {
		String s = null;
		char hexDigits[] = { '0', '1', '2', '3', '4', '5', '6', '7', '8', '9', 'A', 'B', 'C', 'D', 'E', 'F' };
		try {
			java.security.MessageDigest md = java.security.MessageDigest.getInstance("MD5");
			byte tmp[];
			synchronized (MD5Util.class) {
				md.update(source);
				tmp = md.digest();
			}
			char str[] = new char[16 * 2];
			int k = 0;
			for (int i = 0; i < 16; i++) {
				byte byte0 = tmp[i];
				str[k++] = hexDigits[byte0 >>> 4 & 0xf];
				str[k++] = hexDigits[byte0 & 0xf];
			}
			s = new String(str);

		} catch (Exception e) {
			e.printStackTrace();
		}
		return s;
	}
}
再来提供一个 MD5Service类 进行一次封装:(都是为了案例写的),放在 service 包下
package com.imddy.springboot.md5test.service;

import com.imddy.springboot.md5test.util.MD5Util;

public class MD5Service {
	public String getMD5( String input ) {
        return MD5Util.getMD5( input.getBytes() );
    }
}
2、编写自动装配类
这一步十分重要,也是编写 Spring Boot Starter最重要的一步:(编写项目springboot自动装配类),放在 autoconfiguration 包下
package com.imddy.springboot.md5test.autoconfiguration;

import org.springframework.context.annotation.Bean;
import org.springframework.context.annotation.Configuration;

import com.imddy.springboot.md5test.service.MD5Service;

@Configuration
public class MD5AutoConfiguration {

	@Bean
    MD5Service md5Service() {
        return new MD5Service();
    }

}
这个是最简单的例子,可以参考 官网 的说明。
3、编写spring.factories
我们还需要在 resources/META-INF/ 下创建一个名为 spring.factories的文件,然后置入以下内容:
org.springframework.boot.autoconfigure.EnableAutoConfiguration=com.imddy.springboot.md5test.autoconfiguration.MD5AutoConfiguration这一步也是相当重要哇,为什么这一步这么重要呢,文章《SpringBoot 应用程序启动过程探秘》 中讲过了,Spring Boot自动注入的奥秘就来源于 Spring Boot应用在启动过程中会通过 SpringFactoriesLoader 加载所有 META-INF/spring.factories 文件,通过一系列的处理流程最终将 spring.factories 文件中的定义的各种 beans 装载入 ApplicationContext容器。
这一步搞定之后其实一个 Spring Boot Starter已经写好了。这里还提供下pom.xml中的build
				org.springframework.boot
				spring-boot-maven-plugin


				org.apache.maven.plugins
				maven-compiler-plugin

					1.8
					1.8
					UTF-8


				org.apache.maven.plugins
				maven-resources-plugin

					UTF-8
接下来可以通过 mvn:install打包,并传到 私有/公有Maven仓库以供使用了。
二、新建测试项目
项目名称为:md5testtest-spring-boot-starter 测试上面的spring-boot-starter
添加依赖:
			com.imddy.springboot
			md5test-spring-boot-starter
			0.0.1-SNAPSHOT

        ......

            org.springframework.boot
            spring-boot-starter-web
引入了 springboot 的 web 依赖。
贴下pom.xml:
	4.0.0

	com.imddy.springboot
	md5testtest-spring-boot-starter
	0.0.1-SNAPSHOT
	jar

	md5testtest-spring-boot-starter
	http://maven.apache.org


		UTF-8


				org.springframework.boot
				spring-boot-dependencies
				2.1.1.RELEASE
				pom
				import


			junit
			junit
			test


			com.imddy.springboot
			md5test-spring-boot-starter
			0.0.1-SNAPSHOT


            org.springframework.boot
            spring-boot-starter-web


				org.springframework.boot
				spring-boot-maven-plugin


				org.apache.maven.plugins
				maven-compiler-plugin

					1.8
					1.8
					UTF-8


				org.apache.maven.plugins
				maven-resources-plugin

					UTF-8
编写TestController (在 controller 包下):
package com.imddy.springboot.md5testtest.controller;

import org.springframework.beans.factory.annotation.Autowired;
import org.springframework.web.bind.annotation.RequestMapping;
import org.springframework.web.bind.annotation.RestController;

import com.imddy.springboot.md5test.service.MD5Service;

@RestController
public class TestController {

	@Autowired
    private MD5Service md5Service;

    @RequestMapping("/test")
    public String getMD5() {
        return "MD5加密结果为:" + md5Service.getMD5("mypassword");
    }
}
编写springboot的Application:
package com.imddy.springboot.md5testtest;

import org.springframework.boot.SpringApplication;
import org.springframework.boot.autoconfigure.SpringBootApplication;


@SpringBootApplication
public class Application {

	public static void main(String[] args) throws Exception  {
		// TODO Auto-generated method stub
		SpringApplication.run(Application.class, args);
	}
}
运行结果如下:
三、他们把项目放到github中(国内支持gitee),通过https://jitpack.io实现直接在引入。
推送到远端仓库
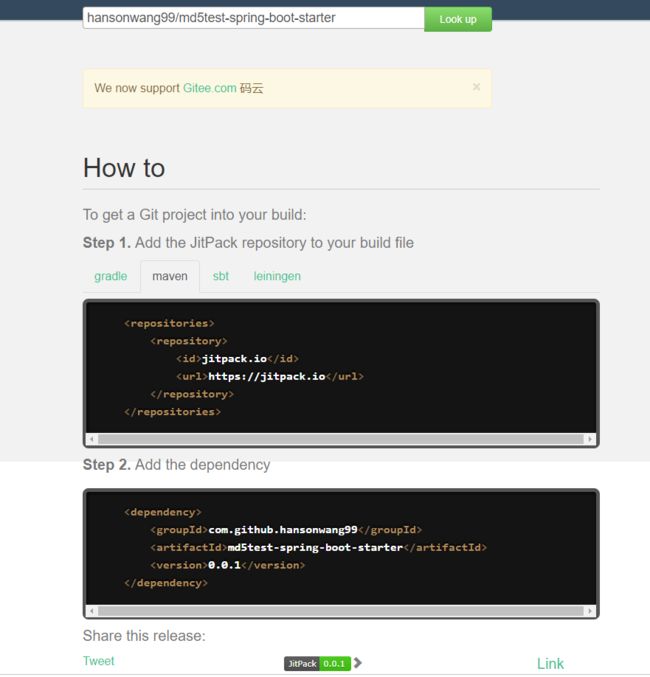
很多公司都搭有私有的 Maven仓库,但个人实验可以借助于 JitPack这个 “远端公服”来为我们托管自制的 Spring Boot Starter。
我们将编写好的 Spring Boot Starter代码置于 Github公有仓库上,然后通过 JitPack来拉取我们的代码并打包生成Jar包即可
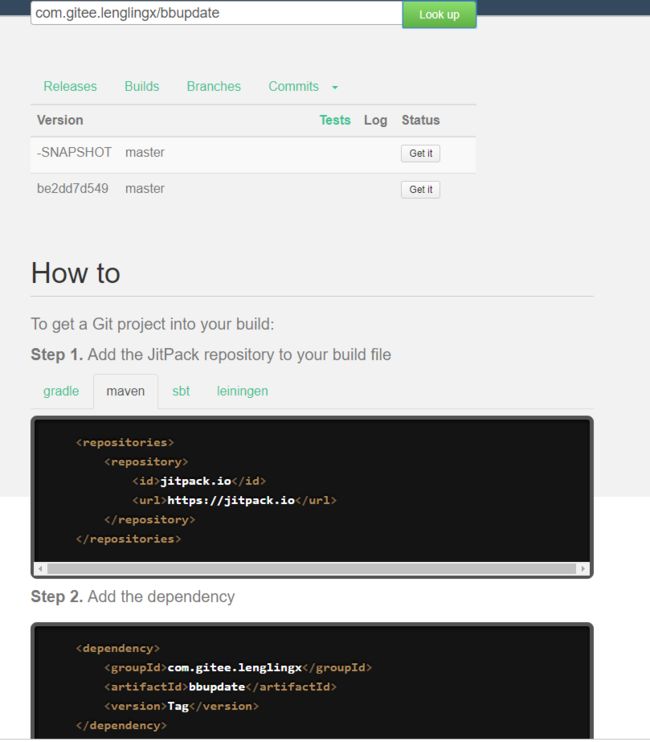
默认github.com的,支持国内的gitee.com。
输入 http://github.com/lenglingx/bbupdate ,或者直接lenglingx/bbupdate 。
这里输入的是hansonwang99/md5test-spring-boot-starter 。
输入 http://gitee.com/lenglingx/bbupdate 或者 com.gitee.lenglingx/bbupdate 都可以。


