springboot整合https和wss协议
一、首先得明白什么是wss协议:
可以看这篇文章:WSS、SSL 和 https 之间的关系
二、接下来就是配置wss协议了(注意:tomcat搭建https的低版本支持高版本不支持)
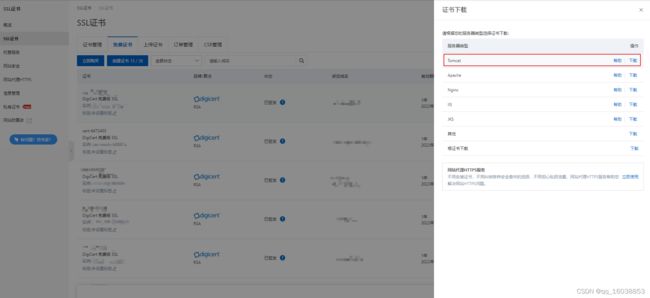
(1)先拿到ssl证书:我这边是用的阿里云的免费证书具体获取方法如下:
先登录阿里云官网找到SSL证书选项,然后申请免费证书,然后下载tomcat证书,具体的申请流程我就不再说明了。
大家可以参考:阿里云申请免费 SSL证书 https 的图文教程_林中明月间丶-CSDN博客_阿里云申请免费ssl证书
(2)将下载的证书导入到项目中配置环境
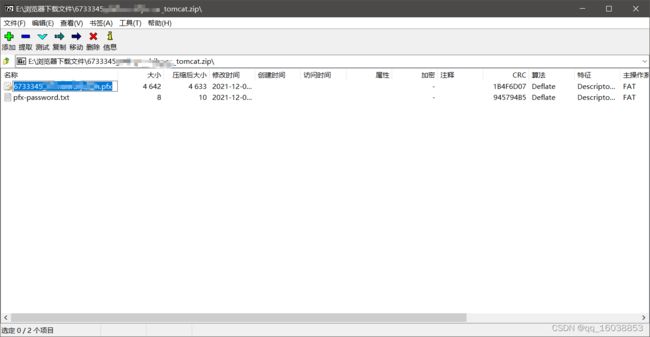
下载后得后的压缩包解压之后将pfx后缀的证书文件导入到项目中。(我这边是导入了多个证书文件,你们根据业务需求导入一个即可。)
然后在springboot的配置文件里面配置相应的属性(证书密码在解压后的pfx-password.txt文件中可以查看),我这边是配置了两个端口http和https都能访问该项目,同理ws和wss协议也都是支持的。
# 秘钥证书库文件所在位置
server.ssl.key-store=classpath:证书名称.pfx
# 密码
server.ssl.key-store-password=证书密码
# 秘钥证书库类型
server.ssl.keyStoreType=PKCS12
#这里先放一个参数,一会儿再程序中直接@Value获取
myhttp.port=9097
# 此端口为HTTPS端口
server.port=9095
import org.apache.catalina.connector.Connector;
import org.springframework.beans.factory.annotation.Value;
import org.springframework.boot.SpringApplication;
import org.springframework.boot.autoconfigure.SpringBootApplication;
import org.springframework.boot.web.embedded.tomcat.TomcatServletWebServerFactory;
import org.springframework.boot.web.servlet.server.ServletWebServerFactory;
import org.springframework.context.annotation.Bean;
@SpringBootApplication
public class RestaurantApplication {
public static void main(String[] args) {
try {
SpringApplication.run(RestaurantApplication.class, args);
} catch (Exception e) {
e.printStackTrace();
}
}
@Value("${myhttp.port}")
private Integer httpPort;
//SpringBoot 2.x版本(以及更高版本) 使用下面的代码
@Bean
public ServletWebServerFactory servletContainer() {
TomcatServletWebServerFactory tomcat = new TomcatServletWebServerFactory();
tomcat.addAdditionalTomcatConnectors(createHTTPConnector());
return tomcat;
}
private Connector createHTTPConnector() {
Connector connector = new Connector("org.apache.coyote.http11.Http11NioProtocol");
connector.setScheme("http");
connector.setSecure(false);
connector.setPort(httpPort);
return connector;
}
/**
* 创建wss协议接口
*
* @return
*/
@Bean
public TomcatContextCustomizer tomcatContextCustomizer() {
System.out.println("websocket init");
return new TomcatContextCustomizer() {
@Override
public void customize(Context context) {
System.out.println("init customize");
context.addServletContainerInitializer(new WsSci(), null);
}
};
}
然后在启动项目。
到这里所有的配置都已经结束了,接下来就是测试了。
附上测试代码:我这里就不再说明了。
websocket pom依赖
            org.springframework.boot
            spring-boot-starter-websocket
import com.alibaba.fastjson.JSON;
import com.alibaba.fastjson.JSONObject;
import com.soonreach.oas.util.httpUtil;
import com.soonreach.oas.vo.messageVo;
import lombok.extern.slf4j.Slf4j;
import org.apache.commons.lang.StringUtils;
import org.springframework.stereotype.Component;

import javax.websocket.*;
import javax.websocket.server.PathParam;
import javax.websocket.server.ServerEndpoint;
import java.io.IOException;
import java.util.Iterator;
import java.util.Map;
import java.util.Set;
import java.util.concurrent.ConcurrentHashMap;


/**
 * WebSocketServer
 *
 * @author lihao
 */
@ServerEndpoint("/websocket/{userId}")
@Component
@Slf4j
public class WebSocketServer {

    //private RedisTemplate redisTemplate =new RedisTemplate();

    /**
     * 静态变量,用来记录当前在线连接数。应该把它设计成线程安全的。
     */
    private static int onlineCount = 0;
    /**
     * concurrent包的线程安全Set,用来存放每个客户端对应的MyWebSocket对象。
     */
    private static ConcurrentHashMap webSocketMap = new ConcurrentHashMap<>();
    /**
     * 与某个客户端的连接会话,需要通过它来给客户端发送数据
     */
    private Session session;
    /**
     * 接收userId
     */
    private String userId = "";

    /**
     * 连接建立成功调用的方法
     */
    @OnOpen
    public void onOpen(Session session, @PathParam("userId") String userId) {
        this.session = session;
        this.userId = userId;
        if (webSocketMap.containsKey(userId)) {
            webSocketMap.remove(userId);
            webSocketMap.put(userId, this);
            //加入set中
        } else {
            webSocketMap.put(userId, this);
            //加入set中
            addOnlineCount();
            //在线数加1
        }

        log.info("用户连接:" + userId + ",当前在线人数为:" + getOnlineCount());
    }

    /**
     * 连接关闭调用的方法
     */
    @OnClose
    public void onClose() {
        if (webSocketMap.containsKey(userId)) {
            webSocketMap.remove(userId);
            //从set中删除
            subOnlineCount();
        }
        log.info("用户退出:" + userId + ",当前在线人数为:" + getOnlineCount());
    }

    /**
     * 收到客户端消息后调用的方法
     *
     * @param message 客户端发送过来的消息
     */
    @OnMessage
    public void onMessage(String message, Session session) throws IOException {
        log.info("用户消息:" + userId + ",报文:" + message);
        //可以群发消息
        //消息保存到数据库、redis
    }

    /**
     * @param session
     * @param error
     */
    @OnError
    public void onError(Session session, Throwable error) {
        log.error("用户错误:" + this.userId + ",原因:" + error.getMessage());
        error.printStackTrace();
    }

    /**
     * 实现服务器主动推送
     */
    public void sendMessage(String message) throws IOException {
        this.session.getBasicRemote().sendText(message);
    }


    /**
     * 发送自定义消息
     */
    public static void sendInfo(String message, @PathParam("userId") String userId) throws IOException {
        log.info("发送消息到:" + userId + ",报文:" + message);
        log.error("用户" + userId + ",不在线!");

    }


    public static synchronized int getOnlineCount() {
        return onlineCount;
    }

    public static synchronized void addOnlineCount() {
        com.soonreach.oas.config.WebSocketServer.onlineCount++;
    }

    public static synchronized void subOnlineCount() {
        com.soonreach.oas.config.WebSocketServer.onlineCount--;
    }
}
import org.springframework.context.annotation.Bean;
import org.springframework.context.annotation.Configuration;
import org.springframework.web.socket.server.standard.ServerEndpointExporter;
/**
* 开启WebSocket支持
*
* @author lihao
*/
@Configuration
public class WebSocketConfig {
@Bean
public ServerEndpointExporter serverEndpointExporter() {
return new ServerEndpointExporter();
}
}
websocket通讯
【userId】:
【toUserId】:
【toUserId】:
【操作】:
【操作】:


