spring security 用户认证原理
目录
一、从过滤器链开始
二、获取用户信息
三、用户名和密码认证流程
四、构建成功的认证对象
五、认证信息放入SecurityContext
一、从过滤器链开始
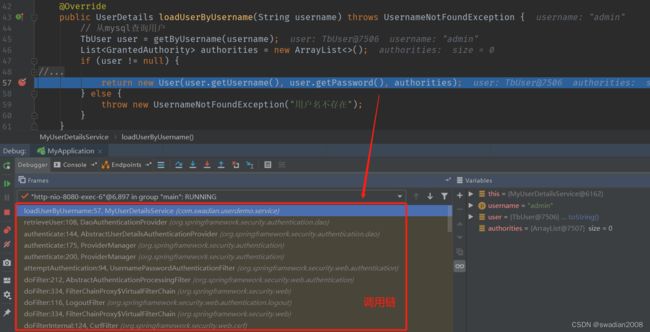
当我们执行认证逻辑,在获取用户信息时,可打一个断点,跟踪程序的调用链
在程序的调用链中,找到一个 StandardWrapperValve 的记录,StandardWrapperValve.class 类位于 tomcat 核心包中,跟踪到这个调用位置(StandardWrapperValve#invoke),可以看到过滤器链的调用
二、获取用户信息
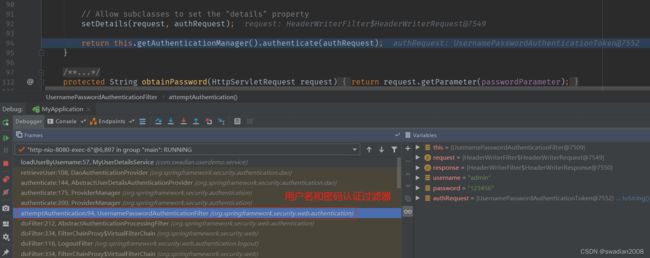
在调用链的一系列过滤器中,找到 UsernamePasswordAuthenticationFilter.calss(用户名和密码认证过滤器)
用户名和密码认证过滤器继承了 AbstractAuthenticationProcessingFilter.calss,该过滤器的 #doFilter 方法中,调用了用户名和密码认证过滤器中用户认证的逻辑
public void doFilter(ServletRequest req, ServletResponse res, FilterChain chain)
			throws IOException, ServletException {

		HttpServletRequest request = (HttpServletRequest) req;
		HttpServletResponse response = (HttpServletResponse) res;

		if (!requiresAuthentication(request, response)) {
            // 返回点 -> 需要关注
			chain.doFilter(request, response);

			return;
		}

		if (logger.isDebugEnabled()) {
			logger.debug("Request is to process authentication");
		}

		Authentication authResult;

		try {
            // 调用认证逻辑-> 返回认证结果
			authResult = attemptAuthentication(request, response);
			if (authResult == null) {
				// return immediately as subclass has indicated that it hasn't completed
				// authentication
				return;
			}
			sessionStrategy.onAuthentication(authResult, request, response);
		}
		catch (InternalAuthenticationServiceException failed) {
			logger.error(
					"An internal error occurred while trying to authenticate the user.",
					failed);
            // 扩展点
			unsuccessfulAuthentication(request, response, failed);

			return;
		}
		catch (AuthenticationException failed) {
			// 扩展点 Authentication failed 认证失败
			unsuccessfulAuthentication(request, response, failed);

			return;
		}

		// Authentication success 认证成功
		if (continueChainBeforeSuccessfulAuthentication) {
			chain.doFilter(request, response);
		}
        // 扩展点 -> AuthenticationSuccessHandler
		successfulAuthentication(request, response, chain, authResult);
	}
调用 attemptAuthentication(request, response) 抽象方法
UsernamePasswordAuthenticationFilter#attemptAuthentication 实现了该抽象方法
public Authentication attemptAuthentication(HttpServletRequest request,
			HttpServletResponse response) throws AuthenticationException {
		// 1-必须为 post 方法
        if (postOnly && !request.getMethod().equals("POST")) {
			throw new AuthenticationServiceException(
					"Authentication method not supported: " + request.getMethod());
		}
        // 2-解析用户名和密码 -> 固定解析参数名称 'username','password'
		String username = obtainUsername(request);
		String password = obtainPassword(request);

		if (username == null) {
			username = "";
		}

		if (password == null) {
			password = "";
		}

		username = username.trim();
        // 3-封装到认证的token,此时认证状态为 false -> setAuthenticated(false);
		UsernamePasswordAuthenticationToken authRequest = new UsernamePasswordAuthenticationToken(
				username, password);

		// Allow subclasses to set the "details" property
		setDetails(request, authRequest);
        // 4-调用认证管理器进行认证 -> 认证核心逻辑
		return this.getAuthenticationManager().authenticate(authRequest);
	}
方法 this.getAuthenticationManager().authenticate(authRequest); 调用认证管理器的具体实现进行权限验证
具体认证管理器的实现逻辑为 ProviderManager.class#authenticate
public Authentication authenticate(Authentication authentication)
			throws AuthenticationException {
		Class toTest = authentication.getClass();
		AuthenticationException lastException = null;
		AuthenticationException parentException = null;
		Authentication result = null;
		Authentication parentResult = null;
		boolean debug = logger.isDebugEnabled();
        // providers 列表循环
		for (AuthenticationProvider provider : getProviders()) {
			if (!provider.supports(toTest)) {
				continue;
			}

			if (debug) {
				logger.debug("Authentication attempt using "
						+ provider.getClass().getName());
			}

			try {
                // 具体的provider -> 结果返回,关键的认证方法
				result = provider.authenticate(authentication);

				if (result != null) {
					copyDetails(authentication, result);
					break;
				}
			}
			catch (AccountStatusException e) {
				prepareException(e, authentication);
				// SEC-546: Avoid polling additional providers if auth failure is due to
				// invalid account status
				throw e;
			}
			catch (InternalAuthenticationServiceException e) {
				prepareException(e, authentication);
				throw e;
			}
			catch (AuthenticationException e) {
				lastException = e;
			}
		}

		if (result == null && parent != null) {
			// Allow the parent to try.
			try {
				result = parentResult = parent.authenticate(authentication);
			}
			catch (ProviderNotFoundException e) {
				// ignore as we will throw below if no other exception occurred prior to
				// calling parent and the parent
				// may throw ProviderNotFound even though a provider in the child already
				// handled the request
			}
			catch (AuthenticationException e) {
				lastException = parentException = e;
			}
		}

		if (result != null) {
			if (eraseCredentialsAfterAuthentication
					&& (result instanceof CredentialsContainer)) {
				// Authentication is complete. Remove credentials and other secret data
				// from authentication
				((CredentialsContainer) result).eraseCredentials();
			}

			// If the parent AuthenticationManager was attempted and successful than it will publish an AuthenticationSuccessEvent
			// This check prevents a duplicate AuthenticationSuccessEvent if the parent AuthenticationManager already published it
			if (parentResult == null) {
				eventPublisher.publishAuthenticationSuccess(result);
			}
			return result;
		}

		// Parent was null, or didn't authenticate (or throw an exception).

		if (lastException == null) {
			lastException = new ProviderNotFoundException(messages.getMessage(
					"ProviderManager.providerNotFound",
					new Object[] { toTest.getName() },
					"No AuthenticationProvider found for {0}"));
		}

		// If the parent AuthenticationManager was attempted and failed than it will publish an AbstractAuthenticationFailureEvent
		// This check prevents a duplicate AbstractAuthenticationFailureEvent if the parent AuthenticationManager already published it
		if (parentException == null) {
			prepareException(lastException, authentication);
		}

		throw lastException;
	}
具体调用到哪一个 ProviderManager#authenticate 的实现,我们可以通过断点来定位
此时,我们回到原来断点的调用链,可以看到代码的调用层次如下
- -> ProviderManager#authenticate
- -> AbstractUserDetailsAuthenticationProvider#authenticate 认证
- -> DaoAuthenticationProvider#retrieveUser // 获取用户信息
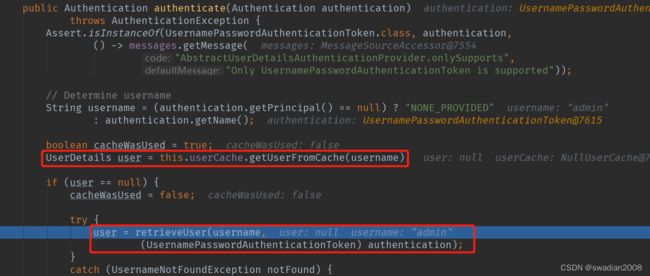
执行逻辑调用到了 AbstractUserDetailsAuthenticationProvider#authenticate 方法中,该方法中有多个获取用户信息的扩展点,支持用户进行自定义
public Authentication authenticate(Authentication authentication)
			throws AuthenticationException {
		Assert.isInstanceOf(UsernamePasswordAuthenticationToken.class, authentication,
				() -> messages.getMessage(
						"AbstractUserDetailsAuthenticationProvider.onlySupports",
						"Only UsernamePasswordAuthenticationToken is supported"));

		// Determine username
		String username = (authentication.getPrincipal() == null) ? "NONE_PROVIDED"
				: authentication.getName();

		boolean cacheWasUsed = true;
        // 1-从cache中获取用户信息 -> 可是实现 UserCache 接口自定义、redis等
		UserDetails user = this.userCache.getUserFromCache(username);

		if (user == null) {
			cacheWasUsed = false;

			try {
                // 2-从定义的方法中获取用户信息(实现接口自定义)
				user = retrieveUser(username,
						(UsernamePasswordAuthenticationToken) authentication);
			}
			catch (UsernameNotFoundException notFound) {
				logger.debug("User '" + username + "' not found");

				if (hideUserNotFoundExceptions) {
					throw new BadCredentialsException(messages.getMessage(
							"AbstractUserDetailsAuthenticationProvider.badCredentials",
							"Bad credentials"));
				}
				else {
					throw notFound;
				}
			}

			Assert.notNull(user,
					"retrieveUser returned null - a violation of the interface contract");
		}

		try {
            // 3-检验用户是否被锁、是否可用、过期等 -> UserDetails 属性(可以自定义逻辑)
			preAuthenticationChecks.check(user);
            // 4-密码认证逻辑 -> 该类中的additionalAuthenticationChecks实现
			additionalAuthenticationChecks(user,
					(UsernamePasswordAuthenticationToken) authentication);
		}
		catch (AuthenticationException exception) {
			if (cacheWasUsed) {
				// There was a problem, so try again after checking
				// we're using latest data (i.e. not from the cache)
				cacheWasUsed = false;
				user = retrieveUser(username,
						(UsernamePasswordAuthenticationToken) authentication);
				preAuthenticationChecks.check(user);
				additionalAuthenticationChecks(user,
						(UsernamePasswordAuthenticationToken) authentication);
			}
			else {
				throw exception;
			}
		}

		postAuthenticationChecks.check(user);

		if (!cacheWasUsed) {
            // 设置用户缓存
			this.userCache.putUserInCache(user);
		}

		Object principalToReturn = user;

		if (forcePrincipalAsString) {
			principalToReturn = user.getUsername();
		}
        // 5-创建成功的权限验证结果 -> 构建成功的认证对象
		return createSuccessAuthentication(principalToReturn, authentication, user);
	}
因为我们使用的是从数据库获取用户信息,所以程序最终会执行到下边的方法中来
user = retrieveUser(username,
(UsernamePasswordAuthenticationToken) authentication);
最终进入 DaoAuthenticationProvider.class#retrieveUser 方法,此方法中会去获取用户信息 -> 会调用我们自己实现的获取用户信息的方法
protected final UserDetails retrieveUser(String username,
			UsernamePasswordAuthenticationToken authentication)
			throws AuthenticationException {
		prepareTimingAttackProtection();
		try {
            // 获取用户信息->调用我们自己实现的获取用户信息的方法
			UserDetails loadedUser = this.getUserDetailsService().loadUserByUsername(username);
			if (loadedUser == null) {
				throw new InternalAuthenticationServiceException(
						"UserDetailsService returned null, which is an interface contract violation");
			}
			return loadedUser;
		}
		catch (UsernameNotFoundException ex) {
			mitigateAgainstTimingAttack(authentication);
			throw ex;
		}
		catch (InternalAuthenticationServiceException ex) {
			throw ex;
		}
		catch (Exception ex) {
			throw new InternalAuthenticationServiceException(ex.getMessage(), ex);
		}
	}
调用我们自己实现的 loadUserByUsername() 方法
三、用户名和密码认证流程
获取用户信息后,回到 AbstractUserDetailsAuthenticationProvider#authenticate 方法中,该方法后边代码具体实现了密码验证的逻辑
public Authentication authenticate(Authentication authentication)
			throws AuthenticationException {
		Assert.isInstanceOf(UsernamePasswordAuthenticationToken.class, authentication,
				() -> messages.getMessage(
						"AbstractUserDetailsAuthenticationProvider.onlySupports",
						"Only UsernamePasswordAuthenticationToken is supported"));

		// Determine username
		String username = (authentication.getPrincipal() == null) ? "NONE_PROVIDED"
				: authentication.getName();

		boolean cacheWasUsed = true;
        // 1-从cache中获取用户信息 -> 可是实现 UserCache 接口自定义、redis等
		UserDetails user = this.userCache.getUserFromCache(username);

		if (user == null) {
			cacheWasUsed = false;

			try {
                // 2-从定义的方法中获取用户信息(实现接口自定义)
				user = retrieveUser(username,
						(UsernamePasswordAuthenticationToken) authentication);
			}
			catch (UsernameNotFoundException notFound) {
				logger.debug("User '" + username + "' not found");

				if (hideUserNotFoundExceptions) {
					throw new BadCredentialsException(messages.getMessage(
							"AbstractUserDetailsAuthenticationProvider.badCredentials",
							"Bad credentials"));
				}
				else {
					throw notFound;
				}
			}

			Assert.notNull(user,
					"retrieveUser returned null - a violation of the interface contract");
		}

		try {
            // 3-检验用户是否被锁、是否可用、过期等 -> UserDetails 属性(可以自定义逻辑)
			preAuthenticationChecks.check(user);
            // 4-密码认证逻辑 -> 该类中的additionalAuthenticationChecks实现
			additionalAuthenticationChecks(user,
					(UsernamePasswordAuthenticationToken) authentication);
		}
		catch (AuthenticationException exception) {
			if (cacheWasUsed) {
				// There was a problem, so try again after checking
				// we're using latest data (i.e. not from the cache)
				cacheWasUsed = false;
				user = retrieveUser(username,
						(UsernamePasswordAuthenticationToken) authentication);
				preAuthenticationChecks.check(user);
				additionalAuthenticationChecks(user,
						(UsernamePasswordAuthenticationToken) authentication);
			}
			else {
				throw exception;
			}
		}

		postAuthenticationChecks.check(user);

		if (!cacheWasUsed) {
            // 设置用户缓存
			this.userCache.putUserInCache(user);
		}

		Object principalToReturn = user;

		if (forcePrincipalAsString) {
			principalToReturn = user.getUsername();
		}
        // 5-创建成功的权限验证结果 -> 构建成功的认证对象
		return createSuccessAuthentication(principalToReturn, authentication, user);
	}
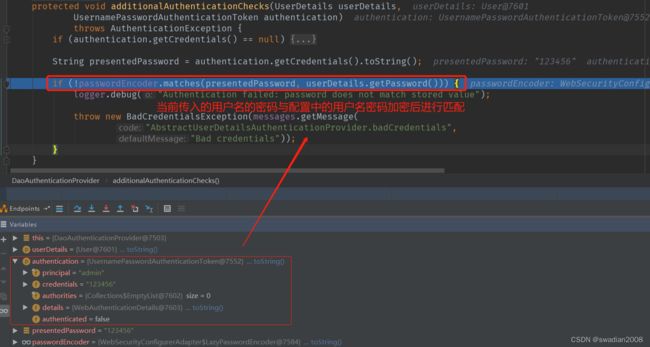
密码验证的具体逻辑
protected void additionalAuthenticationChecks(UserDetails userDetails,
			UsernamePasswordAuthenticationToken authentication)
			throws AuthenticationException {
		if (authentication.getCredentials() == null) {
			logger.debug("Authentication failed: no credentials provided");

			throw new BadCredentialsException(messages.getMessage(
					"AbstractUserDetailsAuthenticationProvider.badCredentials",
					"Bad credentials"));
		}

		String presentedPassword = authentication.getCredentials().toString();
        // 对加密后的密码进行匹配
		if (!passwordEncoder.matches(presentedPassword, userDetails.getPassword())) {
			logger.debug("Authentication failed: password does not match stored value");

			throw new BadCredentialsException(messages.getMessage(
					"AbstractUserDetailsAuthenticationProvider.badCredentials",
					"Bad credentials"));
		}
	}
执行断点截图
至此用户名和密码认证完成,密码认证通过后,接着会获取用户权限,并构建成功的认证对象
四、构建成功的认证对象
回到 AbstractUserDetailsAuthenticationProvider#authenticate 方法中
public Authentication authenticate(Authentication authentication)
			throws AuthenticationException {
		Assert.isInstanceOf(UsernamePasswordAuthenticationToken.class, authentication,
				() -> messages.getMessage(
						"AbstractUserDetailsAuthenticationProvider.onlySupports",
						"Only UsernamePasswordAuthenticationToken is supported"));

		// Determine username
		String username = (authentication.getPrincipal() == null) ? "NONE_PROVIDED"
				: authentication.getName();

		boolean cacheWasUsed = true;
        // 1-从cache中获取用户信息 -> 可是实现 UserCache 接口自定义、redis等
		UserDetails user = this.userCache.getUserFromCache(username);

		if (user == null) {
			cacheWasUsed = false;

			try {
                // 2-从定义的方法中获取用户信息(实现接口自定义)
				user = retrieveUser(username,
						(UsernamePasswordAuthenticationToken) authentication);
			}
			catch (UsernameNotFoundException notFound) {
				logger.debug("User '" + username + "' not found");

				if (hideUserNotFoundExceptions) {
					throw new BadCredentialsException(messages.getMessage(
							"AbstractUserDetailsAuthenticationProvider.badCredentials",
							"Bad credentials"));
				}
				else {
					throw notFound;
				}
			}

			Assert.notNull(user,
					"retrieveUser returned null - a violation of the interface contract");
		}

		try {
            // 3-检验用户是否被锁、是否可用、过期等 -> UserDetails 属性(可以自定义逻辑)
			preAuthenticationChecks.check(user);
            // 4-密码认证逻辑 -> 该类中的additionalAuthenticationChecks实现
			additionalAuthenticationChecks(user,
					(UsernamePasswordAuthenticationToken) authentication);
		}
		catch (AuthenticationException exception) {
			if (cacheWasUsed) {
				// There was a problem, so try again after checking
				// we're using latest data (i.e. not from the cache)
				cacheWasUsed = false;
				user = retrieveUser(username,
						(UsernamePasswordAuthenticationToken) authentication);
				preAuthenticationChecks.check(user);
				additionalAuthenticationChecks(user,
						(UsernamePasswordAuthenticationToken) authentication);
			}
			else {
				throw exception;
			}
		}

		postAuthenticationChecks.check(user);

		if (!cacheWasUsed) {
            // 设置用户缓存
			this.userCache.putUserInCache(user);
		}

		Object principalToReturn = user;

		if (forcePrincipalAsString) {
			principalToReturn = user.getUsername();
		}
        // 5-创建成功的权限验证结果 -> 构建成功的认证对象
		return createSuccessAuthentication(principalToReturn, authentication, user);
	}
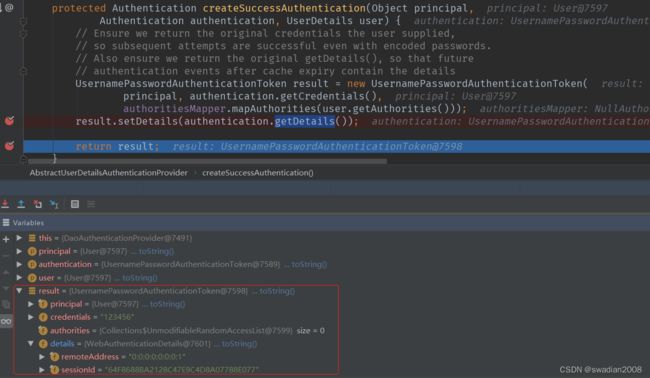
createSuccessAuthentication(principalToReturn, authentication, user); 构建的认证成功结果如下
五、认证信息放入SecurityContext
UsernamePasswordAuthenticationFilter 继承了认证过滤器 AbstractAuthenticationProcessingFilter,实现了具体的认证逻辑,用户认证时会先执行AbstractAuthenticationProcessingFilter#doFilter
public void doFilter(ServletRequest req, ServletResponse res, FilterChain chain)
			throws IOException, ServletException {

		HttpServletRequest request = (HttpServletRequest) req;
		HttpServletResponse response = (HttpServletResponse) res;

		if (!requiresAuthentication(request, response)) {
			chain.doFilter(request, response);

			return;
		}

		if (logger.isDebugEnabled()) {
			logger.debug("Request is to process authentication");
		}

		Authentication authResult;

		try {
            // 认证逻辑 -> UsernamePasswordAuthenticationFilter
			authResult = attemptAuthentication(request, response);
			if (authResult == null) {
				// return immediately as subclass has indicated that it hasn't completed
				// authentication
				return;
			}
			sessionStrategy.onAuthentication(authResult, request, response);
		}
		catch (InternalAuthenticationServiceException failed) {
			logger.error(
					"An internal error occurred while trying to authenticate the user.",
					failed);
			unsuccessfulAuthentication(request, response, failed);

			return;
		}
		catch (AuthenticationException failed) {
			// Authentication failed
			unsuccessfulAuthentication(request, response, failed);

			return;
		}

		// Authentication success
		if (continueChainBeforeSuccessfulAuthentication) {
			chain.doFilter(request, response);
		}
        // 成功认证后的操作
		successfulAuthentication(request, response, chain, authResult);
	}
认证通过后,doFilter 方法中调用了 以下方法
successfulAuthentication(request, response, chain, authResult);该方法也在 AbstractAuthenticationProcessingFilter 过滤器中, 在AbstractAuthenticationProcessingFilter#successfulAuthentication 方法中,把认证结果存入到了 SecurityContext 中
protected void successfulAuthentication(HttpServletRequest request,
			HttpServletResponse response, FilterChain chain, Authentication authResult)
			throws IOException, ServletException {

		if (logger.isDebugEnabled()) {
			logger.debug("Authentication success. Updating SecurityContextHolder to contain: "
					+ authResult);
		}
        // 把认证结果存入到 SecurityContext 中
		SecurityContextHolder.getContext().setAuthentication(authResult);

		rememberMeServices.loginSuccess(request, response, authResult);

		// Fire event
		if (this.eventPublisher != null) {
			eventPublisher.publishEvent(new InteractiveAuthenticationSuccessEvent(
					authResult, this.getClass()));
		}

		successHandler.onAuthenticationSuccess(request, response, authResult);
	}
至此,整个认证流程完成。
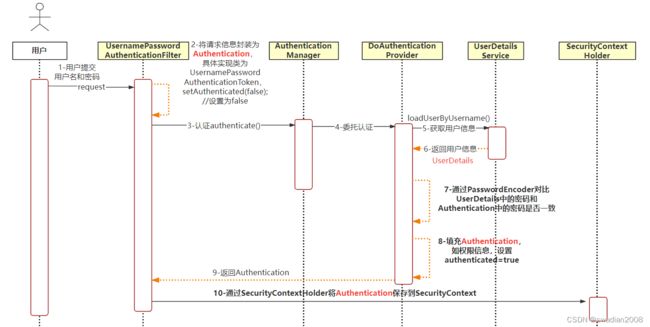
补充用户认证流程。
