Vue基础知识总结(二):进阶篇
Vue基础知识总结(二):进阶篇
1.0 MVVM模式
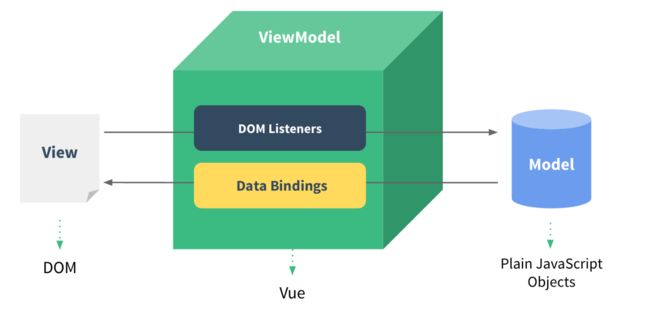
- MVVM 是Model-View-ViewModel 的缩写,它是一种基于前端开发的架构模式。
- MVVM模式将页面,分层了 M 、V、和VM ,解释为:
- Model: 负责数据存储
- View: 负责页面展示
- View Model: 负责业务逻辑处理(比如Ajax请求等),对数据进行加工后交给视图展示
<body>
  <div id="app">

   <h2>{{name}}h2>
  div>
 body>
 <script src="./js/vue.min.js">script>
 <script>
  //创建的vue实例,就是 VM ViewModel
  var VM = new Vue({
   el: "#app",
   //data就是MVVM模式中的 model
   data: {
    name: "hello",
  },
 });
 script>
-
首先,我们将上图中的DOM Listeners和Data Bindings看作两个工具,它们是实现双向绑定的关键。
- 从View侧看,ViewModel中的DOM Listeners工具会帮我们监测页面上DOM元素的变化,如果有变化,则更改Model中的数据;
- 从Model侧看,当我们更新Model中的数据时,Data Bindings工具会帮我们更新页面中的
DOM元素
-
MVVM的思想,主要是为了让我们的开发更加的方便,因为MVVM提供了数据的双向绑定
1.1 v-mode指令
作用:获取和设置表单元素的值(实现双向数据绑定)
- 双向数据绑定
- 单向绑定:就是把Model绑定到View,当我们用javaScript代码更新时Model时,View就会自动更新。
- 双向绑定:用户更新了View,Model的数据也自动被更新了,这种情况况就是双向绑定。
- 什么情况下用户可以更新View呢?
- 填写表单就是一个最直接的例子。当用户填写表单时,View的状态就被更新了,如果此时MVVM框架可以自动更新Model的状态,那就相当于我们把Model和View做了双向绑定:
代码实例:
DOCTYPE html>
<html lang="en">
<head>
    <meta charset="UTF-8">
    <meta http-equiv="X-UA-Compatible" content="IE=edge">
    <meta name="viewport" content="width=device-width, initial-scale=1.0">
    <title>Documenttitle>
    <script src="../js/vue.js" >script>
head>
<body>

    <div id="app" >
        <input type="button" value="修改model的数据" @click="change" /><br>

        <input type="text" V-bind:value="msg" /> <br>
        <label>单向绑定:label>{{msg}}<br>

        <input type="text" v-model="msg" /><br>
        <label>双向绑定:label>{{msg}}
    div>
body>
<script>
    //创建的vue实例,就是 VM ViewModel
    var obj = new Vue({
        el: "#app",
         //data就是MVVM模式中的 model
        data: {
            msg: "天天好心情",
        },
        methods:{
            change:function(){
                this.msg = "我变了";
            },
        },
    });

script>
html>
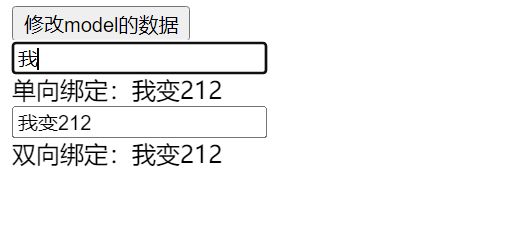
效果展示:
v-model指令总结
- v-model 指令的作用是便捷的设置和获取表单元素的值
- 绑定的数据会和表单元素值相关联
- 双向数据绑定
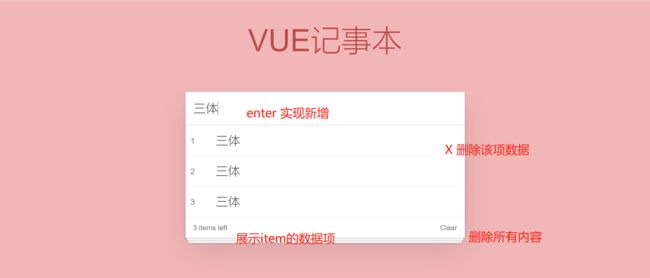
1.2 实现简单记事本
<html>
  <head>
    <meta http-equiv="content-type" content="text/html; charset=UTF-8" />
    <title>小黑记事本title>
    <meta http-equiv="content-type" content="text/html; charset=UTF-8" />
    <meta name="robots" content="noindex, nofollow" />
    <meta name="googlebot" content="noindex, nofollow" />
    <meta name="viewport" content="width=device-width, initial-scale=1" />
    <link rel="stylesheet" type="text/css" href="../css/index.css" />
  head>

  <body>

    <section id="app">


      <header class="header">
        <h1>VUE记事本h1>
        <input
          autofocus="autofocus"
          autocomplete="off"
          placeholder="输入日程"
          class="new-todo"
          v-model:value="msg"
          @keyup.enter="add"
        />
      header>


      <section class="main">
        <ul class="listview">
          <li class="todo" v-for="(item,index) in content">
            <div class="view">
              <span class="index">{{index + 1}}span> <label>{{item}}label>
              <button class="destroy" @click="del(index)">button>
            div>
          li>
        ul>
      section>

       <footer class="footer">
        <span class="todo-count"> <strong>{{content.length}}strong> items left span>
        <button class="clear-completed" @click="delAll">
          Clear
        button>
      footer>
    section>


    <script src="https://cdn.jsdelivr.net/npm/vue/dist/vue.js">script>
    <script>
      var obj = new Vue({
        el: "#app",
        data:{
          content:["西游记","水浒传","红楼梦"],
          msg: "三体",
        },
        methods:{
          add:function(){
            //将用户输入的信息添加到列表里去
            this.content.push(this.msg);
          },
          // 删除方法
          del:function(index){
            // 使用splice(元素索引,删除几个)根据索引删除
            this.content.splice(index,1);
          },
          delAll:function(){
            this.content = [];
          }
        },
      });
    script>
  body>
html>
-
删除内容
点击删除指定内容(根据索引删除元素)
删除方法:
//删除方法 remove:function(index){ console.log(index); //使用splice(元素索引,删除几个) 根据索引删除 this.list.splice(index,1); } -
清空数据
<button class="clear-completed" @click="clear()">Clearbutton>//清空数组元素 clear:function(){ this.list=[]; }
1.3 Axios
1.3.1 Ajax回顾
Ajax 是指一种创建交互式网页应用的开发技术。Ajax = 异步 JavaScript 和 XML。
1.3.2 什么是Ajxa?
Ajax 是指一种创建交互式网页应用的开发技术。Ajax = 异步 JavaScript 和 XML。
1.3.3 Ajxa的作用
- Ajax 可以使网页实现异步更新。这意味着可以在不重新加载整个网页的情况下,对网页的某部分进行更新(局部更新)。传统的网页如果需要更新内容,必须重载整个网页页面。
- 简单记: Ajax 是一种在无需重新加载整个网页的情况下,能够更新部分网页的技术, 维护用户体验性, 进行网页的局部刷新.
1.3.4 异步与同步
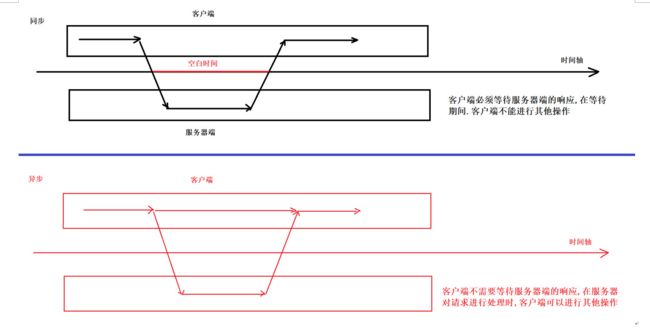
- 浏览器访问服务器的方式
- 同步访问: 客户端必须等待服务器端的响应,在等待过程中不能进行其他操作
- 异步访问: 客户端不需要等待服务的响应,在等待期间,浏览器可以进行其他操作
案例演示
<%@ page contentType="text/html;charset=UTF-8" language="java" %>
<html lang="en">
<head>
  <meta charset="UTF-8" />
  <meta name="viewport" content="width=device-width, initial-scale=1.0" />
  <title>Documenttitle>
head>
<body>
    <input type="text" />
  <input type="button" value="Jquery发送异步请求" onclick="run1()" />
body>
<script src="./jquery-1.8.3.min.js">script>
<script>
  function run1() {
    //JQuery Ajax方式 发送异步请求
    $.ajax({
      url: "/ajax",
      async:true,
      data: { name: "天青" },
      type: "post",
      dataType:"text",
      success: function (res) {
        console.log(res)
        alert("响应成功" + res);
     },
      error: function () {
        alert("响应失败!");
     }
   });
 }
script>
html>
servlet
@WebServlet("/ajax")
public class AjaxServlet extends HttpServlet {
  @Override
  protected void doGet(HttpServletRequest req, HttpServletResponse resp)
throws ServletException, IOException {
    //1.获取请求数据
    String username = req.getParameter("name");
    //模拟业务操作,造成的延时效果
    try {
      Thread.sleep(5000);
   } catch (InterruptedException e) {
      e.printStackTrace();
   }
    //2.打印username
    System.out.println(username);
    resp.getWriter().write("hello hello");
 }
  @Override
  protected void doPost(HttpServletRequest req, HttpServletResponse resp)
throws ServletException, IOException {
    doGet(req, resp);
 }
}
- 如果是同步,那么页面在空白期会等待服务器响应才能操作
- 异步的话,页面input能进行输入
1.3.5 axios介绍
VUE中结合网络数据进行应用的开发
- 目前十分流行网络请求库,专门用来发送请求,其内部还是ajax,进行封装之后使用更加方便
- axios作用: 在浏览器中可以帮助我们完成 ajax异步请求的发送.
[^]: Vue2.0之后,尤雨溪推荐大家用axios替换JQuery ajax
1.3.6 axios入门
使用步骤:
-
导包
<!-- 官网提供的 axios 在线地址 --> <script src="https://unpkg.com/axios/dist/axios.min.js"></script> -
请求方式
get
POST
axios.post(地址,{key:value,key2:value2}).then(function(response)
{},function(error){})
- 原生js
<body>
  <input type="button" value="get请求" id="get">
  <input type="button" value="post请求" id="post">
</body>
<script src="https://unpkg.com/axios/dist/axios.min.js"></script>
<script>
  /*
   请求地址:https://autumnfish.cn/api/joke/list
   请求方法:get
   请求参数:num(笑话条数,数字)
   响应内容:随机笑话
 */
  document.getElementById("get").onclick=function(){
    axios.get("https://autumnfish.cn/api/joke/list?num=1")
   .then(function(response){
      //请求成功,调用
      console.log(response);
   },function(error){
      //请求失败,调用
      console.log(error)
   });
 }
  /*
   请求地址:https://autumnfish.cn/api/user/reg
   请求方法:post
   请求参数:username(用户名,字符串)
   响应内容:注册成功或失败
 */
  document.getElementById("post").onclick=function(){
    axios.post("https://autumnfish.cn/api/user/reg",{username:"张百万"})
   .then(function(response){
      console.log(response);
   },function(error){
      console.log(error);
   });
 }
</script>
- axios小结
-
axios 必须导包才能使用
-
使用get或者post方法,就可以发送请求
-
then方法中的回调函数,会在请求成功或者请求失败的时候触发
-
通过回调函数的形参可以获取响应的内容,或者错误信息
vue+axios
<body>
  <div id="app">
    <input type="button" value="点击获取一个笑话" @click="getJoke">
    <p>{{joke}}p>
  div>
body>

<script src="https://cdn.jsdelivr.net/npm/vue/dist/vue.js">script>
<script src="https://unpkg.com/axios/dist/axios.min.js">script>
<script>
  /*
   请求地址:https://autumnfish.cn/api/joke
   请求方法:get
   请求参数:无
   响应内容:随机笑话
 */
  var VM = new Vue({
    el:"#app",
    data:{
      joke:"笑笑更健康"
   },
    methods: {
      getJoke:function(){
        console.log(this.joke);//笑笑更健康
        var that = this; //把this保存起来
        //异步访问
        axios.get("https://autumnfish.cn/api/joke").then(
          function(response){
            //获取data中的笑话
            console.log(response.data);
            //console.log(this.joke); //undefined 没有获取到this
            that.joke=response.data;
         },
          function(error){}
       )
     }
   }
 })
script>
案例总结
-
axios回调函数中this指向已经改变,无法访问data中的数据
-
解决方案: 将this进行保存,回调函数中直接使用保存的this即可
1.4 computed计算属性
在Vue应用中,在模板中双向绑定一些数据或者表达式,但是表达式如果过长忙活着逻辑更为复杂时,就会变得臃肿甚至难以维护和阅读,比如下面的代码:
<div>
写在双括号中的表达式太长了,不利于阅读
{{text.split(',').reverse().join(',')}}
div>.
将这段操作text.split(',').reverse().join(',')  放到计算属性中,最终返回一个结果值就可以
- computed的作用:减少运算次数,缓存运算结果,运用于重复相同的计算
<body>
    <div id="app">
        <h2>{{res()}}h2>
        <h2>{{res()}}h2>

        <h1>{{res2}}h1>
        <h1>{{res2}}h1>
        <h1>{{res2}}h1>
    div>
body>
<script>
    var obj = new Vue({
        el:"#app",
        data:{
            a:10,
            b:20,
        },
        methods:{
            res:function(){
                console.log("methods执行了:");
                return this.a * this.b;
            },
        },
        computed:{
            res2:function(){
                console.log("computed执行了!");
                return this.a * this.b;
            },
        },
    });
script>
效果展示:
1.4.1 computed总结
- 可以看出methods里的res被执行了两次,但是computed值被执行了一次,说明computed是在缓存中运算取得结果的。
- 定义函数也可以实现与 计算属性相同的效果,都可以简化算。
- 不同的是计算属性是基于它们的响应式依赖进行缓存的。只在相关响应式依赖发生改变时它们才会重新求值。
1.5 filter 过滤器
1.5.1 什么是过滤器
过滤器是对即将显示的数据做进一步的筛选处理,然后进行显示,值得注意的是过滤器并没有改变原来的数据,只是在原数据的基础上产生新的数据。
数据加工车间,对值进行筛选加工.
1.5.2 过滤器使用位置
- 双括号插值内
{{ msg | filterA }} msg是需要处理的数据, filterA是过滤器, | 这个竖线是管道,通过这个管道将数据传输给过滤器进行过滤 加工操作
- v-bind绑定的值的地方。
<h1 v-bind:id=" msg | filterA"> {{ msg }} h1>
1.5.3 过滤器
- 局部过滤器
需求: 通过过滤器给电脑价格前面 添加一个符号$
实现代码:
DOCTYPE html>
<html lang="en">
<head>
    <meta charset="UTF-8">
    <meta http-equiv="X-UA-Compatible" content="IE=edge">
    <meta name="viewport" content="width=device-width, initial-scale=1.0">
    <title>Documenttitle>
    <script src="../js/vue.js">script>
head>
<body>
    <div id="app">
        <P>电脑价格:{{price | addIcon}}P>
    div>
body>
    <script>
        var obj = new Vue({
            el: "#app",
            data:{
                price:200,
            },
            methods:{

            },
            computed:{

            },
            // 局部过滤器
            filters:{
                // 处理函数,value = price,是固定参数
                addIcon(value){
                    return "$" + value;
                },
            }

        });
    script>
html>
-
全局过滤器
需求: 将用户名开头字母大写
DOCTYPE html>
<html lang="en">
<head>
    <meta charset="UTF-8">
    <meta http-equiv="X-UA-Compatible" content="IE=edge">
    <meta name="viewport" content="width=device-width, initial-scale=1.0">
    <title>Documenttitle>
    <script src="../js/vue.js">script>
head>
<body>
    <div id="app">
        <p>姓名:{{user.name | changeName}}p>
    div>
body>
<script>
    // 在创建Vue实例之前,创建全局过滤器
        Vue.filter("changeName",function(value){
        // 将姓名开头字母大写,然后在重新拼接
        return value.charAt(0).toUpperCase() + value.slice(1);
    });
    var obj = new Vue({
        el: "#app",
        data: {
            user:{name:"jack"},
        },
    });
script>
html>
总结:
- 在创建Vue实例之前,创建全局过滤器,不然不起作用
- 过滤器常用来处理文本格式化的操作。过滤器可以用在两个地方:双花括号插值和 v-bind 表达式
- 过滤器应该被添加在 JavaScript 表达式的尾部,由“管道”符号指示
1.6 watch 侦听器
1.6.1什么是监听器
- Vue.js 提供了一个方法 watch,它用于观察Vue实例上的数据变动。
- 作用: 当你有一些数据需要随着其它数据变动而变动时,可以使用侦听属性
1.6.3案例演示
需求: 监听姓名变化,实时显示
DOCTYPE html>
<html lang="en">
<head>
    <meta charset="UTF-8">
    <meta http-equiv="X-UA-Compatible" content="IE=edge">
    <meta name="viewport" content="width=device-width, initial-scale=1.0">
    <title>Documenttitle>
    <script src="../js/vue.js">script>
head>
<body>
    <div id="app">
        <label>姓:label> <input typoe="text" v-model="lastName" /><br>
        <label>名:label><input type="text" v-model="firstName" /><br>
        <label>全名:{{getfullName}}label>
    div>
body>
<script>
    var obj = new Vue({
        el: "#app",
        data: {
            firstName: "",
            lastName: "",
            fullName: "",
        },
        watch:{
            firstName(newValue, oldValue){
                console.log("newValue:"+newValue);
                console.log("oldValue:"+oldValue);
                this.fullName = this.lastName +" "+newValue;
            },
            lastName(newValue,oldValue){
                console.log("newValue:"+newValue);
                console.log("oldValue:"+oldValue);
                this.fullName = newValue +""+ this.firstName;
            },

        },
        computed:{
            getfullName:function(){
                return this.fullName = this.lastName+this.firstName
            }
        }
    });

script>
html>
1.7 全局组件
语法格式:
Vue.component("组件名称", {
  template: "html代码",  // 组件的HTML结构代码
  data(){ //组件数据
    return {}
 },
  methods: {  // 组件的相关的js方法
    方法名(){
      // 逻辑代码
   }
 }
})
注意:
- 组件名以小写开头,采用短横线分割命名: 例如 hello-Word
- 组件中的data 必须是一个函数,注意与Vue实例中的data区分
- 在template模板中, 只能有一个根元素
代码实现:
DOCTYPE html>
<html lang="en">
<head>
<meta charset="UTF-8">
<meta http-equiv="X-UA-Compatible" content="IE=edge">
<meta name="viewport" content="width=device-width, initial-scale=1.0">
<title>Documenttitle>
<script src="../js/vue.js">script>
head>
<body>
<div id="app">
<page-head>page-head>
div>
body>
<script>
// 定义全局组件
Vue.component("page-head",{
// 组件的命名一般使用短横线方式,组件中的模板只能有一个根元素
template: "{{msg}}
",
data(){
// 组价中的data是一个函数
return {
msg:"hello这里是组件中的data数据",
};
},
methods: {
hello() {
alert("天天好心情");
}
},
});
var obj = new Vue({
el: "#app",
data:{
},
});
script>
html>
1.8 局部组件
比起全局组件,局部组件只能在同一个实例内才能被调用。局部组件的写法和全局组件差不多。 唯一不同就是:局部组件要写在Vue实例里面。
new Vue({
  el: "#app",
  components: {
    组件名: {
      // 组件结构
      template: "HTML代码",
      // data数据
      data() { return { msg:"xxxx" };},
   },
 },
});
注意:
创建局部组件,注意components,注意末尾有’‘s’’,而全局组件是不用+“s”的,这意味着,component里可以创建多个组件。
DOCTYPE html>
<html lang="en">
<head>
<meta charset="UTF-8">
<meta http-equiv="X-UA-Compatible" content="IE=edge">
<meta name="viewport" content="width=device-width, initial-scale=1.0">
<title>Documenttitle>
<script src="../js/vue.js">script>
head>
<body>
<div id="app">
<pagecontent>pagecontent>
div>
body>
<script>
var obj = new Vue({
el: "#app",
components:{
// 组件名称
"pagecontent":{
// 组件内容
template: "{{msg}}
",
data(){
return{
msg:"今天不学习,明天变垃圾!",
};
},
},
},
});
script>
html>
效果展示:
1.9 组件与模板分离
- 由于把html语言写在组件里面很不方便,也不太好看所以将它们分开写。
DOCTYPE html>
<html lang="en">
<head>
    <meta charset="UTF-8">
    <meta http-equiv="X-UA-Compatible" content="IE=edge">
    <meta name="viewport" content="width=device-width, initial-scale=1.0">
    <title>Documenttitle>
    <script src="../js/vue.js">script>
head>
<body>
    <div id="app">

      <page-content>page-content>
    div>

    <template id="content">
        <div>
            <button @click="show">{{msg}}button>
        div>
    template>
body>
<script>
    var obj = new Vue({
        el: "#app",
        components:{
            "page-content":{
                template: "#content",
                data(){
                    return{
                        msg:"点击查询",
                    };
                },
                methods:{
                    show(){
                        alert("正在查询,请稍等···");
                    }
                }
            },
        },
    });
script>
html>
总结:
- 上面这种写法,浏览器会把 html 里的 template 标签过滤掉。所以 template 标签的内容是不会在页面中展示的。直到它被 JS 中的 Vue 调用。
- 在 html 中,template 标签一定要有一个 id,因为通过 id 是最直接被选中的。 data 和 methods等参数,全部都要放到 Vue 实例里面写。
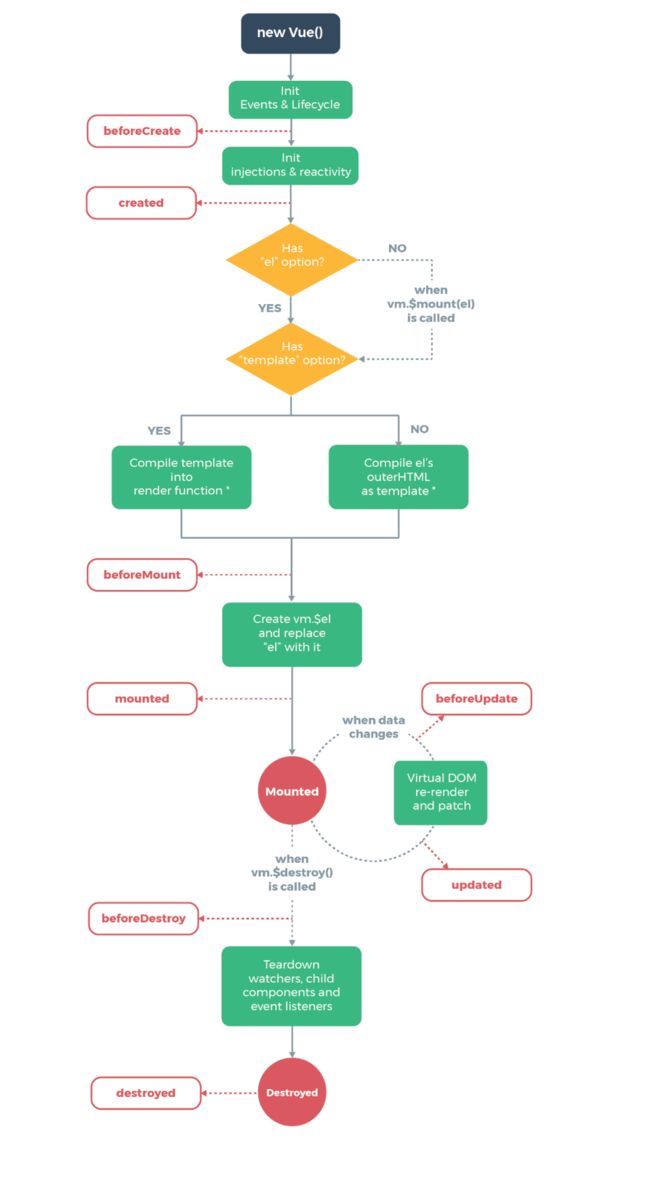
2.0 Vue生命周期
2.0.1 生命周期图示
每个Vue实例在被创建之前都要经过一系列的初始化过程,这个过程就是vue的生命周期
了解生命周期的好处:
- 找错误
- 解决需求
下图展示了实例的生命周期:
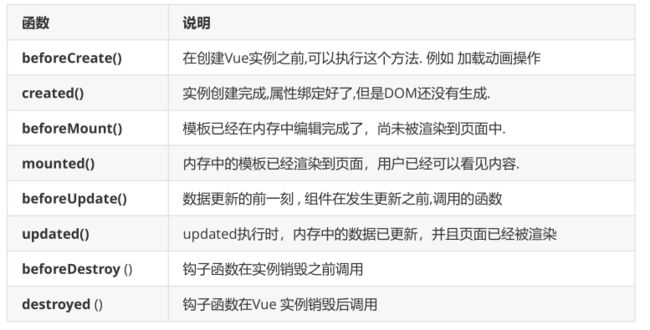
2.0.2 钩子函数介绍
- 生命周期中的钩子函数
钩子函数:钩子函数是在一个事件触发的时候,在系统级捕获到了他,然后做一些操作。
2.0.3 案例演示
<body>
    <div id="app">
        <button @click="next">获取下一句button>
        <h2 id="msg">{{message}}h2>
    div>
body>
<script src="./vue.min.js">script>
<script>
    var VM = new Vue({
        el: "#app",
        data: {
            message: "想当年,金戈铁马",
        },
        methods: {
            next() {
                this.message = "气吞万里如虎!";
            },
            show() {
                alert("show方法执行!");
            },
        },
        beforeCreate() {
            alert("1.beforeCreate函数在组件实例化之前执行");
            alert(this.message); //undefined
            this.show(); // this.show is not a function
        },
        created() {
            alert("2.created函数执行时,组件实例化完成,但是DOM(页面)还未生成");
            alert(this.message);
            this.show();
        },
        beforeMount() {
            alert(
                "3.beforeMount函数执行时,模板已经在内存中编辑完成了,尚未被渲染到页面中"
            );
            alert(document.getElementById("msg").innerText); //Cannot read property'innerText' of null
        },
        mounted() {
            alert("4.mounted函数执行时,模板已经渲染到页面,执行完页面显示");
            alert(document.getElementById("msg").innerText);
        },
        beforeUpdate() {
            alert("5.beforeUpdate执行时,内存中的数据已更新,但是页面尚未被渲染");
            alert("页面显示的内容:" + document.getElementById("msg").innerText);
            alert("data中的message数据是: " + this.message);
        },
        updated() {
            alert("6.updated执行时,内存中的数据已更新,此方法执行完显示页面!");
        },
    });
script>
2.1 Vue Router路由
2.1.1 什么是路由?
在Web开发中,路由是指根据URL分配到对应的处理程序。 路由允许我们通过不同的 URL 访问不同的内容。
通过 Vue.js 可以实现多视图单页面web应用(single page web application,SPA)
2.1.2 什么是SPA ?
百度百科
- 单页面Web应用(single page web application,SPA),就是只有一张Web页面的应用,是加载单个HTML 页面并在用户与应用程序交互时动态更新该页面的Web应用程序。
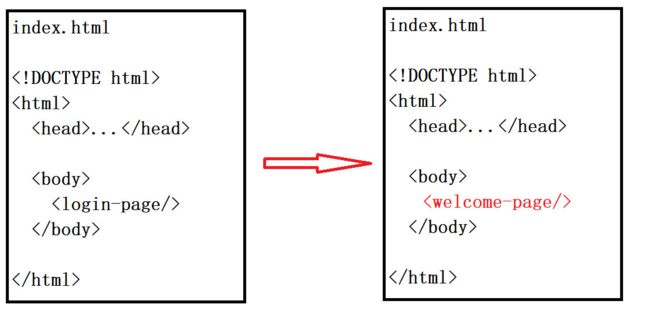
单页应用不存在页面跳转,它本身只有一个HTML页面。我们传统意义上的页面跳转在单页应用的概念下转变为了 body 内某些元素的替换和更新,举个例子:
整个body的内容从登录组件变成了欢迎页组件, 从视觉上感受页面已经进行了跳转。但实际上,页面只是随着用户操作,实现了局部内容更新,依然还是在index.html 页面中。
单页面应用的好处:
- 用户操作体验好,用户不用刷新页面,整个交互过程都是通过Ajax来操作。
- 适合前后端分离开发,服务端提供http接口,前端请求http接口获取数据,使用JS进行客户端渲染。
2.1.3 路由相关的概念
-
router :
是 Vue.js 官方的路由管理器。它和 Vue.js 的核心深度集成,让构建单页面应用(SPA)变得易如反掌 ,router 就相当于一个管理者,它来管理路由。 -
route:
ruter相当于路由器, route就相当于一条路由.比如: Home按钮 => home内容, 这是一条route, news按钮 => news内容, 这是另一条路由。 -
routes :
是一组路由,把上面的每一条路由组合起来,形成一个数组。[{home 按钮 =>home内容 }, {about按钮 => about 内容}] -
router-link组件:
router-link 是一个组件,是对标签的一个封装. 该组件用于设置一个导航链接,切换不同 HTML内容。 to 属性为目标地址, 即要显示的内容。
-
router-view 组件:
路由导航到指定组件后,进行渲染显示页面.
2.1.4 使用路由
(1)Vue.js路由需要载入vue-router库
//方式1: 本地导入
<script src="vue-router.min.js"></script>
//方式2: CDN
<script src="https://unpkg.com/vue-router/dist/vue-router.js"></script>
(2)使用步骤
- 定义路由所需的组件
- 定义路由 每个路由都由两部分 path (路径) 和component (组件)
- 创建router路由器实例 ,管理路由
- 创建Vue实例, 注入路由对象, 使用$mount() 指定挂载点
Vue 的$mount()为手动挂载,在项目中可用于延时挂载(例如在挂载之前要进行一些其他操作、判断等),之后要手动挂载上。new Vue时,el和$mount并没有本质上的不同。
(3)Html代码
<body>
  <div id="app">
   <h1>渣浪.comh1>
   <p>

    <router-link to="/home">go to homerouter-link>
    <router-link to="/news">go to newsrouter-link>
   p>

   <router-view>router-view>
  div>
