【springboot进阶】springboot集成fastjson(三)配置redis使用fastJson进行序列化
目录
一、引入依赖
二、添加redis连接配置
三、新建RedisConfig类配置
四、测试
五、踩过的坑
数字型的保存
对象的保存
上一章节,我们说到fastjson的自定义序列化和反序列化,这章节,我们看看如何配置redis使用fastjson进行序列化。
一、引入依赖
默认使用的redis连接为方式为lettuce
    org.springframework.boot
    spring-boot-starter-data-redis


    org.apache.commons
    commons-pool2
二、添加redis连接配置
在application.yml文件中,添加redis配置
#redis配置
spring:
  redis:
    host: 127.0.0.1
    password:
    port: 6379
    database: 3
    # 连接超时时间(毫秒)
    timeout: 10s
    client-type: lettuce
    lettuce:
      pool:
        # 连接池最大连接数(使用负值表示没有限制) 默认 8
        max-active: 1000
        # 连接池中的最大空闲连接 默认 8
        max-idle: 300
        # 连接池中的最小空闲连接 默认 0
        min-idle: 3
        # 连接池最大阻塞等待时间(使用负值表示没有限制) 默认 -1
        max-wait: 1s
三、新建RedisConfig类配置
@Configuration
public class FastjsonRedisConfig {

    /**
     * 自定义redisTemplate配置
     *
     * 使用的序列化方式
     *
     * @param redisConnectionFactory
     * @return
     */
    @Bean
    public RedisTemplate redisTemplate(RedisConnectionFactory redisConnectionFactory) {
        RedisTemplate redisTemplate = new RedisTemplate<>();
        redisTemplate.setConnectionFactory(redisConnectionFactory);
        //key值使用spring默认的StringRedisSerializer
        redisTemplate.setKeySerializer(new StringRedisSerializer());
        //value值使用fastjson的GenericFastJsonRedisSerializer
        GenericFastJsonRedisSerializer fastJsonRedisSerializer = new GenericFastJsonRedisSerializer();
        redisTemplate.setValueSerializer(fastJsonRedisSerializer);
        //以下是hash序列化的配置
        redisTemplate.setHashKeySerializer(new StringRedisSerializer());
        redisTemplate.setHashValueSerializer(fastJsonRedisSerializer);

        return redisTemplate;
    }

}
四、测试
编写测试demo
@SpringBootTest
class SpringbootFastjsonApplicationTests {
@Resource
RedisTemplate redisTemplate;
@Test
void contextLoads() {
redisTemplate.opsForValue().set("fastjson_key", "a1b2c3", Duration.ofMinutes(5));
Object object = redisTemplate.opsForValue().get("fastjson_key");
System.out.println(object);
}
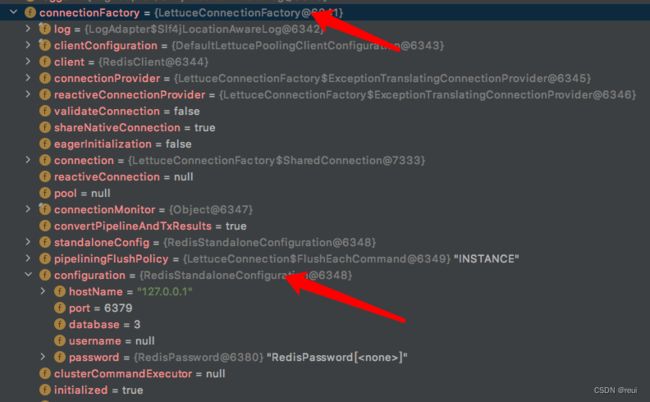
} 从调试窗口可以看到,redis连接池和redis连接配置信息,都是我们上面设置的。
运行后,我们看一下redis保存的信息是否存在。
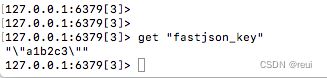
可以看到在3库里面,保存着我们刚才设置的值。
这里看出,使用fastjson保存的字符串,会多出两个引号,这是区分字符和数字的标志。
五、踩过的坑
使用fastJson进行序列化时,有一些坑是需要注意的。
数字型的保存
如果我们使用的是字符串来保存一个数字,那么我们就不能够在获取值的时候强制转化为数字型,否则会报错。
redisTemplate.opsForValue().set("fastjson_key", "123", Duration.ofMinutes(5));

Integer object = (Integer)redisTemplate.opsForValue().get("fastjson_key");
System.out.println(object);
如下图报错信息

这里有个坑点就是,保存的时候用了字符串,但是取的时候印象中记得是一个数字,所以就理想当然的用数字型来强制转换,就会报错。redis中也是用的双引号标志,这是一个字符串,所以fastjson取值的时候也当作是一个字符串来处理。
![]()
我们在看看,如果我们存的是一个数字型,是怎么样的。

可以看到,外层没有了双引号,fastjson也能识别出一个数字型,所以这次强转是没有报错了。
对象的保存
建议保存对象的时候,能够先序列化为json字符串再保存,然后在获取的时候,再从字符串转为对应的对象。
如果我们直接保存对象到redis,代码如下。
FastjsonDemoRequest fastjsonDemoRequest = new FastjsonDemoRequest();
fastjsonDemoRequest.setUserName("张三");
fastjsonDemoRequest.setAge(18);
fastjsonDemoRequest.setMoney("1.8");

redisTemplate.opsForValue().set("fastjson_key", fastjsonDemoRequest, Duration.ofMinutes(5));

FastjsonDemoRequest object = (FastjsonDemoRequest)redisTemplate.opsForValue().get("fastjson_key");
System.out.println(object);
此时的redis保存的值,如下图,这里多了一个"@type",值为这个类的class包路径。

这里会有什么问题呢?如果在其他的业务系统中,也要读取这个值,因为不同的系统间,包路径命名等不同,就会导致取值的时候会报错,如下图。
FastjsonDemoRequest fastjsonDemoRequest = new FastjsonDemoRequest();
fastjsonDemoRequest.setUserName("张三");
fastjsonDemoRequest.setAge(18);
fastjsonDemoRequest.setMoney("1.8");

redisTemplate.opsForValue().set("fastjson_key", fastjsonDemoRequest, Duration.ofMinutes(5));

org.liurb.springboot.fastjson.redis.FastjsonDemoRequest object = (org.liurb.springboot.fastjson.redis.FastjsonDemoRequest)redisTemplate.opsForValue().get("fastjson_key");
System.out.println(object);
报错信息,如下图

如果我们先序列化为一个json字符串,代码如下
FastjsonDemoRequest fastjsonDemoRequest = new FastjsonDemoRequest();
fastjsonDemoRequest.setUserName("张三");
fastjsonDemoRequest.setAge(18);
fastjsonDemoRequest.setMoney("1.8");

redisTemplate.opsForValue().set("fastjson_key", JSON.toJSONString(fastjsonDemoRequest), Duration.ofMinutes(5));

String str = (String)redisTemplate.opsForValue().get("fastjson_key");

org.liurb.springboot.fastjson.redis.FastjsonDemoRequest object = JSON.parseObject(str, org.liurb.springboot.fastjson.redis.FastjsonDemoRequest.class);

System.out.println(object);
这样,我们就不需要担心因为跨业务系统导致包路径不相同,或者我们重命名为另外一个类的名字,都可以正常获取到redis的值,只要字段名字相同就行了。