Docker - 镜像的分层 - busybox镜像制作
目录
知识点1:镜像的分层
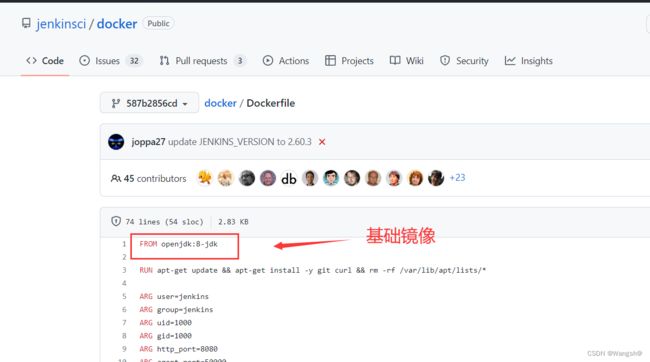
示例:进入 docker hub查看Jenkins的Dockerfile
知识点2:base镜像
知识点3:scratch镜像
scratch 镜像是什么?
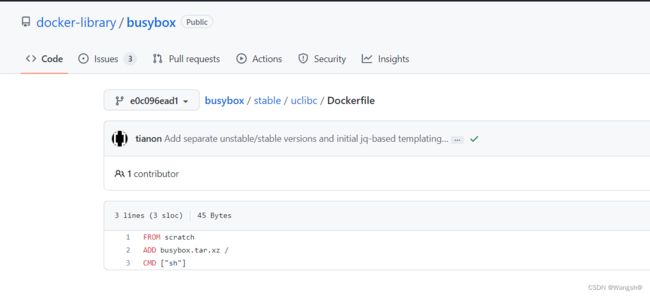
示例:在docker hub里面查看busybox的Dockerfile,
知识点4:bootfs 和 rootfs
知识点5:为什么Docker镜像要采用这种分层结构?
如果多个容器共享一份基础镜像,当某个容器修改了基础镜像的内容,比如 /etc 下的文件,这时其他容器的 /etc 是否也会被修改?
可写层的概念:
Cpoy-on-Write
知识点6:制作一个busybox镜像
1、编写Dockerfile
ENTRYPOINT和CMD的区别
2、编写while.sh
3、制作镜像
4、启动容器,使用镜像
给while.sh赋予可执行权限
知识点1:镜像的分层
镜像:镜像是一个软件单元
镜像是各个不同的层组合而成的,这就是镜像的分层
最底层是基础镜像 -- base images
镜像里的系统使用宿主机的内核,基础镜像里面有操作系统,
[root@sc-docker-server mydocker]# vim Dockerfile
FROM python:2.7-slim
WORKDIR /app # 进入到容器后进入的文件夹
ADD . /app # 将linux系统当前目录下的内容到容器的/app目录下,类似于docker cp
RUN pip install --trusted-host  pypi.python.org -r requirements.txt  # 在容器内部执行的命令
EXPOSE 80   # 暴露80端口
ENV NAME World   # 定义了环境变量NAME赋值world
ENV AUTHOR cali  # 定义了环境变量AUTHOR ccali
CMD ["python","app.py"]  # 容器启动的时候执行命令  python app.py
在镜像制作的过程中,每执行一次RUN命令,镜像就会多一些内容,镜像就会大一些
镜像是要加载到容器里面去运行的,一个容器对应一个进程,进程是需要消耗cpu和内存的。
示例:进入 docker hub查看Jenkins的Dockerfile
FROM openjdk:8-jdk : 指定镜像使用的基础镜像 -- 》底座
因为jenkins是使用java开发的软件,必须有java环境 jdk
知识点2:base镜像
base镜像有两层含义
1. 不依赖其他镜像,从 scratch 构建。
2. 其他镜像可以之为基础进行扩展。
base镜像通常都是各种linux发行版的Docker镜像,例如Ubuntu,Debian,Centos等
知识点3:scratch镜像
scratch 镜像是什么?
scratch是最基础的一个空白镜像,可以用于构建busybox等超小镜像,可以说实真正的从零开始构建属于自己的镜像
示例:在docker hub里面查看busybox的Dockerfile,
busybox镜像是使用功scratch作为基础镜像的,如果被容器使用的话,只有一个shell解释器,
知识点4:bootfs 和 rootfs
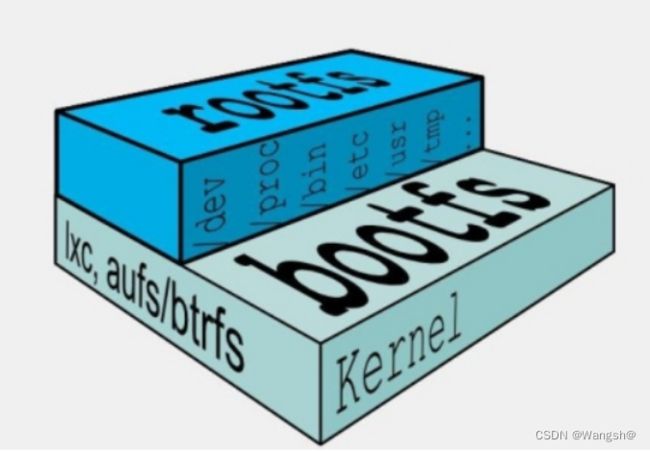
bootfs --》容器启动的时候需要的内容,是linux kernel 提供了 bootfs boot 启动/引导 fs file system,容器启动后,bootfs会被卸载
对于 base 镜像来说,底层直接用 宿主机 的 kernel,kernel 会提供bootfs 自己只需要提供 rootfs 就行了。
rootfs --》容器内部的操作系统,镜像里的操作系统提供的 root :根 file system,
rootfs加载完成后,容器里就形成了一个封闭的环境。类似于一个操作系统的环境
里面有 /dev /proc /bin /etc/ /usr /tmp 等
不同linux 发行版的区别主要就是rootfs的区别
知识点5:为什么Docker镜像要采用这种分层结构?
最大的好处是:共享资源
例如:有多个镜像都是从相同的base镜像构建而来,那么只需要再Docker 宿主机上面保存一份base镜像,同时内存中也只需要加载一份base镜像
就可以为所有容器服务了,而且镜像的每一层都可以被共享,可以节约磁盘和内存资源
如果多个容器共享一份基础镜像,当某个容器修改了基础镜像的内容,比如 /etc 下的文件,这时其他容器的 /etc 是否也会被修改?
可写层的概念:
当容器启动时,一个新的可写层会被加载到镜像的顶部,这一层通常被称作 容器层,容器层之下的都叫镜像层
镜像层数量可能会很多,所有镜像层会联合在一起组成一个统一的文件系统
Cpoy-on-Write
容器层保存的是镜像变化的部分,不会对镜像本身进行任何修改
所有对容器的改变,无论是添加,删除,还是修改都只会在容器层发送
容器启动的时候是自下而上,容器读数据是自上而下的
1、添加文件
在容器中创建文件时,新文件被添加到容器层中
2、读取文件
在容器中读取某个文件时,Docker会从上往下依次在各进行层中查找此文件,一旦找到,打开并读入内存
3、修改文件
在容器中修改已存在的文件时,Docker会从上往下依次在各镜像层中查找这个文件,一旦找到,立即将其复制到容器层,然后修改
4、删除文件
在容器中删除文件时Docker也是从上往下依次在镜像层中查找此文件,找到后,会在容器层中记录下次删除操作。
示例:制作一个镜像,观察容器层的变化
[root@docker1 scdocker]# cat Dockerfile
FROM centos:7
RUN yum install vim -y
RUN yum install net-tools tree -y
RUN mkdir /sanchuang
RUN touch /sanchuang/fengdeyong{1..10}.txt
RUN rm -rf /sanchuang/fengdeyong1.txt
CMD ["/bin/bash"]
[root@docker1 scdocker]# docker build -t sccentos:7.9 .
Sending build context to Docker daemon  2.048kB
Step 1/7 : FROM centos:7
 ---> eeb6ee3f44bd
Step 2/7 : RUN yum install vim -y
 ---> Running in 93af96c0310c
Loaded plugins: fastestmirror, ovl
...........
..........
Complete!
Removing intermediate container 4a96fbf70500
 ---> 6fa74b2106fa
Step 4/7 : RUN mkdir /sanchuang
 ---> Running in 3a1cf78d4ca0
Removing intermediate container 3a1cf78d4ca0
 ---> 01a4d2f21282
Step 5/7 : RUN touch /sanchuang/fengdeyong{1..10}.txt
 ---> Running in c25513038189
Removing intermediate container c25513038189
 ---> f39a961d3899
Step 6/7 : RUN rm -rf /sanchuang/fengdeyong1.txt
 ---> Running in f6dc4e06812b
Removing intermediate container f6dc4e06812b
 ---> 56c7f9f45d6f
Step 7/7 : CMD ["/bin/bash"]
 ---> Running in 3f959c0752c6
Removing intermediate container 3f959c0752c6
 ---> c66b1be73d66
Successfully built c66b1be73d66
Removing intermediate container 4a96fbf70500
每执行一次操作,都会产生一个临时的容器,来执行操作,执行完成后就会删除这个临时容器
CMD ["/bin/bash"]
CMD里面接的命令,必须一致在容器里面运行,在前台运行,
只要容器里运行的命令结束,容器就会退出
知识点6:制作一个busybox镜像
1、编写Dockerfile
[root@docker1 busybox]# cat Dockerfile
FROM busybox
COPY . /
RUN cat /hello.txt
ENTRYPOINT ["/bin/sh","/while.sh"]
ENTRYPOINT :指定启动容器的时候运行的命令
executable :可执行程序
param1:参数1
param2:参数2
ENTRYPOINT和CMD的区别
1、docker run 启动容器的时候,可以传递参数进入给ENTYRPOINT 里面的命令
2、当2者都存在的时候,CMD里的内容会成为ENTRYPOINT里的参数(位置参数)
2、编写while.sh
[root@docker1 busybox]# cat while.sh
#! /bin/bash
i=1
while:
do
	echo "hello world,sanchuang $i"
	let i++
	sleep 1

done
[root@docker1 busybox]# ls
Dockerfile  hello.txt  while.sh
Dockerfile 制作镜像的配置文件
hello.txt 故意放到容器里的,要来验证从宿主机复制文件到容器里面
while.sh 真正在容器里面运行的程序
3、制作镜像
[root@docker1 busybox]# docker build -t scbusybox:1.0 .
Sending build context to Docker daemon  4.096kB
Step 1/4 : FROM busybox
latest: Pulling from library/busybox
2c39bef88607: Pull complete
Digest: sha256:20142e89dab967c01765b0aea3be4cec3a5957cc330f061e5503ef6168ae6613
Status: Downloaded newer image for busybox:latest
 ---> c98db043bed9
Step 2/4 : COPY . /
 ---> 2cffc30469ea
Step 3/4 : RUN cat /hello.txt
 ---> Running in 776107d1c216
welcome to sanchuang!
Removing intermediate container 776107d1c216
 ---> 20a16576f67a
Step 4/4 : ENTRYPOINT ["/while.sh"]
 ---> Running in 9b742e805ee6
Removing intermediate container 9b742e805ee6
 ---> 7fb76760295e
Successfully built 7fb76760295e
Successfully tagged scbusybox:1.0
[root@docker1 busybox]# docker images
REPOSITORY   TAG            IMAGE ID       CREATED             SIZE
scbusybox    1.0            7fb76760295e   40 seconds ago      1.24MB
4、启动容器,使用镜像
会报错,因为while.sh没有可执行权限
[root@docker1 busybox]# docker run -d --name scbusybox-1 scbusybox:1.0
e19ac4541e0908bcc60c5b685a7968a35f9f600a3d307095c3c5ab64920613ee
docker: Error response from daemon: failed to create shim task: OCI runtime create failed: runc create failed: unable to start container process: exec: "/while.sh": permission denied: unknown.
[root@docker1 busybox]# ls
Dockerfile  hello.txt  while.sh
[root@docker1 busybox]# ll
总用量 12
-rw-r--r--. 1 root root 66 9月   3 16:48 Dockerfile
-rw-r--r--. 1 root root 22 9月   3 17:34 hello.txt
-rw-r--r--. 1 root root 84 9月   3 17:38 while.sh
给while.sh赋予可执行权限
[root@docker1 busybox]# chmod +x while.sh
[root@docker1 busybox]# ll
总用量 12
-rw-r--r--. 1 root root 66 9月   3 16:48 Dockerfile
-rw-r--r--. 1 root root 22 9月   3 17:34 hello.txt
-rwxr-xr-x. 1 root root 84 9月   3 17:38 while.sh
还是会报错,因为我们只是在宿主机上面修改了,但是镜像里面还没有修改,所以我们要重新制作镜像
[root@docker1 busybox]# docker run -d --name scbusybox-2 scbusybox:1.0
40b729eeede30cfb75119001c6ad489ead452322ced8188b5f2306534c37e135
docker: Error response from daemon: failed to create shim task: OCI runtime create failed: runc create failed: unable to start container process: exec: "/while.sh": permission denied: unknown.
[root@docker1 busybox]#
[root@docker1 busybox]# docker build -t scbusybox:1.1 .
Sending build context to Docker daemon  4.096kB
Step 1/4 : FROM busybox
 ---> c98db043bed9
Step 2/4 : COPY . /
 ---> ec25c9060e17
Step 3/4 : RUN cat /hello.txt
 ---> Running in ec27802a5ca9
welcome to sanchuang!
Removing intermediate container ec27802a5ca9
 ---> d10143844fcb
Step 4/4 : ENTRYPOINT ["/while.sh"]
 ---> Running in f698d042c7fd
Removing intermediate container f698d042c7fd
 ---> 4883eded6503
Successfully built 4883eded6503
Successfully tagged scbusybox:1.1
然后启动容器
[root@docker1 busybox]# docker run -itd --name scbusybox-6 scbusybox:1.1
2e55c707993466b6f13ee004ad022790219dacbdbceb21b3a63503aa3100727b
[root@docker1 busybox]# docker ps
CONTAINER ID   IMAGE           COMMAND               CREATED         STATUS        PORTS     NAMES
2e55c7079934   scbusybox:1.1   "/bin/sh /while.sh"   2 seconds ago   Up 1 second             scbusybox-6


