小兔鲜儿电商前台项目(一) —— 项目初始化
一、创建项目
1. vue-cli 创建项目
-
路由是否使用history模式?选择 n
如果项目中存在要求就使用history(即:y),但是一般还是推荐大家使用hash模式,毕竟history模式需要依赖运维

-
选择一种CSS预处理类型,这个需要根据各个项目的要求使用那种css编译处理

-
是否保存当前选择的配置项
如果当前配置是经常用到的配置,建议选择y存储一下当前配置项。如果只是临时使用的话就不需要存储了

2. 项目目录调整
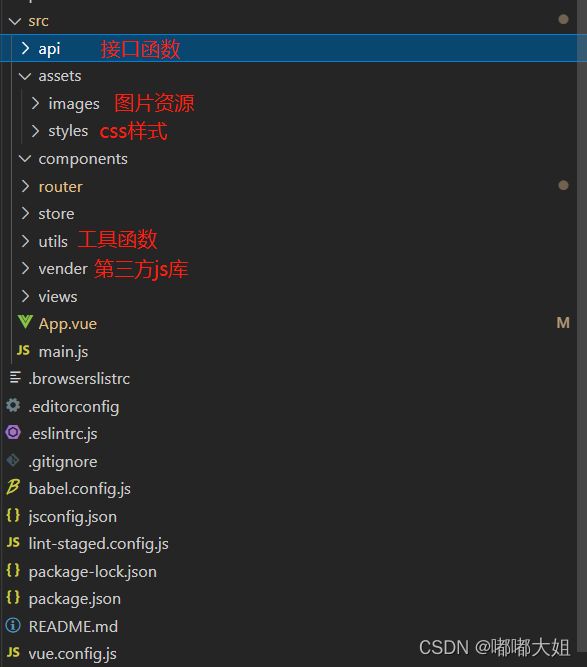
2.1 初始项目目录
2.2 调整后的项目目录
2.3 vue3 中改变的文件
-
router / index.js
import { createRouter, createWebHashHistory } from 'vue-router' // 路由规则 const routes = [ ] // 创建路由实例 const router = createRouter({ // 使用hash路由模式 history: createWebHashHistory(), routes }) export default router -
store / index.js
import { createStore } from 'vuex' // 创建仓库 export default createStore({ state: { }, getters: { }, mutations: { }, actions: { }, modules: { } }) -
. main.js
// 不再引入Vue构造函数,引入的是名为createApp的工厂函数,无需通过new调用
import { createApp } from 'vue'
// 引入根组件
import App from './App.vue'
// 引入路由实例
import router from './router'
// 引入仓库(vuex)实例
import store from './store'
// createApp(App):创建应用实例对象——app(类似于vue2中的vm,但app比vm更“轻”,即app没有vm那么多的方法属性等)
const app = createApp(App)
// 挂载
app.mount('#app')
3. 项目配置
3.1 src文件夹简写,别名@的配置
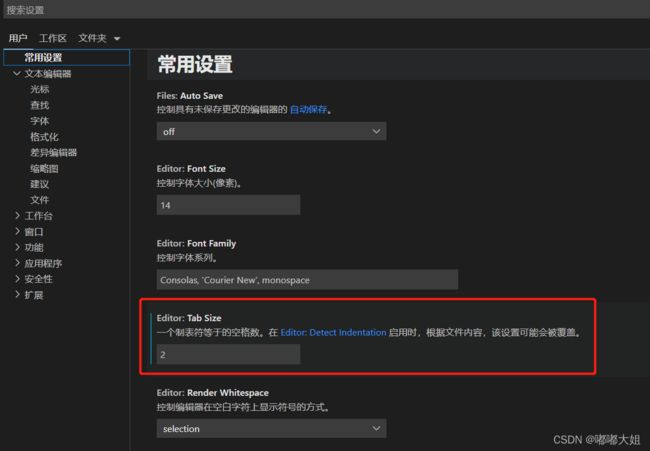
- 这个是针对项目进行配置的,如果vscode已经全局配置了,可以不进行配置
- 新建
src / jsconfig.json
{
  "compilerOptions": {
      "baseUrl": "./",
          "paths": {
          "@/*": [
              "src/*"
          ]
      }
  },
  "exclude": [
      "node_modules",
      "dist"
  ]
}
- 注意:配置后需要重启编辑器
3.2 忽略eslint校验
- 新建
src / .eslintignore
/dist
/src/vender
- eslint在做风格检查的时候忽略 dist 和 vender 不去检查
二、编程规范
1. 代码格式规范
通过 ESLint + Prettier + VSCode 配置 配合进行了处理。最终达到在保存代码时,自动规范化代码格式的目的
1.1 ESlint 和 Prettier 配合解决代码格式问题
- VSCode中安装prettier插件
- 新建prettier配置文件:
.prettierrc
注意:复制过去时,不能加注释!!!!
{
    // 不尾随分号
    "semi": false,
    // 使用单引号
    "singleQuote": true,
    // 多行逗号分割的语法中,最后一行不加逗号
    "trailingComma": "none"
  }
- 解决 ESLint 和 Prettier之间冲突问题
- 打开
.eslintrc.js在 rules 下新增'space-before-function-paren': 'off'
2. git 提交规范
2.1 工具 —— Commitizen
约定式提交
当使用 commitizen 进行代码提交(git commit)时,commitizen 会提交你在提交时填写所有必需的提交字段!
- 全局安装commitizen
cnpm install -g commitizen
- 安装并配置 cz-customizable 插件
通过 cz-customizable 自定义提交规范
- 使用 npm 下载 cz-customizable
cnpm i --save-dev cz-customizable
- 添加以下配置到 package.json 中
"config": {
    "commitizen": {
      "path": "node_modules/cz-customizable"
    }
  }
- 项目根目录下创建
.cz-config.js自定义提示文件
module.exports = {
  // 可选类型
  types: [
    { value: 'feat', name: 'feat:     新功能' },
    { value: 'fix', name: 'fix:      修复' },
    { value: 'docs', name: 'docs:     文档变更' },
    { value: 'style', name: 'style:    代码格式(不影响代码运行的变动)' },
    {
      value: 'refactor',
      name: 'refactor: 重构(既不是增加feature,也不是修复bug)'
    },
    { value: 'perf', name: 'perf:     性能优化' },
    { value: 'test', name: 'test:     增加测试' },
    { value: 'chore', name: 'chore:    构建过程或辅助工具的变动' },
    { value: 'revert', name: 'revert:   回退' },
    { value: 'build', name: 'build:    打包' }
  ],
  // 消息步骤
  messages: {
    type: '请选择提交类型:',
    customScope: '请输入修改范围(可选):',
    subject: '请简要描述提交(必填):',
    body: '请输入详细描述(可选):',
    footer: '请输入要关闭的issue(可选):',
    confirmCommit: '确认使用以上信息提交?(y/n/e/h)'
  },
  // 跳过问题
  skipQuestions: ['body', 'footer'],
  // subject文字长度默认是72
  subjectLimit: 72
}
- 使用
git cz代替 git commit,即可看到提示内容
2.2 Git Hooks配置提交校验
用到的两个hooks
commit-msg
- 用来规范化标准格式
- 由 git commit 和 git merge 调用
- 可以按需指定是否要拒绝本次提交,使用 git commit --no-verify 绕过
pre-commit
- 会在提交前被调用,由
git commit调用- 可以按需指定是否要拒绝本次提交,使用 git commit --no-verify 绕过
2.2.1 使用 husky + commitlint 检查提交描述是否符合规范要求
-
commitlint:用于检查提交信息
-
husky:是
git hooks工具
注意:npm 需要在 7.x 以上版本!!!!!
2.2.1.1 安装commitlint
- 安装依赖:
cnpm install --save-dev @commitlint/config-conventional @commitlint/cli
- 创建
commitlint.config.js文件
- config-conventional 默认配置点击可查看
module.exports = {
  // 继承的规则
  extends: ['@commitlint/config-conventional'],
  // 定义规则类型
  rules: {
    // type 类型定义,表示 git 提交的 type 必须在以下类型范围内
    'type-enum': [
      // 当前验证的错误级别
      2,
      // 在什么情况下验证
      'always',
      // 泛型内容
      [
        'feat', // 新功能 feature
        'fix', // 修复 bug
        'docs', // 文档注释
        'style', // 代码格式(不影响代码运行的变动)
        'refactor', // 重构(既不增加新功能,也不是修复bug)
        'perf', // 性能优化
        'test', // 增加测试
        'chore', // 构建过程或辅助工具的变动
        'revert', // 回退
        'build' // 打包
      ]
    ],
    // subject 大小写不做校验
    'subject-case': [0]
  }
}
注意:确保保存为 UTF-8 的编码格式,否则可能报错
2.2.1.2 安装husky
- 安装依赖:
cnpm install --save-dev husky
- 启动
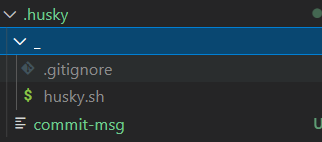
hooks, 生成.husky文件夹
控制台输入:
npx husky install
- 在
package.json中生成prepare指令( 需要 npm > 7.0 版本 )
npm set-script prepare "husky install"
- 执行
prepare指令
npm run prepare
-
添加
commitlint的hook到husky中,并指定在commit-msg的hooks下执行npx --no-install commitlint --edit "$1"指令
npx husky add .husky/commit-msg ‘npx --no-install commitlint --edit “$1”’
至此, 不符合规范的 commit 将不再可提交
强制规范化的提交要求,到现在 不符合规范的提交信息,将不可在被提交!
2.3 通过 pre-commit 检测提交时代码规范
通过
husky监测pre-commit钩子,在该钩子下执行npx eslint --ext .js,.vue src指令来去进行相关检测:
- 执行
npx husky add .husky/pre-commit "npx eslint --ext .js,.vue src"添加commit时的hook(npx eslint --ext .js,.vue src会在执行到该 hook 时运行)
npx husky add .husky/pre-commit "npx eslint --ext .js,.vue src"
2.4 lint-staged 自动修复格式错误
-
lint-staged 可以让你当前的代码检查 只检查本次修改更新的代码,并在出现错误的时候,自动修复并且推送
-
lint-staged 无需单独安装,我们生成项目时,
vue-cli已经帮助我们安装过了,所以我们直接使用就可以了
-
修改
package.json配置"lint-staged": { "src/**/*.{js,vue}": [ "eslint --fix", "git add" ] } -
如上配置,每次它只会在你本地
commit之前,校验你提交的内容是否符合你本地配置的eslint规则(这个见文档 ESLint ),校验会出现两种结果:- 如果符合规则:则会提交成功。
- 如果不符合规则:它会自动执行
eslint --fix尝试帮你自动修复- 修复成功,则会帮你把修复好的代码提交
- 如果失败,则会提示你错误,让你修好这个错误之后才能允许你提交代码。
-
修改
.husky/pre-commit文件#!/bin/sh . "$(dirname "$0")/_/husky.sh" npx lint-staged -
再次执行提交代码
-
发现 暂存区中 不符合
ESlint的内容,被自动修复
2.5 总结
对于 git 提交规范 而言我们使用了 husky 来监测 Git hooks 钩子,并且通过以下插件完成了对应的配置:
- 约定式提交规范
- commitizen:git 提交规范化工具
- commitlint:用于检查提交信息
pre-commit:git hooks钩子- lint-staged:只检查本次修改更新的代码,并在出现错误的时候,自动修复并且推送
三、vuex 扩展
1. getters
- vuex的计算属性,用来简化state中的数据
2. modules模块
- 让代码更好维护,让多种数据分类更加明确
- 组件的state、actions、mutations、getters单独管理,最后引入
2.1 默认模块
- state 区分模块,其他 getters mutations actions 都在全局
- 使用时直接 store.state.getters/mutations/actions.xxx 即可
2.2 开启命名空间的模块
-
通过
namespaced:true开启命名空间 -
所有功能区分模块,更高封装度和复用
-
使用时要写模块名
- 开启命名空间(namespace)后,组件中读取state数据
// 直接读取 $store.state.模块名.要读取的state数据- 开启命名空间后,组件中读取getters数据:
// 直接读取 $store.getters['模块名/要读取的getters']- 开启命名空间后,组件中调用dispatch
// 直接dispatch $store.dispatch('模块名/actions方法名',数据)- 开启命名空间后,组件中调用commit
// 直接commit
$store.commit('模块名/xxx',数据)
四、vuex 持久化
- vuex中的数据会在刷新时丢失
- 在实际开发中,比如用户信息(名字,头像,token),需要vuex中存储且需要本地存储来实现持久化
- 可以通过插件简化该过程,让在vuex中管理的状态数据同时存储在本地,免去自己存储的环节
1. 需要持久化存储的模块
- 新建需要持久化存储的模块:
src / store / modules下新建cart.js 、user.js 、 category.js - 子模块state建议写成函数形式
- 本项目的子模块都开启了命名空间
-
user.js:用户模块
/** 用户模块 */ // 子模块state建议写成函数 const state = () => { return { // 用户信息 profile: { id: '', avatar: '', nickname: '', account: '', mobile: '', token: '' } } } const mutations = { // 修改用户信息,payload代表要修改的用户信息对象 SETUSER (state, payload) { state.profile = payload } } const actions = {} const getters = {} export default { namespaced: true, // 开启命名空间 state, mutations, actions, getters } -
cart.js:购物车模块
/** 购物车模块 */ const state = () => { return { // 购物车商品列表 list: [] } } const mutations = {} const actions = {} const getters = {} export default { namespaced: true, // 开启命名空间 state, mutations, actions, getters } -
category.js :分类模块,管理所有分类
/** 分类模块 */ const state = () => { return { // 分类信息 categoryList: [] } } const mutations = {} const actions = {} const getters = {} export default { namespaced: true, // 开启命名空间 state, mutations, actions, getters } -
store / index.js中引入
import { createStore } from 'vuex'
// 导入模块
import user from './modules/user'
import cart from './modules/cart'
import category from './modules/category'

// 创建仓库实例
export default createStore({
  modules: {
    user,
    cart,
    category
  }
})
2. vuex的状态持久化插件
- 安装 vuex-persistedstate
cnpm i vuex-persistedstate --save
- 使用vuex-persistedstate插件
import { createStore } from 'vuex'
// 引入持久化插件
import createPersistedstate from 'vuex-persistedstate'
// 导入模块
import user from './modules/user'
import cart from './modules/cart'
import category from './modules/category'

// 创建仓库实例
export default createStore({
  modules: {
    user,
    cart,
    category
  },
  // 配置插件
  plugins: [
    // 默认存储在localStorage
    createPersistedstate({
      // 本地存储的名字
      key: 'rabbit-client-pc-store',
      // 指定需要存储的模块
      paths: ['user', 'cart']
    })
  ]
})
注意:
-
默认是存储在
localStorage中 -
key是存储数据的键名
-
paths是存储state中的那些数据,如果是模块下具体的数据需要加上模块名称,如user.token
-
修改state后触发才可以看到本地存储数据的的变化
五、axios请求工具函数
目的:基于axios封装一个请求工具,调用接口时使用。封装请求拦截器、响应拦截器,进行一些业务处理
在后续需要调用接口时,要引入该工具
- 安装 axios
cnpm install --save axios
- 新建 src / utils / request.js
/** *****************axios的二次封装,主要是封装请求拦截器和响应拦截器 ************/
/** 实现步骤
 * 1. 创建一个新的axios实例
 * 2. 请求拦截器,如果有token进行头部携带
 * 3. 响应拦截器,获取响应数据,拦截失效token
 * 4. 定义函数,使用配置好的axios发送请求
 **/

// 导入axios
import axios from 'axios'
// 导入store实例
import store from '@/store'
// 导入路由
import router from '@/router'

// 导出baseURL:一些不是axios发送的请求也会用到baseURL
export const baseURL = 'http://pcapi-xiaotuxian-front-devtest.itheima.net/'
/**
 * TODO-1: 通过 axios.create() 创建axios实例
 */
const instance = axios.create({
  // axios 的配置
  // 基础路径,`baseURL` 将自动加在 `url` 前面
  baseURL,
  // 超时时间,指定请求超时的毫秒数(0 表示无超时时间)
  // 如果请求话费了超过 `timeout` 的时间,请求将被中断
  timeout: 5000
})

/**
 * TODO-2:请求拦截器
 */
instance.interceptors.request.use(config => {
  // 发送请求前要做的事情
  // config:配置对象,其中含请求头header属性

  const { profile } = store.state.user
  // 如果存在token,就在请求头携带
  if (profile.token) {
    config.headers.token = `Bearer ${profile.token}`
  }

  // 最后必须返回config配置对象
  return config
}, error => {
  // 请求失败要做的事情
  return Promise.reject(new Error(error))
})

/**
 * TODO-3:响应拦截器
 */
instance.interceptors.response.use(response => {
  // 响应成功,直接返回data数据
  return response.data
}, error => {
  // 响应失败

  // 401 未登录状态
  if (error.response && error.response.status === 401) {
    // 清空本地无效信息:通过提交修改用户信息的mutation,并且传递一个空对象实现
    store.commit('user/SETUSER', {})
    /** 跳转到登录,且传递当前路由地址给登录页面 */
    // js模块中获取当前路由信息地址:router.currentRoute.value.fullPath
    // encodeURIComponent 转换uri编码,防止解析地址出问题
    const fullPath = encodeURIComponent(router.currentRoute.value.fullPath)
    router.push(`/login?redirectUrl=${fullPath}`)
  }

  return Promise.reject(new Error(error))
})

/**
 * TODO-4:封装请求函数
 * 负责发请求,传递的参数:请求地址、请求方式、提交的数据
 */
export default (url, method, submitData) => {
  // instance 负责发请求,得到的是Promise对象,所以最后直接返回instance
  return instance({
    url,
    method,
    // 如果是get请求,需要使用params传参
    // 如果不是get请求,需要使用data进行传参
    [method.toLowerCase() === 'get' ? 'params' : 'data']: submitData
  })
}
六、路由
1. 路由设计
| 路径 | 组件(功能) | 嵌套级别 |
|---|---|---|
| / | 首页布局容器 | 1级 |
| / | 首页 | 2级 |
| /category/:id | 一级分类 | 2级 |
| /category/sub/:id | 二级分类 | 2级 |
| /product/:id | 商品详情 | 2级 |
| /login | 登录 | 1级 |
| /login/callback | 第三方登录回调 | 1级 |
| /cart | 购物车 | 2级 |
| /member/checkout | 填写订单 | 2级 |
| /member/pay | 进行支付 | 2级 |
| /member/pay/result | 支付结果 | 2级 |
| /member | 个人中心布局容器 | 2级 |
| /member | 个人中心 | 3级 |
| /member/order | 订单管理 | 3级 |
| /member/order/:id | 订单详情 | 3级 |
2. 路由与组件
- App.vue 中设置路由出口
<template>

  <router-view>router-view>
template>
- 一级路由布局容器: 新建
src / views / Layout.vue
<template>

  <div>顶部通栏div>

  <div>顶部组件div>

  <main class="main-box">

    <router-view>router-view>
  main>

  <footer>底部组件footer>
template>

<script setup>
import {} from 'vue'
script>
<style lang="scss" scoped>style>
- 二级路由首页组件:新建
src /views / home / index.vue
<template>
  <div>home首页div>
template>

<script setup>
import {} from 'vue'
script>
<style lang="scss" scoped>style>
- 配置路由规则: src / router / index.js
import { createRouter, createWebHashHistory } from 'vue-router'

const routes = [
  // 一级路由布局容器
  {
    path: '/',
    component: () => import('@/views/Layout.vue'), // 路由懒加载
    children: [
      // 二级路由
      {
        path: '/',
        component: () => import('@/views/home/index.vue')
      }
    ]
  }
]

const router = createRouter({
  history: createWebHashHistory(),
  routes
})

export default router
七、scss的自动化导入
1. 项目中的变量文件和混入文件
- 变量:新建
src / assets / styles / variables.scss
// 主题
$xtxColor:#27BA9B;
// 辅助
$helpColor:#E26237;
// 成功
$sucColor:#1DC779;
// 警告
$warnColor:#FFB302;
// 价格
$priceColor:#CF4444;
- 混入:新建
src/assets/styles/mixins.scss
// 鼠标经过上移阴影动画
@mixin hoverShadow {
  transition: all .5s;
  &:hover {
    transform: translate3d(0,-3px,0);
    box-shadow: 0 3px 8px rgba(0,0,0,0.2);
  }
}
- 混入就是,申明一段css代码,在其他css选择器调用,可复用包裹的代码
2. 自动注入公用变量和混入
- 存在的问题:每次使用公用的变量和mixin的时候需要单独引入到文件中
<style lang="scss" scoped>
@import '~@/assets/styles/mixins.scss';
.box {
  @include hoverShadow;
}
style>
-
解决方法: 使用 vue-cli 的
style-resoures-loader插件来完成自动注入到每个scss文件或者vue组件中style标签中 -
在当前项目下执行命令 ,安装插件
cnpm i sass-resources-loader --save-dev -
配置
vue.config.js,配置完成后重启项目const path = require('path') const { defineConfig } = require('@vue/cli-service') module.exports = defineConfig({ transpileDependencies: true, pluginOptions: { 'style-resources-loader': { preProcessor: 'scss', // 需要自动引入的文件,要使用绝对路径 // 通过path.join()拼接完整路径 patterns: [ path.join(__dirname, './src/assets/styles/mixins.scss'), path.join(__dirname, './src/assets/styles/variables.scss') ] } } }) -
使用
<style lang='scss' scoped>
.home-container {
  color: $themeColor;
  @include hoverShadow
}
style>
八、样式重置
准备网站所需的重置样式代码,以及一些公用样式代码
1. 重置样式
- 执行
cnpm i --save normalize.css安装重置样式的包,然后在main.js导入 normalize.css 即可
// 重置样式
import 'normalize.css'
2. 公用样式
- 新建文件
src/assets/styles/common.scss在该文件写入常用的样式,然后在main.js导入即可。
// common.scss

// 重置样式
* {
  box-sizing: border-box;
 }

 html {
   height: 100%;
   font-size: 14px;
 }
 body {
   height: 100%;
   color: #333;
   min-width: 1240px;
   font: 1em/1.4 'Microsoft Yahei', 'PingFang SC', 'Avenir', 'Segoe UI', 'Hiragino Sans GB', 'STHeiti', 'Microsoft Sans Serif', 'WenQuanYi Micro Hei', sans-serif
 }

 ul,
 h1,
 h3,
 h4,
 p,
 dl,
 dd {
   padding: 0;
   margin: 0;
 }

 a {
   text-decoration: none;
   color: #333;
   outline: none;
 }

 i {
   font-style: normal;
 }

 input[type="text"],
 input[type="search"],
 input[type="password"],
 input[type="checkbox"]{
   padding: 0;
   outline: none;
   border: none;
   -webkit-appearance: none;
   &::placeholder{
     color: #ccc;
   }
 }

 img {
   max-width: 100%;
   max-height: 100%;
   vertical-align: middle;
 }

 ul {
   list-style: none;
 }

 #app {
   background: #f5f5f5;
   user-select: none;
 }

 .container {
   width: 1240px;
   margin: 0 auto;
   position: relative;
 }

 .ellipsis {
   white-space: nowrap;
   text-overflow: ellipsis;
   overflow: hidden;
 }

 .ellipsis-2 {
   word-break: break-all;
   text-overflow: ellipsis;
   display: -webkit-box;
   -webkit-box-orient: vertical;
   -webkit-line-clamp: 2;
   overflow: hidden;
 }

 .fl {
   float: left;
 }

 .fr {
   float: right;
 }

 .clearfix:after {
   content: ".";
   display: block;
   visibility: hidden;
   height: 0;
   line-height: 0;
   clear: both;
 }
//main.js

import '@/assets/styles/common.scss'
九、其他插件
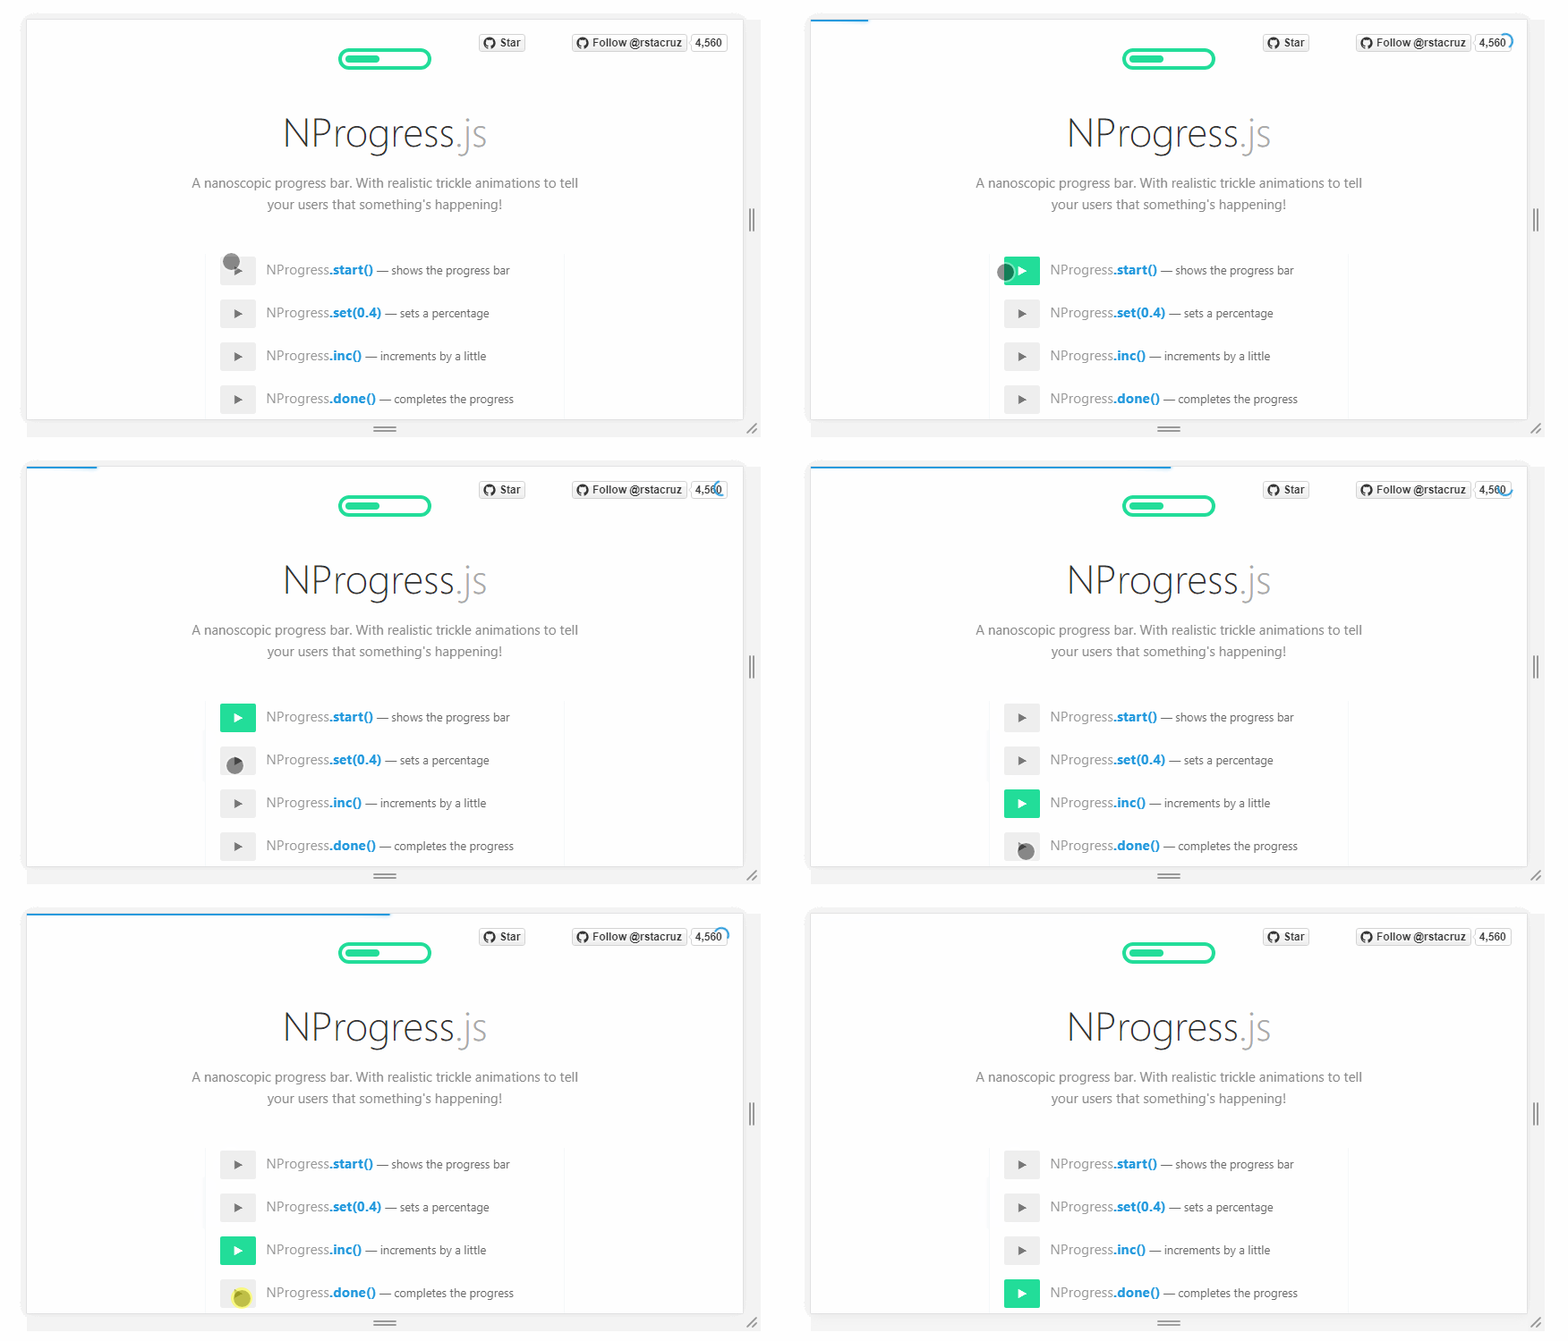
1. nprogress 进度条
- nprogress文档
- 安装nprogress插件
cnpm install --save nprogress
- 使用:
request.js配置
// 引入进度条
import nprogress from 'nprogress'
// 引入进度条样式
import 'nprogress/nprogress.css'

// 请求拦截器中
// 进度条开始
 nprogress.start();

// 响应拦截器中
// 进度条结束
nprogress.done();


