【万字详解Linux系列】基础IO

文章目录

  • 前言
    • (1)当前目录
    • (2)stdin、stdout、stderr
  • 一、open
    • (1) 标志位
    • (2) O_WRONLY
    • (3) O_CREAT
  • 二、close,read,write
  • 三、文件描述符
    • 1.概念
    • 2.原理
    • 3.分配规则
  • 四、重定向
    • 1.输出重定向
    • 2.再谈缓冲区
      • (1)缓冲方式
      • (2)缓冲区
    • 3.输入重定向
    • 4.追加重定向
    • 5.stdout和stderr
  • 五、dup2
  • 感谢阅读,如有错误请批评指正


前言

有关C语言中对文件的操作可以在C语言文件操作中查看。

(1)当前目录

先来看一段代码:

#include 

int main()
{
	//如果文件不存在,默认在当前目录下创建文件
	FILE* fp = fopen("log.txt", "w");
	if (fp == NULL)
	{
		perror("fopen");
		return 1;
	}
	fprintf(fp, "hello world!");
	
	fclose(fp);
	return 0;
}

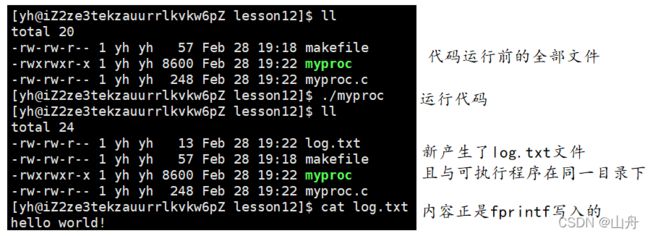
运行结果如下:
【万字详解Linux系列】基础IO_第1张图片
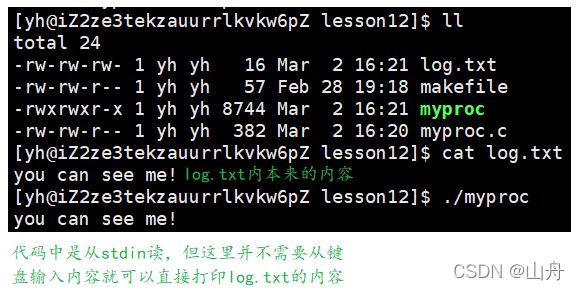
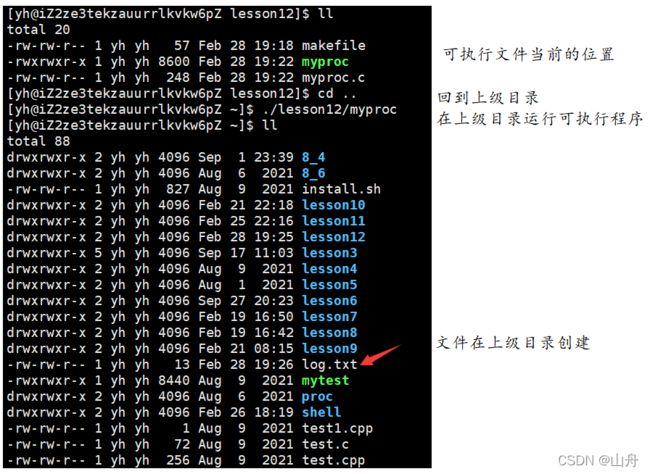
从上可以看出创建的文件与可执行程序在同一目录下,这一理解其实不对,请看下面的例子。
【万字详解Linux系列】基础IO_第2张图片
所以当前目录是进程运行时所处的目录,具体可通过下面的方式来查看。

#include 
#include 

int main()
{
	//如果文件不存在,默认在当前目录下创建文件
	FILE* fp = fopen("log.txt", "w");
	if (fp == NULL)
	{
		perror("fopen");
		return 1;
	}
	fprintf(fp, "hello world!");
	
	fclose(fp);
	
	while(1)//进程死循环,便于查看进程信息
	{
		sleep(1);
	}	
	return 0;
}

【万字详解Linux系列】基础IO_第3张图片


(2)stdin、stdout、stderr

C语言任何进程默认会打开三个输入输出流,分别是stdin、stdout、stderr(分别对应键盘、显示器、显示器),事实上这三个流的类型都是FILE*,它们本质上都是文件指针。

【万字详解Linux系列】基础IO_第4张图片

因为它们都是默认打开的,所以C语言中scanf可以直接从键盘读、printf可以直接向显示器输出。

//下面的写法两两等价
char buffer[1024];
fgets(buffer, 1000, stdin);//从stdin(键盘)读其实等价于scanf
scanf("%s", buffer);

fprintf(stdout, "hello world!");//向stdout(显示器)输出其实等价于printf
fprintf(stderr, "hello world!");//stderr也是显示器,所以这样也可以向显示器输出
printf("hello world!");

一、open

用open来引出系统级别的IO。
【万字详解Linux系列】基础IO_第5张图片
(上图只是man中对open最直接的介绍,各种参数及用法并没有放在图中)

pathname是要打开或创建的目标文件。

参数flags有很多,比如O_RDONLY(只读打开)、O_WRONLY(只写打开)、O_RDWR(读,写打开)这三个常量,必须指定一个且只能指定一个;还有O_CREAT(若文件不存在,则创建,且需要使用mode选项,来指明新文件的访问权限)、O_APPEND(追加写)。

返回值:成功则返回新打开的文件的文件描述符(后面会提到),失败则返回-1。


(1) 标志位

flags是一个int类型的参数,而int有32个比特位,把每一位为1都定义为一个宏,在这种规则下就可以定义出32种状态,当需要同时满足多种状态时只需要“或”操作即可。

比如将0x1定义为O_WRONLY、0x20定义为O_CREAT,则它们的二进制序列如下:

00000000 00000000 00000000 00000001 O_WRONLY
00000000 00000000 00000010 00000000 O_CREAT

传入参数后,只需检测flags哪一个比特位为1就可以识别出传入了哪种状态;如果需要同时传入多种状态,只需取“或”运算。

这样只用一个int型的参数就能定义出很多的状态(包括各自的组合)。


(2) O_WRONLY

#include 
#include 
#include 
#include 

int main()
{
	int fd = open("log.txt", O_WRONLY);
	printf("fd : %d\n", fd);

	return 0;
}

【万字详解Linux系列】基础IO_第6张图片
可以看到返回值为-1,说明有错误,且当前目录下并没有log.txt,原因是系统级别的open不同于C语言中的fopen,它在只写且文件不存在时不会自动创建。


(3) O_CREAT

#include 
#include 
#include 
#include 

int main()
{
	//			加入O_CREAT,在文件不存在时自动创建
	int fd = open("log.txt", O_WRONLY | O_CREAT);
	printf("fd : %d\n", fd);

	return 0;
}

【万字详解Linux系列】基础IO_第7张图片
加入O_CREAT后,fd返回值不是-1说明open正常返回,当前目录下也创建出了log.txt,但很明显看到新创建的文件的权限是乱的,log.txt本身也自动用红底标注出来。

#include 
#include 
#include 
#include 

int main()
{
	umask(0);//将掩码设置为0
	int fd = open("log.txt", O_WRONLY, 0666);//将log.txt的权限设置为0666,注意第一个0不能省略
	printf("fd : %d\n", fd);

	return 0;
}

这样一个具有特定权限的log.txt就创建出来了。(有关掩码、权限等可在【万字详解Linux系列】权限管理中查看)
【万字详解Linux系列】基础IO_第8张图片


二、close,read,write

【万字详解Linux系列】基础IO_第9张图片
像C语言中fclose与fopen对应一样,系统层面的close也和open相对应。

//count是希望读入或写入的个数
//返回实际读入或写入的个数
ssize_t write(int fd, const void *buf, size_t count);
ssize_t read(int fd, void *buf, size_t count);

下面代码用系统接口write向文件中写入内容。

#include 
#include 
#include 
#include 
#include 
#include 

int main()
{
	umask(0);
	int fd1 = open("log.txt", O_WRONLY, 0666);
	if (fd1 < 0)
	{
		printf("open error!\n");
		return 1;
	}

	int count = 5;
	const char* msg = "hello world!\n";
	while (count--)
	{
		//注意最后的参数如果用strlen(msg)+1把'\0'算上是不对的
		//因为字符串以'\0'结尾是C语言的规定
		//向文件里写入时不需要管'\0'
		write(fd1, msg, strlen(msg));
	}
	
	close(fd1);
	return 0;
}

成功创建log.txt并向其中写入了5个hello world!
【万字详解Linux系列】基础IO_第10张图片


下面再使用read读取文件内的内容。

#include 
#include 
#include 
#include 
#include 
#include 

int main()
{
	umask(0);
	int fd1 = open("log.txt", O_RDONLY, 0666);//以只读的方式打开
	if (fd1 < 0)
	{
		printf("open error!\n");
		return 1;
	}

	char c;
	while (1)
	{
		//每次向c内读一个字符,num返回读到的字符个数
		ssize_t num = read(fd1, &c, 1);
		if (num <= 0)//如果没有读到字符就退出
			break;

		write(stdout, &c, 1);//向屏幕输出
	}
	
	close(fd1);
	return 0;
}

【万字详解Linux系列】基础IO_第11张图片

fopen、fclose、fread、fwrite等都是C标准库(libc)当中的函数,称之为库函数,通过libc这一层封装,在保证可读性的同时也兼顾了跨平台性。而open、close、read、write等等都属于系统提供的接口,是系统调用接口。


三、文件描述符

1.概念

上面open返回的值要么是-1(失败),要么是3,它会是其他值吗?

下面连续创建5个文件,查看每个open的返回值有什么规律。

#include 
#include 
#include 
#include 

int main()
{
	umask(0);
	int fd1 = open("log.txt", O_WRONLY | O_CREAT, 0666);
	printf("fd1 : %d\n", fd1);
	int fd2 = open("log.txt", O_WRONLY | O_CREAT, 0666);
	printf("fd2 : %d\n", fd2);
	int fd3 = open("log.txt", O_WRONLY | O_CREAT, 0666);
	printf("fd3 : %d\n", fd3);
	int fd4 = open("log.txt", O_WRONLY | O_CREAT, 0666);
	printf("fd4 : %d\n", fd4);
	int fd5 = open("log.txt", O_WRONLY | O_CREAT, 0666);
	printf("fd5 : %d\n", fd5);

	close(fd1);
	close(fd2);
	close(fd3);
	close(fd4);
	close(fd5);
	return 0;
}

很明显看到5个返回值是从3开始递增的。

【万字详解Linux系列】基础IO_第12张图片

-1表示失败,所以中间少了0、1、2三个文件描述符。还记得前言中提到的stdin、stdout、stderr吗?没错,这三个文件对应的文件描述符依次是0、1、2。因为它们是默认已经打开的,所以再创建时文件描述符从3开始依次递增(事实上,文件描述符的本质是数组下标)。

由于1、2代表的特殊意义,前面的代码可以如下修改。

#include 
#include 
#include 
#include 
#include 
#include 

int main()
{
	umask(0);
	int fd1 = open("log.txt", O_RDONLY, 0666);//以只读的方式打开
	if (fd1 < 0)
	{
		printf("open error!\n");
		return 1;
	}

	char c;
	while (1)
	{
		//每次向c内读一个字符,num返回读到的字符个数
		ssize_t num = read(fd1, &c, 1);
		if (num <= 0)//如果没有读到字符就退出
			break;

		//下面三种写法等价
		write(stdout, &c, 1);
		write(1, &c, 1);//1是显示器的文件描述符,即向屏幕输出
		write(2, &c, 1);//2也显示器的文件描述符,即向屏幕输出
	}
	
	close(fd1);
	return 0;
}

如果关闭0、1、2中的一个或几个会发生什么呢?请看下面的代码。

#include 
#include 
#include 
#include 
#include 
#include 

int main()
{
	close(1);//关闭1文件描述符,也即关闭显示器
	printf("hello world!\n");
	return 0;
}

运行后并没有打印hello world!,因为printf底层就是向显示器(文件描述符为1)中打印内容,但它被关闭了,所以自然无法打印出内容来。同理,如果把文件描述符0关掉,就无法从键盘输入。

在这里插入图片描述

2.原理

因为每个进程都可以打开多个文件,而系统中时刻都存在大量运行中的进程,所以也就存在大量的已经打开的文件,而每个文件有包括它的内容和属性,所以文件管理就是操作系统必须做的。Linux中用struct file这个结构体就是来管理文件。

【万字详解Linux系列】基础IO_第13张图片
文件描述符就是从0开始的整数。当打开文件时,操作系统在内存中要创建相应的数据结构来描述目标文件,于是就有了file结构体表示一个已经打开的文件对象。而进程执行IO系统调用必须让进程和文件关联起来。每个进程都有一个指针*files, 指向一张表files_struct,该表包含一个指针数组,每个元素都是一个指向打开文件的指针。所以,本质上,文件描述符就是该数组的下标。所以,只要拿着文件描述符,就可以找到对应的文件。


3.分配规则

再看下一段代码

#include 
#include 
#include 
#include 
#include 
#include 

int main()
{
	close(0);
	int fd1 = open("log.txt", O_WRONLY | O_CREAT, 06666);
	printf("fd1 : %d\n", fd1);
	int fd2 = open("log.txt", O_WRONLY | O_CREAT, 06666);
	printf("fd2 : %d\n", fd2);
	int fd3 = open("log.txt", O_WRONLY | O_CREAT, 06666);
	printf("fd3 : %d\n", fd3);
	int fd4 = open("log.txt", O_WRONLY | O_CREAT, 06666);
	printf("fd4 : %d\n", fd4);

	return 0;
}

四个文件描述符的值如下。
【万字详解Linux系列】基础IO_第14张图片

所以文件描述符的分配规则是:从最小的但未被使用的开始分配。以上面为例,0在一开始就被关闭,且是最小的,所以给fd1分配0,1和2都已经被占用,所以不能分配,3之后都没有被占用,所以从小到大依次分配。


四、重定向

1.输出重定向

#include 
#include 
#include 
#include 
#include 
#include 

int main()
{
	close(1);//关闭标准输出
	umask(0);

	//由上面分配规则可知,这里open的返回值一定是1,即fd=1
	int fd = open("log.txt", O_WRONLY | O_CREAT, 0666);
	if (fd < 0)
	{
		perror("open");
		return 1;
	}

	printf("hello printf\n");
	fprintf(stdout, "hello fprintf\n");
	fputs("hello fputs\n", stdout);
	fflush(stdout);//需要刷新才能看到结果

	close(fd);

	return 0;
}

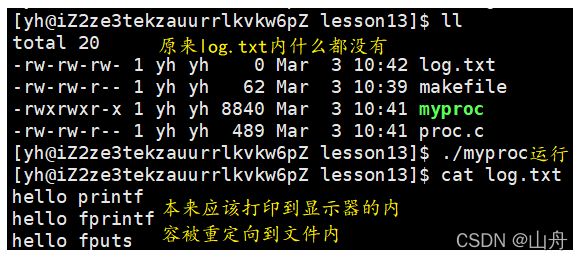
结果如下:
【万字详解Linux系列】基础IO_第15张图片
代码一开始关闭了文件描述符为1的文件,即关闭了显示器,切断了1和stdout之间的联系。而printf以及fprintf和puts都向stdout这一FILE*的指针输入,在系统调用时只看1,而不管1是与stdout对应还是与其他文件对应,在上面的代码中,1与log.txt对应,所以所有向屏幕的输出都输入到了log.txt,也即重定向到了log.txt。

【万字详解Linux系列】基础IO_第16张图片

这里在各种打印结束后需要刷新stdout,因为向文件重定向时变成了全缓冲(下面会提到),如果不刷新就必须到缓冲区写满才会刷新,所以需要刷新stdout。


2.再谈缓冲区

在【Linux小练习】进度条程序 中简单介绍了缓冲区,这里再深入地讲一下缓冲区。

(1)缓冲方式

  1. 无缓冲
  2. 全缓冲:多用于(磁盘)文件写入时。
  3. 行缓冲:常见于对显示器进行刷新时。

缓冲就像送快递一样,无缓冲是拿到一个快递就送一个快递,全缓冲是拿到所有快递后一次送完,行缓冲是拿到一定数量的快递就送一批。显然全缓冲从送快递的人的角度来看效率最高。

要刷新的数据就像快递,送快递就是将内容从缓冲区写到文件中。由于磁盘文件、显示器等都是外设,写入的效率很低,所以采用全缓冲来提高一些效率。但向显示器刷新时,显然我们都希望尽快从显示器得到结果,但不缓冲的效率太低了、行缓冲打印内容又不及时,所以折中采用行缓冲的方式。


(2)缓冲区

#include 
#include 
#include 
#include 
#include 
#include 

int main()
{
	//C
	printf("hello printf\n");
	fprintf(stdout, "hello fprintf\n");
	
	//system
	const char* msg = "hello write\n";
	write(1, msg, strlen(msg));

	fork();//在最后创建子进程
	return 0;
}

【万字详解Linux系列】基础IO_第17张图片
由上面的结果可得:

  1. 重定向与否会更改缓冲方式(向显示器打印是行缓冲,但向磁盘文件写入是全缓冲)。
  2. C语言的函数接口打印了两次,而系统接口只打印了一次。

上面现象的解释如下:

  1. 向显示器打印时,按行刷新,所以fork时缓冲区里的内容都已经打印完了(打印且刷新到显示器),创建子进程不会有影响。
  2. 但向磁盘文件(log.txt)重定向时,缓冲方式是全缓冲,当代码走到fork时,仅仅打印,但还没有刷新,当父子进程有一个刷新时,发生了写时拷贝,所以C语言接口打印的内容有两份。而write系统调用是没有缓冲区的,所以只会打印一次。

由此可知,所谓的缓冲区其实是语言自带的(C语言中的缓冲区在FILE结构体中维护),而系统并没有缓冲区。

下面是C语言FILE结构体中与缓冲区相关的内容

 //缓冲区相关
/* Note: Tk uses the _IO_read_ptr and _IO_read_end fields directly. */
 char* _IO_read_ptr; /* Current read pointer */
 char* _IO_read_end; /* End of get area. */
 char* _IO_read_base; /* Start of putback+get area. */
 char* _IO_write_base; /* Start of put area. */
 char* _IO_write_ptr; /* Current put pointer. */
 char* _IO_write_end; /* End of put area. */
 char* _IO_buf_base; /* Start of reserve area. */
 char* _IO_buf_end; /* End of reserve area. */
 /* The following fields are used to support backing up and undo. */
 char *_IO_save_base; /* Pointer to start of non-current get area. */
 char *_IO_backup_base; /* Pointer to first valid character of backup area */
 char *_IO_save_end; /* Pointer to end of non-current get area. */

3.输入重定向

输入重定向道理与输出重定向相同,就是关闭文件描述符0,然后通过分配规则将0赋给一个文件,从stdin中读入时就变成了从该文件中读。

#include 
#include 
#include 
#include 
#include 
#include 

int main()
{
	close(0);//关闭标准输入
	umask(0);

	//由分配规则可知,这里open的返回值一定是0,即fd=0
	int fd = open("log.txt", O_RDONLY, 0666);
	if (fd < 0)
	{
		perror("open");
		return 1;
	}

	char buffer[1024];
	fgets(buffer, 1000, stdin);//本来从stdin读,但因为stdin被关闭,实际从log.txt中读
	printf("%s\n", buffer);

	close(fd);

	return 0;
}

【万字详解Linux系列】基础IO_第18张图片


4.追加重定向

追加重定向本质上就是从覆盖写变成在文本最后接着写,实现时主要是修改文件的打开方式。

#include 
#include 
#include 
#include 
#include 
#include 

int main()
{
	close(1);//关闭标准输出
	umask(0);

	//							文件打开方式改变
	int fd = open("log.txt", O_WRONLY | O_APPEND, 0666);
	if (fd < 0)
	{
		perror("open");
		return 1;
	}

	printf("hello printf\n");
	fprintf(stdout, "hello fprintf\n");
	fputs("hello fputs\n", stdout);
	fflush(stdout);//需要刷新才能看到结果

	close(fd);

	return 0;
}

【万字详解Linux系列】基础IO_第19张图片


5.stdout和stderr

stdout和stderr都代表显示器,但它们显然是有区别的,可以通过下面的代码来看到。

#include 
#include 
#include 
#include 
#include 
#include 

int main()
{
	printf("hello printf\n");//stdout
	perror("perror");//stderr

	fprintf(stdout, "hello stdout\n");//stdout
	fprintf(stderr, "hello stderr\n");//stderr

	return 0;
}

结果如下:
【万字详解Linux系列】基础IO_第20张图片
所以stdout和stderr虽然都代表显示器,但是它们本质是不同的文件。


五、dup2

将文件描述符为newfd的文件的内容重定向到文件描述符为oldfd的文件内。
【万字详解Linux系列】基础IO_第21张图片

在这里插入图片描述
下面在代码中使用dup2:

#include 
#include 
#include 
#include 
#include 
#include 

int main()
{
	umask(0);

	//fd=0
	int fd = open("log.txt", O_WRONLY | O_CREAT, 0666);
	if (fd < 0)
	{
		perror("open");
		return 1;
	}

	dup2(fd, 1);//把向1输入的内容重定向到fd中

	printf("hello printf\n");
	fprintf(stdout, "hello fprintf\n");
	fputs("hello fputs\n", stdout);
	fflush(stdout);//需要刷新才能看到结果

	close(fd);

	return 0;
}

【万字详解Linux系列】基础IO_第22张图片


感谢阅读,如有错误请批评指正

你可能感兴趣的:(万字详解Linux系列,linux)