Sencha Touch 1.x快速入门 第三章 布局(1)Box布局
Sencha Touch里的布局有五种
o hbox
o vbox
o card
o fit
o auto[默认]
实际上可以分为Box布局和Fit布局两种。
Sencha touch里的布局应该理解为:该控件内部子项的排列方式。
我们今天先来看看box布局
Box布局
顾名思义,box布局就是一个个的box组成的。
hbox: 水平排列、垂直居中、靠左置顶
vbox: 竖直堆叠、水平居中、靠上置顶
hbox:
 hbox
hbox
Ext.setup({
    tabletStartupScreen: 'tablet_startup.png',
    phoneStartupScreen: 'phone_startup.png',
    icon: 'icon.png',
    glossOnIcon: false,
    onReady : function() {
        var pnl =new Ext.Panel({
            fullscreen: true,
            layout: 'hbox',
            items:[
                {xtype:'button',text:'按钮1'},
                {xtype:'button',text:'按钮2'},
                {xtype:'button',text:'按钮3'}
            ]
        });
    }
});

vbox:
将以上的hbox改为vbox
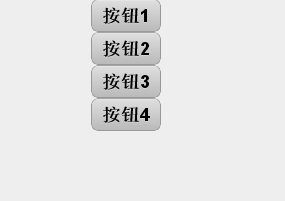
但是,只是知道这些,还不足以玩转box布局,下面让我们看看其他常见的box布局实例。
vbox变型:
 vbox变型
Ext.setup({
    tabletStartupScreen: 'tablet_startup.png',
    phoneStartupScreen: 'phone_startup.png',
    icon: 'icon.png',
    glossOnIcon: false,
    onReady : function() {
        var pnl =new Ext.Panel({
            fullscreen: true,
            layout: 'vbox',
            defaults: {
                flex: 1
            },
            items:[
                {xtype:'button',text:'按钮1'},
                {xtype:'button',text:'按钮2'},
                {xtype:'button',text:'按钮3'}
            ]
        });
    }
});
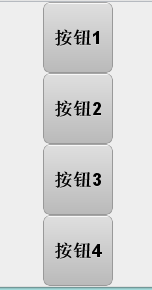
关于这里的flex,sencha Touch使用了css3中的弹性和模型,所以大家如果有兴趣可以看看 扩展阅读:css3中的弹性盒模型
vbox变型2:
在上面代码的defaults中加入width : '100%',得到下图
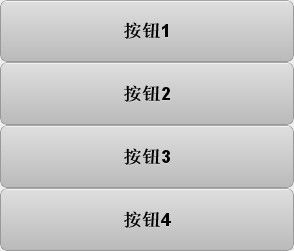
了解以上内容之后,我们来想想经典的九宫格布局如何实现吧!
相必大家也已经心中有数了。
经典的九宫格布局:
 九宫格
九宫格
Ext.setup({
    tabletStartupScreen: 'tablet_startup.png',
    phoneStartupScreen: 'phone_startup.png',
    icon: 'icon.png',
    glossOnIcon: false,
    onReady : function() {
        var pnl =new Ext.Panel({
            fullscreen: true,
            layout: 'vbox',
            defaults: {
                flex: 1,
                width: '100%',
                defaults: {
                    flex: 1,
                    height: '100%'
                }
            },
            items:[{
                xtype: 'panel',
                layout: 'hbox',
                items:[
                    {xtype:'button',text:'按钮1'},
                    {xtype:'button',text:'按钮2'},
                    {xtype:'button',text:'按钮3'}
                ]
            },{
                xtype: 'panel',
                layout: 'hbox',
                items:[
                    {xtype:'button',text:'按钮4'},
                    {xtype:'button',text:'按钮5'},
                    {xtype:'button',text:'按钮6'}
                ]
            },{
                xtype: 'panel',
                layout: 'hbox',
                items:[
                    {xtype:'button',text:'按钮7'},
                    {xtype:'button',text:'按钮8'},
                    {xtype:'button',text:'按钮9'}
                ]
            }]
        });
    }
});
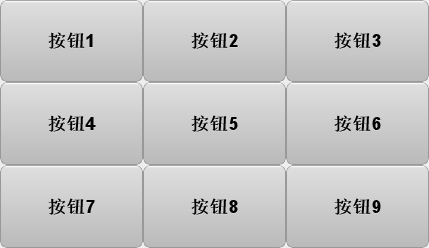
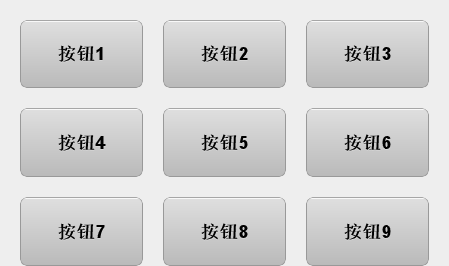
嫌紧挨着不舒服?别急,我们还有些属性没用上!你没有猜错那就是-----margin、padding!你知道怎么做的!
松散九宫格:
 松散九宫格
松散九宫格
Ext.setup({
    tabletStartupScreen: 'tablet_startup.png',
    phoneStartupScreen: 'phone_startup.png',
    icon: 'icon.png',
    glossOnIcon: false,
    onReady : function() {
        var pnl =new Ext.Panel({
            fullscreen: true,
            layout: 'vbox',
            defaults: {
                flex: 1,
                width: '100%',
                padding: 10,
                defaults: {
                    flex: 1,
                    height: '100%',
                    margin: 10
                }
            },
            items:[{
                xtype: 'panel',
                layout: 'hbox',
                items:[
                    {xtype:'button',text:'按钮1'},
                    {xtype:'button',text:'按钮2'},
                    {xtype:'button',text:'按钮3'}
                ]
            },{
                xtype: 'panel',
                layout: 'hbox',
                items:[
                    {xtype:'button',text:'按钮4'},
                    {xtype:'button',text:'按钮5'},
                    {xtype:'button',text:'按钮6'}
                ]
            },{
                xtype: 'panel',
                layout: 'hbox',
                items:[
                    {xtype:'button',text:'按钮7'},
                    {xtype:'button',text:'按钮8'},
                    {xtype:'button',text:'按钮9'}
                ]
            }]
        });
    }
});
OK,到这里,你已经可以对box已经可以运用自如了,下一篇,我们将接着讲解sencha touch里的另一种布局“Fit”布局。
