让AI帮你玩游戏(二)训练模型并获取结果
让AI帮你玩游戏
- 让AI帮你玩游戏(二)训练模型并获取结果
- 训练模型
- 用训练好的Model获取坐标
- 实现我们想要的功能
- 最后再次声明:本文所涉及的内容仅用作学习研究,严禁用于非法用途,游戏中违反相关协议可能会使你失去你的游戏账号!
- 教程完结,祝大家生活愉快!
书接上文:
我们在上一期介绍了我们整体的思路以及创建训练数据,搭建ssd-resnet50模型,现在我们开始训练我们的模型,并用我们训练好的模型获得浮标所在的坐标。
让AI帮你玩游戏(二)训练模型并获取结果
训练模型
没啥好说的直接上代码,这里的代码我进行了注释,大概解释了每段代码都在干什么。
class_id = 1
class_name = 'drift'
num_classes = 1
num_boxes = 1
batch_size = 4
learning_rate = 0.01
num_batches = 100  # 这里是训练步数,数量太大会过拟合,效果反而不好,针对我们样本数这里设为100足够
# 我们只选择模型的top layers变量进行训练,而不是整个模型,我们用少量样本训练模型会有过拟合的现象,不过我们也不是造原子弹,所以无所谓拉
trainable_variables = detection_model.trainable_variables
to_fine_tune = []
prefixes_to_train = [
    'WeightSharedConvolutionalBoxPredictor/WeightSharedConvolutionalBoxHead',
    'WeightSharedConvolutionalBoxPredictor/WeightSharedConvolutionalClassHead']
for var in trainable_variables:
    if any([var.name.startswith(prefix) for prefix in prefixes_to_train]):
        to_fine_tune.append(var)


# 为单个训练步骤设置 forward + backward

def get_model_train_step_function(model, optimizer, vars_to_fine_tune):
    """这个函数是用来获取训练step的."""
   @tf.function
    def train_step_fn(image_tensors,
                      groundtruth_boxes_list,
                      groundtruth_classes_list):
        shapes = tf.constant(batch_size * [[im_width, im_height, 3]], dtype=tf.int32)
        model.provide_groundtruth(
            groundtruth_boxes_list=groundtruth_boxes_list,
            groundtruth_classes_list=groundtruth_classes_list)
        with tf.GradientTape() as tape:
            preprocessed_images = tf.concat(
                [detection_model.preprocess(image_tensor)[0]
                 for image_tensor in image_tensors], axis=0)
            prediction_dict = model.predict(preprocessed_images, shapes)
            losses_dict = model.loss(prediction_dict, shapes)
            total_loss = losses_dict['Loss/localization_loss'] + losses_dict['Loss/classification_loss']
            gradients = tape.gradient(total_loss, vars_to_fine_tune)
            optimizer.apply_gradients(zip(gradients, vars_to_fine_tune))
        return total_loss
    return train_step_fn

# 采用SGD方法进行优化
optimizer_ = tf.keras.optimizers.SGD(learning_rate=learning_rate, momentum=0.9)
train_step_fn_ = get_model_train_step_function(
                                            detection_model,
                                            optimizer_,
                                            to_fine_tune)

# 从这里开始训练模型
for idx in range(num_batches):
    all_keys = list(range(len(train_images_np)))
    random.shuffle(all_keys)
    example_keys = all_keys[:batch_size]
   gt_boxes_list = [gt_box_tensors[key] for key in example_keys]
    gt_classes_list = [gt_classes_one_hot_tensors[key] for key in example_keys]
    im_tensors = [train_image_tensors[key] for key in example_keys]
    total_loss_ = train_step_fn_(im_tensors, gt_boxes_list, gt_classes_list)
    if idx % 10 == 0:
        print('batch ' + str(idx) + ' of ' + str(num_batches) + ', loss=' + str(total_loss_.numpy()), flush=True)
# 训练结束!

训练结果如图,可见我们的loss在训练100次就达到了0.01,已经很低了,可以认为收敛了!
用训练好的Model获取坐标
首先将我们定义一个函数将图片转换为array
from six import BytesIO
from PIL import Image
from object_detection.utils import visualization_utils as viz_utils
def load_image_into_numpy_array(path):
    img_data = tf.io.gfile.GFile(path, 'rb').read()
    image_ = Image.open(BytesIO(img_data))
    (width, height) = image_.size
    return np.array(image_.getdata()).reshape(
        (height, width, 3)).astype(np.uint8)
path就是图片的路径,没啥好说的。
下面我们来定义一个将我们获取到的坐标画到图片上的函数
def plot_detections(image_np,
                    boxes,
                    classes,
                    scores,
                    category_index,
                    figsize=(12, 16),
                    image_name=None):
    image_np_with_annotations = image_np.copy()
    viz_utils.visualize_boxes_and_labels_on_image_array(
        image_np_with_annotations,
        boxes,
        classes,
        scores,
        category_index,
        use_normalized_coordinates=True,
        min_score_thresh=0.6)
    if image_name:
        plt.imsave(image_name, image_np_with_annotations)
    else:
        plt.imshow(image_np_with_annotations)
定义预测函数,用来获取我们模型的检测结果
@tf.function
def detect(tensor_):
    preprocessed_image, shapes_ = detection_model.preprocess(tensor_)
    prediction_dict_ = detection_model.predict(preprocessed_image, shapes_)
    return detection_model.postprocess(prediction_dict_, shapes)
现在我们来获取我们想要的结果!
label_id_offset = 1
for i in range(len(test_images_np)):
    print(i)
    input_tensor = tf.convert_to_tensor(test_images_np[i],
                                        dtype=tf.float32)
    detections = detect(input_tensor)
    plot_detections(
        test_images_np[i][0],
        detections['detection_boxes'][0].numpy(),
        detections['detection_classes'][0].numpy().astype(np.uint32) + label_id_offset,
        detections['detection_scores'][0].numpy(),
        category_index,
        figsize=(15, 20),
        image_name="results/gif_frame_" + ('%02d' % i) + ".jpg")
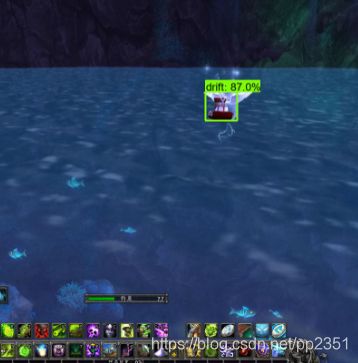
我们来看一下效果:


结果显而易见,在这么复杂的环境下识别率很高,其中有个跟花重叠的都可以识别,其实超过60%就可以认为成功识别,可见我们的模型准确性还是可以的!
实现我们想要的功能
整个工程中最难的部分已经解决,现在我们可以用得到的坐标,计算出浮标的中心点位置,然后就可以进行各种骚操作了,需要提醒的是,当第一次运行的时候需要把从图像获取到的坐标跟游戏里鼠标的位置进行校正,只要你游戏里视角发生变化都需要进行校正!切记!
关于声音的判断,有无数种方法,你可以计算获取到声音的特征值,做比较,相似就收杆,也可以判断声卡发出声音的响度来判断(我比较懒,用的后者,嘿嘿),你也可以搭建一个神经网络模型来训练,让它可以听出来这个声音(声音检测)等等。。。
我们有坐标了,有收杆时机的判断了,就可以实现主逻辑了,至于主逻辑嘛我就不多做介绍了,既然前边难度那么大的都可以轻松解决,这点事情肯定不会难到您的。至于功能的实现可以用windows API啊,HOOK啊,驱动啊等等想用什么用什么,群魔乱舞。。。噗,不对不对,是八仙过海各显神通。。。好了本教程到此结束!