A TensorFlow gesture detector (waving, fist pumping, running, random motion) for the Atltvhead project and exploration into data science.
用于Atltvhead项目的TensorFlow手势检测器(挥手,拳头抽气,跑步,随机运动)和数据科学探索。
While completing this project I made some tools for anyone who wants to replicate this with their own gestures. All my files are found in this Github Repo. Getting up and Running TLDR:
在完成此项目时,我为想要用自己的手势复制它的任何人提供了一些工具。 我的所有文件都可以在Github Repo中找到。 启动并运行TLDR:
If you use Docker you can use the JupyterNotebook’s Tensorflow container or build my makefile
如果您使用Docker,则可以使用JupyterNotebook的Tensorflow容器或构建我的makefile
Get started by uploading the capture data ino in the Arduino_Sketch folder onto a Sparkfun ESP32 Thing Plus with a push button between pin 33 and GND and Adafruit LSM6DSOX 9dof IMU connect with a Qwiic connector.
通过将Arduino_Sketch文件夹中的捕获数据ino上载到Sparkfun ESP32 Thing Plus并通过引脚33和GND之间的按钮开始操作,IMU的Adafruit LSM6DSOX 9dof IMU通过Qwiic连接器进行连接。
Use the Capture data python script in the Training_Data folder. Initiate this script on any pc, type in the gesture name, start recording the motion data by pressing the button on the Arduino
使用Training_Data文件夹中的Capture data python脚本 。 在任何PC上启动此脚本,输入手势名称,然后按Arduino上的按钮开始记录运动数据
- After several gestures were recorded change to a different gesture, do it again. I tried to get at least 50 motion recordings of each gesture, you can try less if you like. 记录了几个手势后,将其更改为另一个手势,请再次执行此操作。 我尝试每个手势至少获取50个运动记录,如果愿意,可以尝试更少。
Once all the data is collected, navigate to the Python Scripts folder and run data pipeline python script and model pipeline script in that order. Models are trained here and can time some time.
收集完所有数据后,导航到“ Python脚本”文件夹,并按此顺序运行数据管道python脚本和模型管道脚本 。 在这里训练模型,并且可以花一些时间。
Run predict gesture script and press the button on the Arduino to take a motion recording and see the results printed out. Run the tflite gesture prediction script to run with the smaller model.
运行预测手势脚本 ,然后按Arduino上的按钮进行运动记录并查看打印结果。 运行tflite手势预测脚本以与较小的模型一起运行。
Problem:
问题:
I run an interactive live stream. I wear an old tv (with working led display) for a helmet and a backpack with an integrated display. Twitch chat controls what’s displayed on the television screen and the backpack screen through chat commands. Together Twitch chat and I go through the city of Atlanta, Ga spreading cheer.
我运行一个交互式实时流。 我戴着一台旧电视(带有可正常工作的LED显示屏),用于头盔和带有集成显示屏的背包。 Twitch聊天通过聊天命令控制电视屏幕和背包屏幕上显示的内容。 在一起Twitch聊天时,我经历了乔治亚州亚特兰大市的欢呼声。
As time has gone on, I have over 20 channel commands for the tv display. Remembering these commands has become complicated and tedious. So it’s time to simplify my interface to the tvhead.
随着时间的流逝,我有20多个电视显示频道命令。 记住这些命令变得复杂而乏味。 因此,现在该简化我与tvhead的界面了。
What are my resources? During the live stream, I am on rollerblades, my right hand is holding the camera, my left hand has a high five detecting glove I’ve built from a lidar sensor and esp32, my backpack has a raspberry pi 4, and a website with buttons that post commands in twitch chat.
我有什么资源? 在直播期间,我身着旱冰鞋,右手握着相机,左手有一个我用激光雷达传感器和esp32制成的高五指检测手套,我的背包有一个raspberry pi 4,在抽搐聊天中发布命令的按钮。
What to simplify? I’d like to simplify the channel commands and gamify it a bit more.
要简化什么? 我想简化通道命令,并使其更加游戏化。
What resources to use? I am going to change my high five gloves, removing the lidar sensor, and feed the raspberry pi with acceleration and gyroscope data. So that the Pi can inference a gesture performed from the arm data.
使用什么资源? 我将换上高五指的手套,移除激光雷达传感器,并向树莓派提供加速度和陀螺仪数据。 这样Pi可以从手臂数据推断出手势。
Goal:
目标:
A working gesture detection model using TensorFlow and sensor data.
使用TensorFlow和传感器数据的工作手势检测模型。
Machine Learning Flow:
机器学习流程:
Sensors :
感应器
To briefly explain my sensor choices.
简要说明我的传感器选择。
Lidar: I’ve used “lidar” Time of flight sensors to detect high fives, in the previous version of my wearable. However, it cannot detect arm gestures without complex mounting a ton of them all over one arm.
激光雷达:在以前的可穿戴设备版本中,我使用“激光雷达”飞行时间传感器来检测击掌。 但是,如果没有在一个手臂上复杂地安装大量手势,就无法检测到手臂手势。
Stain Sensor: Using the change-in-resistance stretch rubbers or flex sensors I can get an idea of what muscles I’m actuating or general shape of my arm. However, they are easily damaged and wear with use.
污点传感器:使用电阻变化的拉伸橡胶或挠性传感器,我可以大致了解我正在锻炼的肌肉或手臂的总体形状。 但是,它们很容易损坏,使用时会磨损。
Muscle Sensors: Something like an MYO armband can determine hand gestures, but require a lot of processing overhead for my use case. They are also quite expensive and the electrodes not reusable.
肌肉传感器:像MYO臂章之类的东西可以确定手势,但是对于我的用例来说,需要很多处理开销。 它们也很昂贵并且电极不可重复使用。
IMU: Acceleration and gyroscope sensors are cheap and do not wear out over time. However, determining a gesture from the data output of the sensor requires a lot of manual thresholding and timing to determine anything useful. Luckily machine learning can determine relationships in the data and even can be implemented on a microcontroller with tflite and TinyML. So I chose to go forward with an IMU sensor and Machine Learning.
IMU:加速度传感器和陀螺仪传感器很便宜,并且不会随着时间而磨损。 但是,从传感器的数据输出确定手势需要大量手动阈值设置和计时,才能确定有用的内容。 幸运的是,机器学习可以确定数据中的关系,甚至可以在具有tflite和TinyML的微控制器上实现。 因此,我选择继续使用IMU传感器和机器学习。
The AGRB-Traning-Data-Capture.ino is my Arduino script to pipe acceleration and gyroscope data from an Adafruit LSM6DSOX 9dof IMU out of the USB serial port. An esp32 Thingplus by SparkFun is the board I’ve chosen due to the Qwiic connector support between this board and the Adafruit IMU. A push-button is connected between ground and pin 33 with the internal pullup resistor on. Eventually, I plan to deploy a tflite model on the esp32, so I’ve included a battery.
AGRB-Traning-Data-Capture.ino是我的Arduino脚本,用于将来自IMU的Adafruit LSM6DSOX 9dof IMU的加速度和陀螺仪数据通过USB串行端口输出。 我选择的是SparkFun的esp32 Thingplus,因为该板与Adafruit IMU之间具有Qwiic连接器支持。 在内部上拉电阻接通的情况下,将按钮连接在接地和引脚33之间。 最终,我计划在esp32上部署tflite模型,因此我包括了一块电池。
The data stream is started after the button on the Arduino is pressed and stops after 3 seconds. It is similar to a photograph, but instead of an x/y of camera pixels, its sensor data/time.
按下Arduino上的按钮后开始数据流,并在3秒钟后停止。 它类似于照片,但不是传感器像素的x / y,而是传感器数据/时间。
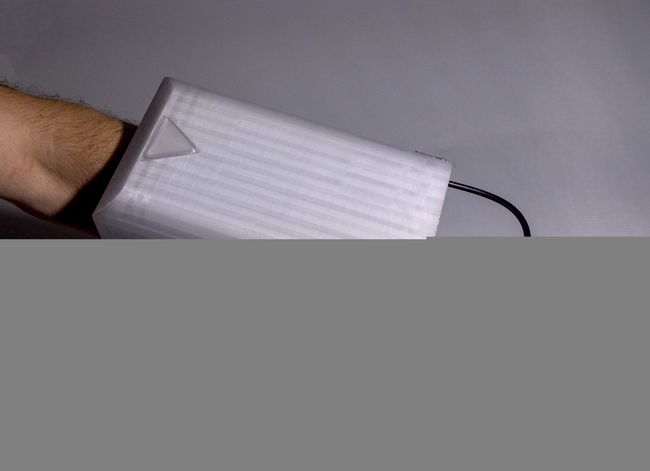
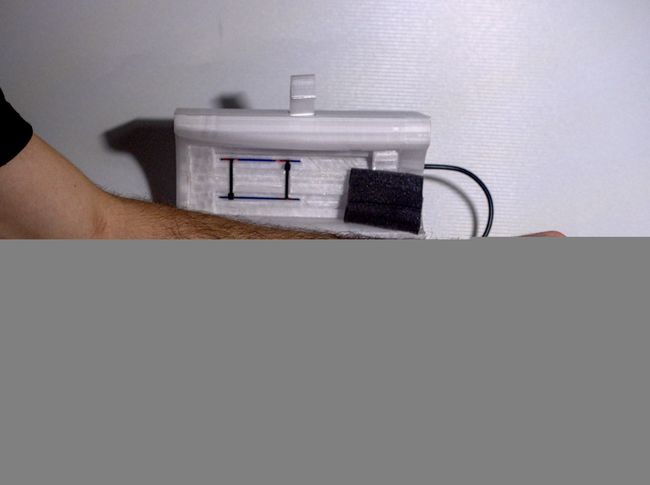
Building Housing: I modeled my arm and constructed the housing around it using Fusion 360. I then 3D printed everything and assembled the joints with some brass rod. I especially enjoy using the clip to secure the electronics to my arm.
建立房屋:我建模了手臂,并使用Fusion 360建造了房屋。然后我进行3D打印,并用一些黄铜棒组装了接头。 我特别喜欢使用夹子将电子设备固定到手臂上。
Data Collection:
数据采集:
With the Arduino loaded with the AGRB-Traning-Data-Capture.ino script and connected to the capture computer with a USB cable, run the CaptureData.py script. It’ll ask for the name of the gesture you are capturing. Then when you are ready to perform the gesture press the button on the Arduino and perform the gesture within 3 seconds. When you have captured enough of one gesture, stop the python script. Rinse and Repeat.
在Arduino加载了AGRB-Traning-Data-Capture.ino脚本并通过USB电缆连接到捕获计算机的情况下,运行CaptureData.py脚本。 它会询问您要捕获的手势的名称。 然后,当您准备执行手势时,请按Arduino上的按钮并在3秒钟内执行手势。 捕获到足够的一个手势后,停止python脚本。 冲洗并重复。
I choose 3 seconds of data collection or roughly 760 data points because I wasn’t positive how long each gesture would take to be performed. Anyways, more data is better right?
我选择3秒钟的数据收集或大约760个数据点,因为我不确定每个手势要花多长时间。 无论如何,更多的数据更好吧?
Docker File:
Docker文件:
I’ve included a Docker makefile for you! I used this docker container while processing my data and training my model. It’s based on the Jupiter Notebooks TensorFlow docker container.
我为您提供了一个Docker makefile ! 我在处理数据和训练模型时使用了这个docker容器。 它基于Jupiter Notebooks TensorFlow泊坞窗容器。
Data Exploration and Augmentation:
数据探索和增强:
As said in the TLDR, the DataPipeline.py script, will take all of your data from the data collection, split them between training/test/validation sets, augment the training data, and finalized CSVs ready for the model training.
如TLDR中所述, DataPipeline.py脚本将从数据收集中获取所有数据,在训练/测试/验证集之间进行拆分,扩充训练数据,并为模型训练准备好最终的CSV。
在Jypter_Scripts / Data_Exploration.ipynb文件中找到以下结论和发现: (The following conclusions and findings are found in Jypter_Scripts/Data_Exploration.ipynb file:)
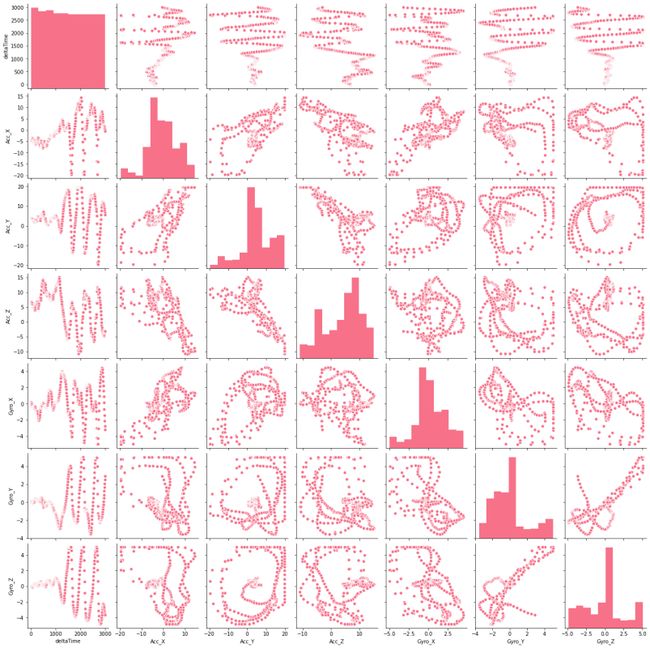
- The first exploration task I conducted was to use seaborn’s pair plot to plot all variables against one another for each different type of gesture. I was looking to see if there was any noticeable outright linear or logistic relationships between variables. For the fist pump data there seem to be some possible linear effects between the Y and Z axis, but not enough to make me feel confident in them. 我进行的第一个探索任务是使用Seaborn的对图针对每种不同类型的手势将所有变量相互绘制。 我一直在寻找变量之间是否存在任何明显的线性或逻辑关系。 对于第一个泵数据,似乎在Y轴和Z轴之间可能存在一些线性影响,但不足以使我对它们产生信心。
- Looking at the descriptions, I noticed that each gesture sampling had a different number of points, and are not consistent between samples of the same gesture. 通过查看描述,我注意到每个手势采样都有不同数量的点,并且在相同手势的采样之间不一致。
- Each gesture’s acceleration data and gyroscope data is pretty unique when looking at time series plots. With fist-pump mode and speed mode looking the most similar and will probably be the trickiest to differentiate from one another. 当查看时间序列图时,每个手势的加速度数据和陀螺仪数据非常独特。 拳头泵模式和速度模式看起来最相似,并且可能是最难以区分的。
- Conducting a PCA of the different gestures yielded that acceleration contributed the principal components when determining gestures. However, when conducting a PCA with min/max normalized acceleration and gyroscope data, the most important feature became the normalized gyroscope data. Specifically, Gyro_Z seems to contribute the most to the first principal component, across all gestures. 进行不同手势的PCA得出,在确定手势时,加速度是主要成分。 但是,当使用最小/最大归一化加速度和陀螺仪数据进行PCA时,最重要的功能就是归一化陀螺仪数据。 具体而言,在所有手势中,Gyro_Z似乎对第一主成分的贡献最大。
So now the decision. The PCA of Raw Data says that accelerations work. The PCA of Normalized Data seems to conclude that gyroscope data works. Since I’d like to eventually move this project over to the esp32, less pre-processing will reduce processing overhead on the micro. So let’s try just using the raw acceleration data first. If that doesn’t work, I’ll add in the raw gyroscope data. If none of those work well, I’ll normalize the data.
所以现在决定。 原始数据的PCA表示,加速有效。 归一化数据的PCA似乎得出结论,陀螺仪数据有效。 由于我最终希望将此项目移至esp32,因此较少的预处理将减少微处理的开销。 因此,让我们尝试首先仅使用原始加速度数据 。 如果那不起作用,我将添加原始陀螺仪数据。 如果这些方法都无法正常工作,我将对数据进行标准化。
可以在Data Cleaning and Augmentation.ipynb文件中找到以下详细信息: (The following information is can be found in more detail in the Data Cleaning and Augmentation.ipynb file:)
Since I was collecting the data myself, I have a super small data set. Meaning I will most likely overfit my model. To overcome this I implemented augmentation techniques to my data set.
自从我自己收集数据以来,我有了一个非常小的数据集。 这意味着我很可能会过度拟合我的模型。 为了克服这个问题,我对数据集实施了扩充技术。
The augmentation techniques used are as follows:
使用的增强技术如下:
- Increase and decrease the peaks of the XYZ data 增加和减少XYZ数据的峰
- Shift the data to complete faster or slower. Time stretch and shrink. 移动数据以更快或更慢地完成。 时间舒展。
- Add noise to the data points 给数据点增加噪音
- Increase and decrease the magnitude the XYZ data uniformly 均匀增加和减少XYZ数据的大小
- Shift the snapshot window around the time series data, making the gesture start sooner or later 在时间序列数据周围移动快照窗口,使手势迟早开始
To address the number of data points inconsistency, I found that 760 data points per sample was the average. I then implemented a script that cut off the front and end of my data by a certain number of samples depending on the length. Saving the first half and the second half as two different samples, to keep as much data as possible. This cut data had a final length of 760 for each sample.
为了解决数据点不一致的数量,我发现每个样本平均有760个数据点。 然后,我实现了一个脚本,该脚本根据长度将数据的前端和后端截断一定数量的样本。 将前一半和后一半另存为两个不同的样本,以保留尽可能多的数据。 每个样品的切割数据的最终长度为760。
Before Augmenting I had 168 samples in my training set, 23 in my test set, and 34 in my validation set. After I augmenting I ended up with 8400 samples in my training set, 46 in my test set, and 68 in my validation set. Still small, but better than before.
在扩充之前,我的训练集中有168个样本,测试集中有23个样本,而验证集中有34个样本。 扩充后,我在训练集中得到了8400个样本,在测试集中得到了46个样本,在验证集中得到了68个样本。 仍然很小,但是比以前更好。
Model Building and Selection:
模型的建立和选择:
As said in the TLDR, the ModelPipeline.py script will import all data from the finalized CSVs generated from DataPipeline.py, create 2 different models an LSTM and CNN, compare the models’ performances, and save all models. Note the LSTM will not have a size optimized tflite model.
如TLDR中所述,ModelPipeline.py脚本将从从DataPipeline.py生成的最终CSV导入所有数据,创建两个不同的模型LSTM和CNN,比较模型的性能并保存所有模型。 请注意,LSTM将没有尺寸优化的tflite模型。
I want to eventually deploy on the esp32 with TinyML. That limits us to using Tensorflow. I am dealing with time-series data, meaning each data point in a sample is not independent of one another. Since RNN’s and LSTM’s assume there are relationships between data points and take sequencing into account, they are a good choice for modeling our data. A CNN can also extract features from a time series, however, it needs to be presented with the entire time sequence of data because of how it handles the sequence order of data.
我最终想用TinyML部署在esp32上。 那限制了我们使用Tensorflow。 我正在处理时间序列数据,这意味着样本中的每个数据点都不相互独立。 由于RNN和LSTM假设数据点之间存在关联并且考虑到排序,因此它们是建模数据的不错选择。 CNN也可以从时间序列中提取特征,但是,由于其如何处理数据的顺序,因此需要将其与整个数据时间序列一起显示。
CNN: I made a 10 layer CNN. The first layer being a 2D convolution layer, going into a maxpool, dropout, another 2D convolution, another maxpool, another dropout, a flattening, a dense, a final dropout, and a dense output layer for the 4 gestures.
CNN:我制作了10层CNN。 第一层是2D卷积层,进入4个手势的maxpool,dropout,另一个2D卷积,另一个maxpool,另一个dropping,扁平化,密集,最终dropout和密集输出层。
After tuning hyperparameters, I ended up with a batch size of 192, 300 steps per epoch, and 20 epochs. I optimized with an adam optimizer and used sparse categorical cross-entropy for my loss, having accuracy as the metric to measure.
调整超参数之后,我最终得到了192个批处理的大小,每个时期300个步骤和20个时期。 我使用adam优化器进行了优化,并使用了稀疏的分类交叉熵来弥补损失,并以准确性作为衡量指标。
LSTM: Using TensorFlow I made a sequential LTSM model with 22 bidirectional layers and a dense output layer classifying to my 4 gestures.
LSTM:使用TensorFlow,我创建了一个顺序LTSM模型,该模型具有22个双向层和一个密集的输出层,分类为我的4个手势。
After tuning hyperparameters, I ended up with a batch size of 64, 200 steps per epoch, and 20 epochs. I optimized with an adam optimizer and used sparse categorical cross-entropy for my loss, having accuracy as the metric to measure.
调整超参数后,我最终得到了64个批处理,每个时期200个步骤和20个时期的批处理大小。 我使用adam优化器进行了优化,并使用了稀疏的分类交叉熵来弥补损失,并以准确性作为衡量指标。
Model Selection:
选型:
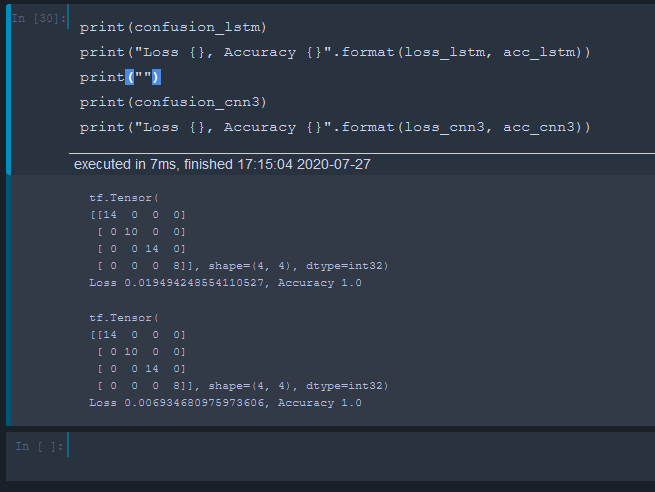
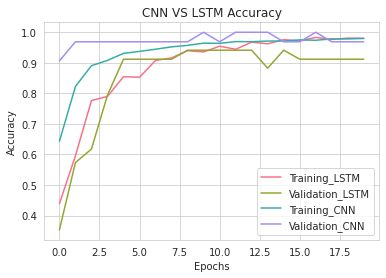
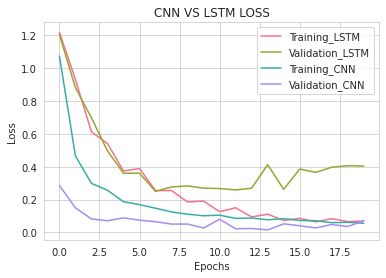
Both the CNN and LSTM perfectly predicted the gestures of the training set. The LSTM with a loss of 0.04 and the CNN with a loss of 0.007 during the test.
CNN和LSTM都可以完美地预测训练集的手势。 在测试期间,LSTM的损失为0.04,CNN的损失为0.007。
Next, I looked at the Training Validation loss per epoch of training. From the look of it, the CNN with a batch size of 192 is pretty close to being fit correctly. The CNN batch size of 64 and the LSTM both seem a little overfit.
接下来,我查看了每个培训时期的培训验证损失。 从外观上看,批量大小为192的CNN非常接近正确安装的状态。 CNN批处理大小为64,而LSTM似乎都有点过大。
I also looked at the size of the model. The h5 filesize of the LSTM is 97KB and the size of the CNN is 308KB. However, when comparing their tflite models, the CNN came in at 91KB and the LSTM grew to 119KB. On top of that, the quantized tflite CNN shrank to 28KB. I was unable to quantize the LSTM for size, so the CNN seems to be the winner. One last comparison when converting the tflite model to C++ for use on my microcontroller revealed that both models increased in size. The CNN 167KB and the LSTM to 729KB.
我还查看了模型的大小。 LSTM的h5文件大小为97KB,CNN的大小为308KB。 但是,比较它们的tflite模型时,CNN的大小为91KB,LSTM的大小为119KB。 最重要的是,量化的tflite CNN缩小到28KB。 我无法量化LSTM的大小,因此CNN似乎是赢家。 将tflite模型转换为C ++以在我的微控制器上使用时的最后一次比较显示,这两种模型的大小都增加了。 CNN 167KB和LSTM到729KB。
EDIT After some more hyperparameter tweaking (cnn_model3), I shrank the CNN optimized model. The C++ implementation of this model is down to 69KB and the tflight implementation is down to 12KB. The Loss 0.015218148939311504, Accuracy 1.0 for model 3.
编辑经过更多的超参数调整(cnn_model3)之后,我缩小了CNN优化模型。 此模型的C ++实现减少到69KB,tflight实现减少到12KB。 损耗0.015218148939311504,模型3的精度1.0
So I chose to proceed with the CNN model, trained with a batch size of 192. I saved the model, as well as saved a tflite version of the model optimized for size in the model folder.
因此,我选择了以192的批处理大小进行训练的CNN模型。我保存了模型,并在模型文件夹中保存了针对大小优化的tflite版本的模型。
Raspberry Pi Deployment:
Raspberry Pi部署:
I used a raspberry pi 4 for my current deployment since it was already in a previous tvhead build, has the compute power for model inference, and can be powered by a battery.
我在当前的部署中使用了raspberry pi 4,因为它已经在以前的tvhead构建中,具有用于模型推断的计算能力,并且可以由电池供电。
The pi is in a backpack with a display. On the display is a positive message that changes based on what is said in my Twitch chat, during live streams. I used this same script but added the TensorFlow model gesture prediction components from the Predict_Gesture_Twitch.py script to create the PositivityPack.py script.
pi位于带显示器的背包中。 显示屏上显示的是一条积极消息,该消息会根据实时直播期间我在Twitch聊天中所说的内容而改变。 我使用了相同的脚本,但是从Predict_Gesture_Twitch.py脚本中添加了TensorFlow模型手势预测组件,以创建PositivityPack.py脚本。
To infer gestures and send them to Twitch, use the PositivityPack.py or the Predict_Gesture_Twitch.py. They run the heavy.h5 model file. To run the tflite model on the raspberry pi run the Test_TFLite_Inference_Serial_Input.py script. You’ll need to connect the raspberry pi with the ESP32 in the arm attachment using a USB cable. Press the button the arm attachment to send data and predict gesture. Long press the button to continually detect gestures, continuous snapshot mode.
要推断手势并将其发送到Twitch,请使用PositivityPack.py或Predict_Gesture_Twitch.py。 他们运行heavy.h5模型文件。 要在树莓派上运行tflite模型,请运行Test_TFLite_Inference_Serial_Input.py脚本。 您需要使用USB电缆将树莓派与手臂附件中的ESP32连接。 按下手臂附件按钮可发送数据并预测手势。 长按按钮可连续检测手势,连续快照模式。
Note: When running the scripts that communicate with Twitch you’ll need to follow Twitch’s chatbot development documentation for creating your chatbot and authenticating it.
注意:运行与Twitch进行通信的脚本时,您需要遵循Twitch的chatbot开发文档来创建您的chatbot并进行身份验证。
它起作用吗?!: (DOES IT WORK?!:)
It works! The gesture prediction works perfectly when triggering a gesture prediction from the arm attachment. Continuously sending data from my glove works well but feels sluggish in use due to the 3 seconds data sampling between gesture predictions.
有用! 从手臂附件触发手势预测时,手势预测可以完美地工作。 从我的手套连续发送数据效果很好,但是由于手势预测之间需要3秒钟的数据采样,因此使用起来很缓慢。
Future Work:
未来的工作:
- Shrink the data capture window from 3 seconds to 1.5 seconds 将数据捕获窗口从3秒缩短到1.5秒
- Test if the gyroscope data improves continuous snapshot mode 测试陀螺仪数据是否改善了连续快照模式
- Deploy on the ESP32 with TinyML / TensorFlow Lite 使用TinyML / TensorFlow Lite在ESP32上部署
Feel free to give me any feedback on this project or my scripts as it was my first real dive into Data Science and ML!
请随意给我有关此项目或脚本的任何反馈,因为这是我第一次真正接触数据科学和ML!
翻译自: https://medium.com/swlh/gesture-recognition-with-tensorflow-e559be22c29e
